Page 113 of 216

CAUTION■If not in the process of changing gear, do not leave your hand on the gear-
shift lever while driving. The pressure from the hand can cause the gearshift
mechanism to wear excessively.■
When stopping on a slope, never try to keep the vehicle in position by using
the accelerator pedal – this may lead to damage of clutch parts.
Pedals
The operation of the pedals must not be hindered under any circumstances!
In the driver's foot well, only a foot mat, which is attached to the two corre-
sponding attachment points, may be used.
Only use factory-supplied foot mats or foot mats from the range of
ŠKODAOriginal Accessories, which are fitted to two the two required attach-
ment points.
WARNINGNo objects are allowed in the driver's footwell – there is a risk of obstruct-
ing or restriction pedal operation.
Automatic transmission
Introduction
This chapter contains information on the following subjects:
Modes and use of selector lever
111
Selector lever lock
111
Manual gear shifting (Tiptronic)
112
Starting-off and driving
112
The automatic transmission performs automatic gear changes.
The modes for the automatic transmission can be adjusted by the driver by
means of the selector lever.
WARNING■ Never accelerate when the mode for moving forward is set with the se-
lector lever - there is a risk of accident!■
Never shift the selector lever to R or P modes when driving – there is a
risk of an accident.
■
The vehicle must be held on the brake pedal in D, S or R modes if the ve-
hicle is halted and the engine is running. Even when the engine is idling,
power transmission is never completely interrupted – the vehicle will creep.
■
When leaving the vehicle, the selector lever is always to be put in the P
mode. Otherwise the vehicle could then start to move and potentially cause
an accident.
CAUTION
■ If the selector lever is moved to mode N while driving, the accelerator pedal
must be released and you will need to wait until the engine has reached its
idling speed before moving the selector lever to a forward driving mode again.■
When the outdoor temperature is below -10 ° C, the selector lever, when
starting, must always be in P mode.
■
When stopping on a slope, never try to keep the vehicle in position by using
the accelerator pedal – this may lead to gear damage.
Note
After the ignition is switched off, the ignition key can only be withdrawn if the
selector lever is in the position P (valid only for certain countries).110Driving
Page 114 of 216

Modes and use of selector leverFig. 110
Selection lever / lock button / display
Read and observe
and on page 110 first.
When the ignition is switched on, the gearbox mode and the currently selected gear are indicated in the display » Fig. 110.
The following modes can be selected with the selector lever » Fig. 110.
P
– Parking mode
The driven wheels are locked mechanically in this mode.
Parking mode must only be selected when the vehicle is stationary.
R
- Reverse gear
Reverse gear can only be engaged when the vehicle is stationary and the en-
gine is at idling speed.
N
- Neutral
Power transmission to the drive wheels is interrupted in this mode.
D
/
S
- mode for driving forward (Normal program) / mode for driving
forward (Sport program)
The system switches from one mode to the other by moving the selector lever
into the spring-loaded position
» Fig. 110 .
In mode D or S, the forward gears are shifted automatically depending on the
engine load, the operation of the accelerator pedal, the vehicle speed, and the
selected driving mode .
In mode S, the forward gears are shifted automatically up and down at higher
engine speeds than in mode D.
Selector lever lock
Read and observe
and on page 110 first.
The selector lever is locked in the P and N modes to prevent the forwards trav-
el mode from being selected accidentally and setting the vehicle in motion.
The selector lever is locked only when the vehicle is stationary and at speeds
up to 5 km/h.
The selector lever lock is indicated by the illumination of the warning
light.
The selector lever is not locked when quickly moving across the position N
(e.g. from R to D/S ). This, for example, helps to rock out a vehicle that is stuck,
e.g. in a bank of snow. The selector lever lock will engage if the lever is in posi-
tion N for more than approx. 2 seconds without the brake pedal being de-
pressed.
Releasing selector lever from mode P or N (selector lever lock)
›
Press the brake pedal and the lock button at the same time in the direction
of
1
» Fig. 110 on page 111 .
Just depress the brake pedal, if you would like to change from the mode N to
D/S .
Defective selector lever lock
If the selector lever lock is defective or its power supply is interrupted (e.g. dis-
charged vehicle battery, faulty fuse), the selector lever can no longer be moved
out of position P in the normal manner and the vehicle can no longer be driven.
The selector lever must be emergency released » page 181.
Note
If you want to move the selector lever from mode P to mode D/S or vice versa,
move the selector lever quickly. This prevents modes R or N from being selec-
ted accidentally.111Starting-off and driving
Page 115 of 216
Fig. 111
Selector lever
Read and observe and on page 110 first.
Tiptronic mode makes it possible to manually shift gears on the selector lever.This mode can be selec")
Manual gear shifting (Tiptronic)Fig. 111
Selector lever
Read and observe and on page 110 first.
Tiptronic mode makes it possible to manually shift gears on the selector lever.This mode can be selected both while halted and while driving.
The currently selected gear is indicated in the » Fig. 110 on page 111 display.
The gearshift indicator must be observed when changing gear » page 44.
Switching to manual shifting
›
Push the gear selector from position D/S towards the right, or left in a right-
hand drive vehicle.
When switching to the manual shifting while driving, the current gear is main-
tained.
Shifting up gears
›
Press the selector lever forwards
+
» Fig. 111 .
Shifting down gears
›
Press the selector lever backwards
-
» Fig. 111 .
Note
■
It may be advantageous to use manual gear shifting when driving downhill,
for example. Shifting to a lower gear reduces the load on the brakes and hence
brake wear » page 107.■
When accelerating, the gearbox automatically shifts up into the higher gear
just before the maximum permissible engine speed is reached.
■
If a lower gear is selected, the gearbox does not shift down until there is no
risk of the engine overrevving.
Starting-off and driving
Read and observe
and on page 110 first.
Starting off
›
Start the engine.
›
Firmly depress and hold the brake pedal.
›
Press the lock button in the direction of
1
» Fig. 110 on page 111 and hold.
›
Move the selector lever into the desired position » page 111and then release
the lock button.
›
Release the brake pedal and accelerate.
Stopping (while the car is moving)
›
Fully depress and hold the brake pedal and bring the vehicle to a stop.
›
Keep holding the brake pedal until driving is resumed.
The selector lever position N does not have to be selected when stopping for a
short time, such as at a cross roads.
Kickdown
The kickdown function allows you to achieve maximum acceleration by your vehicle while driving.
When the accelerator pedal is fully depressed, the kickdown function is activa-
ted in any forward driving mode.
The gearbox shifts down one or more gears depending on the vehicle speed
and engine speed, and the vehicle accelerates.
The gearbox does not shift up into the highest gear until the engine has
reached its maximum revolutions for this gear range.
WARNINGRapid acceleration, particularly on slippery roads, can lead to loss of control
of the vehicle – there is a risk of an accident.
Retraction and economical driving
Introduction
This chapter contains information on the following subjects:
Driving in
113
Tips for economical driving
113
112Driving
Page 116 of 216

The fuel consumption, degree of pollution and vehicle wear depend on driving
style, road condition, weather conditions and the like.
Driving in
Driving in the engine
The engine has to be run in during the first 1 500 kilometres. During this peri-
od, the driving style decides on the quality of the driving-in process.
During the first 1,000 km ,we recommend not driving faster than 3/4 of the
maximum permissible engine speed, not to drive at full throttle and not to use
a trailer.
In the range of 1,000 to 1,500 kilometres, the engine load can be increased up
to the maximum permitted engine speed.
New tyres
New tyres have to be “run in” since they do not offer optimal grip at first.
Drive especially carefully for the first 500 km or so.
New brake pads
New brake pads have to first “grind in” because these do not initially have the
best possible braking effect.
Drive especially carefully for the first 200 km or so.
Tips for economical driving
To achieve the lowest possible fuel consumption, the following instructions
must be observed.
Looking ahead when driving
Avoid unnecessary acceleration and braking.
Change gear in an energy saving and timely manner
Observe the recommended gear » page 44.
Avoid full throttle and high speeds
Fuel consumption will be halved if you drive at only three-quarters of the pos-
sible top speed of your vehicle.
Reducing idling
When the engine is switched off, such as when waiting in a traffic jam, the fuel
economy is already greater after 30 - 40 s than the fuel quantity which is re-
quired for engine re-start.
Avoid short distances
When driving a short distance of less than about 4 km, the engine cannot
reach its operating temperature. As long as the engine has not reached oper-
ating temperature, the fuel consumption is significantly higher than with the
engine hot.
Pay attention to the correct tyre inflation pressure being maintained
Further information » page 162.
Avoid unnecessary ballast
Per 100 kg of weight, consumption increases by about 1 l/100 km. At a speed of
100 - 120 km/h, a vehicle fitted with a roof rack cross member without a load
will use about 10 % more fuel than normal due to the increased aerodynamic
drag.
Saving electricity
Electrical consumers (e.g. seat heating, air conditioning and the like) should
only be turned on for as long as necessary.
Driving through water and driving off made-up roads
Introduction
This chapter contains information on the following subjects:
Driving through water
114
Driving off paved roads
114WARNINGImmediately after driving through water, mud, slush and the like, braking
effectiveness will be temporarily impaired » page 107, Information for brak-
ing . For this reason, sudden and violent braking manoeuvres are to be avoi-
ded - there is a risk of accident!113Starting-off and driving
Page 117 of 216

Driving through waterFig. 112
Maximum permissible water lev-
el when driving through water
Read and observe on page 113 first.
The following instructions must be observed if vehicle damage is to be avoided when driving through water (e.g. flooded roads).
›
Therefore, always determine the depth of the water before driving through
water.
The water level must not reach above the web of the lower sill » Fig. 112.
›
Do not drive any faster than at a walking speed.
At a higher speed, a water wave can form in front of the vehicle, which can
cause water to penetrate into the engine's air intake system or other parts of
the vehicle.
›
Never stop in the water, do not reverse and do not switch the engine off.
CAUTION
■ Should water penetrate into the intake system of the engine, there is a risk
of serious damage to the engine parts!■
When driving through water, some vehicle parts such as chassis, electrics or
transmissions may be severely damaged.
■
Oncoming vehicles can generate water waves which can exceed the permis-
sible water level for your vehicle.
■
Potholes, mud or rocks can be hidden under the water, making it difficult or
impossible to drive through water.
■
Do not drive through salt water, as the salt can cause corrosion. A vehicle
coming into contact with salt water is to be thoroughly rinsed with fresh wa-
ter.
Driving off paved roads
Read and observe
on page 113 first.
Only drive on such roads and in such terrain, which match the vehicle parame-ters » page 194 , Technical data as well as your driving skills.
The driver is always responsible for deciding whether the vehicle can handle
travelling in the given terrain.
WARNINGDrive particularly considerately and pro-actively when not on paved roads.■Always adjust your driving to the current terrain and weather conditions.
Excessive speed or incorrect driving manoeuvres can cause damage to the
vehicle and lead to serious injuries.■
Objects trapped under the base of the vehicle can damage the fuel lines,
the brake system, the seals and other parts of the chassis. Check the un-
derside of the vehicle and remove the trapped objects.
■
Combustible objects such as dry leaves or twigs caught under the base of
the vehicle could ignite on hot vehicle parts - risk of fire!
CAUTION
■ Pay attention to the ground clearance of the vehicle! When driving over ob-
jects which are larger than the ground clearance, the chassis and its compo-
nents can get damaged.■
Drive slowly in unknown terrain and watch out for unexpected obstacles,
such as potholes, rocks, stumps, etc.
■
Check up on confusing sections of unpaved roads before travelling on them
and consider whether such travelling is possible without risk.
114Driving
Page 118 of 216

115
Anti-lock Braking System (ABS)
115")
Assist systems
Braking and stabilisation systems
Introduction
This chapter contains information on the following subjects:
Electronic Stability Control (ESC)
115
Anti-lock Braking System (ABS)
115
Traction Control System (TCS)
115
Electronic Differential Lock (EDL and XDS)
116
Hydraulic Brake Assist (HBA)
116
Hill Hold Control (HHC)
116
Multi-collision brake (MCB)
116
This chapter deals with the functions of the braking and stabilisation systems,
with the error indicator referred to in chapter » page 33, Warning lights .
The braking and stabilisation systems are automatically activated each time the ignition is switched on.
WARNING■ A lack of fuel can cause irregular engine running or cause the engine to
shut down. The brake assist systems would then fail to function – risk of
accident!■
The increased safety provided by the brake assist systems must not
tempt you to take safety risks – risk of accident!
■
Adjust the speed and driving style to the current visibility, weather, road
and traffic conditions.
Electronic Stability Control (ESC)
Read and observe
on page 115 first.
The ESC improves vehicle stability in dynamic driving situations, such as whenthe vehicle starts to skid.
The ESC monitors whether the desired direction of the current vehicle motion
is occurring. In case of any deviation (e.g. oversteer), the ESC automatically
brakes individual wheels to maintain the desired direction.
During an intervention of the system, the warning light flashes in the instru-
ment cluster.
Anti-lock Braking System (ABS)
Read and observe
on page 115 first.
ABS prevents the wheels locking when braking. Thereby, it helps the driver to
maintain control of the vehicle.
The intervention of the ABS is noticeable from the pulsating movements of
the brake pedal which is accompanied by noises.
When the ABS system is active, do not pump the brakes or lift off the brake
pedal.
Traction Control System (TCS)
Fig. 113
System button: Activating/deac-
tivating TCS
Read and observe on page 115 first.
TCS prevents the spinning of the wheels of the driven axle. TCS reduces the drive power transmitted to the wheels in the case of slipping wheels. Thereby,
for example, driving on road surfaces with low grip is made easier.
During a TCS intervention, the indicator light flashes in the instrument clus-
ter.
Activating/deactivating TCS
The activation or deactivation of TCS can be done, depending on equipment, in
one of the following ways.
› In Infotainment
» Operating instructions for Infotainment , chapter Vehicle
settings (CAR button) .
› By briefly pressing the symbol key
» Fig. 113 .
115Assist systems
Page 119 of 216
 deactivated.
ASR OFF
Upon activation, in the instru")
Upon deactivation, in the instrument cluster the indicator light illuminates
and the display shows the following message.
Traction control (TCS) deactivated.
ASR OFF
Upon activation, in the instrument cluster the indicator turns
and the display
shows the following message.
Traction control (TCS) activated.
ASR ON
The TCS should normally always be enabled. The system should be deactivated
only in the following situations, for example.
› When driving with snow chains.
› When driving in deep snow or on a very loose surface.
› When “rocking a car free” when it has become stuck.
Electronic Differential Lock (EDL and XDS)
Read and observe
on page 115 first.
EDL
EDL prevents the turning of the respective wheel of the driven axle. EDL
brakes the spinning wheel, if necessary, and transmits the driving force to the
other driving wheel. Driving becomes easier on road surfaces with different
traction under each wheel of the driven axle.
EDL switches off automatically to avoid excessive heat generation on the
brake of the wheel being braked. The vehicle can continue to be driven and
has the same characteristics as a vehicle not fitted with EDL. Once the brakes
have cooled down, there is an automatic re-activation of EDL.
XDS
XDL is an extension to the electronic differential lock. XDL does not respond to
traction, but to the load relief of the inner front wheel of the driving axle dur-
ing fast cornering.
The automatic brake intervention on the brake of the wheel with reduced load
prevents the wheel from spinning. Thus, the traction is improved and the vehi-
cle can continue to follow the desired track.
Hydraulic Brake Assist (HBA)
Read and observe
on page 115 first.
HBA increases the braking effect and helps to shorten the braking distance.The HBA is activated by very rapid depression of the brake pedal. To achieve
the shortest possible braking distance, the brake pedal must be applied firmly
until the vehicle has come to a complete standstill.
HBA is automatically switched off when the brake pedal is released.
Hill Hold Control (HHC)
Read and observe
on page 115 first.
HHC allows you to move your foot from the brake pedal to the accelerator ped-al without having to use the handbrake when pulling away on a gradient.
The system holds the brake pressure produced by the activation of the brake
pedal for approx. 2 seconds after the brake pedal is released.
The brake pressure drops gradually the more you operate the accelerator ped-
al. If the vehicle does not start off within 2 seconds, it starts to roll back.
HHC is active on slopes of >5 % when the driver door is closed. HHC is always only active on slopes pulling away forwards or in reverse.
Multi-collision brake (MCB)
Read and observe
on page 115 first.
The MCB helps to decrease speed after a collision through automatic brakinginterventions and to stabilize the vehicle. This reduces the risk of a subse-
quent crash due to uncontrolled vehicle movement.
The automatic brake interventions can take place only if the following condi-
tions are met.
A head-on or side collision occurred.
The impact speed was higher than approx. 10 km/h.
The brakes, the ESL and other required electrical systems remain function-
al after impact.
The accelerator pedal is not actuated.
116Driving
Page 120 of 216

Parking aid
Introduction
This chapter contains information on the following subjects:
Function
117
Activation/deactivation
118
Automatic system activation when moving forward
118
The parking aid (hereinafter referred to only as system) draws attention via
acoustic signals or the Infotainment display when manoeuvring around obsta-
cles in the vicinity of the vehicle.
The system uses ultrasound waves to calculate the distance between the
bumper and an obstacle. The ultrasonic sensors are, depending on vehicle
equipment,, located in the back or in the front bumper » Fig. 115 on page 117 .
WARNING■
The system only serves as an assistance and does not relieve the driver
of the responsibility for the vehicle operation.■
Moving persons or objects may not be recognised by the system sensors.
■
Under certain circumstances, surfaces of certain objects and types of
clothing cannot reflect the system signals. For this reason, such people or
objects may not be recognised by the system sensors.
■
External noise sources may affect the signals of the system sensors. Un-
der adverse conditions, this may cause objects or people to be not recog-
nised by the system.
■
Before reversing, you should make sure that there are no small obstacles,
such as rocks, thin posts, trailer drawbars etc. in front or behind your vehi-
cle. Such obstacles may not be recognised by the system sensors.
CAUTION
■ Keep the system sensors » Fig. 115 on page 117 clean, snow-and ice-free and
do not cover with any objects of any kind, otherwise the system functioning
may be impaired.■
Under adverse weather conditions (heavy rain, water vapour, very low or
high temperatures etc.) system function may be limited “incorrect obstacle de-
tection ”.
■
Additionally installed accessories such as e.g. bicycle carriers can impair the
system function.
FunctionFig. 114
System key (Version 2) / Sampled areas and range of sensors
Fig. 115
Fitting the ultrasonic sensors: front/rear
Read and observe
and on page 117 first.
Depending on the equipment, the following system versions can exist
» Fig. 114 .
› Version 1: warns of obstacles in the areas
C
,
D
.
› Version 2: warns of obstacles in the areas
A
,
B
,
C
,
D
.
Approximate range of sensors (in cm)
Area » Fig. 114Version 1
(3 sensors)Version 2
(7 sensors)A-120B-60C160160D6060 117Assist systems
 1
1 2
2 3
3 4
4 5
5 6
6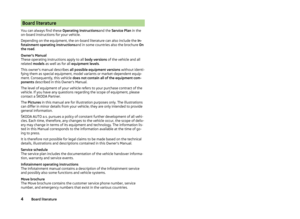 7
7 8
8 9
9 10
10 11
11 12
12 13
13 14
14 15
15 16
16 17
17 18
18 19
19 20
20 21
21 22
22 23
23 24
24 25
25 26
26 27
27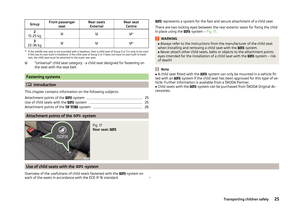 28
28 29
29 30
30 31
31 32
32 33
33 34
34 35
35 36
36 37
37 38
38 39
39 40
40 41
41 42
42 43
43 44
44 45
45 46
46 47
47 48
48 49
49 50
50 51
51 52
52 53
53 54
54 55
55 56
56 57
57 58
58 59
59 60
60 61
61 62
62 63
63 64
64 65
65 66
66 67
67 68
68 69
69 70
70 71
71 72
72 73
73 74
74 75
75 76
76 77
77 78
78 79
79 80
80 81
81 82
82 83
83 84
84 85
85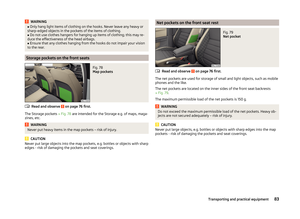 86
86 87
87 88
88 89
89 90
90 91
91 92
92 93
93 94
94 95
95 96
96 97
97 98
98 99
99 100
100 101
101 102
102 103
103 104
104 105
105 106
106 107
107 108
108 109
109 110
110 111
111 112
112 113
113 114
114 115
115 116
116 117
117 118
118 119
119 120
120 121
121 122
122 123
123 124
124 125
125 126
126 127
127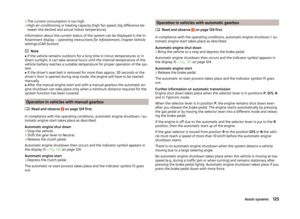 128
128 129
129 130
130 131
131 132
132 133
133 134
134 135
135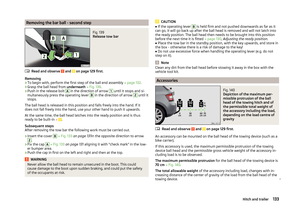 136
136 137
137 138
138 139
139 140
140 141
141 142
142 143
143 144
144 145
145 146
146 147
147 148
148 149
149 150
150 151
151 152
152 153
153 154
154 155
155 156
156 157
157 158
158 159
159 160
160 161
161 162
162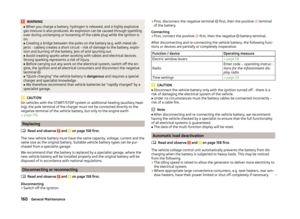 163
163 164
164 165
165 166
166 167
167 168
168 169
169 170
170 171
171 172
172 173
173 174
174 175
175 176
176 177
177 178
178 179
179 180
180 181
181 182
182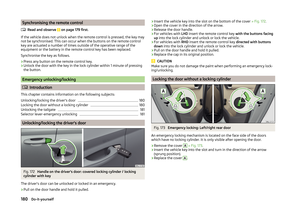 183
183 184
184 185
185 186
186 187
187 188
188 189
189 190
190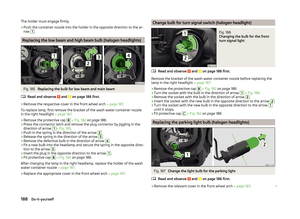 191
191 192
192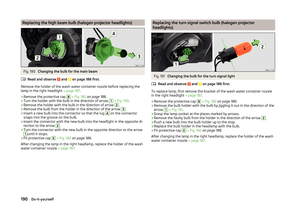 193
193 194
194 195
195 196
196 197
197 198
198 199
199 200
200 201
201 202
202 203
203 204
204 205
205 206
206 207
207 208
208 209
209 210
210 211
211 212
212 213
213 214
214 215
215