Page 57 of 216

Child safety lockFig. 35
Back door: left/right
Read and observe
and on page 50 first.
The child safety lock prevents the rear door from being opened from the in- side. The door can only be opened from the outside.
Switching the child safety lock on and off » Fig. 35
Switching on
Switching off
You can switch the child safety lock on and off using the vehicle key.
Malfunctions
Read and observe
and on page 50 first.
Failure of the central locking
In the event of failure of central locking, the key can be used to lock or unlock
the driver's door alone. The other doors and the tailgate can be emergency
locked or emergency released.
› Unlocking / locking
» page 50 for vehicles without remote control.
› Unlocking / locking for vehicles with remote control
» page 180.
› Emergency locking of the door
» page 180.
› Emergency unlocking of the boot lid
» page 181.
Displaying an error
If the warning icon in the driver's door initially flashes quickly for around 2 sec-
onds, and then lights up for 30 seconds without interruption before flashing
again slowly, you will need to seek the assistance of a specialist garage.
Discharged battery in the remote control key
If the red warning light B » Fig. 30 on page 50 does not flash when you press
a button on the remote control key the battery is dead.
If the voltage of the battery in the remote control key is too low, the following
message appears in the display of the instrument cluster.
Change the key battery!
KEY BATTERY PLEASE CHANGE
Replace the battery » page 179.
Anti-theft alarm system
Introduction
This chapter contains information on the following subjects:
Activating/deactivating
55
Interior monitor and towing protection
55
The anti-theft alarm system increases the level of protection against theft and
break-in
The alarm system triggers audible and visual signals if an attempt is made to
break into the vehicle (hereafter referred to only as alarm).
Triggering the alarm
The alarm is triggered when the following unauthorized actions are carried out
on the locked vehicle.
› Opening the bonnet.
› Opening the boot lid.
› Opening the doors.
› Manipulation of the ignition lock.
› Towing the vehicle
» page 55.
› Movement in the vehicle
» page 55.
› Sudden and significant voltage failure of the electrical system.
› Uncoupling the trailer
» page 134, Trailer, connect and disconnect .
If the driver's door of a vehicle with a remote control is unlocked and opened by the lock cylinder, then the alarm is triggered.
Switching off the alarm
The alarm is turned off by pressing the button on the radio remote control
key or switching on the ignition.
54Operation
Page 58 of 216

CAUTIONBefore leaving the vehicle, check that the doors and windows are closed in or-
der to ensure that the alarm system is fully operational.
Note
The working life of the alarm siren is 5 years.
Activating/deactivating
Read and observe
on page 55 first.
Activating
The alarm system is activated automatically approximately 30 seconds after
the vehicle is locked.
If the vehicle is unlocked and a door or the boot lid not opened within the next
45 seconds, the vehicle will lock again automatically and the SafeLock system
or anti-theft alarm system will be switched back on. This function is intended
to prevent the car being unlocked unintentionally.
Deactivating
The alarm system is deactivated automatically after the vehicle is unlocked. If
the vehicle is not opened within 45 seconds, the alarm system is automatically
activated again.
The alarm system is also deactivated if you unlock the driver door using the
key within 45 seconds of locking the vehicle.
Interior monitor and towing protection
Fig. 36
Button for interior monitor and
towing protection
Read and observe on page 55 first.
The interior monitor detects movements inside the car and then triggers the
alarm.
The tow-away protection triggers the alarm if a vehicle is registered as being
on an inclination.
Activating
The interior monitor and the towing protection are activated automatically af-
ter the vehicle is locked.
Deactivating›
Switch off the ignition.
›
Open the driver door.
›
Press the symbol button
» Fig. 36 on the B column on the driver's side.
The illumination of the symbol
in the button changes from red to orange.
›
Lock the vehicle within 30 seconds.
Deactivate the interior monitor and the towing protection if there is a possibili-
ty of the alarm being triggered by movements (e.g. by children or animals)
within the vehicle interior or if the vehicle has to be transported (e.g. by train
or ship) or towed.
CAUTION
■ The opened glasses storage compartment reduces the effectiveness of the
interior monitor. To ensure the full functionality of the interior monitor, the
glasses storage compartment must always be closed before locking the vehi-
cle.■
The anti-theft alarm system is activated when the vehicle is locked, even if
the SafeLock system is deactivated. The interior monitor is however not acti-
vated.
Tailgate
Introduction
This chapter contains information on the following subjects:
Opening/closing
56
Automatic locking of the boot lid
56
55Unlocking and opening
Page 59 of 216

WARNING■Ensure that the lock is properly engaged after closing the boot lid. Other-
wise, the lid might open suddenly while the vehicle is moving, even if the
lid was locked – risk of accident!■
Never drive with the tailgate fully opened or slightly ajar otherwise ex-
haust gases may get into the interior of the vehicle – risk of poisoning.
■
Do not press on the rear window when closing the tailgate, as otherwise
this could crack – risk of injury.
■
Make sure that when closing the boot lid, no body parts are crushed -
there is danger of injury!
Note
The function of the button in the grip above the licence plate is deactivated
when starting off or at a speed of 5 km/hour or more for vehicles with central
locking. The function is restored after the vehicle stops and the door is
opened.
Opening/closing
Fig. 37
Opening / closing tailgate
Read and observe
on page 56 first.
After unlocking the vehicle, the boot lid can be opened with the button in the
handle above the number plate.
Opening/closing boot lid » Fig. 37
Unlocking the door
Open flap
Closing the flap (by pulling the handle)
123CAUTIONOn vehicles with a variable loading floor, this must not be affixed by means of
the hook on the frame of the boot lid when closing the boot lid » page 91 -
there is the risk of damage to the hook.
Automatic locking of the boot lid
Read and observe
on page 56 first.
If the boot lid is unlocked with the key symbol on the remote control key,
then the door is automatically locked after closing.
The period after which the boot lid is locked automatically can be extended by
a specialist garage.
After the activation of the delayed locking, the door can be opened again after
closing within a limited period.
Delayed locking can be deactivated by a specialist garage at any time.
CAUTION
There is a risk of unwanted entry into the vehicle before the boot lid is locked
automatically. We therefore recommend locking the vehicle with the key sym-
bol
on the remote control key.
Power windows
Introduction
This chapter contains information on the following subjects:
Open / close windows
57
Opening the windows in the front passenger door and in the rear doors
58
Force limitation
58
Operational faults
58
The electrical power windows can only be operated when the ignition is
switched on.
56Operation
Page 60 of 216
 » page 58 . If there is an obsta-
cle, the closing process is stopped")
WARNINGPower windows in the driver's door and the rear doors are equipped with a
force limiter (only applies to the Variant 2 ) » page 58 . If there is an obsta-
cle, the closing process is stopped and the window goes down by several
centimetres. The windows should nevertheless be closed carefully – risk of
injury.
CAUTION
■ Keep the windows clean to ensure the correct functionality of the electric
windows.■
In the event that the windows are frozen, first of all eliminate the ice
» page 143 , Windows and external mirrors and only then operate the electrical
power windows. Otherwise, the window sealing and the electrical power win-
dow mechanism could be damaged.
■
In the winter, ice on the window may cause greater resistance as the win-
dow is closed. The window will stop and open again by several centimetres. It
is necessary to deactivate the force limiter to close the window » page 58.
■
Always make sure that the windows are closed when you leave the locked
vehicle.
■
Always close the windows before disconnecting the battery » page 58,
Force limitation .
■
The window lift mechanism is equipped with protection against overheater.
Repeated opening and closing of the window can cause this mechanism to
overheat. If this happens, it will not be possible to operate the window for a
short time. You will be able to operate the window again as soon as the over-
heater protection has cooled down.
For the sake of the environment
At high speeds you should keep the windows closed to prevent unnecessarily high fuel consumption.
Note
When driving always use the existing heater, air conditioning and ventilation
system for ventilating the interior of the vehicle. With the windows open, dust
and other dirt can get into the vehicle. In addition, wind noises can occur at
certain speeds.Open / close windowsFig. 38
Buttons for window-openers Version 1/version 2
Read and observe
and on page 57 first.
Depending on the equipment configuration, the front windows - Variant 1 or
the front and rear windows - Variant 2 be operated with the door buttons
» Fig. 38 .
Buttons for window levers Front door left
Front door right
Rear door, left
Rear door, right
Deactivation / activation of the buttons in the rear doors
Opening
›
Lightly press the appropriate button down and hold it until the window has
moved into the desired position.
Releasing the button causes the window to stop immediately.
In Variant 2 » Fig. 38thedriver's window can be automatically fully opened by
pressing the button briefly until it stops. When pressed again or after with-
drawing the button, the window will stop.
Closing
›
Pull gently on the top edge of the corresponding button and hold until the
window has moved into the desired position.
Releasing the button causes the window to halt immediately.
ABCDE57Unlocking and opening
Page 61 of 216

In Variant 2 » Fig. 38the driver's window can be automatically closed com-
pletely by drawing the button to the stop. When drawn again or after pressing
the button, the window will stop.
Disable / enable the buttons in the rear doors›
Press the button
E
» Fig. 38 .
When the buttons are disabled in the rear doors, the indicator light
in the
button
E
lights up.
WARNINGIf the rear seats are accommodating people who are not completely inde-
pendent, e.g. children, it is recommended that for safety reasons the but-
tons in the rear doors are disabled with the button E
» Fig. 38 .
Opening the windows in the front passenger door and in the rear
doors
Fig. 39
Window winder button
Read and observe and on page 57 first.
There is a button in the front passenger door and in the rear doors for that
window.
Opening
›
Lightly press the appropriate button down and hold it until the window has
moved into the desired position.
Releasing the button causes the window to halt immediately.
Closing
›
Pull gently on the top edge of the corresponding button and hold until the
window has moved into the desired position.
Releasing the button causes the window to halt immediately.
Force limitation
Only version 2 of the power windows is equipped with the power limiter (does
not apply to the passenger window).
Read and observe
and on page 57 first.
If there is an obstacle, the closing process is stopped and the window goes
down by several centimetres.
If the obstacle prevents the window from being closed during the next 10 sec-
onds, the closing process is interrupted once again and the window goes down
by several centimetres.
If you attempt to close the window again within 10 seconds of the window be-
ing moved down for the second time, even though the obstacle was not yet
been removed, the closing process is only stopped. During this time it is not
possible to automatically close the window. The force limiter is still switched
on.
The force limiter is only switched off if you attempt to close the window again
within the next 10 seconds - the window will now close with full force!
If you wait longer than 10 seconds, the force limiter is switched on again.
WARNING■ Variant 1 of the power window » Fig. 38 on page 57 has no force limiter.
The windows should nevertheless be closed carefully – risk of injury!■
The passenger window in variant 2 of the power window » Fig. 38 on
page 57 has no force limiter. The windows should nevertheless be closed
carefully – risk of injury!
Operational faults
Read and observe
and on page 57 first.
The electric window levers do not work if the vehicle battery has been discon-nected and connected again while a window was open. The system must be
activated.
Activation sequence:
›
Switch on the ignition.
›
Pull the top edge of the button and close the window.
›
Release the button.
58Operation
Page 62 of 216

›Pull the relevant button upwards again for approx. 1 seconds, and keep it
pressed down.
Mechanical windows
Introduction
This chapter contains information on the following subjects:
Opening / closing windows
59
The window can be operated mechanically by the winder attached to the re-
spective door panel.
WARNINGThe windows should be closed carefully – risk of injury!
CAUTION
■ In the event that the windows are frozen, first of all eliminate the ice
» page 143 , Windows and external mirrors and only then operate the electri-
cal power windows. Otherwise, the window sealing and the electrical power
window mechanism could be damaged.■
Always make sure that the windows are closed when you leave the locked
vehicle.
For the sake of the environment
At high speeds, you should keep the windows closed to prevent unnecessarily high fuel consumption.
Note
When driving always use the existing heater, air conditioning and ventilation
system for ventilating the interior of the vehicle. If the windows are opened,
dust as well as other dirt can get into the vehicle and in addition the wind
noise is more at certain speeds.Opening / closing windowsFig. 40
Window operations: left/right
Read and observe
and on page 59 first.
Only one window can be operated mechanically at a time.
Opening
Turn the winder in the direction of arrow
A
» Fig. 40 .
Closing
Turn the winder in the direction of the arrow
B
» Fig. 40 .
59Unlocking and opening
Page 63 of 216

61
Turn signal and main beam
62
Au")
Lights and visibility
Lights
Introduction
This chapter contains information on the following subjects:
Operating the lights
60
Daylight running lights (DAY LIGHT)
61
Turn signal and main beam
62
Automatic driving lamp control
62
Fog lights
63
Fog lights with the CORNER function
63
Rear fog light
63
COMING HOME / LEAVING HOME
63
Hazard warning light system
64
Parking lights
65
Driving abroad
65
The lights work only with the ignition on, unless otherwise stated.
The layout of the controls on right-hand drive vehicles differs partially from
that shown in » Fig. 41 on page 60 . The symbols which mark the positions of
the controls are identical.
Keep the headlights lenses clean. The following guidelines must be observed
» page 144 , Headlight glasses .
WARNING■
The activation of the lights should only be undertaken in accordance with
national legal requirements.■
The driver is always responsible for the correct settings and use of the
lights.
WARNING (Continued)■ The automatic driving lamp control only operates as a support and
does not release the driver from his responsibility to check the lights and, if
necessary, to switch on the light depending on the prevailing light condi-
tions. The light sensor cannot, for example, detect rain or snow. Under
these conditions we recommend switching on the low beam or fog lights!■
Never drive with only the parking lights on! The parking lights are not
bright enough to light up the road sufficiently in front of you or to be seen
by other oncoming traffic. Therefore always switch on the low beam when
it is dark or if visibility is poor.
Note
■ The headlights may mist up temporarily. When the driving lights are switched
on, the light outlet areas are free from condensation after a short time, al-
though the headlight lenses may still be misted up around the edge. This mist
has no influence on the life of the lighting system.■
The instruments are also illuminated when the parking light, low or high
beam light is switched on. The brightness of the instrument lighting can be ac-
tivated or deactivated in the Infotainment » Operating instructions for Info-
tainment , chapter Vehicle settings (CAR button) .
Operating the lights
Fig. 41
Light switch and control dial for
headlight range adjustment
Read and observe on page 60 first.
Switching lights on and off
Depending on the equipment configuration, the light switch
A
» Fig. 41 can be
moved to the following positions.
60Operation
Page 64 of 216
Switching lights on and off automatically » page 62
Switching on the parking light or parking lights » page 65
Switch on low beam
Pul")
Turn switchSwitching off lights (except daytime running lights)Switching lights on and off automatically » page 62
Switching on the parking light or parking lights » page 65
Switch on low beam
Pull switch Switch on the front fog lamp » page 63
Switch on the rear fog light » page 63
Headlight beam range regulation
Turning the dial B
» Fig. 41 from the position
in
means the headlight beam
range is gradually adjusted, thereby shortening the beam of light.
The positions of the width of illumination correspond approximately to the fol-
lowing car load.
Front seats occupied, boot empty
All seats occupied, boot empty
All seats occupied, boot loaded
Driver seat occupied, boot loaded
We recommend you adjust the headlight beam when the low beam is switched
on.
WARNINGAlways adjust the headlight beam to satisfy the following conditions.■The vehicle does not dazzle other road users, especially oncoming vehi-
cles.■
The beam range is sufficient for safe driving.
Note
■ The light switch is in position or and the ignition is turned off, the low
beam is switched off automatically and the status light is lit. The parking light
goes out after the ignition key is removed.■
If there is a fault in the light switch, the low beam comes on automatically.
Daylight running lights (DAY LIGHT)
Read and observe
on page 60 first.
The daytime running lights (the only function) provides the lighting of the frontvehicle range.
The daytime running lights are switched on automatically if the following
conditions are met.
The light switch is in the position
or
» Fig. 41 on page 60 .
The ignition is switched on.
The parking aid is activated.
Activating/deactivating function on vehicles with Infotainment
The function can be activated/deactivated in the Infotainment system » Info-
tainment user manual , chapter Vehicle settings (CAR button) .
Deactivating on vehicles without Infotainment
›
Switch off the ignition.
›
Pull the turn signal- and main beam lever ( » Fig. 42 on page 62 ) towards the
steering wheel, push down and hold in this position.
›
Switch on the ignition.
›
Hold the lever in this position for at least 3 seconds after switching on the
ignition.
Activating on vehicles without Infotainment
›
Switch off the ignition.
›
Pull the turning signal and main beam lever towards the steering wheel,
push it up and hold it in this position.
›
Switch on the ignition.
›
Hold the lever in this position for at least 3 seconds after switching on the
ignition.
WARNINGWhen the daytime running light is switched on, the parking lights (neither
at the front nor the rear) and the number plate lights are not lit. Therefore
always switch on the low beam when the visibility is poor.61Lights and visibility
 1
1 2
2 3
3 4
4 5
5 6
6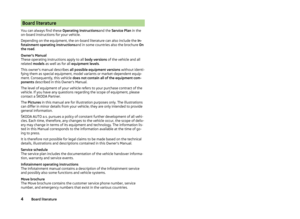 7
7 8
8 9
9 10
10 11
11 12
12 13
13 14
14 15
15 16
16 17
17 18
18 19
19 20
20 21
21 22
22 23
23 24
24 25
25 26
26 27
27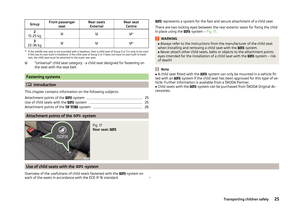 28
28 29
29 30
30 31
31 32
32 33
33 34
34 35
35 36
36 37
37 38
38 39
39 40
40 41
41 42
42 43
43 44
44 45
45 46
46 47
47 48
48 49
49 50
50 51
51 52
52 53
53 54
54 55
55 56
56 57
57 58
58 59
59 60
60 61
61 62
62 63
63 64
64 65
65 66
66 67
67 68
68 69
69 70
70 71
71 72
72 73
73 74
74 75
75 76
76 77
77 78
78 79
79 80
80 81
81 82
82 83
83 84
84 85
85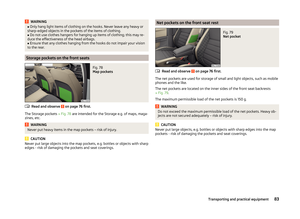 86
86 87
87 88
88 89
89 90
90 91
91 92
92 93
93 94
94 95
95 96
96 97
97 98
98 99
99 100
100 101
101 102
102 103
103 104
104 105
105 106
106 107
107 108
108 109
109 110
110 111
111 112
112 113
113 114
114 115
115 116
116 117
117 118
118 119
119 120
120 121
121 122
122 123
123 124
124 125
125 126
126 127
127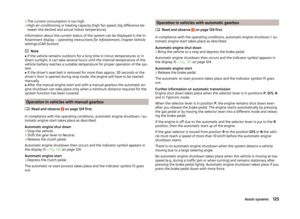 128
128 129
129 130
130 131
131 132
132 133
133 134
134 135
135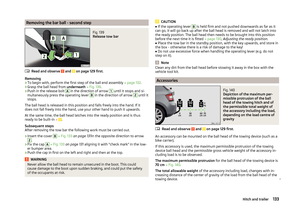 136
136 137
137 138
138 139
139 140
140 141
141 142
142 143
143 144
144 145
145 146
146 147
147 148
148 149
149 150
150 151
151 152
152 153
153 154
154 155
155 156
156 157
157 158
158 159
159 160
160 161
161 162
162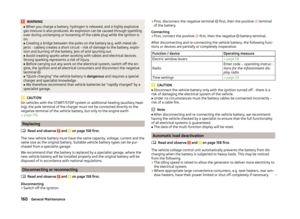 163
163 164
164 165
165 166
166 167
167 168
168 169
169 170
170 171
171 172
172 173
173 174
174 175
175 176
176 177
177 178
178 179
179 180
180 181
181 182
182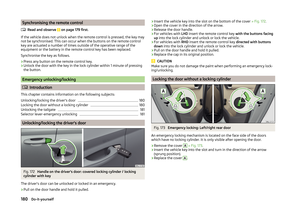 183
183 184
184 185
185 186
186 187
187 188
188 189
189 190
190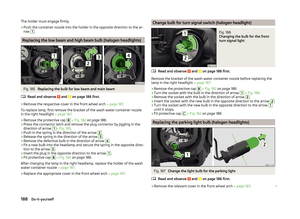 191
191 192
192 193
193 194
194 195
195 196
196 197
197 198
198 199
199 200
200 201
201 202
202 203
203 204
204 205
205 206
206 207
207 208
208 209
209 210
210 211
211 212
212 213
213 214
214 215
215