2014 NISSAN TEANA SEC
[x] Cancel search: SECPage 3190 of 4801
MA-6
< PERIODIC MAINTENANCE >
GENERAL MAINTENANCE
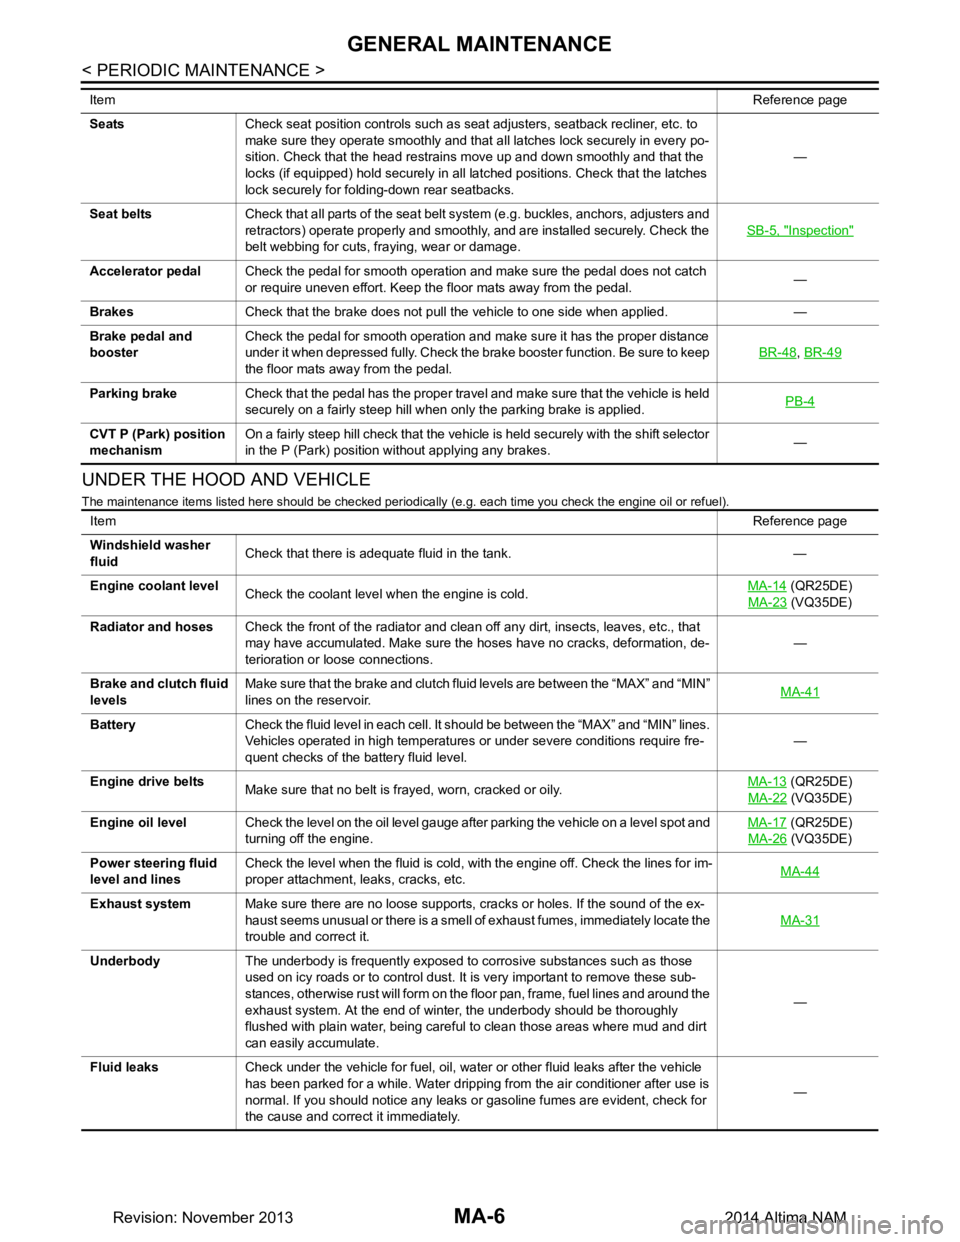
UNDER THE HOOD AND VEHICLE
The maintenance items listed here should be checked periodically (e.g. each time you check the engine oil or refuel).
SeatsCheck seat position controls such as seat adjusters, seatback recliner, etc. to
make sure they operate smoothly and that all latches lock securely in every po-
sition. Check that the head restrains move up and down smoothly and that the
locks (if equipped) hold securely in all latched positions. Check that the latches
lock securely for folding-down rear seatbacks. —
Seat belts Check that all parts of the seat belt system (e.g. buckles, anchors, adjusters and
retractors) operate properly and smoothly, and are installed securely. Check the
belt webbing for cuts, fraying, wear or damage. SB-5, "Inspection"
Accelerator pedal
Check the pedal for smooth operation and make sure the pedal does not catch
or require uneven effort. Keep the floor mats away from the pedal. —
Brakes Check that the brake does not pull the vehicle to one side when applied. —
Brake pedal and
booster Check the pedal for smooth operation and make sure it has the proper distance
under it when depressed fully. Check the brake booster function. Be sure to keep
the floor mats away from the pedal. BR-48
,
BR-49
Parking brake Check that the pedal has the proper travel and make sure that the vehicle is held
securely on a fairly steep hill when only the parking brake is applied. PB-4
CVT P (Park) position
mechanism On a fairly steep hill check that the vehicle is held securely with the shift selector
in the P (Park) position without applying any brakes. —
Item
Reference page
ItemReference page
Windshield washer
fluid Check that there is adequate fluid in the tank. —
Engine coolant level Check the coolant level when the engine is cold. MA-14
(QR25DE)
MA-23
(VQ35DE)
Radiator and hoses Check the front of the radiator and clean off any dirt, insects, leaves, etc., that
may have accumulated. Make sure the hoses have no cracks, deformation, de-
terioration or loose connections. —
Brake and clutch fluid
levels Make sure that the brake and clutch fluid levels are between the “MAX” and “MIN”
lines on the reservoir. MA-41
Battery
Check the fluid level in each cell. It should be between the “MAX” and “MIN” lines.
Vehicles operated in high temperatures or under severe conditions require fre-
quent checks of the battery fluid level. —
Engine drive belts Make sure that no belt is frayed, worn, cracked or oily. MA-13
(QR25DE)
MA-22
(VQ35DE)
Engine oil level Check the level on the oil level gauge after parking the vehicle on a level spot and
turning off the engine. MA-17
(QR25DE)
MA-26
(VQ35DE)
Power steering fluid
level and lines Check the level when the fluid is cold, with the engine off. Check the lines for im-
proper attachment, leaks, cracks, etc. MA-44
Exhaust system
Make sure there are no loose supports, cracks or holes. If the sound of the ex-
haust seems unusual or there is a smell of exhaust fumes, immediately locate the
trouble and correct it. MA-31
Underbody
The underbody is frequently exposed to corrosive substances such as those
used on icy roads or to control dust. It is very important to remove these sub-
stances, otherwise rust will form on the floor pan, frame, fuel lines and around the
exhaust system. At the end of winter, the underbody should be thoroughly
flushed with plain water, being careful to clean those areas where mud and dirt
can easily accumulate. —
Fluid leaks Check under the vehicle for fuel, oil, water or other fluid leaks after the vehicle
has been parked for a while. Water dripping from the air conditioner after use is
normal. If you should notice any leaks or gasoline fumes are evident, check for
the cause and correct it immediately. —
Revision: November 20132014 Altima NAM
Page 3192 of 4801
MA-8
< PERIODIC MAINTENANCE >
PERIODIC MAINTENANCE
NOTE:
• (1) After 40,000 miles (64,000 km) or 48 months, inspect every 10,000 miles (16,000 km) or 12 months. Replace the drive belts if
found damaged.
• (2) If operating mainly in dusty conditions, more frequent maintenance may be required.
• (3) Maintenance-free item. For service procedures, refer to the FL section.
• (4) First replacement interval is 105,000 miles (168,000 km) or 84 months. After first replacement, replace every 75,000 miles (120,000 km) or 60 months.
• (5) Use only Genuine NISSAN long life Antifreeze/Coolant (blue) or equivalent with proper mixture ratio of 50% anti-freeze and 50%
demineralized or distilled water. Mixing any other type of coolant or the use of non-distilled water will reduce the life expec tancy of the
factory fill coolant.
• (6) Replace spark plug when the plug gap exceeds 1.25 mm (0.049 in) even if within specified periodic replacement mileage.
• (7) Periodic maintenance is not required. However, if valve noise increases, inspect valve clearance.
* Maintenance items and intervals with “*” are recommended by NISSAN for reliable vehicle operation. The owner need not perform
such maintenance in order to maintain the emission warranty or manufacturer recall liability. Other maintenance items and inter vals are
required.
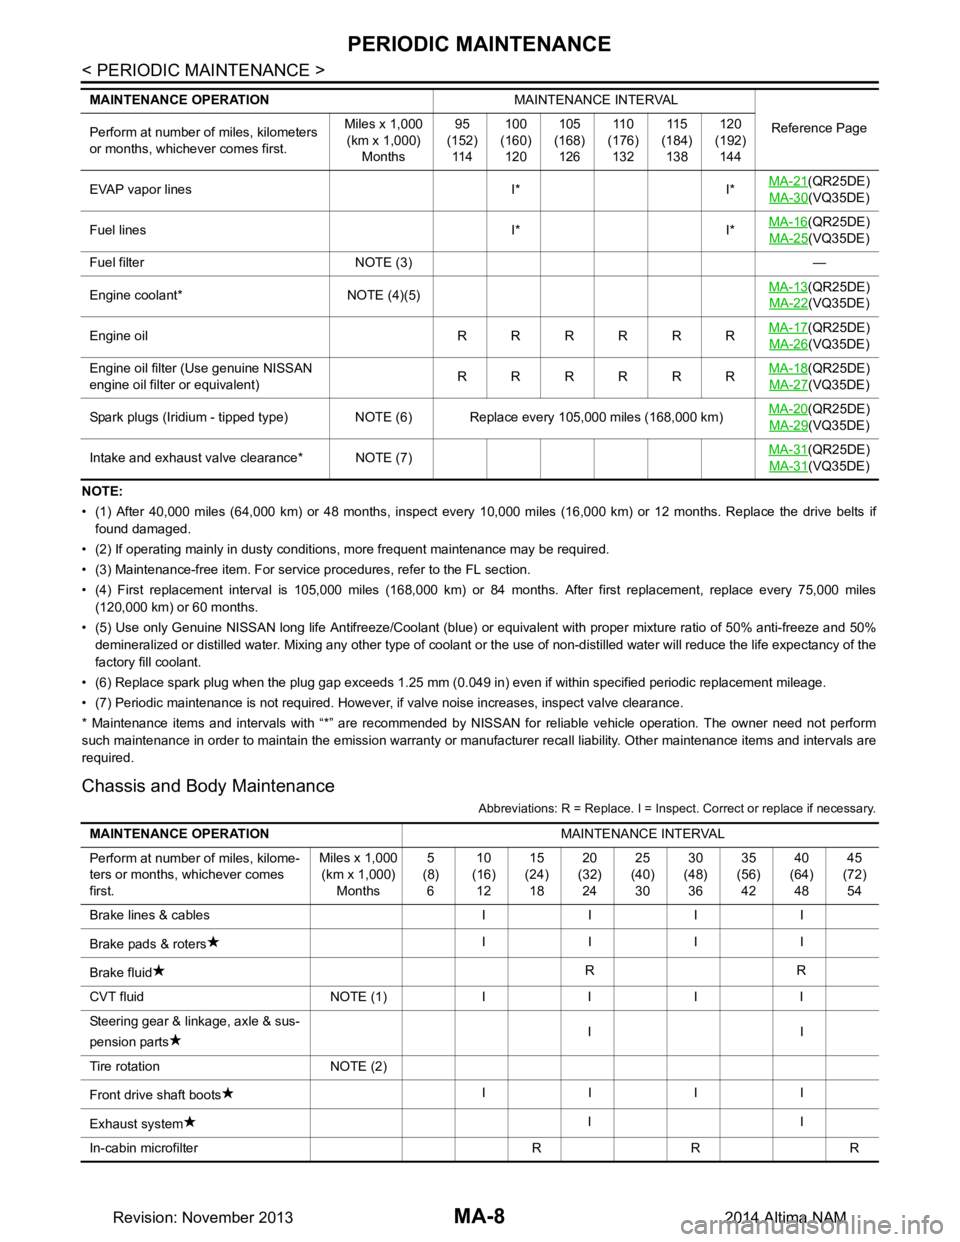
Chassis and Body Maintenance
Abbreviations: R = Replace. I = Inspec t. Correct or replace if necessary.
EVAP vapor lines I* I* MA-21(QR25DE)
MA-30
(VQ35DE)
Fuel lines I* I* MA-16
(QR25DE)
MA-25
(VQ35DE)
Fuel filter NOTE (3) —
Engine coolant* NOTE (4)(5) MA-13
(QR25DE)
MA-22
(VQ35DE)
Engine oil RRRRRR MA-17
(QR25DE)
MA-26
(VQ35DE)
Engine oil filter (Use genuine NISSAN
engine oil filter or equivalent) RRRRRRMA-18
(QR25DE)
MA-27
(VQ35DE)
Spark plugs (Iridium - tipped type) NOTE (6) Replace every 105,000 miles (168,000 km) MA-20
(QR25DE)
MA-29
(VQ35DE)
Intake and exhaust valve clearance* NOTE (7) MA-31
(QR25DE)
MA-31
(VQ35DE)
MAINTENANCE OPERATION
MAINTENANCE INTERVAL
Reference Page
Perform at number of miles, kilometers
or months, whichever comes first. Miles x 1,000
(km x 1,000)
Months 95
(152)
11 4 100
(160)
120 105
(168)
126 11 0
(176)
132 11 5
(184)
138 120
(192)
144
MAINTENANCE OPERATION MAINTENANCE INTERVAL
Perform at number of miles, kilome-
ters or months, whichever comes
first. Miles x 1,000
(km x 1,000) Months 5
(8) 6 10
(16) 12 15
(24) 18 20
(32) 24 25
(40) 30 30
(48) 36 35
(56) 42 40
(64) 48 45
(72) 54
Brake lines & cables I I I I
Brake pads & roters IIII
Brake fluid RR
CVT fluid NOTE (1)IIII
Steering gear & linkage, axle & sus-
pension parts II
Tire rotation NOTE (2)
Front drive shaft boots IIII
Exhaust system II
In-cabin microfilter R R R
Revision: November 20132014 Altima NAM
Page 3193 of 4801
PERIODIC MAINTENANCEMA-9
< PERIODIC MAINTENANCE >
C
D E
F
G H
I
J
K L
M B
MA
N
O A
NOTE:
• Maintenance items with “ ” shoul d be performed more frequently according to “Maintenance Under Severe Driving Condi-
tions”.
• (1) Use only Genuine NISSAN CVT fluid. If towing a trailer, using a camper or a car-top carrier or driving on rough or muddy r oads,
inspect CVT fluid deteriorat ion at NISSAN dealer every 60,000 miles (96,000 km), then change CVT fluid if necessary. And if the
inspection is not performed, change (not just inspect) CVT fluid every 60,000 miles (96,000 km). Using transmission fluid other than
Genuine NISSAN CVT Fluid will damage the CVT, which is not covered by the NISSAN new vehicle limited warranty.
• (2) Refer to “Tire rotation” under the “GENERAL MAINTENANCE” heading earlier in this section.
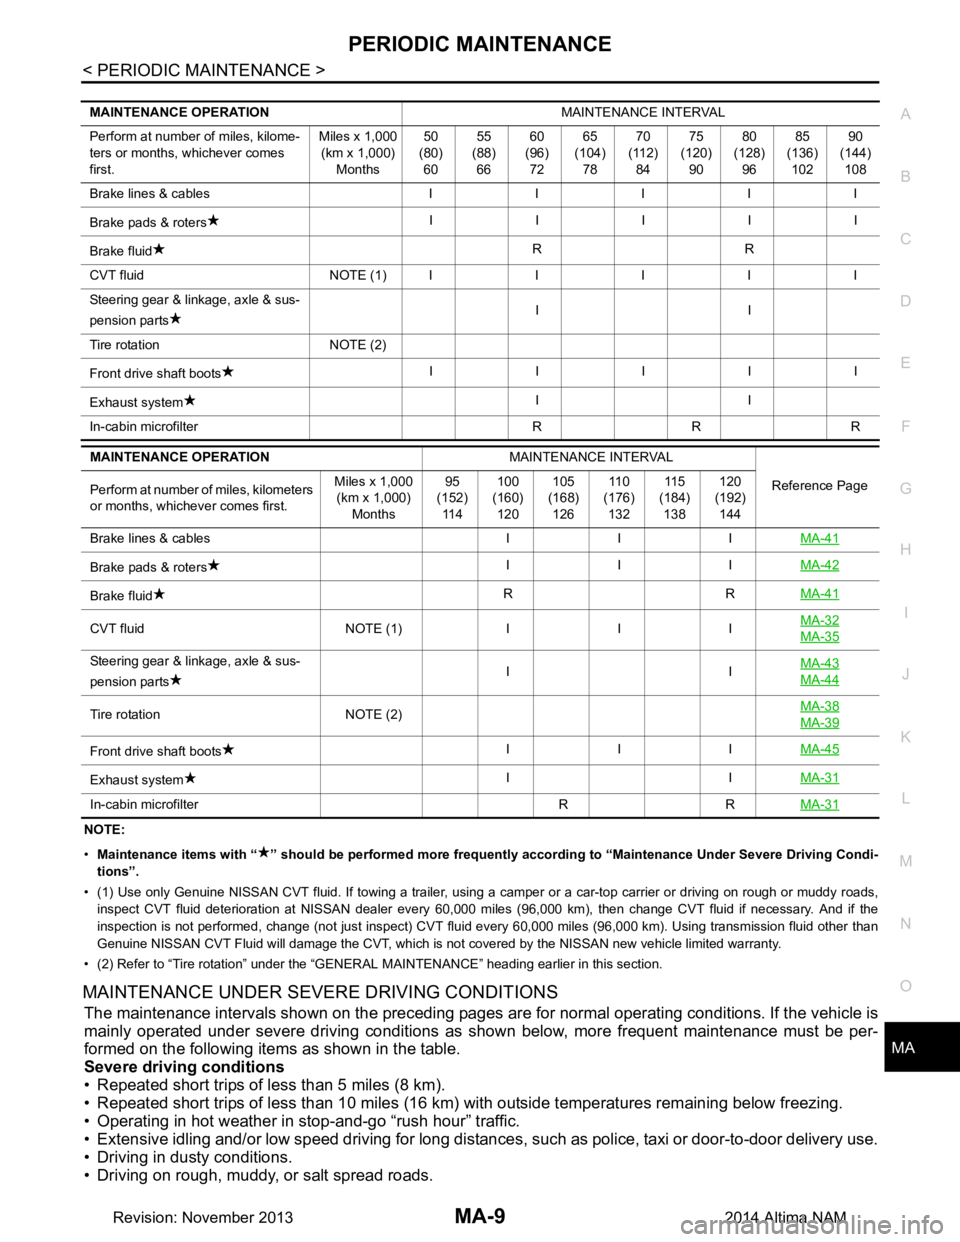
MAINTENANCE UNDER SEVERE DRIVING CONDITIONS
The maintenance intervals shown on the preceding pages are for normal operating conditions. If the vehicle is
mainly operated under severe driving conditions as shown below, more frequent maintenance must be per-
formed on the following items as shown in the table.
Severe driving conditions
• Repeated short trips of less than 5 miles (8 km).
• Repeated short trips of less than 10 miles (16 km) wi th outside temperatures remaining below freezing.
• Operating in hot weather in stop-and-go “rush hour” traffic.
• Extensive idling and/or low speed driving for long distances , such as police, taxi or door-to-door delivery use.
• Driving in dusty conditions.
• Driving on rough, muddy, or salt spread roads.
MAINTENANCE OPERATION MAINTENANCE INTERVAL
Perform at number of miles, kilome-
ters or months, whichever comes
first. Miles x 1,000
(km x 1,000) Months 50
(80) 60 55
(88) 66 60
(96) 72 65
(104) 78 70
(112) 84 75
(120) 90 80
(128) 96 85
(136) 102 90
(144) 108
Brake lines & cables IIIII
Brake pads & roters IIIII
Brake fluid RR
CVT fluid NOTE (1)IIIII
Steering gear & linkage, axle & sus-
pension parts II
Tire rotation NOTE (2)
Front drive shaft boots IIIII
Exhaust system II
In-cabin microfilter R R R
MAINTENANCE OPERATION MAINTENANCE INTERVAL
Reference Page
Perform at number of miles, kilometers
or months, whichever comes first. Miles x 1,000
(km x 1,000)
Months 95
(152)
11 4 100
(160)
120 105
(168)
126 11 0
(176)
132 11 5
(184)
138 120
(192)
144
Brake lines & cables I I I MA-41
Brake pads & rotersIII
MA-42
Brake fluid RR
MA-41
CVT fluid NOTE (1)III MA-32MA-35
Steering gear & linkage, axle & sus-
pension parts II
MA-43
MA-44
Tire rotation NOTE (2) MA-38MA-39
Front drive shaft boots
III
MA-45
Exhaust system II
MA-31
In-cabin microfilter R R MA-31
Revision: November 20132014 Altima NAM
Page 3198 of 4801
MA-14
< PERIODIC MAINTENANCE >
ENGINE MAINTENANCE (QR25DE)
• Loose connections
• Chafing
• Deterioration
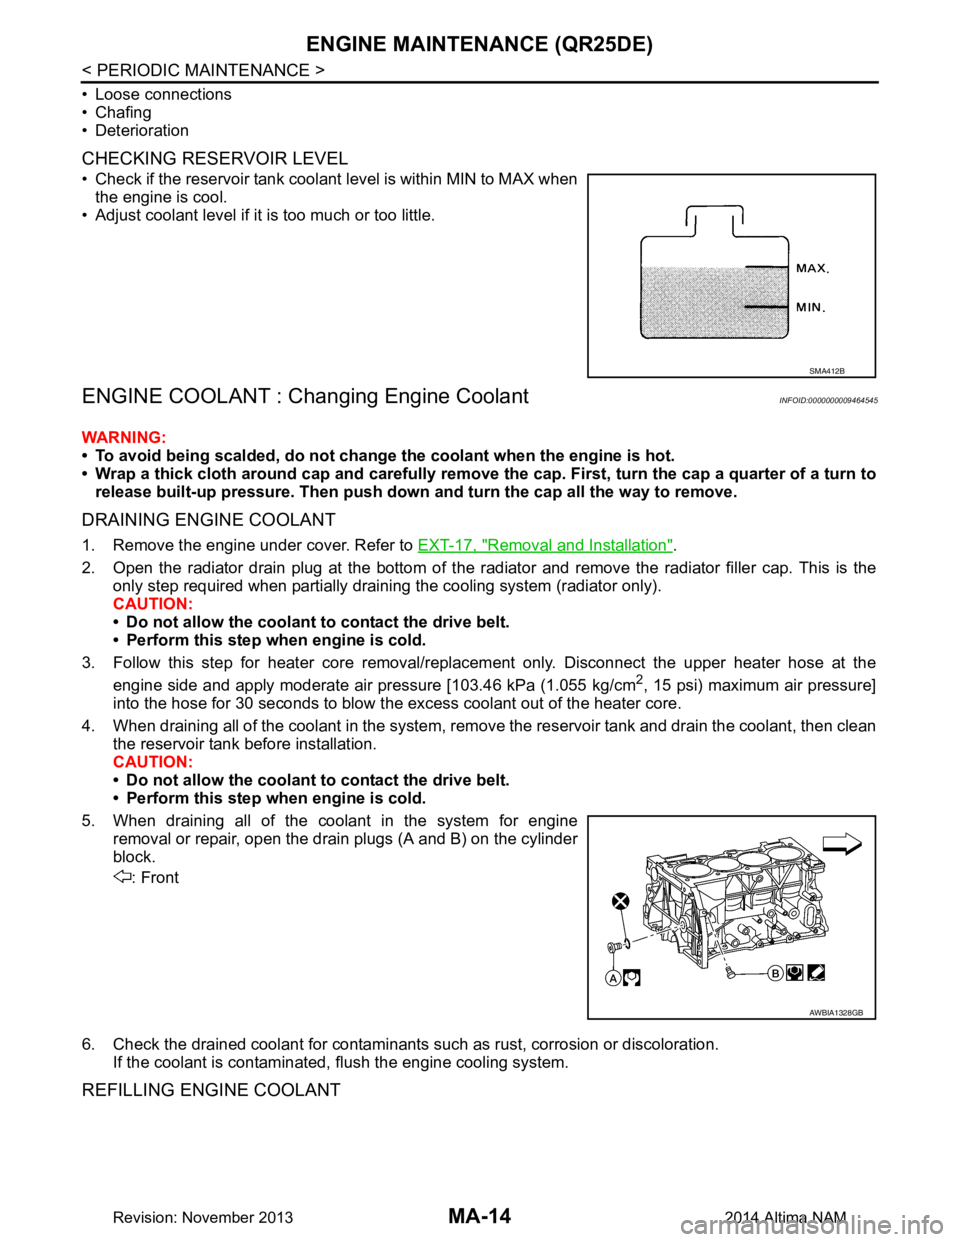
CHECKING RESERVOIR LEVEL
• Check if the reservoir tank coolant level is within MIN to MAX when the engine is cool.
• Adjust coolant level if it is too much or too little.
ENGINE COOLANT : Changing Engine CoolantINFOID:0000000009464545
WARNING:
• To avoid being scalded, do not change the coolant when the engine is hot.
• Wrap a thick cloth around cap and carefully remove the cap. First, turn the cap a quarter of a turn to
release built-up pressure. Then push down and turn the cap all the way to remove.
DRAINING ENGINE COOLANT
1. Remove the engine under cover. Refer to EXT-17, "Removal and Installation".
2. Open the radiator drain plug at the bottom of the radi ator and remove the radiator filler cap. This is the
only step required when partially draining the cooling system (radiator only).
CAUTION:
• Do not allow the coolant to contact the drive belt.
• Perform this step when engine is cold.
3. Follow this step for heater core removal/replac ement only. Disconnect the upper heater hose at the
engine side and apply moderate air pressure [103.46 kPa (1.055 kg/cm
2, 15 psi) maximum air pressure]
into the hose for 30 seconds to blow t he excess coolant out of the heater core.
4. When draining all of the coolant in the system, re move the reservoir tank and drain the coolant, then clean
the reservoir tank before installation.
CAUTION:
• Do not allow the coolant to contact the drive belt.
• Perform this step when engine is cold.
5. When draining all of the coolant in the system for engine removal or repair, open the drain plugs (A and B) on the cylinder
block.
: Front
6. Check the drained coolant for contaminants such as rust, corrosion or discoloration.
If the coolant is contaminated, flush the engine cooling system.
REFILLING ENGINE COOLANT
SMA412B
AWBIA1328GB
Revision: November 20132014 Altima NAM
Page 3200 of 4801
MA-16
< PERIODIC MAINTENANCE >
ENGINE MAINTENANCE (QR25DE)
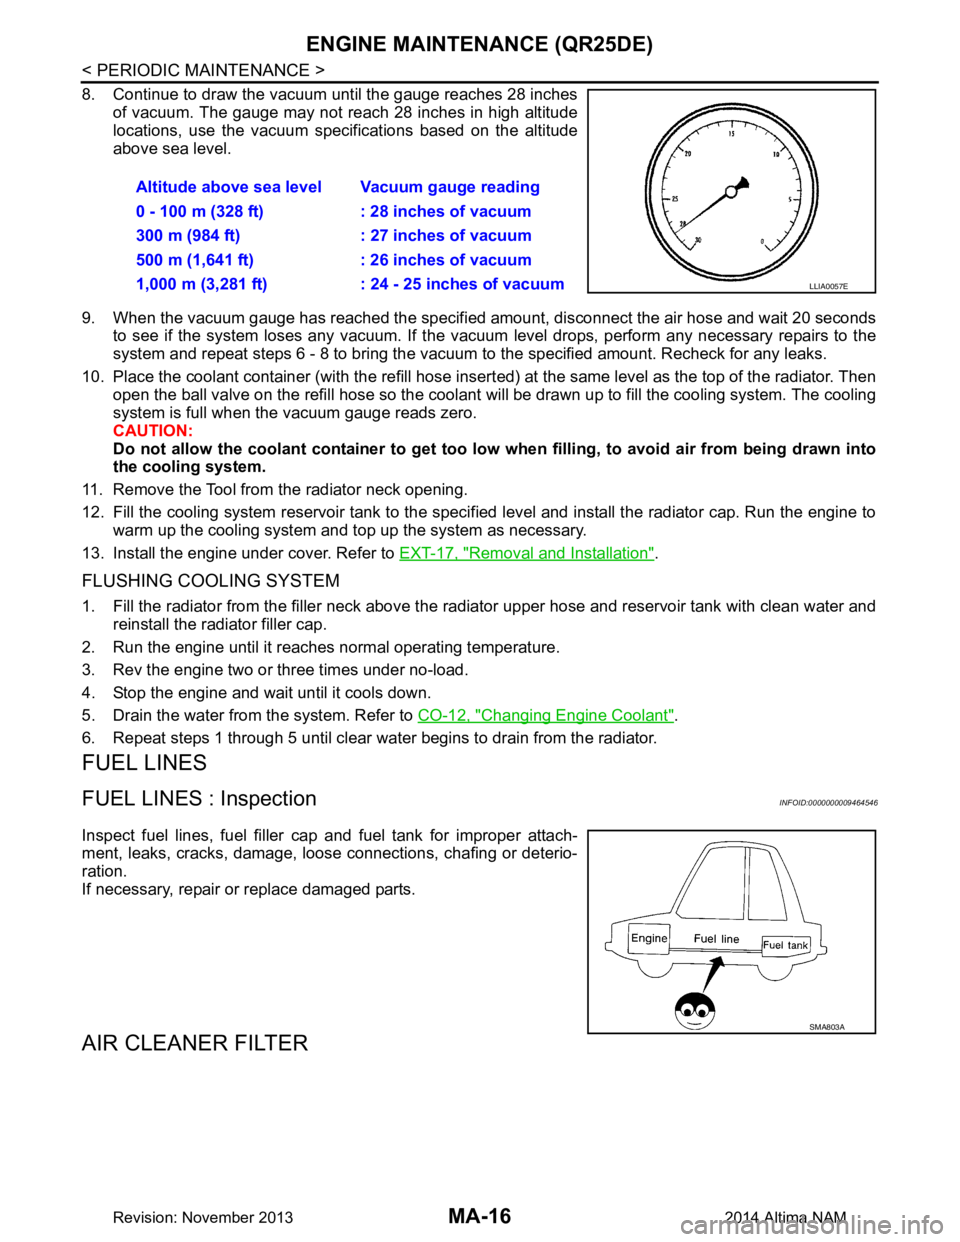
8. Continue to draw the vacuum until the gauge reaches 28 inchesof vacuum. The gauge may not reach 28 inches in high altitude
locations, use the vacuum specifications based on the altitude
above sea level.
9. When the vacuum gauge has reached the specifi ed amount, disconnect the air hose and wait 20 seconds
to see if the system loses any vacuum. If the vacuum level drops, perform any necessary repairs to the
system and repeat steps 6 - 8 to bring the vacuum to the specified amount. Recheck for any leaks.
10. Place the coolant container (with the refill hose insert ed) at the same level as the top of the radiator. Then
open the ball valve on the refill hose so the coolant will be drawn up to fill the cooling system. The cooling
system is full when the vacuum gauge reads zero.
CAUTION:
Do not allow the coolant container to get too low when filling, to avoid air from being drawn into
the cooling system.
11. Remove the Tool from the radiator neck opening.
12. Fill the cooling system reservoir tank to the specif ied level and install the radiator cap. Run the engine to
warm up the cooling system and t op up the system as necessary.
13. Install the engine under cover. Refer to EXT-17, "Removal and Installation"
.
FLUSHING COOLING SYSTEM
1. Fill the radiator from the filler neck above the radiator upper hose and reservoir tank with clean water and
reinstall the radiator filler cap.
2. Run the engine until it reaches normal operating temperature.
3. Rev the engine two or three times under no-load.
4. Stop the engine and wait until it cools down.
5. Drain the water from the system. Refer to CO-12, "Changing Engine Coolant"
.
6. Repeat steps 1 through 5 until clear water begins to drain from the radiator.
FUEL LINES
FUEL LINES : InspectionINFOID:0000000009464546
Inspect fuel lines, fuel filler cap and fuel tank for improper attach-
ment, leaks, cracks, damage, loose connections, chafing or deterio-
ration.
If necessary, repair or replace damaged parts.
AIR CLEANER FILTER
Altitude above sea level Vacuum gauge reading
0 - 100 m (328 ft) : 28 inches of vacuum
300 m (984 ft) : 27 inches of vacuum
500 m (1,641 ft) : 26 inches of vacuum
1,000 m (3,281 ft) : 24 - 25 inches of vacuum
LLIA0057E
SMA803A
Revision: November 20132014 Altima NAM
Page 3201 of 4801
ENGINE MAINTENANCE (QR25DE)MA-17
< PERIODIC MAINTENANCE >
C
D E
F
G H
I
J
K L
M B
MA
N
O A
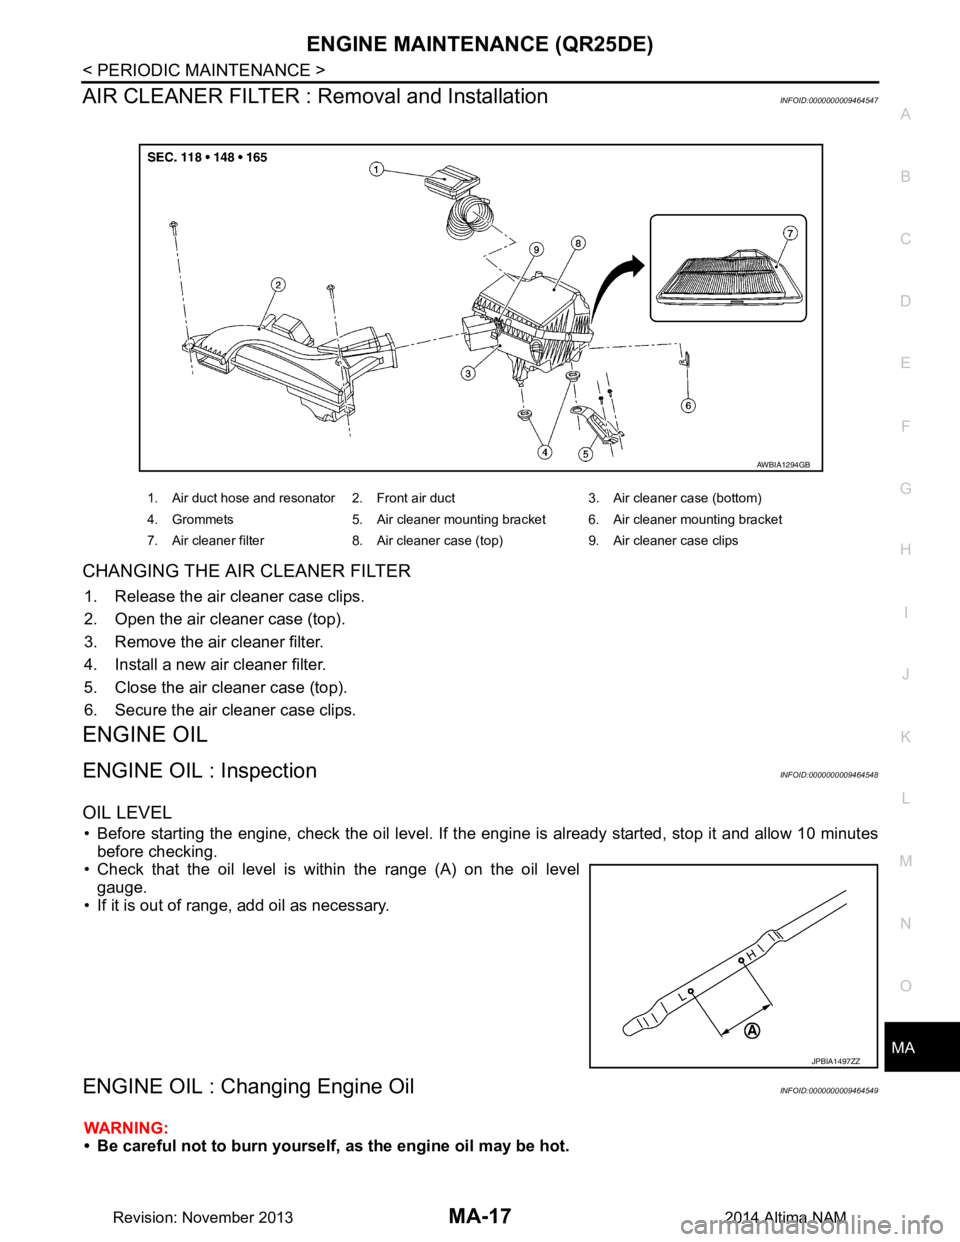
AIR CLEANER FILTER : Removal and InstallationINFOID:0000000009464547
CHANGING THE AIR CLEANER FILTER
1. Release the air cleaner case clips.
2. Open the air cleaner case (top).
3. Remove the air cleaner filter.
4. Install a new air cleaner filter.
5. Close the air cleaner case (top).
6. Secure the air cleaner case clips.
ENGINE OIL
ENGINE OIL : InspectionINFOID:0000000009464548
OIL LEVEL
• Before starting the engine, check the oil level. If t he engine is already started, stop it and allow 10 minutes
before checking.
• Check that the oil level is within the range (A) on the oil level gauge.
• If it is out of range, add oil as necessary.
ENGINE OIL : Changing Engine OilINFOID:0000000009464549
WARNING:
• Be careful not to burn yourself, as the engine oil may be hot.
1. Air duct hose and resonator 2. Front air duct 3. Air cleaner case (bottom)
4. Grommets 5. Air cleaner mounting bracket 6. Air cleaner mounting bracket
7. Air cleaner filter 8. Air cleaner case (top) 9. Air cleaner case clips
AWBIA1294GB
JPBIA1497ZZ
Revision: November 20132014 Altima NAM
Page 3205 of 4801
ENGINE MAINTENANCE (QR25DE)MA-21
< PERIODIC MAINTENANCE >
C
D E
F
G H
I
J
K L
M B
MA
N
O A
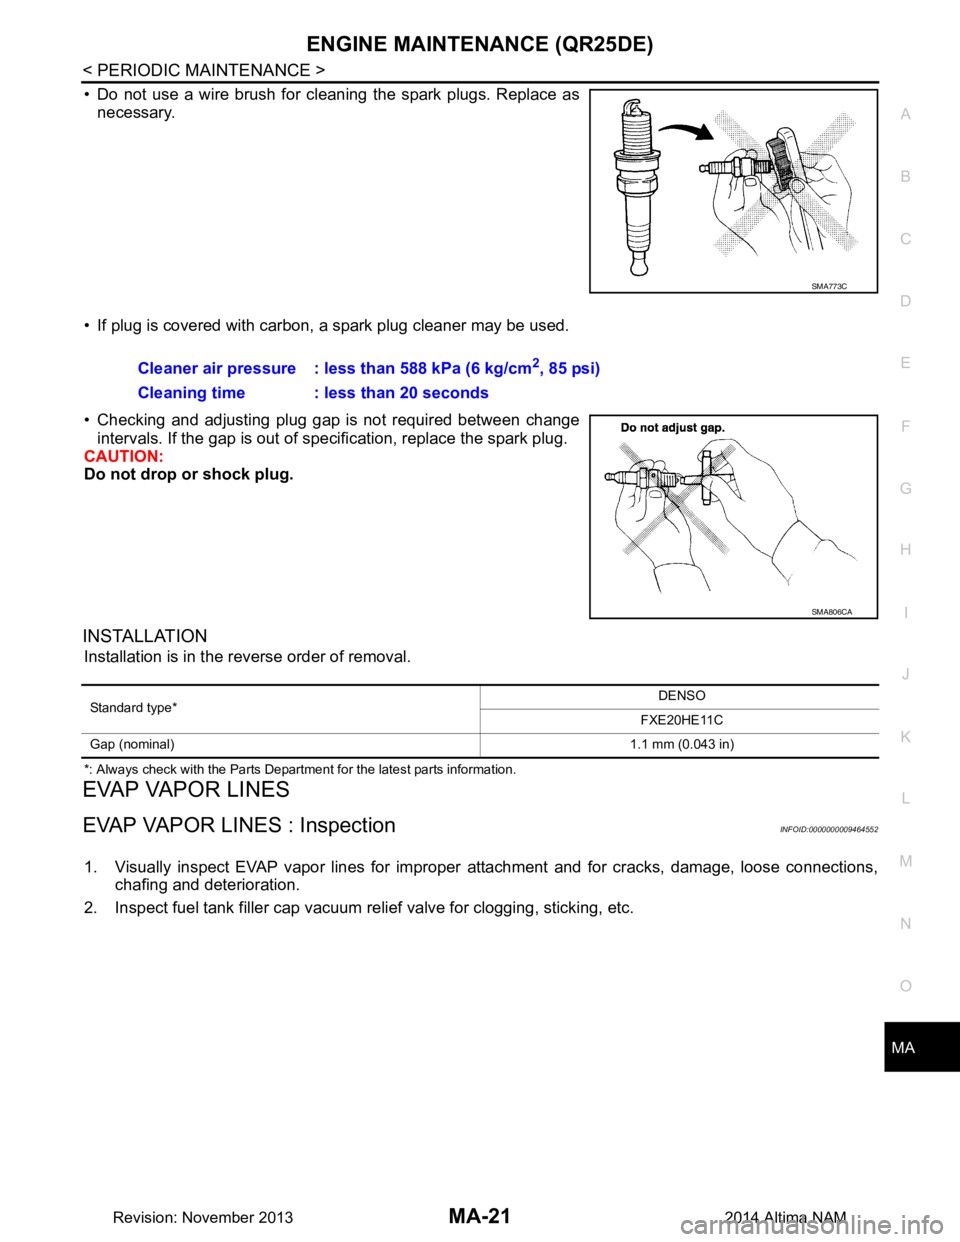
• Do not use a wire brush for cleaning the spark plugs. Replace as
necessary.
• If plug is covered with carbon, a spark plug cleaner may be used.
• Checking and adjusting plug gap is not required between change intervals. If the gap is out of s pecification, replace the spark plug.
CAUTION:
Do not drop or shock plug.
INSTALLATION
Installation is in the reverse order of removal.
*: Always check with the Parts Department for the latest parts information.
EVAP VAPOR LINES
EVAP VAPOR LINES : InspectionINFOID:0000000009464552
1. Visually inspect EVAP vapor lines for improper attachment and for cracks, damage, loose connections,
chafing and deterioration.
2. Inspect fuel tank filler cap vacuum relief valve for clogging, sticking, etc.
SMA773C
Cleaner air pressure : less than 588 kPa (6 kg/cm2, 85 psi)
Cleaning time : less than 20 seconds
SMA806CA
Standard type* DENSO
FXE20HE11C
Gap (nominal) 1.1 mm (0.043 in)
Revision: November 20132014 Altima NAM
Page 3207 of 4801
ENGINE MAINTENANCE (VQ35DE)MA-23
< PERIODIC MAINTENANCE >
C
D E
F
G H
I
J
K L
M B
MA
N
O A
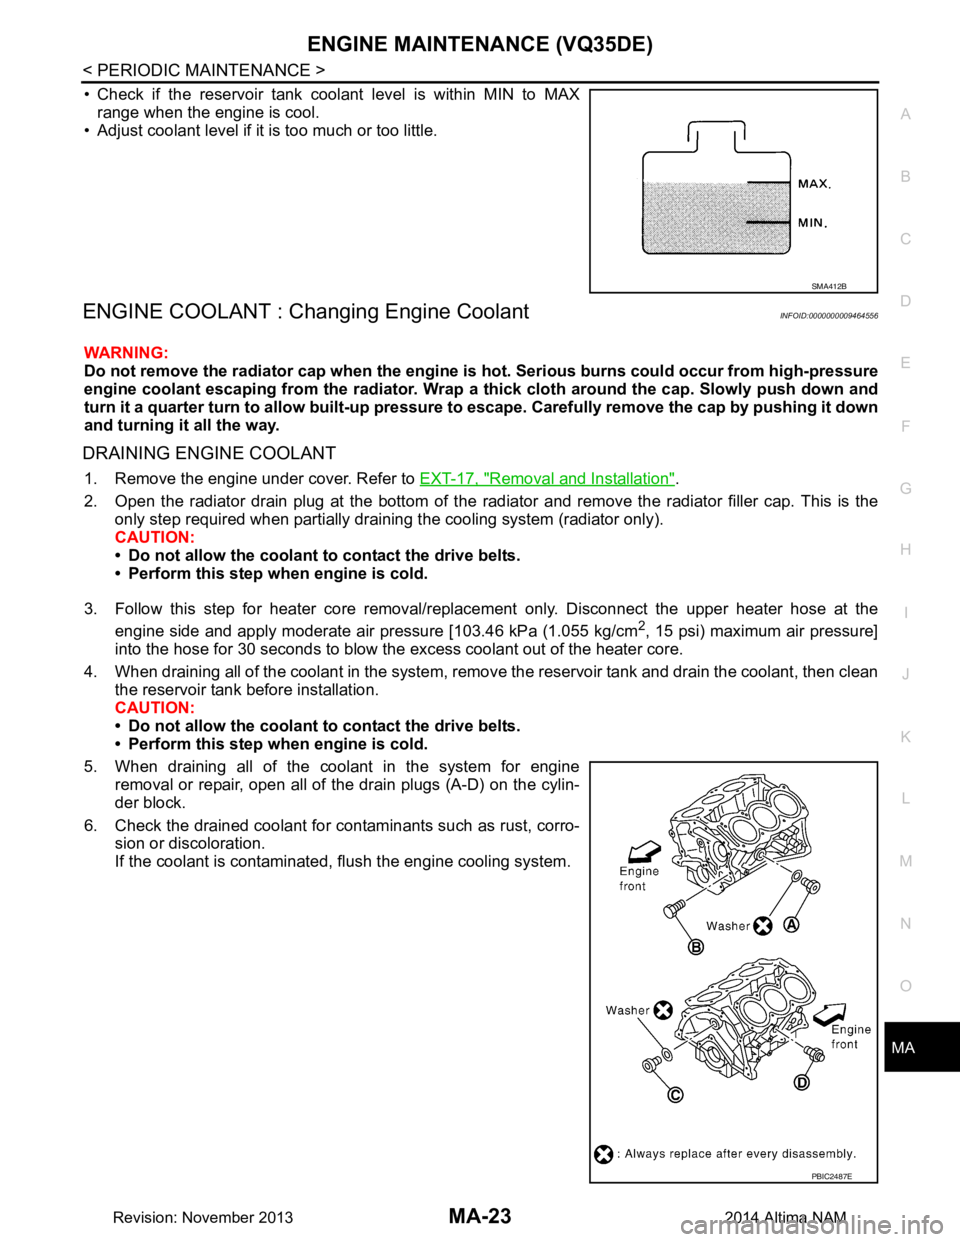
• Check if the reservoir tank coolant level is within MIN to MAX
range when the engine is cool.
• Adjust coolant level if it is too much or too little.
ENGINE COOLANT : Chang ing Engine CoolantINFOID:0000000009464556
WARNING:
Do not remove the radiator cap when the engine is hot. Serious burns could occur from high-pressure
engine coolant escaping from the radiator. Wrap a thick cloth around the cap. Slowly push down and
turn it a quarter turn to allow built-up pressure to escape. Carefully remove the cap by pushing it down
and turning it all the way.
DRAINING ENGINE COOLANT
1. Remove the engine under cover. Refer to EXT-17, "Removal and Installation".
2. Open the radiator drain plug at the bottom of the radiat or and remove the radiator filler cap. This is the
only step required when partially draining the cooling system (radiator only).
CAUTION:
• Do not allow the coolant to contact the drive belts.
• Perform this step when engine is cold.
3. Follow this step for heater core removal/repl acement only. Disconnect the upper heater hose at the
engine side and apply moderate air pressure [103.46 kPa (1.055 kg/cm
2, 15 psi) maximum air pressure]
into the hose for 30 seconds to blow the excess coolant out of the heater core.
4. When draining all of the coolant in the system, remo ve the reservoir tank and drain the coolant, then clean
the reservoir tank before installation.
CAUTION:
• Do not allow the coolant to contact the drive belts.
• Perform this step when engine is cold.
5. When draining all of the coolant in the system for engine removal or repair, open all of the drain plugs (A-D) on the cylin-
der block.
6. Check the drained coolant for contaminants such as rust, corro- sion or discoloration.
If the coolant is contaminated, flush the engine cooling system.
SMA412B
PBIC2487E
Revision: November 20132014 Altima NAM