Page 2486 of 4801

FL-6
< REMOVAL AND INSTALLATION >
FUEL LEVEL SENSOR UNIT, FUEL FILTER AND FUEL PUMP ASSEMBLY
REMOVAL AND INSTALLATION
FUEL LEVEL SENSOR UNIT, FUEL FILTER AND FUEL PUMP ASSEMBLY
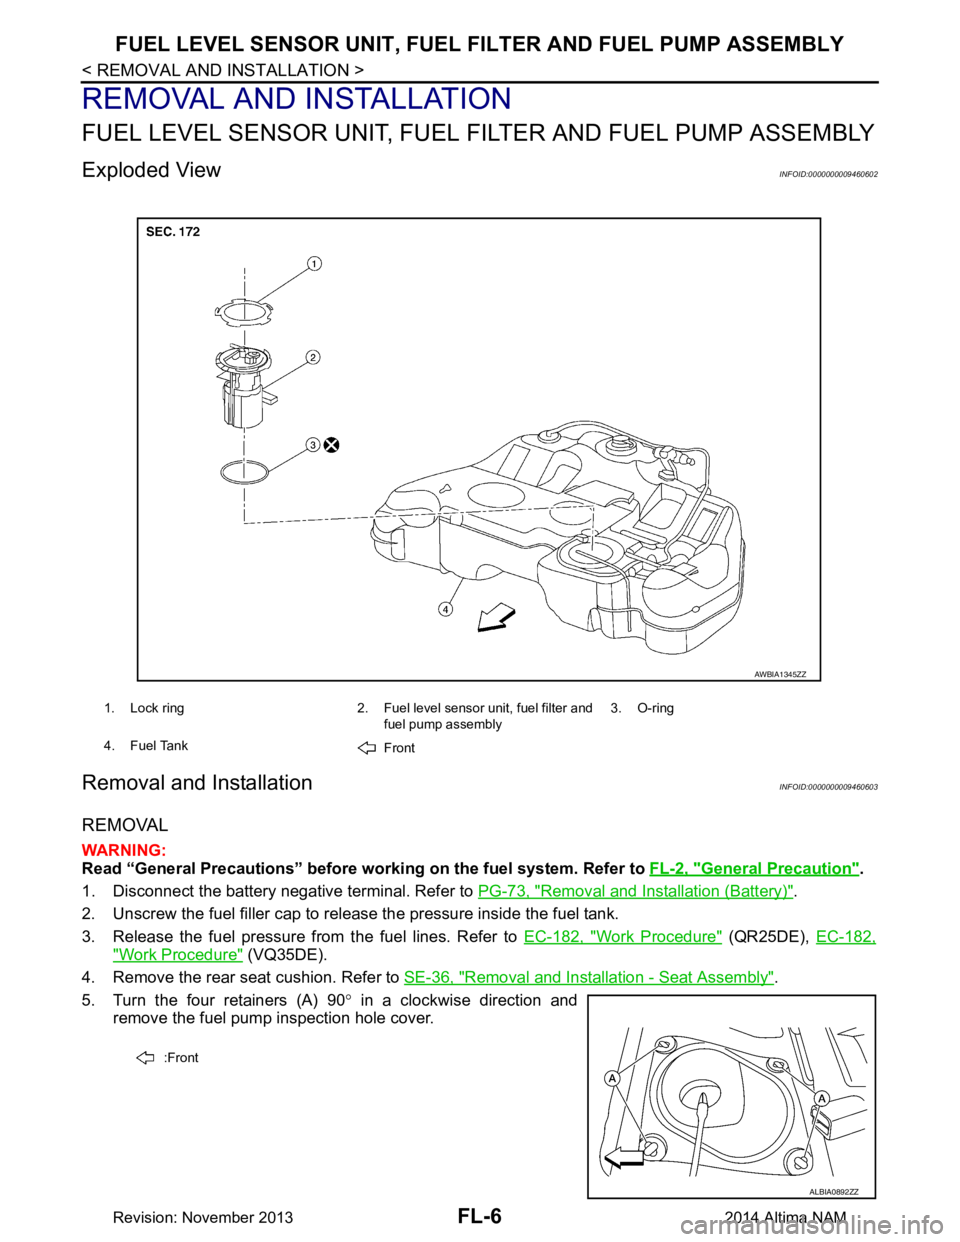
Exploded ViewINFOID:0000000009460602
Removal and InstallationINFOID:0000000009460603
REMOVAL
WARNING:
Read “General Precautions” before wo rking on the fuel system. Refer to FL-2, "General Precaution"
.
1. Disconnect the battery negative terminal. Refer to PG-73, "Removal and Installation (Battery)"
.
2. Unscrew the fuel filler cap to release the pressure inside the fuel tank.
3. Release the fuel pressure from the fuel lines. Refer to EC-182, "Work Procedure"
(QR25DE), EC-182,
"Work Procedure" (VQ35DE).
4. Remove the rear seat cushion. Refer to SE-36, "Removal and Installation - Seat Assembly"
.
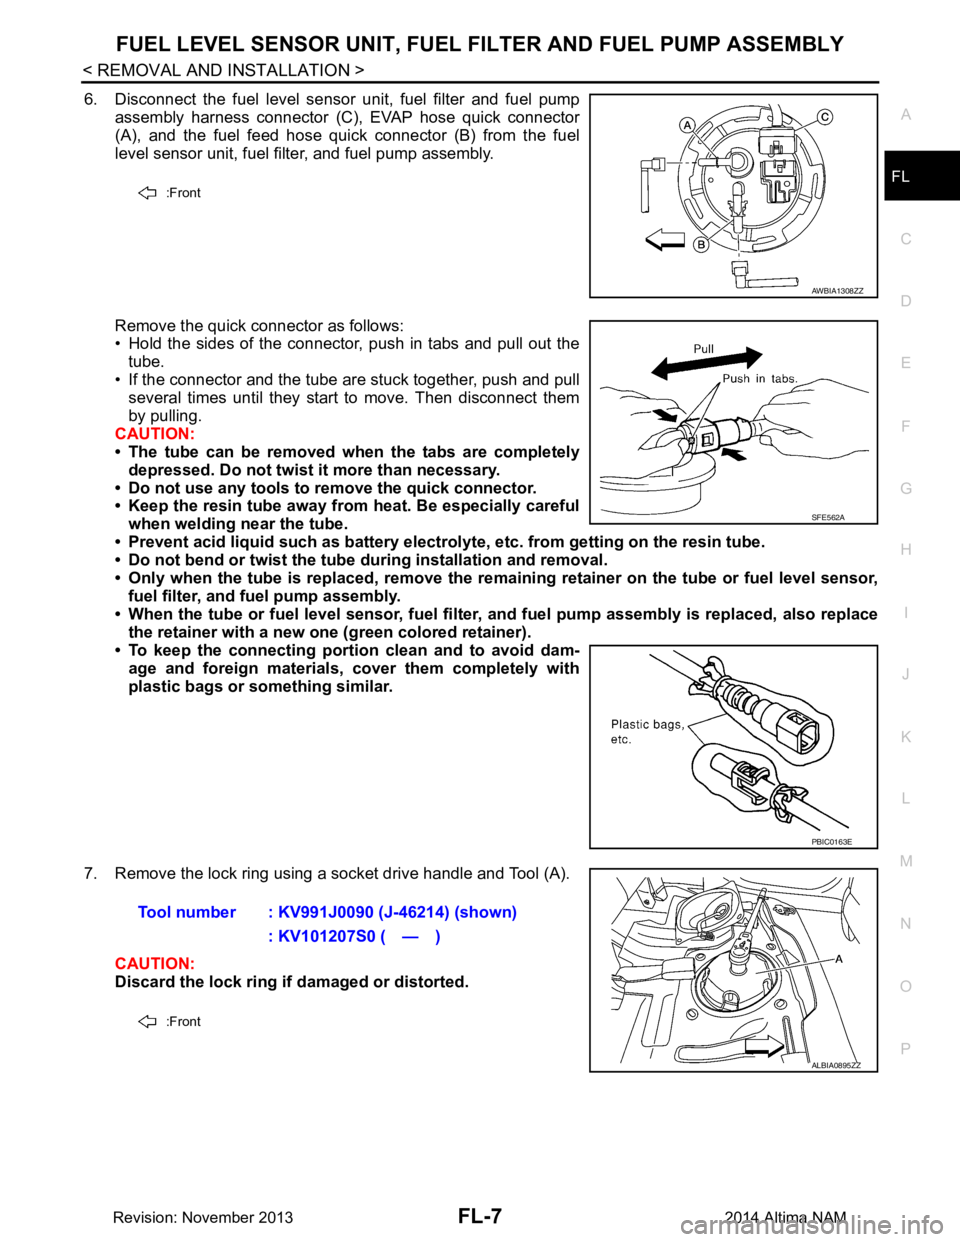
5. Turn the four retainers (A) 90 ° in a clockwise direction and
remove the fuel pump inspection hole cover.
1. Lock ring 2. Fuel level sensor unit, fuel filter and
fuel pump assembly3. O-ring
4. Fuel Tank Front
AWBIA1345ZZ
:Front
ALBIA0892ZZ
Revision: November 20132014 Altima NAM
Page 2487 of 4801

FUEL LEVEL SENSOR UNIT, FUEL FILTER AND FUEL PUMP ASSEMBLYFL-7
< REMOVAL AND INSTALLATION >
C
D E
F
G H
I
J
K L
M A
FL
NP
O
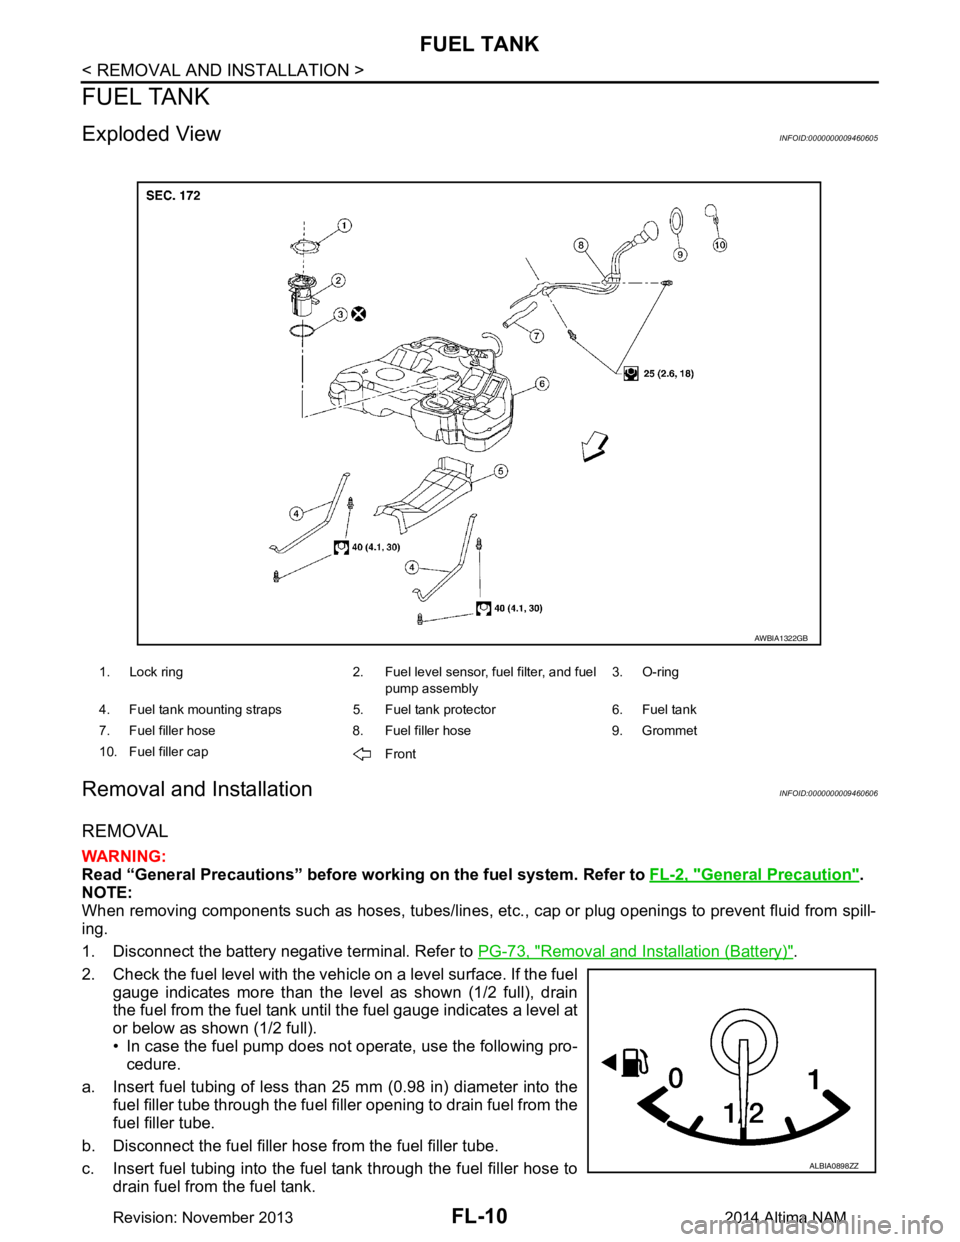
6. Disconnect the fuel level sensor unit, fuel filter and fuel pump
assembly harness connector (C), EVAP hose quick connector
(A), and the fuel feed hose quick connector (B) from the fuel
level sensor unit, fuel filter, and fuel pump assembly.
Remove the quick connector as follows:
• Hold the sides of the connector, push in tabs and pull out the
tube.
• If the connector and the tube are stuck together, push and pull several times until they start to move. Then disconnect them
by pulling.
CAUTION:
• The tube can be removed when the tabs are completely
depressed. Do not twist it more than necessary.
• Do not use any tools to remove the quick connector.
• Keep the resin tube away from heat. Be especially careful
when welding near the tube.
• Prevent acid liquid such as battery electroly te, etc. from getting on the resin tube.
• Do not bend or twist the tube during installation and removal.
• Only when the tube is replaced, remove the remaining retainer on the tube or fuel level sensor,
fuel filter, and fuel pump assembly.
• When the tube or fuel level sen sor, fuel filter, and fuel pump assembly is replaced, also replace
the retainer with a new one (green colored retainer).
• To keep the connecting portio n clean and to avoid dam-
age and foreign materials, cover them completely with
plastic bags or something similar.
7. Remove the lock ring using a socket drive handle and Tool (A). CAUTION:
Discard the lock ring if damaged or distorted.
:Front
AWBIA1308ZZ
SFE562A
PBIC0163E
Tool number : KV991J0090 (J-46214) (shown)
: KV101207S0 ( — )
:Front
ALBIA0895ZZ
Revision: November 20132014 Altima NAM
Page 2490 of 4801

FL-10
< REMOVAL AND INSTALLATION >
FUEL TANK
FUEL TANK
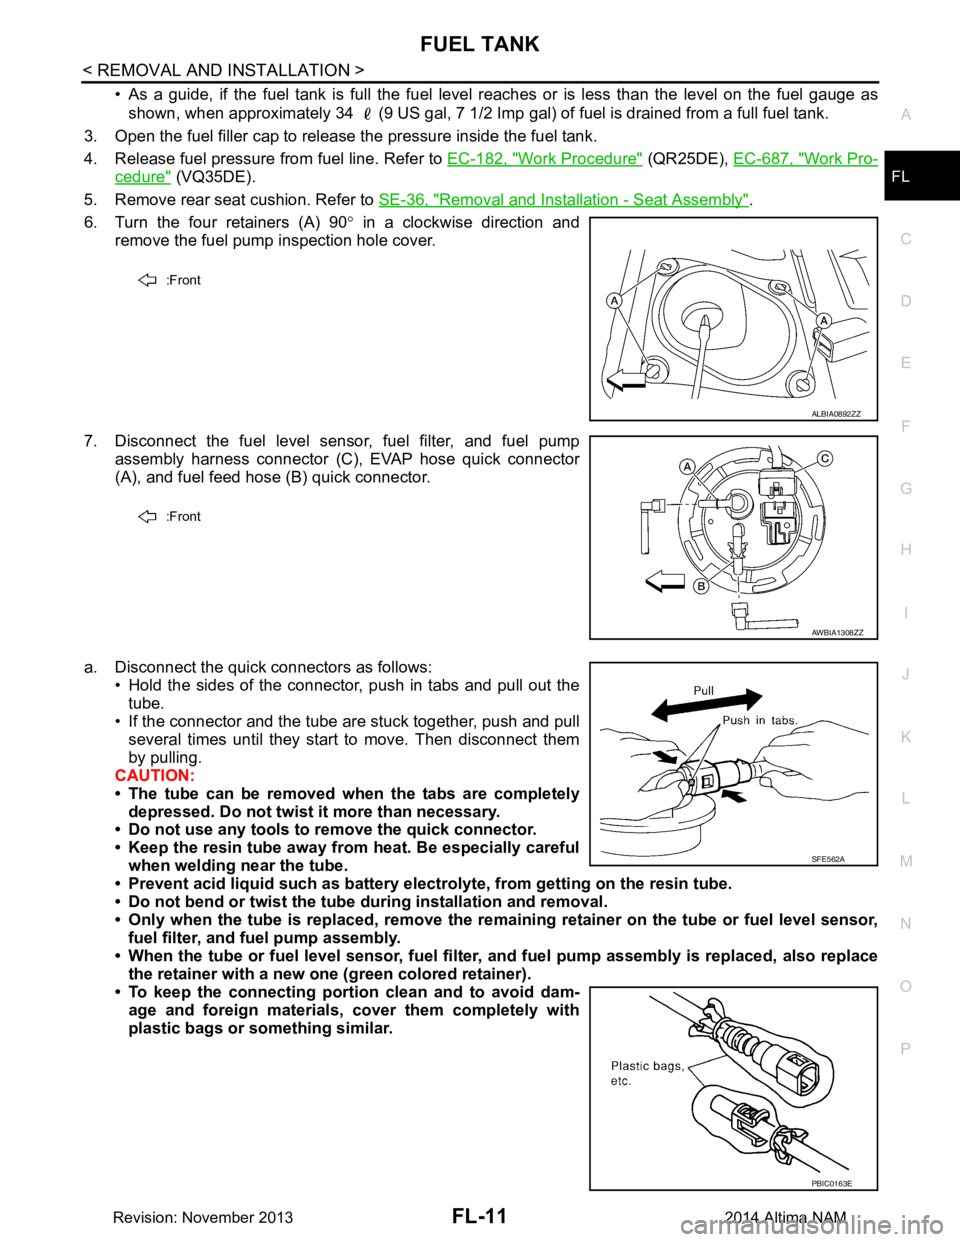
Exploded ViewINFOID:0000000009460605
Removal and InstallationINFOID:0000000009460606
REMOVAL
WARNING:
Read “General Precautions” before wo rking on the fuel system. Refer to FL-2, "General Precaution"
.
NOTE:
When removing components such as hoses, tubes/lines, etc. , cap or plug openings to prevent fluid from spill-
ing.
1. Disconnect the battery negative terminal. Refer to PG-73, "Removal and Installation (Battery)"
.
2. Check the fuel level with the vehicle on a level surface. If the fuel gauge indicates more than the level as shown (1/2 full), drain
the fuel from the fuel tank until the fuel gauge indicates a level at
or below as shown (1/2 full).
• In case the fuel pump does not operate, use the following pro- cedure.
a. Insert fuel tubing of less than 25 mm (0.98 in) diameter into the fuel filler tube through the fuel f iller opening to drain fuel from the
fuel filler tube.
b. Disconnect the fuel filler hose from the fuel filler tube.
c. Insert fuel tubing into the fuel tank through the fuel filler hose to drain fuel from the fuel tank.
1. Lock ring 2. Fuel level sensor, fuel filter, and fuel
pump assembly3. O-ring
4. Fuel tank mounting straps 5. Fuel tank protector 6. Fuel tank
7. Fuel filler hose 8. Fuel filler hose 9. Grommet
10. Fuel filler cap Front
AWBIA1322GB
ALBIA0898ZZ
Revision: November 20132014 Altima NAM
Page 2491 of 4801

FUEL TANKFL-11
< REMOVAL AND INSTALLATION >
C
D E
F
G H
I
J
K L
M A
FL
NP
O
• As a guide, if the fuel tank is full the fuel leve
l reaches or is less than the level on the fuel gauge as
shown, when approximately 34 (9 US gal, 7 1/2 Imp gal) of fuel is drained from a full fuel tank.
3. Open the fuel filler cap to release the pressure inside the fuel tank.
4. Release fuel pressure from fuel line. Refer to EC-182, "Work Procedure"
(QR25DE), EC-687, "Work Pro-
cedure" (VQ35DE).
5. Remove rear seat cushion. Refer to SE-36, "Removal and Installation - Seat Assembly"
.
6. Turn the four retainers (A) 90 ° in a clockwise direction and
remove the fuel pump inspection hole cover.
7. Disconnect the fuel level sensor, fuel filter, and fuel pump assembly harness connector (C), EVAP hose quick connector
(A), and fuel feed hose (B) quick connector.
a. Disconnect the quick connectors as follows: • Hold the sides of the connector, push in tabs and pull out the
tube.
• If the connector and the tube are stuck together, push and pull
several times until they start to move. Then disconnect them
by pulling.
CAUTION:
• The tube can be removed when the tabs are completely depressed. Do not twist it more than necessary.
• Do not use any tools to remove the quick connector.
• Keep the resin tube away from heat. Be especially careful
when welding near the tube.
• Prevent acid liquid such as battery elect rolyte, from getting on the resin tube.
• Do not bend or twist the tube during installation and removal.
• Only when the tube is replaced, remove the remaining retainer on the tube or fuel level sensor,
fuel filter, and fuel pump assembly.
• When the tube or fuel level sen sor, fuel filter, and fuel pump assembly is replaced, also replace
the retainer with a new one (green colored retainer).
• To keep the connecting portio n clean and to avoid dam-
age and foreign materials, cover them completely with
plastic bags or something similar.
:Front
ALBIA0892ZZ
:Front
AWBIA1308ZZ
SFE562A
PBIC0163E
Revision: November 20132014 Altima NAM
Page 2495 of 4801
EVAP CANISTERFL-15
< REMOVAL AND INSTALLATION >
C
D E
F
G H
I
J
K L
M A
FL
NP
O
InspectionINFOID:0000000009460610
Check EVAP canister as follows:
1. Block port (B).
2. Blow air into port (A) and check that it flows freely out of port (C).
3. Release blocked port (B).
4. Apply vacuum pressure to port (B) and check that vacuum pres-
sure exists at the ports (A) and (C).
5. Block port (A) and (B).
6. Apply pressure to port (C) and check that there is no leakage.
PBIB1212E
Revision: November 20132014 Altima NAM
Page 2497 of 4801
EVAP CANISTER VENT CONTROL VALVEFL-17
< REMOVAL AND INSTALLATION >
C
D E
F
G H
I
J
K L
M A
FL
NP
O
EVAP CANISTER VENT CONTROL VALVE
Exploded ViewINFOID:0000000009460613
Removal and InstallationINFOID:0000000009460614
NOTE:
The EVAP canister vent control valve and EVAP cani ster system pressure sensor can be removed without
removing the EVAP canister.
REMOVAL
1. Disconnect breather hose from EVAP canister.
2. Disconnect EVAP canister vent control valve.
3. Turn EVAP canister vent control valve counterclockwise.
4. Remove the EVAP canister vent control valve and O-ring. CAUTION:
Discard the O-ring. Do not reuse O-ring.
INSTALLATION
Installation is in the reverse order of removal.
CAUTION:
Do not reuse O-ring.
1. EVAP control system pressure sensor 2. EVAP canister 3. O-ring
4. EVAP canister vent control valve 5. O-ring
AWBIA1320GB
(A) : Lock
(B) : Unlock
PBIB3091E
Revision: November 20132014 Altima NAM
Page 2499 of 4801
FUEL LEVEL SENSOR UNITFL-19
< UNIT DISASSEMBLY AND ASSEMBLY >
C
D E
F
G H
I
J
K L
M A
FL
NP
O
UNIT DISASSEMBLY AND ASSEMBLY
FUEL LEVEL SENSOR UNIT
Disassembly and AssemblyINFOID:0000000009460617
Fuel Level Sensor Unit
Disassembly
NOTE:
Before disassembly, note the proper placement of the wires to the correct terminals and correct wire routing to
the terminals.
1. Disconnect the red, white (A) and double black connector (B). • Press the tabs on the terminals to release the locking tabs.
ALBIA0926ZZ
1. Level sensor unit module 2. Fuel temperature sensor A. Harness connector
B. Float arm assembly
(C): Fuel pump harness connector
ALBIA0927ZZ
Revision: November 20132014 Altima NAM
Page 2500 of 4801
FL-20
< UNIT DISASSEMBLY AND ASSEMBLY >
FUEL LEVEL SENSOR UNIT
2. Release the two clips and remove the fuel temperature sensorfrom the pump assembly.
3. Release the tab (A) and slide the level sensor unit module and float arm assembly (B) up to remove.
Assembly
Assembly is the reverse order of disassembly.
NOTE:
• Ensure proper placement of the wires to the correct terminals and correct wire routing to the terminals.
• After connecting terminals, ensure they ar e securely locked and can not be pulled out.
• When installing the level sensor unit, push down until the tab is locked into place.
ALBIA0670ZZ
ALBIA0749ZZ
Revision: November 20132014 Altima NAM