2014 NISSAN TEANA fuel filter
[x] Cancel search: fuel filterPage 2492 of 4801
FL-12
< REMOVAL AND INSTALLATION >
FUEL TANK
8. Remove rear wheel and tire using power tool. Refer to WT-55, "Adjustment".
9. Remove rear brake pads. Refer to BR-38, "BRAKE PAD : Removal and Installation"
.
10. Remove rear torque members and rear disc brake rotor.
11. Disconnect rear parking brake shoe, and remove rear cables from toggle lever. Refer to PB-9, "Removal
and Installation".
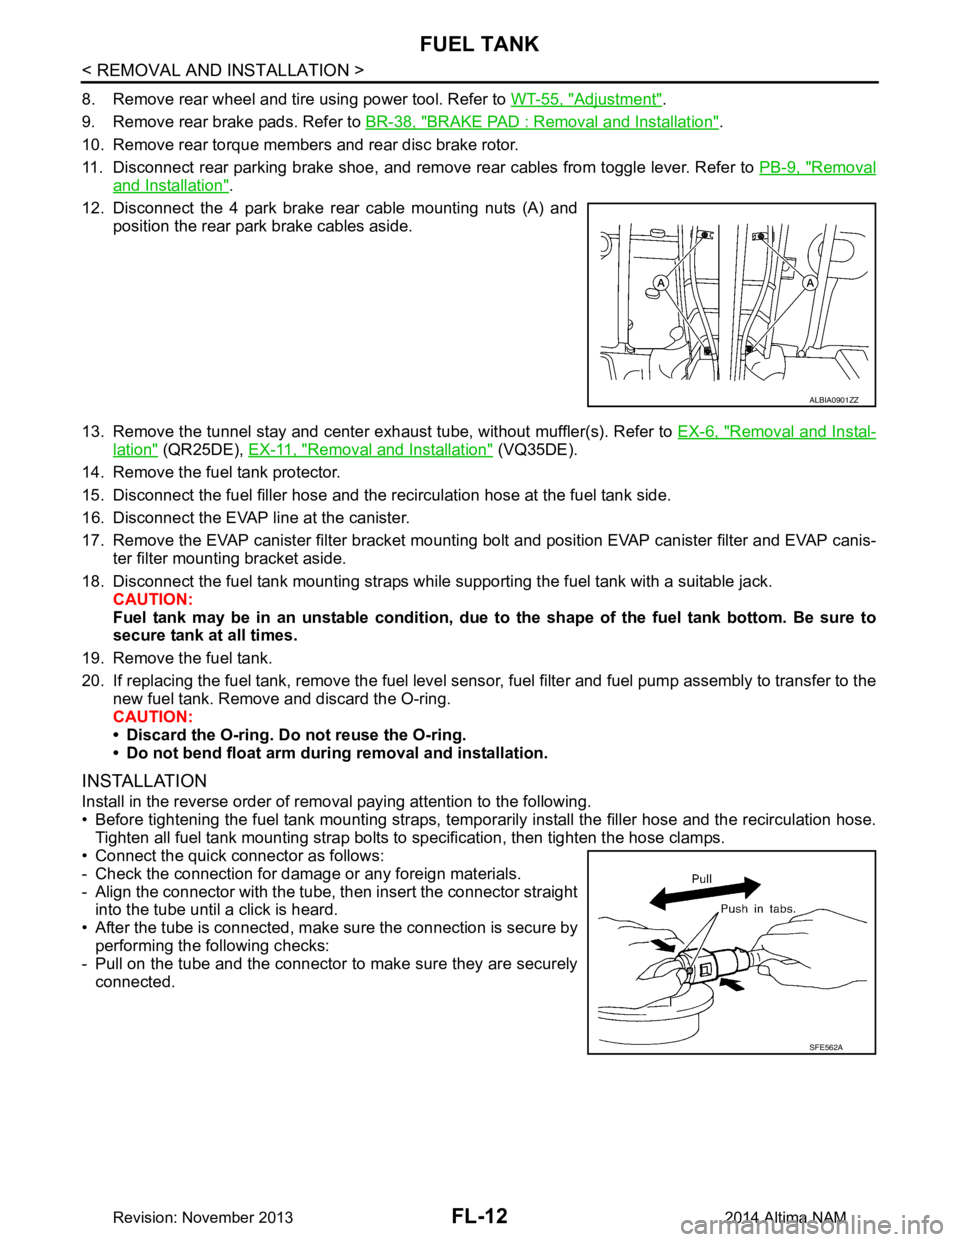
12. Disconnect the 4 park brake rear cable mounting nuts (A) and position the rear park brake cables aside.
13. Remove the tunnel stay and center exhaust tube, without muffler(s). Refer to EX-6, "Removal and Instal-
lation" (QR25DE), EX-11, "Removal and Installation" (VQ35DE).
14. Remove the fuel tank protector.
15. Disconnect the fuel filler hose and the recirculation hose at the fuel tank side.
16. Disconnect the EVAP line at the canister.
17. Remove the EVAP canister filter bracket mounti ng bolt and position EVAP canister filter and EVAP canis-
ter filter mounting bracket aside.
18. Disconnect the fuel tank mounting straps while supporting the fuel tank with a suitable jack. CAUTION:
Fuel tank may be in an unstable condition, due to the shape of the fuel tank bottom. Be sure to
secure tank at all times.
19. Remove the fuel tank.
20. If replacing the fuel tank, remove the fuel level sens or, fuel filter and fuel pump assembly to transfer to the
new fuel tank. Remove and discard the O-ring.
CAUTION:
• Discard the O-ring. Do not reuse the O-ring.
• Do not bend float arm during removal and installation.
INSTALLATION
Install in the reverse order of removal paying attention to the following.
• Before tightening the fuel tank mounting straps, tempor arily install the filler hose and the recirculation hose.
Tighten all fuel tank mounting strap bolts to specification, then tighten the hose clamps.
• Connect the quick connector as follows:
- Check the connection for damage or any foreign materials.
- Align the connector with the tube, then insert the connector straight into the tube until a click is heard.
• After the tube is connected, make sure the connection is secure by performing the following checks:
- Pull on the tube and the connector to make sure they are securely
connected.
ALBIA0901ZZ
SFE562A
Revision: November 20132014 Altima NAM
Page 2559 of 4801
PRECAUTIONSGI-31
< PRECAUTION >
C
D E
F
G H
I
J
K L
M B
GI
N
O P
• Heavily soiled clothing and oil-impregnated footwear should not be worn. Overalls must be cleaned regu- larly.
• First aid treatment should be obtained immediately for open cuts and wounds.
• Use barrier creams, applying them before each work period, to help the removal of oil from the skin.
• Wash with soap and water to ensure all oil is removed (skin cleansers and nail brushes will help). Prepara- tions containing lanolin replace the natural skin oils which have been removed.
• Do not use gasoline, kerosene, diesel fuel, gas oil, thinners or solvents for cleaning skin.
• If skin disorders develop, obtain medical advice without delay.
• Where practical, degrease components prior to handling.
• Where there is a risk of eye contact, eye protecti on should be worn, for example, chemical goggles or face
shields; in addition an eye wash facility should be provided.
ENVIRONMENTAL PROTECTION PRECAUTIONS
Dispose of used oil and used oil filters through authorized waste disposal contractors to licensed waste dis-
posal sites, or to the waste oil reclamation trade. If in doubt, contact the local authority for advice on disposal
facilities.
It is illegal to pour used oil on to the ground, down sewers or drains, or into water sources.
The regulations concerning po llution vary between regions.
Air ConditioningINFOID:0000000009463002
Use an approved refrigerant recovery unit any time t he air conditioning system must be discharged. Refer to
HA-21, "Description"
.
Revision: November 20132014 Altima NAMRevision: November 20132014 Altima NAM
Page 3185 of 4801
MA-1
MAINTENANCE
C
D E
F
G H
I
J
K L
M B
MA
SECTION MA
N
O A
CONTENTS
MAINTENANCE
PRECAUTION ................
...............................3
PRECAUTIONS .............................................. .....3
Precaution for Supplemental Restraint System
(SRS) "AIR BAG" and "SEAT BELT PRE-TEN-
SIONER" ............................................................. ......
3
PREPARATION ............................................4
PREPARATION .............................................. .....4
Special Service Tool ........................................... ......4
Commercial Service Tool ..........................................4
PERIODIC MAINTENANCE ..........................5
GENERAL MAINTE NANCE ........................... .....5
FOR USA AND CANADA ...................................... ......5
FOR USA AND CANADA : Explanation of General
Maintenance ........................................................ ......
5
PERIODIC MAINTENANCE ................................7
FOR USA AND CANADA ...................................... ......7
FOR USA AND CANADA : Introduction of Periodic
Maintenance ........................................................ ......
7
RECOMMENDED FLUIDS AND LUBRI-
CANTS ............................................................ ....
11
FOR USA AND CANADA ...................................... ....11
FOR USA AND CANADA : Fluids and Lubricants ....11
FOR USA AND CANADA : Engine Oil Recom-
mendation ........................................................... ....
11
FOR USA AND CANADA : Engine Coolant Mix-
ture Ratio ............................................................. ....
12
ENGINE MAINTENANCE (QR25DE) .................13
DRIVE BELTS ....................................................... ....13
DRIVE BELTS : Checking Drive Belts ....................13
DRIVE BELTS : Tension Adjustment ......................13
ENGINE COOLANT ............................................... ....13
ENGINE COOLANT : System Inspection ................13
ENGINE COOLANT : Changing Engine Coolant ....14
FUEL LINES ........................................................... ....16
FUEL LINES : Inspection .........................................16
AIR CLEANER FILTER ......................................... ....16
AIR CLEANER FILTER : Removal and Installation
....
17
ENGINE OIL ........................................................... ....17
ENGINE OIL : Inspection .........................................17
ENGINE OIL : Changing Engine Oil ........................17
OIL FILTER ............................................................ ....18
OIL FILTER : Removal and Installation ...................18
SPARK PLUG ........................................................ ....19
SPARK PLUG : Removal and Installation ...............20
EVAP VAPOR LINES ............................................ ....21
EVAP VAPOR LINES : Inspection ...........................21
ENGINE MAINTENANCE (VQ35DE) ................22
DRIVE BELTS ........................................................ ....22
DRIVE BELTS : Checking Drive Belts .....................22
DRIVE BELTS : Tension Adjustment ......................22
ENGINE COOLANT ............................................... ....22
ENGINE COOLANT : System Inspection ................22
ENGINE COOLANT : Changing Engine Coolant ....23
FUEL LINES ........................................................... ....25
FUEL LINES : Inspection .........................................25
AIR CLEANER FILTER ......................................... ....25
AIR CLEANER FILTER : Removal and Installation
....
26
ENGINE OIL ........................................................... ....26
ENGINE OIL : Inspection .........................................26
ENGINE OIL : Changing Engine Oil ........................27
OIL FILTER ............................................................ ....27
Revision: November 20132014 Altima NAM
Page 3191 of 4801
PERIODIC MAINTENANCEMA-7
< PERIODIC MAINTENANCE >
C
D E
F
G H
I
J
K L
M B
MA
N
O A
PERIODIC MAINTENANCE
FOR USA AND CANADA
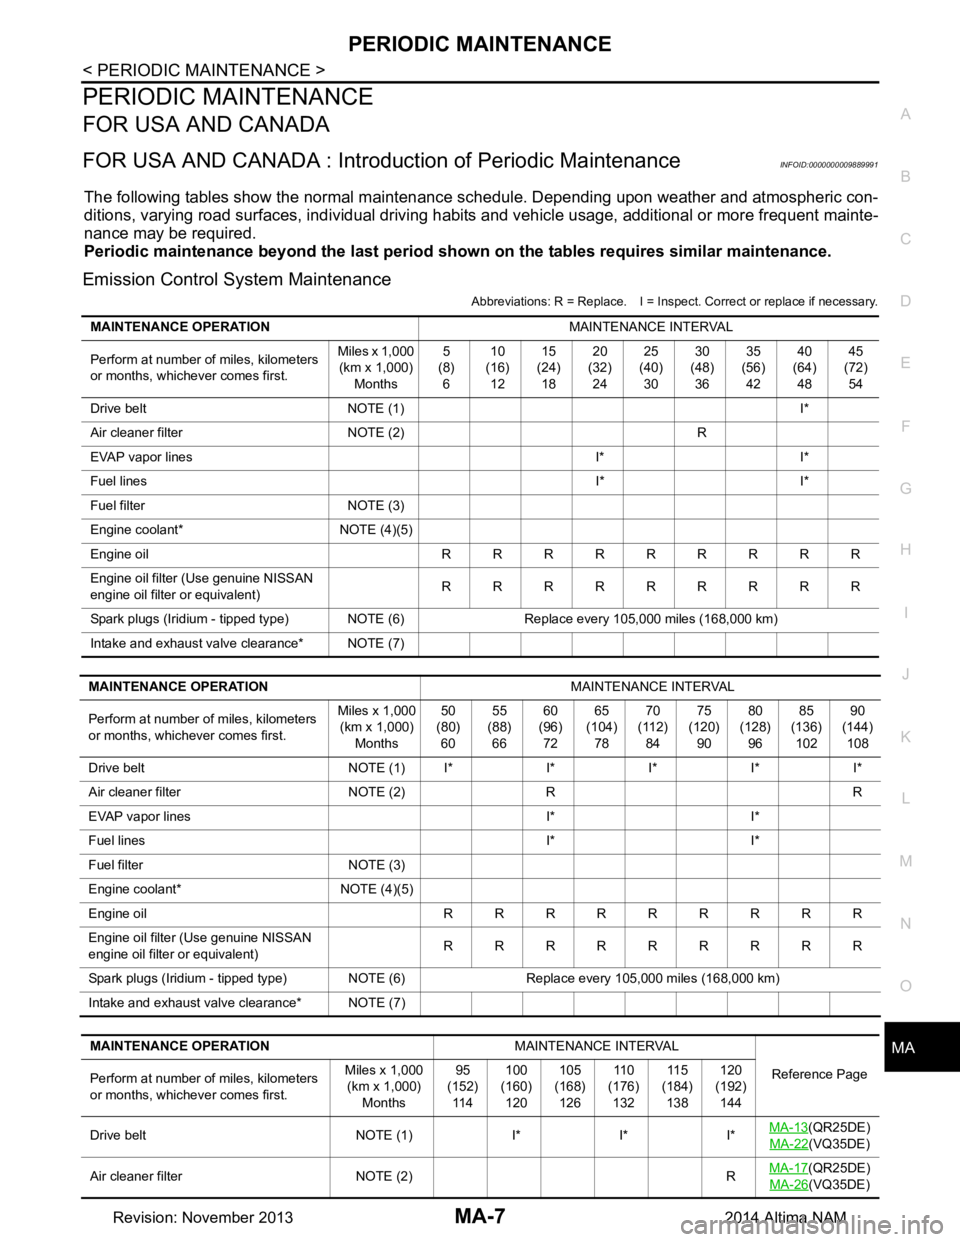
FOR USA AND CANADA : Introduc
tion of Periodic MaintenanceINFOID:0000000009889991
The following tables show the normal maintenanc e schedule. Depending upon weather and atmospheric con-
ditions, varying road surfaces, indi vidual driving habits and vehicle usage, additional or more frequent mainte-
nance may be required.
Periodic maintenance beyond th e last period shown on the tables requires similar maintenance.
Emission Control System Maintenance
Abbreviations: R = Replace. I = Inspec t. Correct or replace if necessary.
MAINTENANCE OPERATION MAINTENANCE INTERVAL
Perform at number of miles, kilometers
or months, whichever comes first. Miles x 1,000
(km x 1,000) Months 5
(8) 6 10
(16) 12 15
(24) 18 20
(32) 24 25
(40) 30 30
(48) 36 35
(56) 42 40
(64) 48 45
(72) 54
Drive belt NOTE (1) I*
Air cleaner filter NOTE (2) R
EVAP vapor lines I* I*
Fuel lines I* I*
Fuel filter NOTE (3)
Engine coolant* NOTE (4)(5)
Engine oil RRRRRRRRR
Engine oil filter (Use genuine NISSAN
engine oil filter or equivalent) RRRRRRRRR
Spark plugs (Iridium - tipped type) NOTE (6) Replace every 105,000 miles (168,000 km)
Intake and exhaust valve clearance* NOTE (7)
MAINTENANCE OPERATION MAINTENANCE INTERVAL
Perform at number of miles, kilometers
or months, whichever comes first. Miles x 1,000
(km x 1,000)
Months 50
(80)
60 55
(88)
66 60
(96)
72 65
(104)
78 70
(112)
84 75
(120)
90 80
(128)
96 85
(136)
102 90
(144)
108
Drive belt NOTE (1)I*I*I*I*I*
Air cleaner filter NOTE (2) R R
EVAP vapor lines I* I*
Fuel lines I* I*
Fuel filter NOTE (3)
Engine coolant* NOTE (4)(5)
Engine oil RRRRRRRRR
Engine oil filter (Use genuine NISSAN
engine oil filter or equivalent) RRRRRRRRR
Spark plugs (Iridium - tipped type) NOTE (6) Replace every 105,000 miles (168,000 km)
Intake and exhaust valve clearance* NOTE (7)
MAINTENANCE OPERATION MAINTENANCE INTERVAL
Reference Page
Perform at number of miles, kilometers
or months, whichever comes first. Miles x 1,000
(km x 1,000)
Months 95
(152)
11 4 100
(160)
120 105
(168)
126 11 0
(176)
132 11 5
(184)
138 120
(192)
144
Drive belt NOTE (1) I* I* I* MA-13
(QR25DE)
MA-22
(VQ35DE)
Air cleaner filter NOTE (2) R MA-17
(QR25DE)
MA-26
(VQ35DE)
Revision: November 20132014 Altima NAM
Page 3192 of 4801
MA-8
< PERIODIC MAINTENANCE >
PERIODIC MAINTENANCE
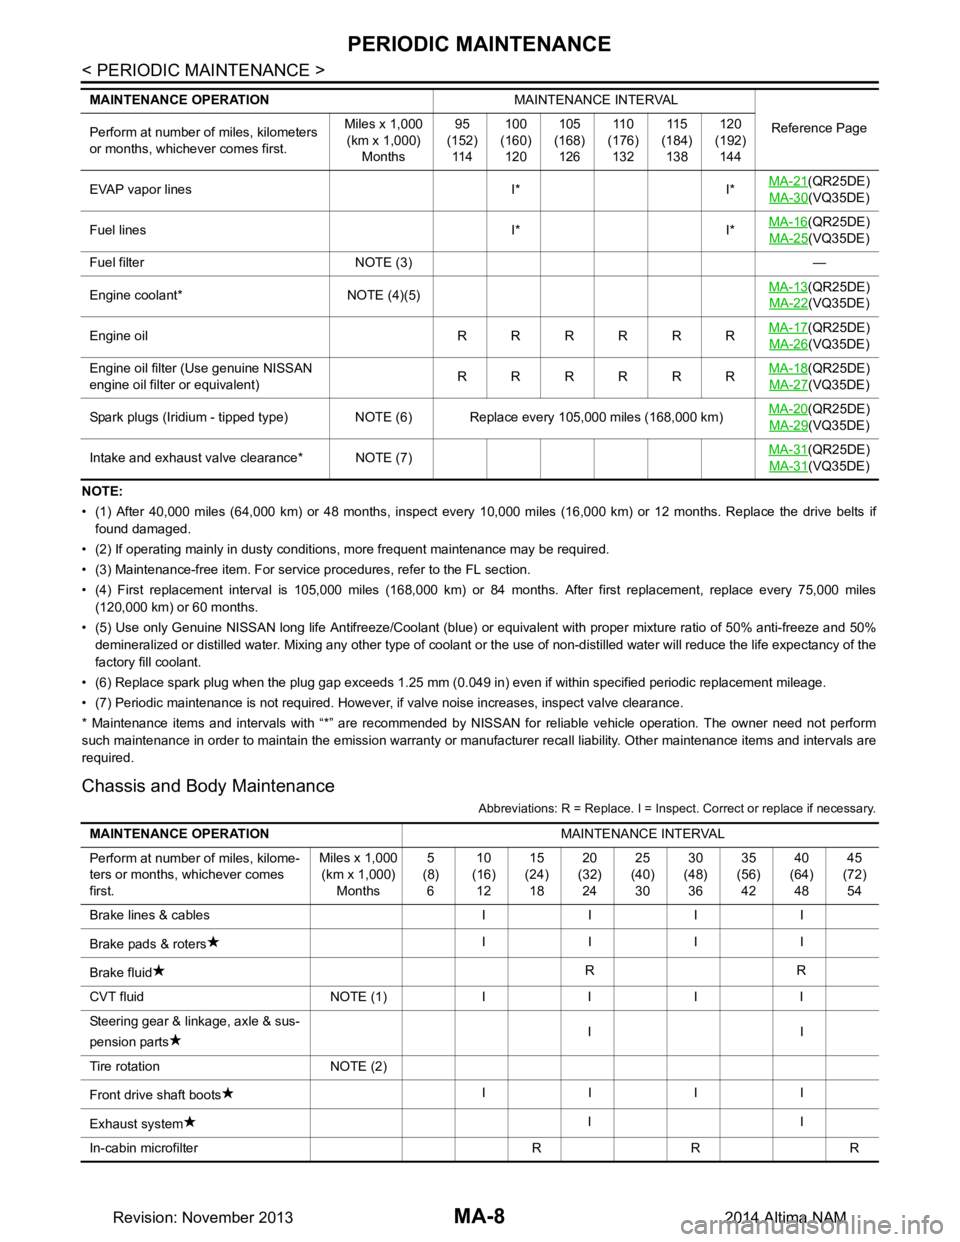
NOTE:
• (1) After 40,000 miles (64,000 km) or 48 months, inspect every 10,000 miles (16,000 km) or 12 months. Replace the drive belts if
found damaged.
• (2) If operating mainly in dusty conditions, more frequent maintenance may be required.
• (3) Maintenance-free item. For service procedures, refer to the FL section.
• (4) First replacement interval is 105,000 miles (168,000 km) or 84 months. After first replacement, replace every 75,000 miles (120,000 km) or 60 months.
• (5) Use only Genuine NISSAN long life Antifreeze/Coolant (blue) or equivalent with proper mixture ratio of 50% anti-freeze and 50%
demineralized or distilled water. Mixing any other type of coolant or the use of non-distilled water will reduce the life expec tancy of the
factory fill coolant.
• (6) Replace spark plug when the plug gap exceeds 1.25 mm (0.049 in) even if within specified periodic replacement mileage.
• (7) Periodic maintenance is not required. However, if valve noise increases, inspect valve clearance.
* Maintenance items and intervals with “*” are recommended by NISSAN for reliable vehicle operation. The owner need not perform
such maintenance in order to maintain the emission warranty or manufacturer recall liability. Other maintenance items and inter vals are
required.
Chassis and Body Maintenance
Abbreviations: R = Replace. I = Inspec t. Correct or replace if necessary.
EVAP vapor lines I* I* MA-21(QR25DE)
MA-30
(VQ35DE)
Fuel lines I* I* MA-16
(QR25DE)
MA-25
(VQ35DE)
Fuel filter NOTE (3) —
Engine coolant* NOTE (4)(5) MA-13
(QR25DE)
MA-22
(VQ35DE)
Engine oil RRRRRR MA-17
(QR25DE)
MA-26
(VQ35DE)
Engine oil filter (Use genuine NISSAN
engine oil filter or equivalent) RRRRRRMA-18
(QR25DE)
MA-27
(VQ35DE)
Spark plugs (Iridium - tipped type) NOTE (6) Replace every 105,000 miles (168,000 km) MA-20
(QR25DE)
MA-29
(VQ35DE)
Intake and exhaust valve clearance* NOTE (7) MA-31
(QR25DE)
MA-31
(VQ35DE)
MAINTENANCE OPERATION
MAINTENANCE INTERVAL
Reference Page
Perform at number of miles, kilometers
or months, whichever comes first. Miles x 1,000
(km x 1,000)
Months 95
(152)
11 4 100
(160)
120 105
(168)
126 11 0
(176)
132 11 5
(184)
138 120
(192)
144
MAINTENANCE OPERATION MAINTENANCE INTERVAL
Perform at number of miles, kilome-
ters or months, whichever comes
first. Miles x 1,000
(km x 1,000) Months 5
(8) 6 10
(16) 12 15
(24) 18 20
(32) 24 25
(40) 30 30
(48) 36 35
(56) 42 40
(64) 48 45
(72) 54
Brake lines & cables I I I I
Brake pads & roters IIII
Brake fluid RR
CVT fluid NOTE (1)IIII
Steering gear & linkage, axle & sus-
pension parts II
Tire rotation NOTE (2)
Front drive shaft boots IIII
Exhaust system II
In-cabin microfilter R R R
Revision: November 20132014 Altima NAM
Page 3195 of 4801
RECOMMENDED FLUIDS AND LUBRICANTSMA-11
< PERIODIC MAINTENANCE >
C
D E
F
G H
I
J
K L
M B
MA
N
O A
RECOMMENDED FLUIDS AND LUBRICANTS
FOR USA AND CANADA
FOR USA AND CANADA :
Fluids and LubricantsINFOID:0000000009464536
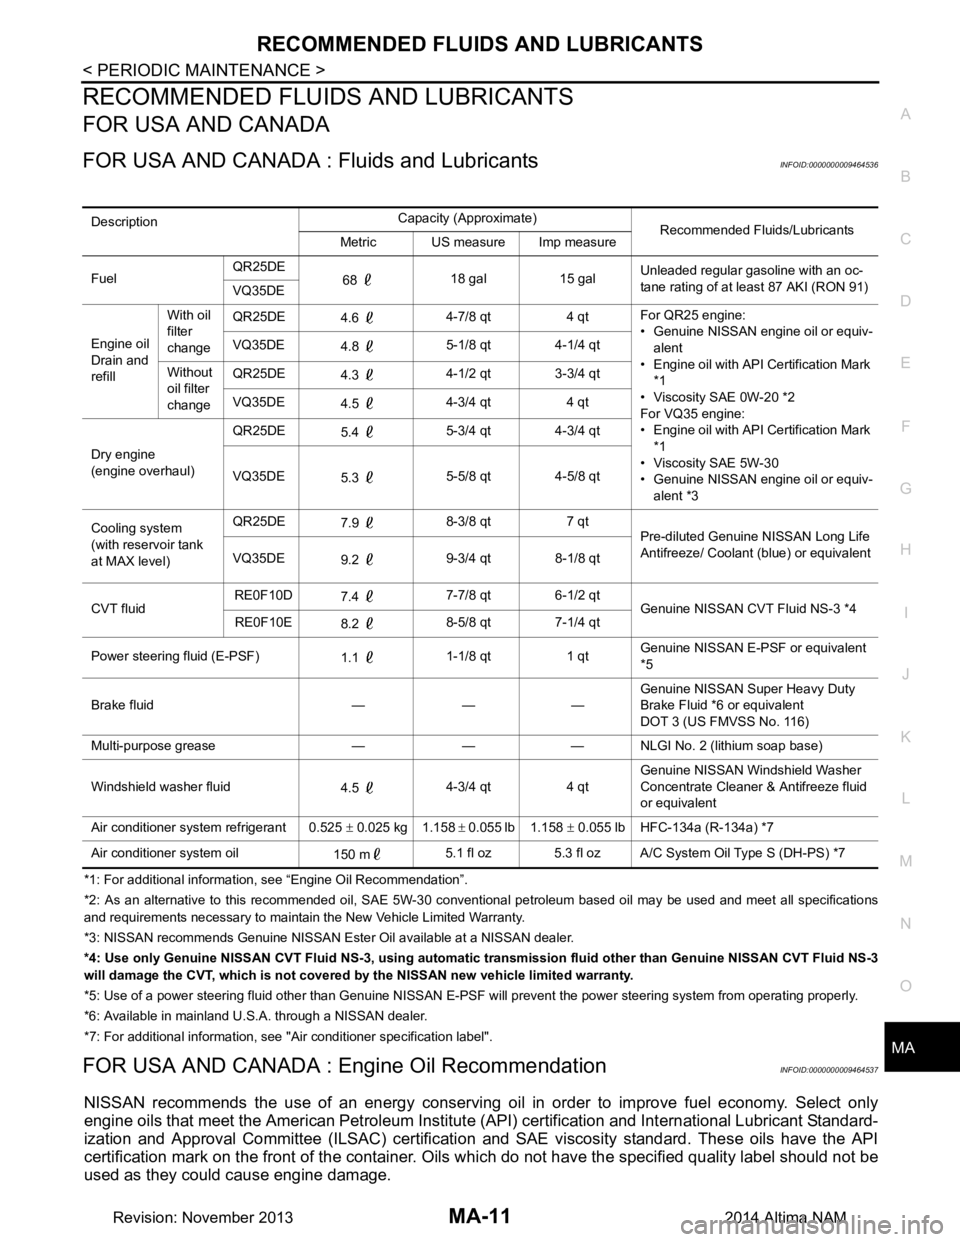
*1: For additional information, see “Engine Oil Recommendation”.
*2: As an alternative to this recommended oil, SAE 5W-30 conventional petroleum based oil may be used and meet all specificatio ns
and requirements necessary to maintain the New Vehicle Limited Warranty.
*3: NISSAN recommen ds Genuine NISSAN Ester Oil av ailable at a NISSAN dealer.
*4: Use only Genuine NISSAN CVT Fluid NS -3, using automatic transmission fluid other than Genuine NISSAN CVT Fluid NS-3
will damage the CVT, which is not covered by the NISSAN new vehicle limited warranty.
*5: Use of a power steering fluid other than Genuine NISSAN E-PSF will prevent the power steering system from operating properly.
*6: Available in mainland U. S.A. through a NISSAN dealer.
*7: For additional information, see "Air conditioner specification label".
FOR USA AND CANADA : En gine Oil RecommendationINFOID:0000000009464537
NISSAN recommends the use of an energy conserving o il in order to improve fuel economy. Select only
engine oils that meet the American Petroleum Institut e (API) certification and International Lubricant Standard-
ization and Approval Committee (ILSAC) certificati on and SAE viscosity standard. These oils have the API
certification mark on the front of the container. Oils which do not have the specified quality label should not be
used as they could cause engine damage.
Description Capacity (Approximate)
Recommended Fluids/Lubricants
Metric US measure Imp measure
Fuel QR25DE
68 18 gal 15 gal Unleaded regular gasoline with an oc-
tane rating of at least 87 AKI (RON 91)
VQ35DE
Engine oil
Drain and
refill With oil
filter
change QR25DE
4.6 4-7/8 qt 4 qt For QR25 engine:
• Genuine NISSAN engine oil or equiv- alent
• Engine oil with API Certification Mark
*1
• Viscosity SAE 0W-20 *2
For VQ35 engine:
• Engine oil with API Certification Mark
*1
• Viscosity SAE 5W-30
• Genuine NISSAN engine oil or equiv-
alent *3
VQ35DE
4.8 5-1/8 qt 4-1/4 qt
Without
oil filter
change QR25DE
4.3 4-1/2 qt 3-3/4 qt
VQ35DE 4.5 4-3/4 qt 4 qt
Dry engine
(engine overhaul) QR25DE
5.4 5-3/4 qt 4-3/4 qt
VQ35DE 5.3 5-5/8 qt 4-5/8 qt
Cooling system
(with reservoir tank
at MAX level) QR25DE
7.9 8-3/8 qt 7 qt
Pre-diluted Genuine NISSAN Long Life
Antifreeze/ Coolant (blue) or equivalent
VQ35DE 9.2 9-3/4 qt 8-1/8 qt
CVT fluid RE0F10D
7.4 7-7/8 qt 6-1/2 qt
Genuine NISSAN CVT Fluid NS-3 *4
RE0F10E 8.2 8-5/8 qt 7-1/4 qt
Power steering fluid (E-PSF) 1.1 1-1/8 qt 1 qt Genuine NISSAN E-PSF or equivalent
*5
Brake fluid — — — Genuine NISSAN Super Heavy Duty
Brake Fluid *6 or equivalent
DOT 3 (US FMVSS No. 116)
Multi-purpose grease — — — NLGI No. 2 (lithium soap base)
Windshield washer fluid 4.5 4-3/4 qt 4 qt Genuine NISSAN Windshield Washer
Concentrate Cleaner & Antifreeze fluid
or equivalent
Air conditioner system refrigerant 0.525 ± 0.025 kg 1.158 ± 0.055 lb 1.158 ± 0.055 lb HFC-134a (R-134a) *7
Air conditioner system oil 150 m5.1 fl oz 5.3 fl oz A/C System Oil Type S (DH-PS) *7
Revision: November 20132014 Altima NAM
Page 3200 of 4801
MA-16
< PERIODIC MAINTENANCE >
ENGINE MAINTENANCE (QR25DE)
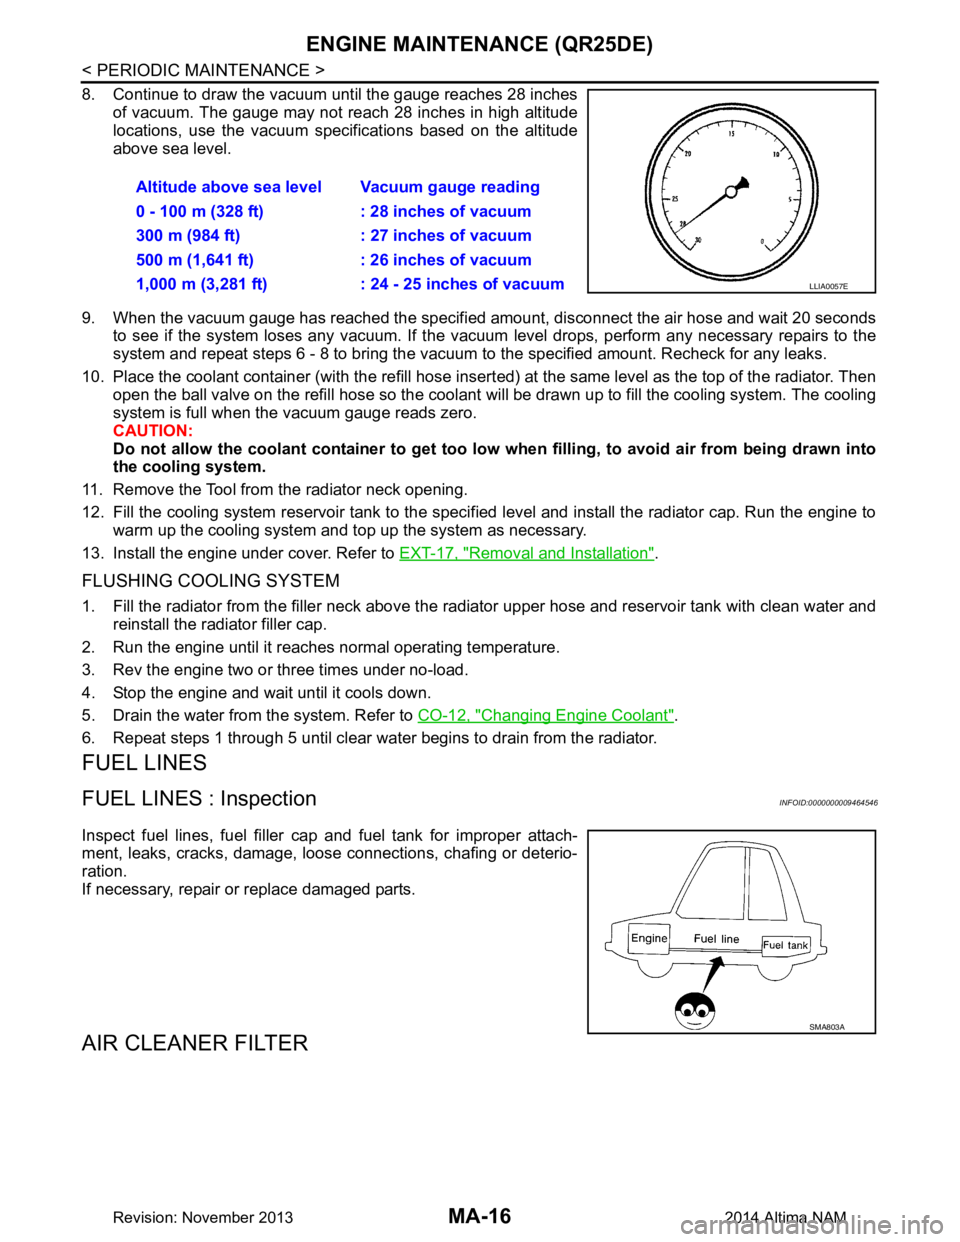
8. Continue to draw the vacuum until the gauge reaches 28 inchesof vacuum. The gauge may not reach 28 inches in high altitude
locations, use the vacuum specifications based on the altitude
above sea level.
9. When the vacuum gauge has reached the specifi ed amount, disconnect the air hose and wait 20 seconds
to see if the system loses any vacuum. If the vacuum level drops, perform any necessary repairs to the
system and repeat steps 6 - 8 to bring the vacuum to the specified amount. Recheck for any leaks.
10. Place the coolant container (with the refill hose insert ed) at the same level as the top of the radiator. Then
open the ball valve on the refill hose so the coolant will be drawn up to fill the cooling system. The cooling
system is full when the vacuum gauge reads zero.
CAUTION:
Do not allow the coolant container to get too low when filling, to avoid air from being drawn into
the cooling system.
11. Remove the Tool from the radiator neck opening.
12. Fill the cooling system reservoir tank to the specif ied level and install the radiator cap. Run the engine to
warm up the cooling system and t op up the system as necessary.
13. Install the engine under cover. Refer to EXT-17, "Removal and Installation"
.
FLUSHING COOLING SYSTEM
1. Fill the radiator from the filler neck above the radiator upper hose and reservoir tank with clean water and
reinstall the radiator filler cap.
2. Run the engine until it reaches normal operating temperature.
3. Rev the engine two or three times under no-load.
4. Stop the engine and wait until it cools down.
5. Drain the water from the system. Refer to CO-12, "Changing Engine Coolant"
.
6. Repeat steps 1 through 5 until clear water begins to drain from the radiator.
FUEL LINES
FUEL LINES : InspectionINFOID:0000000009464546
Inspect fuel lines, fuel filler cap and fuel tank for improper attach-
ment, leaks, cracks, damage, loose connections, chafing or deterio-
ration.
If necessary, repair or replace damaged parts.
AIR CLEANER FILTER
Altitude above sea level Vacuum gauge reading
0 - 100 m (328 ft) : 28 inches of vacuum
300 m (984 ft) : 27 inches of vacuum
500 m (1,641 ft) : 26 inches of vacuum
1,000 m (3,281 ft) : 24 - 25 inches of vacuum
LLIA0057E
SMA803A
Revision: November 20132014 Altima NAM
Page 3209 of 4801
ENGINE MAINTENANCE (VQ35DE)MA-25
< PERIODIC MAINTENANCE >
C
D E
F
G H
I
J
K L
M B
MA
N
O A
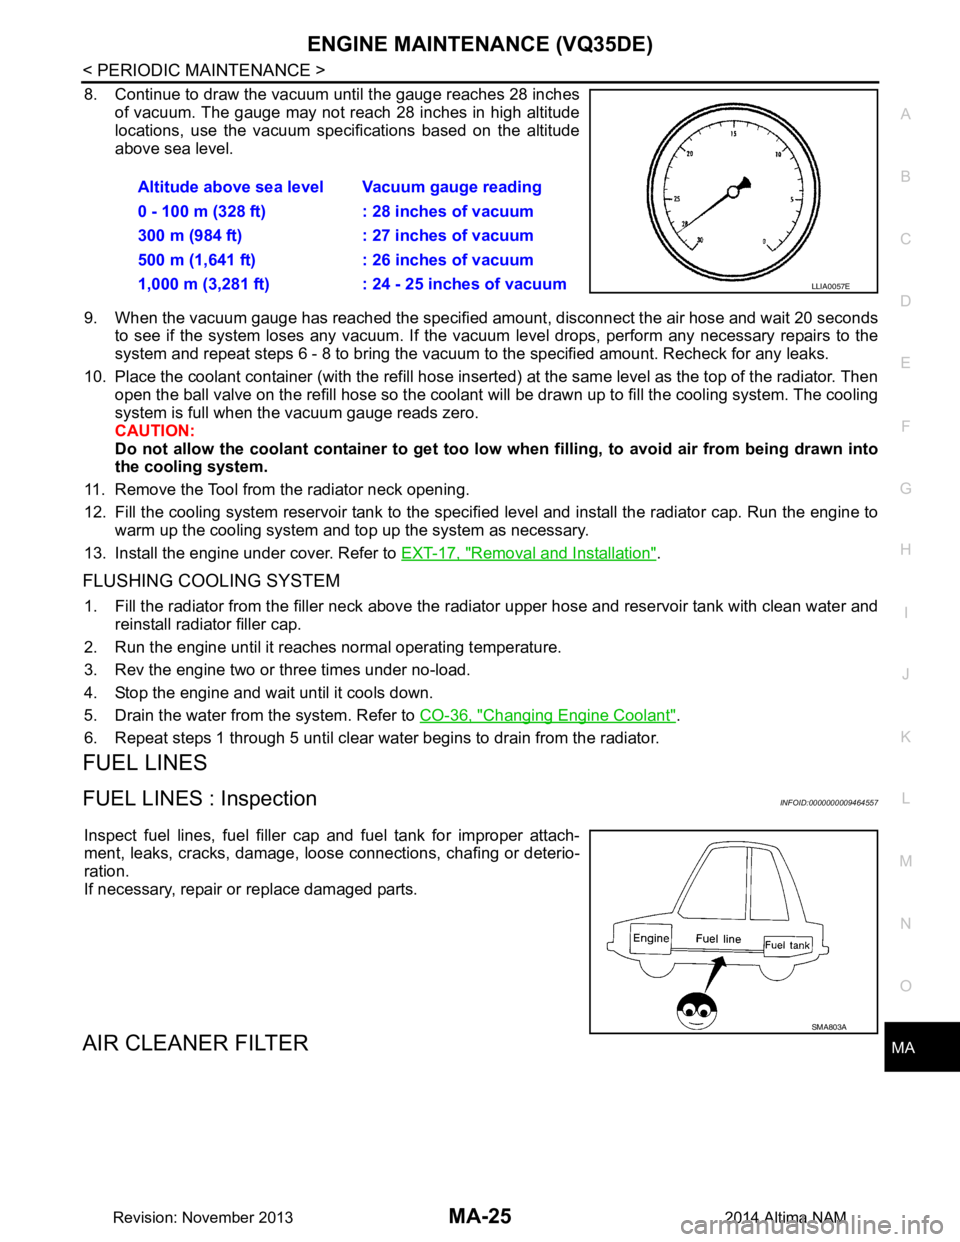
8. Continue to draw the vacuum until the gauge reaches 28 inches
of vacuum. The gauge may not reach 28 inches in high altitude
locations, use the vacuum specifications based on the altitude
above sea level.
9. When the vacuum gauge has reached the specified amount, disconnect the air hose and wait 20 seconds
to see if the system loses any vacuum. If the vacuum level drops, perform any necessary repairs to the
system and repeat steps 6 - 8 to br ing the vacuum to the specified amount. Recheck for any leaks.
10. Place the coolant container (with the refill hose inserted) at the same level as the top of the radiator. Then
open the ball valve on the refill hose so the coolant will be drawn up to fill the cooling system. The cooling
system is full when the vacuum gauge reads zero.
CAUTION:
Do not allow the coolant container to get too low when filling, to avoid air from being drawn into
the cooling system.
11. Remove the Tool from the radiator neck opening.
12. Fill the cooling system reservoir tank to the specif ied level and install the radiator cap. Run the engine to
warm up the cooling system and top up the system as necessary.
13. Install the engine under cover. Refer to EXT-17, "Removal and Installation"
.
FLUSHING COOLING SYSTEM
1. Fill the radiator from the filler neck above the r adiator upper hose and reservoir tank with clean water and
reinstall radiator filler cap.
2. Run the engine until it reaches normal operating temperature.
3. Rev the engine two or three times under no-load.
4. Stop the engine and wait until it cools down.
5. Drain the water from the system. Refer to CO-36, "Changing Engine Coolant"
.
6. Repeat steps 1 through 5 until clear water begins to drain from the radiator.
FUEL LINES
FUEL LINES : InspectionINFOID:0000000009464557
Inspect fuel lines, fuel filler cap and fuel tank for improper attach-
ment, leaks, cracks, damage, loos e connections, chafing or deterio-
ration.
If necessary, repair or replace damaged parts.
AIR CLEANER FILTER
Altitude above sea level Vacuum gauge reading
0 - 100 m (328 ft) : 28 inches of vacuum
300 m (984 ft) : 27 inches of vacuum
500 m (1,641 ft) : 26 inches of vacuum
1,000 m (3,281 ft) : 24 - 25 inches of vacuum
LLIA0057E
SMA803A
Revision: November 20132014 Altima NAM