2014 NISSAN TEANA wheel
[x] Cancel search: wheelPage 2476 of 4801
FAX-24
< UNIT DISASSEMBLY AND ASSEMBLY >
FRONT DRIVE SHAFT
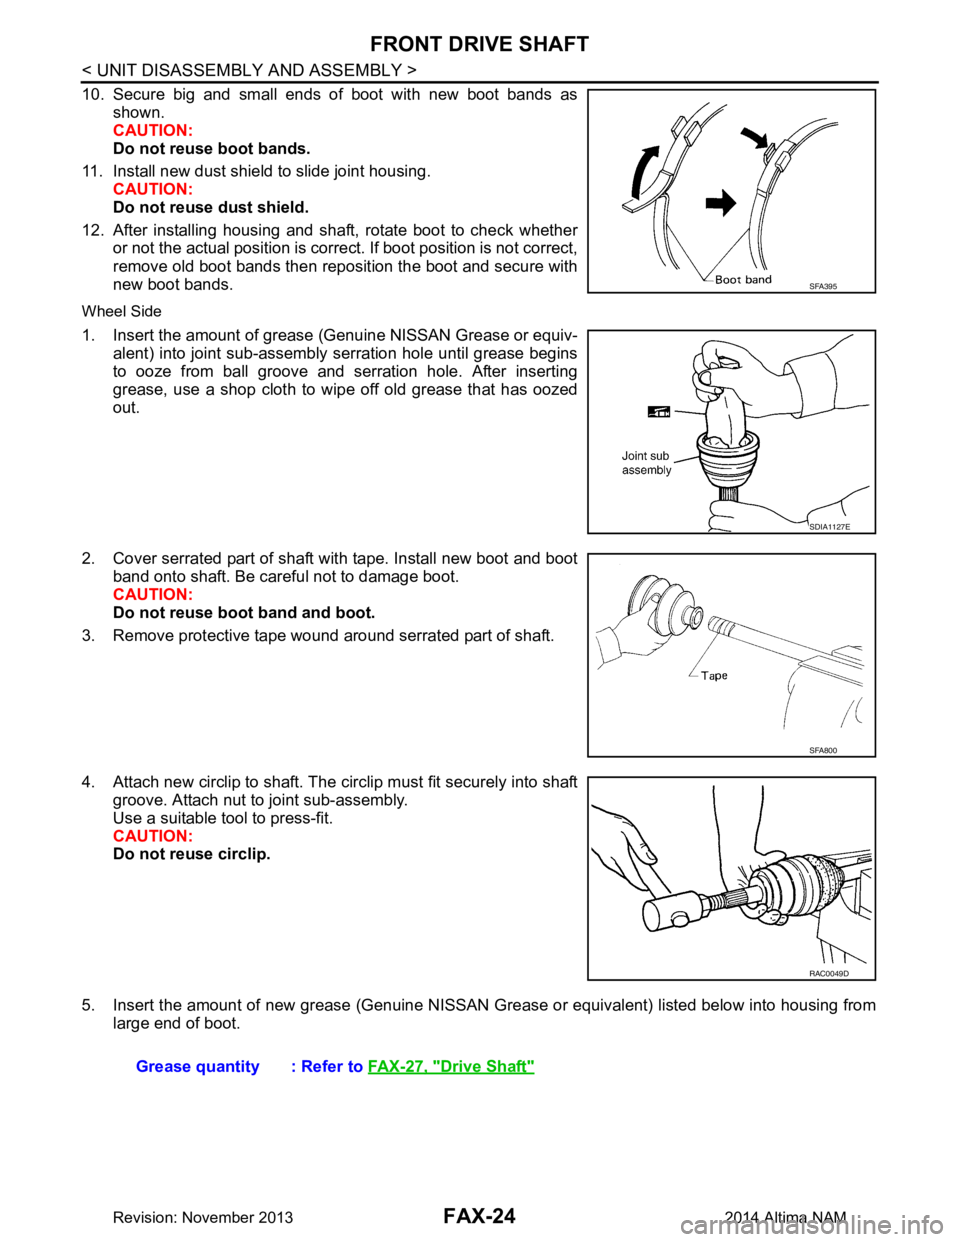
10. Secure big and small ends of boot with new boot bands asshown.
CAUTION:
Do not reuse boot bands.
11. Install new dust shield to slide joint housing. CAUTION:
Do not reuse dust shield.
12. After installing housing and shaft, rotate boot to check whether or not the actual position is corre ct. If boot position is not correct,
remove old boot bands then reposition the boot and secure with
new boot bands.
Wheel Side
1. Insert the amount of grease (Genuine NISSAN Grease or equiv-
alent) into joint sub-assembly serration hole until grease begins
to ooze from ball groove and serration hole. After inserting
grease, use a shop cloth to wipe off old grease that has oozed
out.
2. Cover serrated part of shaft with tape. Install new boot and boot band onto shaft. Be careful not to damage boot.
CAUTION:
Do not reuse boot band and boot.
3. Remove protective tape wound around serrated part of shaft.
4. Attach new circlip to shaft. The circlip must fit securely into shaft groove. Attach nut to joint sub-assembly.
Use a suitable tool to press-fit.
CAUTION:
Do not reuse circlip.
5. Insert the amount of new grease (Genuine NISSAN Grease or equivalent) listed below into housing from
large end of boot.
SFA395
SDIA1127E
SFA800
RAC0049D
Grease quantity : Refer to FAX-27, "Drive Shaft"
Revision: November 20132014 Altima NAM
Page 2479 of 4801
SERVICE DATA AND SPECIFICATIONS (SDS)FAX-27
< SERVICE DATA AND SPECIFICATIONS (SDS)
CEF
G H
I
J
K L
M A
B
FA X
N
O P
SERVICE DATA AND SPECIFICATIONS (SDS)
SERVICE DATA AND SPECIFICATIONS (SDS)
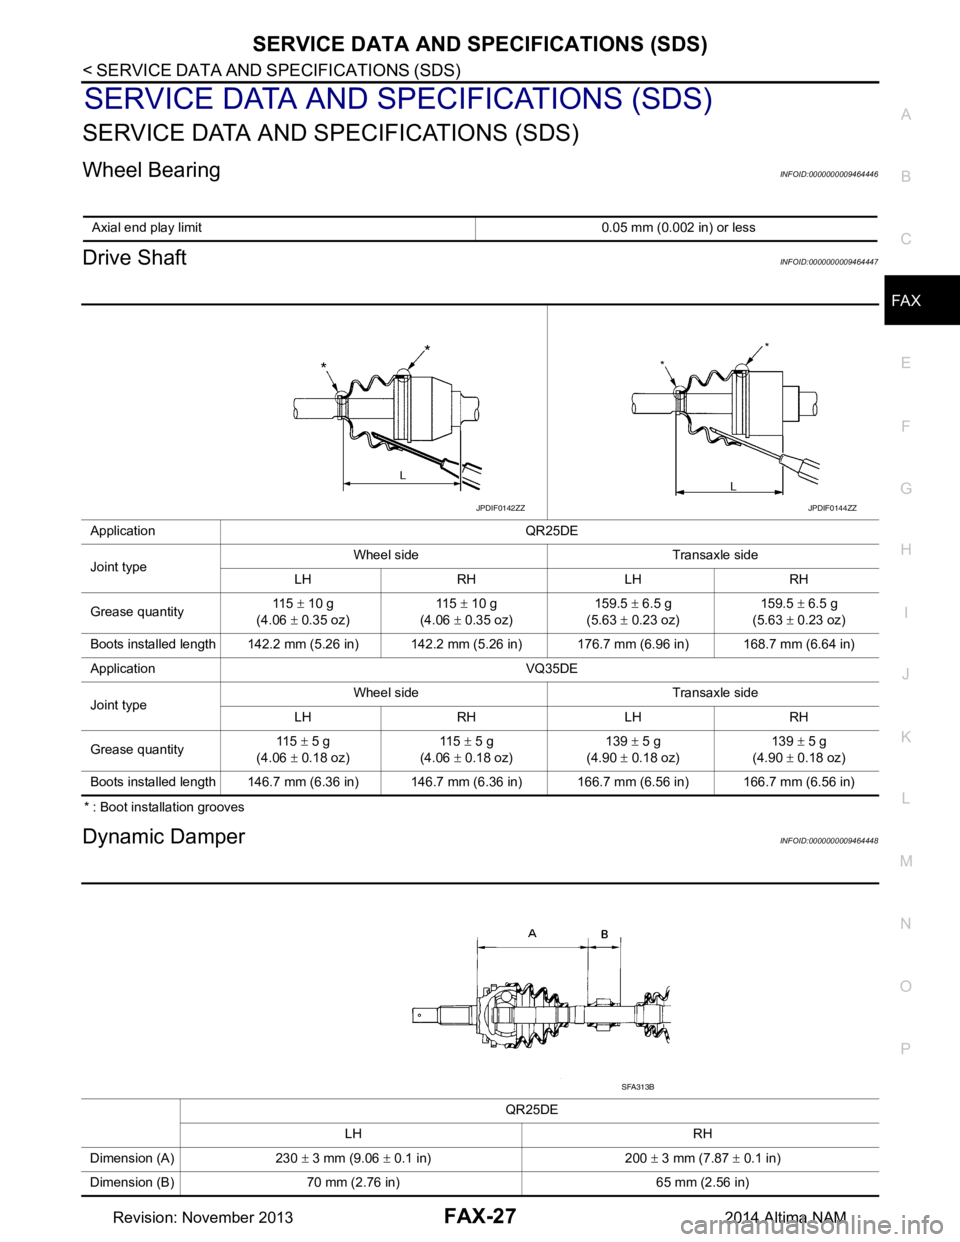
Wheel BearingINFOID:0000000009464446
Drive ShaftINFOID:0000000009464447
* : Boot installation grooves
Dynamic DamperINFOID:0000000009464448
Axial end play limit 0.05 mm (0.002 in) or less
Application QR25DE
Joint type Wheel side Transaxle side
LH RH LH RH
Grease quantity 11 5
± 10 g
(4.06 ± 0.35 oz) 11 5
± 10 g
(4.06 ± 0.35 oz) 159.5
± 6.5 g
(5.63 ± 0.23 oz) 159.5
± 6.5 g
(5.63 ± 0.23 oz)
Boots installed length 142.2 mm (5.26 in) 142.2 mm (5.26 in) 176.7 mm (6.96 in) 168.7 mm (6.64 in)
Application VQ35DE
Joint type Wheel side Transaxle side
LH RH LH RH
Grease quantity 115
± 5 g
(4.06 ± 0.18 oz) 11 5
± 5 g
(4.06 ± 0.18 oz) 139
± 5 g
(4.90 ± 0.18 oz) 139
± 5 g
(4.90 ± 0.18 oz)
Boots installed length 146.7 mm (6.36 in) 146.7 mm (6.36 in) 166.7 mm (6.56 in) 166.7 mm (6.56 in)
JPDIF0142ZZJPDIF0144ZZ
QR25DE
LH RH
Dimension (A) 230 ± 3 mm (9.06 ± 0.1 in) 200 ± 3 mm (7.87 ± 0.1 in)
Dimension (B) 70 mm (2.76 in) 65 mm (2.56 in)
SFA313B
Revision: November 20132014 Altima NAM
Page 2492 of 4801
FL-12
< REMOVAL AND INSTALLATION >
FUEL TANK
8. Remove rear wheel and tire using power tool. Refer to WT-55, "Adjustment".
9. Remove rear brake pads. Refer to BR-38, "BRAKE PAD : Removal and Installation"
.
10. Remove rear torque members and rear disc brake rotor.
11. Disconnect rear parking brake shoe, and remove rear cables from toggle lever. Refer to PB-9, "Removal
and Installation".
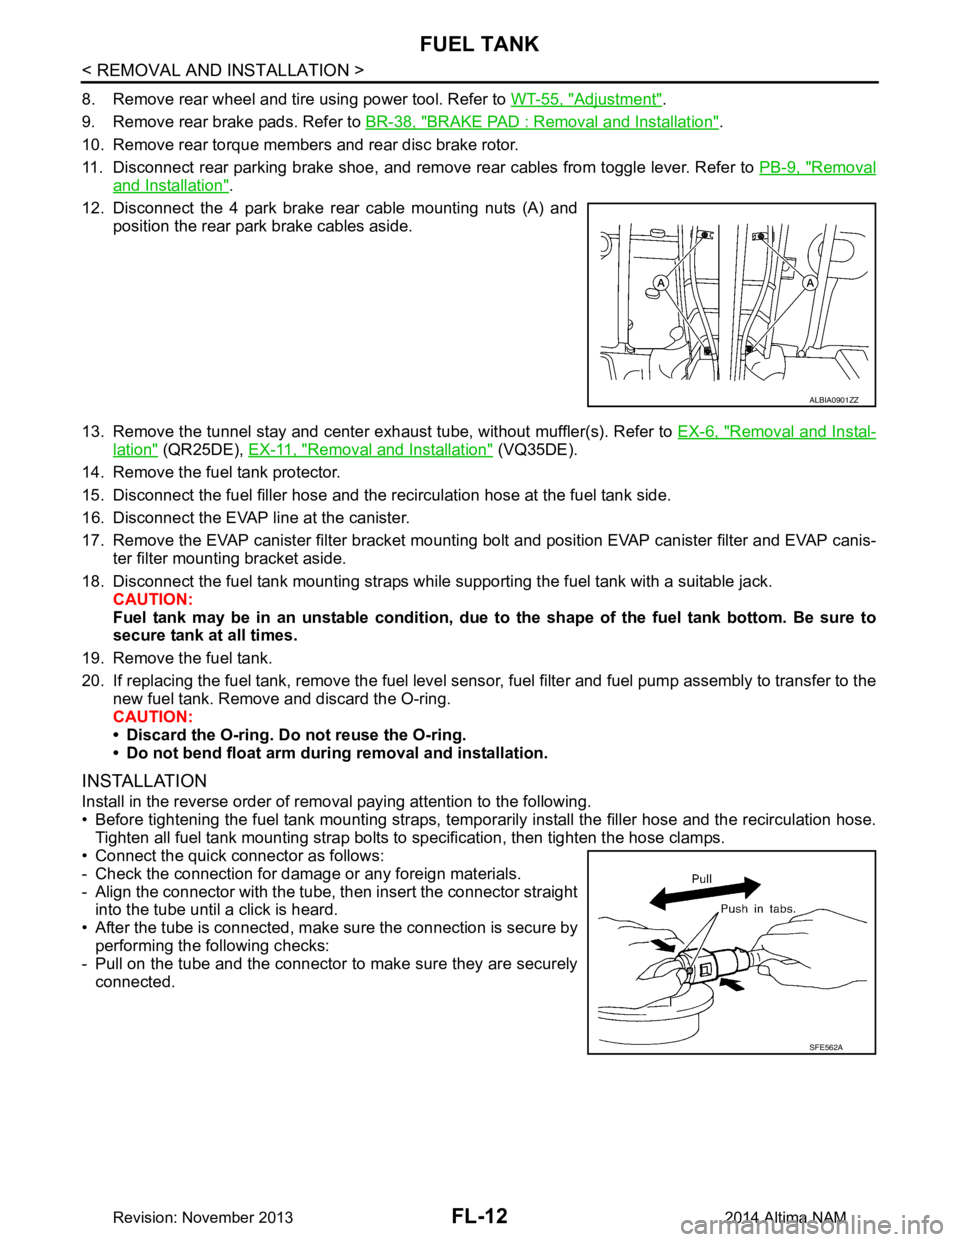
12. Disconnect the 4 park brake rear cable mounting nuts (A) and position the rear park brake cables aside.
13. Remove the tunnel stay and center exhaust tube, without muffler(s). Refer to EX-6, "Removal and Instal-
lation" (QR25DE), EX-11, "Removal and Installation" (VQ35DE).
14. Remove the fuel tank protector.
15. Disconnect the fuel filler hose and the recirculation hose at the fuel tank side.
16. Disconnect the EVAP line at the canister.
17. Remove the EVAP canister filter bracket mounti ng bolt and position EVAP canister filter and EVAP canis-
ter filter mounting bracket aside.
18. Disconnect the fuel tank mounting straps while supporting the fuel tank with a suitable jack. CAUTION:
Fuel tank may be in an unstable condition, due to the shape of the fuel tank bottom. Be sure to
secure tank at all times.
19. Remove the fuel tank.
20. If replacing the fuel tank, remove the fuel level sens or, fuel filter and fuel pump assembly to transfer to the
new fuel tank. Remove and discard the O-ring.
CAUTION:
• Discard the O-ring. Do not reuse the O-ring.
• Do not bend float arm during removal and installation.
INSTALLATION
Install in the reverse order of removal paying attention to the following.
• Before tightening the fuel tank mounting straps, tempor arily install the filler hose and the recirculation hose.
Tighten all fuel tank mounting strap bolts to specification, then tighten the hose clamps.
• Connect the quick connector as follows:
- Check the connection for damage or any foreign materials.
- Align the connector with the tube, then insert the connector straight into the tube until a click is heard.
• After the tube is connected, make sure the connection is secure by performing the following checks:
- Pull on the tube and the connector to make sure they are securely
connected.
ALBIA0901ZZ
SFE562A
Revision: November 20132014 Altima NAM
Page 2502 of 4801
FSU-1
SUSPENSION
C
D
F
G H
I
J
K L
M
SECTION FSU
A
B
FSU
N
O PCONTENTS
FRONT SUSPENSION
PRECAUTION ................ ...............................2
PRECAUTIONS .............................................. .....2
Precaution for Supplemental Restraint System
(SRS) "AIR BAG" and "SEAT BELT PRE-TEN-
SIONER" ............................................................. ......
2
General Precautions .................................................2
Precaution for Procedure without Cowl Top Cover ......2
Precautions for Suspension ......................................2
PREPARATION ............................................4
PREPARATION .............................................. .....4
Special Service Tool ........................................... ......4
Commercial Service Tool ..........................................5
SYMPTOM DIAGNOSIS ...............................6
NOISE, VIBRATION AND HARSHNESS
(NVH) TROUBLESHOOTING ........................ .....
6
NVH Troubleshooting Chart ................................ ......6
PERIODIC MAINTENANCE ..........................7
FRONT SUSPENSION ASSEMBLY .............. .....7
Inspection and Adjustment .................................. ......7
REMOVAL AND INSTALLATION ................9
FRONT COIL SPRING AND STRUT ............. .....9
Exploded View .................................................... ......9
Removal and Installation ...........................................9
Disposal .............................................................. ....10
TRANSVERSE LINK .........................................11
Exploded View ..................................................... ....11
Removal and Installation .........................................11
FRONT STABILIZER ........................................14
Exploded View .........................................................14
Removal and Installation .........................................14
STEERING KNUCKLE ......................................17
Exploded View .........................................................17
Removal and Installation .........................................17
UNIT REMOVAL AND INSTALLATION ......19
FRONT SUSPENSION ASSEMBLY .................19
Exploded View ..................................................... ....19
Removal and Installation .........................................20
UNIT DISASSEMBLY AND ASSEMBLY ....22
FRONT COIL SPRING AND STRUT ................22
Disassembly and Assembly ................................. ....22
SERVICE DATA AND SPECIFICATIONS
(SDS) ............... .............................................
25
SERVICE DATA AND SPECIFICATIONS
(SDS) .................................................................
25
Wheel Alignment (Unladen*1) ............................. ....25
Ball Joint ..................................................................26
Wheelarch Height (Unladen*1) ................................26
Revision: November 20132014 Altima NAM
Page 2503 of 4801
FSU-2
< PRECAUTION >
PRECAUTIONS
PRECAUTION
PRECAUTIONS
Precaution for Supplemental Restraint System (SRS) "AIR BAG" and "SEAT BELT
PRE-TENSIONER"
INFOID:0000000009951705
The Supplemental Restraint System such as “A IR BAG” and “SEAT BELT PRE-TENSIONER”, used along
with a front seat belt, helps to reduce the risk or severi ty of injury to the driver and front passenger for certain
types of collision. Information necessary to service the system safely is included in the SR and SB section of
this Service Manual.
WARNING:
• To avoid rendering the SRS inopera tive, which could increase the risk of personal injury or death in
the event of a collision which would result in air bag inflation, all maintenance must be performed by
an authorized NISS AN/INFINITI dealer.
• Improper maintenance, including in correct removal and installation of the SRS, can lead to personal
injury caused by unintent ional activation of the system. For re moval of Spiral Cable and Air Bag
Module, see the SR section.
• Do not use electrical test equipmen t on any circuit related to the SRS unless instructed to in this
Service Manual. SRS wiring harn esses can be identified by yellow and/or orange harnesses or har-
ness connectors.
PRECAUTIONS WHEN USING POWER TOOLS (AIR OR ELECTRIC) AND HAMMERS
WARNING:
• When working near the Airbag Diagnosis Sensor Unit or other Airbag System sensors with the Igni-
tion ON or engine running, DO NOT use air or electri c power tools or strike near the sensor(s) with a
hammer. Heavy vibration could activate the sensor( s) and deploy the air bag(s), possibly causing
serious injury.
• When using air or electric power tools or hammers , always switch the Ignition OFF, disconnect the
battery and wait at least three minutes before performing any service.
General PrecautionsINFOID:0000000009460620
• When installing rubber bushings, the final tightening mu st be carried out under unladen conditions with tires
on ground. Oil might shorten the life of rubber bushings. Be sure to wipe off any spilled oil.
- Unladen conditions mean that fuel, engine coolant and lubricant are full. Spare tire, jack, hand tools and mats are in designated positions.
• After servicing suspension parts, be sure to check wheel alignment.
• Self-lock nuts are not reusable. Always use new ones when installing. Since new self-lock nuts are pre-oiled,
tighten as they are.
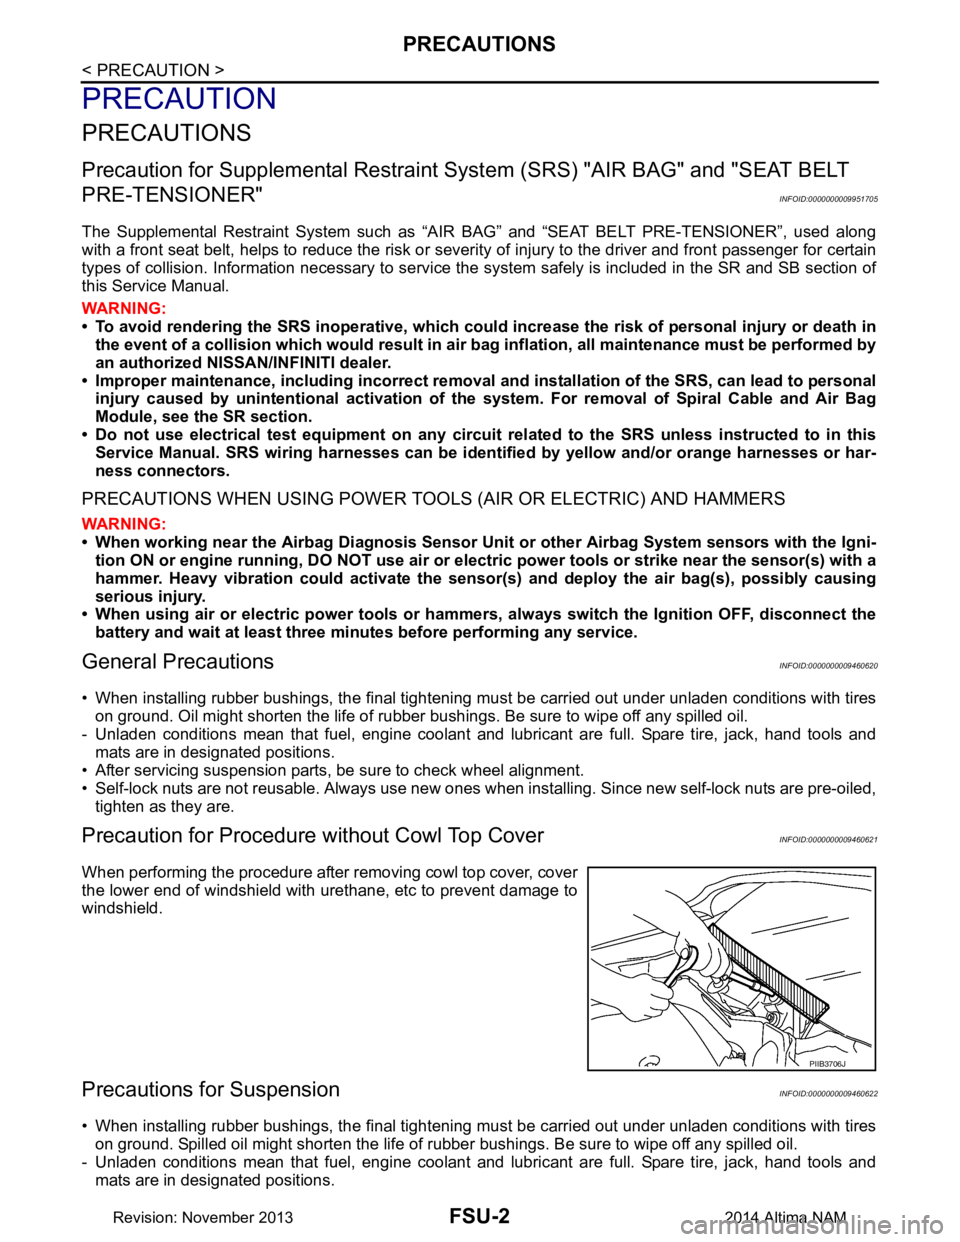
Precaution for Procedure without Cowl Top CoverINFOID:0000000009460621
When performing the procedure after removing cowl top cover, cover
the lower end of windshield with urethane, etc to prevent damage to
windshield.
Precautions for SuspensionINFOID:0000000009460622
• When installing rubber bushings, the final tightening mu st be carried out under unladen conditions with tires
on ground. Spilled oil might shorten the life of rubber bushings. Be sure to wipe off any spilled oil.
- Unladen conditions mean that fuel, engine coolant and lubricant are full. Spare tire, jack, hand tools and mats are in designated positions.
PIIB3706J
Revision: November 20132014 Altima NAM
Page 2504 of 4801
PRECAUTIONSFSU-3
< PRECAUTION >
C
D
F
G H
I
J
K L
M A
B
FSU
N
O P
• After servicing suspension parts, be sure to check wheel alignment.
• Self-lock nuts are not reusable. Always use new ones when installing. Since new self-lock nuts are pre-oiled, tighten as they are.
Revision: November 20132014 Altima NAM
Page 2505 of 4801
FSU-4
< PREPARATION >
PREPARATION
PREPARATION
PREPARATION
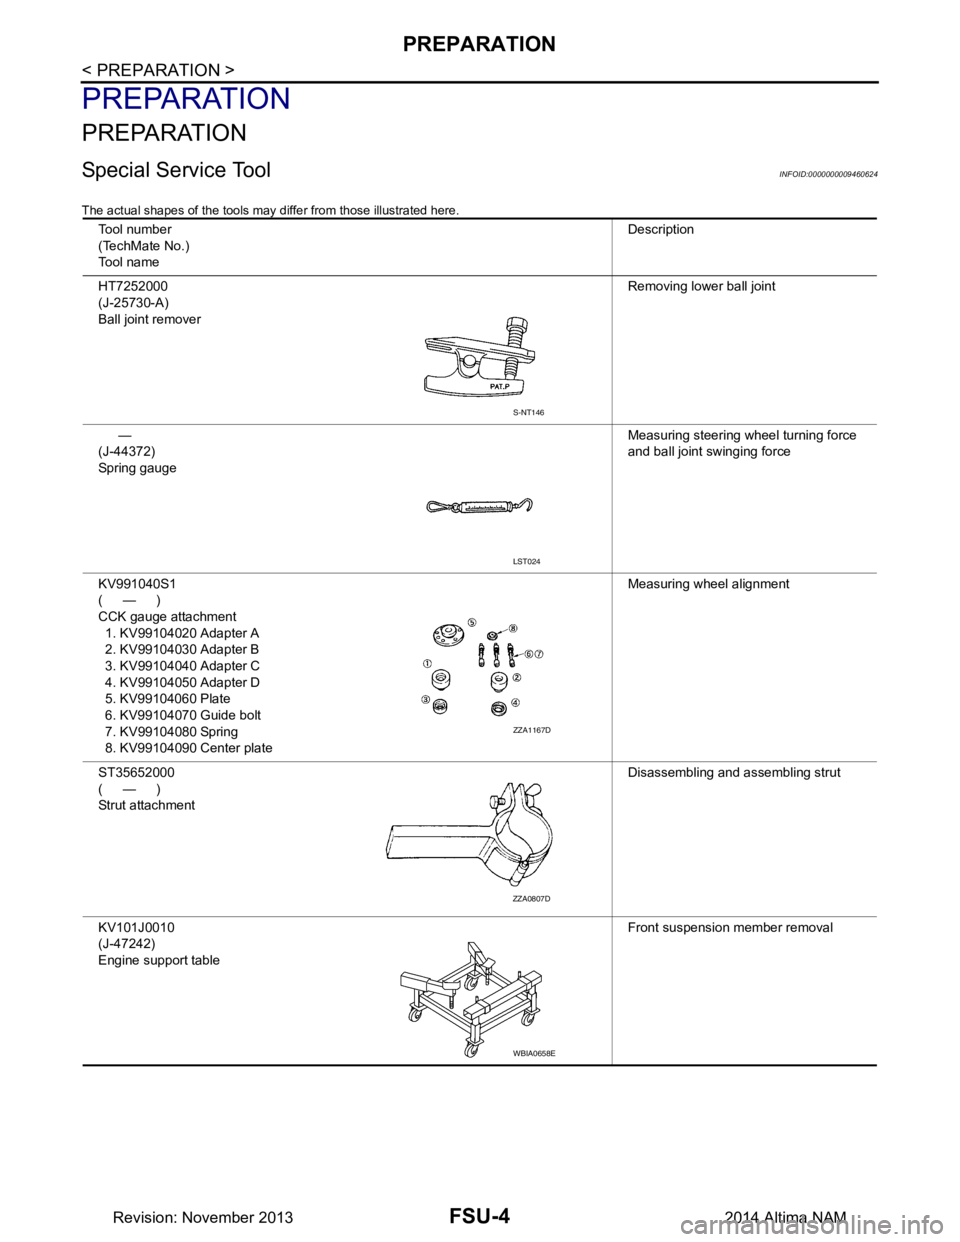
Special Service ToolINFOID:0000000009460624
The actual shapes of the tools may differ from those illustrated here.
Tool number
(TechMate No.)
Tool name Description
HT7252000
(J-25730-A)
Ball joint remover Removing lower ball joint
—
(J-44372)
Spring gauge Measuring steering wheel turning force
and ball joint swinging force
KV991040S1
(—)
CCK gauge attachment 1. KV99104020 Adapter A
2. KV99104030 Adapter B
3. KV99104040 Adapter C
4. KV99104050 Adapter D
5. KV99104060 Plate
6. KV99104070 Guide bolt
7. KV99104080 Spring
8. KV99104090 Center plate Measuring wheel alignment
ST35652000
(—)
Strut attachment Disassembling and assembling strut
KV101J0010
(J-47242)
Engine support table Front suspension member removal
S-NT146
LST024
ZZA1167D
ZZA0807D
WBIA0658E
Revision: November 20132014 Altima NAM
Page 2506 of 4801
PREPARATIONFSU-5
< PREPARATION >
C
D
F
G H
I
J
K L
M A
B
FSU
N
O P
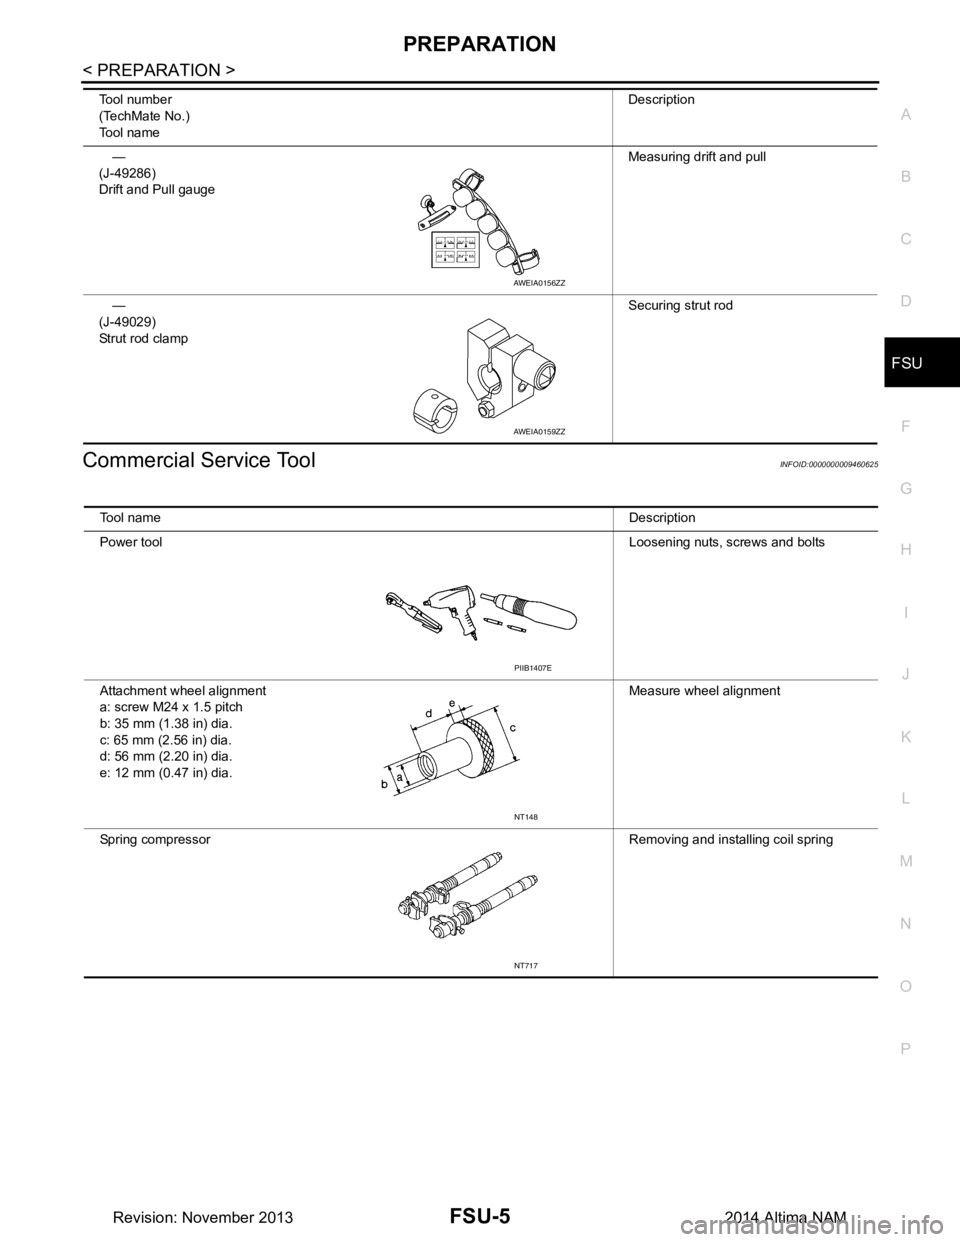
Commercial Service ToolINFOID:0000000009460625
—
(J-49286)
Drift and Pull gauge Measuring drift and pull
—
(J-49029)
Strut rod clamp Securing strut rod
Tool number
(TechMate No.)
Tool name Description
AWEIA0156ZZ
AWEIA0159ZZ
Tool name
Description
Power tool Loosening nuts, screws and bolts
Attachment wheel alignment
a: screw M24 x 1.5 pitch
b: 35 mm (1.38 in) dia.
c: 65 mm (2.56 in) dia.
d: 56 mm (2.20 in) dia.
e: 12 mm (0.47 in) dia. Measure wheel alignment
Spring compressor Removing and installing coil spring
PIIB1407E
NT148
NT717
Revision: November 20132014 Altima NAM