2014 NISSAN TEANA battery
[x] Cancel search: batteryPage 3686 of 4801
POWER SUPPLY AND GROUND CIRCUITRF-21
< DTC/CIRCUIT DIAGNOSIS >
C
D E
F
G H
I
J
L
M A
B
RF
N
O P
DTC/CIRCUIT DIAGNOSIS
POWER SUPPLY AND GROUND CIRCUIT
BCM
BCM : Diagnosis ProcedureINFOID:0000000009941205
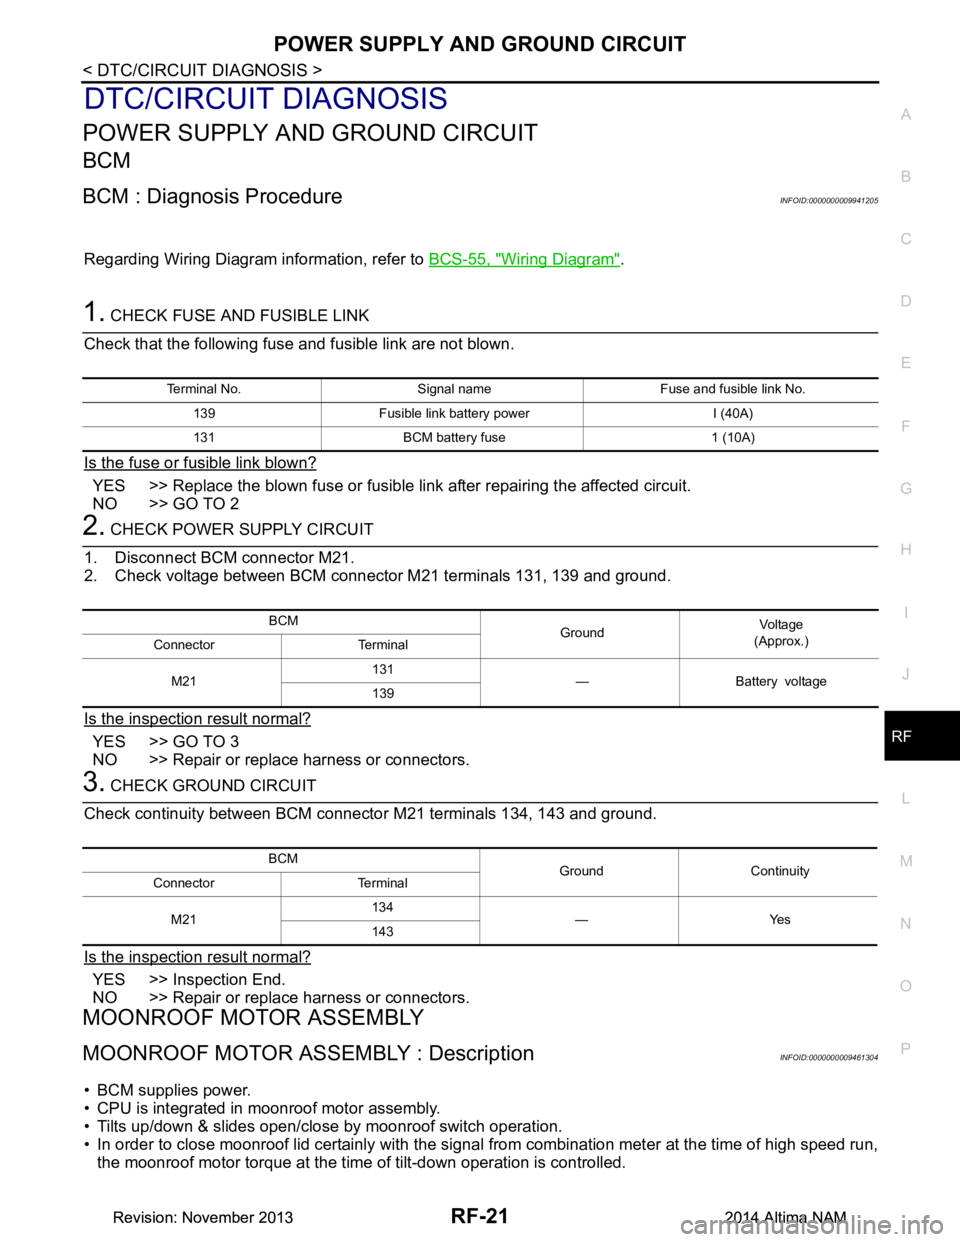
Regarding Wiring Diagram information, refer to BCS-55, "Wiring Diagram".
1. CHECK FUSE AND FUSIBLE LINK
Check that the following fuse and fusible link are not blown.
Is the fuse or fusible link blown?
YES >> Replace the blown fuse or fusible link after repairing the affected circuit.
NO >> GO TO 2
2. CHECK POWER SUPPLY CIRCUIT
1. Disconnect BCM connector M21.
2. Check voltage between BCM connector M21 terminals 131, 139 and ground.
Is the inspection result normal?
YES >> GO TO 3
NO >> Repair or replace harness or connectors.
3. CHECK GROUND CIRCUIT
Check continuity between BCM connector M21 terminals 134, 143 and ground.
Is the inspection result normal?
YES >> Inspection End.
NO >> Repair or replace harness or connectors.
MOONROOF MOTOR ASSEMBLY
MOONROOF MOTOR ASSEMBLY : DescriptionINFOID:0000000009461304
• BCM supplies power.
• CPU is integrated in moonroof motor assembly.
• Tilts up/down & slides open/close by moonroof switch operation.
• In order to close moonroof lid certainly with the signal from combination meter at the time of high speed run,
the moonroof motor torque at the time of tilt-down operation is controlled.
Terminal No. Signal name Fuse and fusible link No.
139 Fusible link battery power I (40A)
131 BCM battery fuse 1 (10A)
BCM GroundVo l ta g e
(Approx.)
Connector Terminal
M21 131
—Batteryvoltage
139
BCM Ground Continuity
Connector Terminal
M21 134
—Yes
143
Revision: November 20132014 Altima NAMRevision: November 20132014 Altima NAM
Page 3687 of 4801
RF-22
< DTC/CIRCUIT DIAGNOSIS >
POWER SUPPLY AND GROUND CIRCUIT
MOONROOF MOTOR ASSEMBLY : Component Function Check
INFOID:0000000009461305
1. CHECK MOONROOF MOTOR FUNCTION
Do tilt up/down & slide open/close functi ons operate normally with moonroof switch?
Is the inspection result normal?
YES >> Moonroof motor assembly is OK.
NO >> Refer to RF-22, "MOONROOF MOTOR ASSEMBLY : Diagnosis Procedure"
.
MOONROOF MOTOR ASSEMB LY : Diagnosis ProcedureINFOID:0000000009461306
Regarding Wiring Diagram information, refer to RF-12, "Wiring Diagram".
MOONROOF MOTOR ASSEMBLY
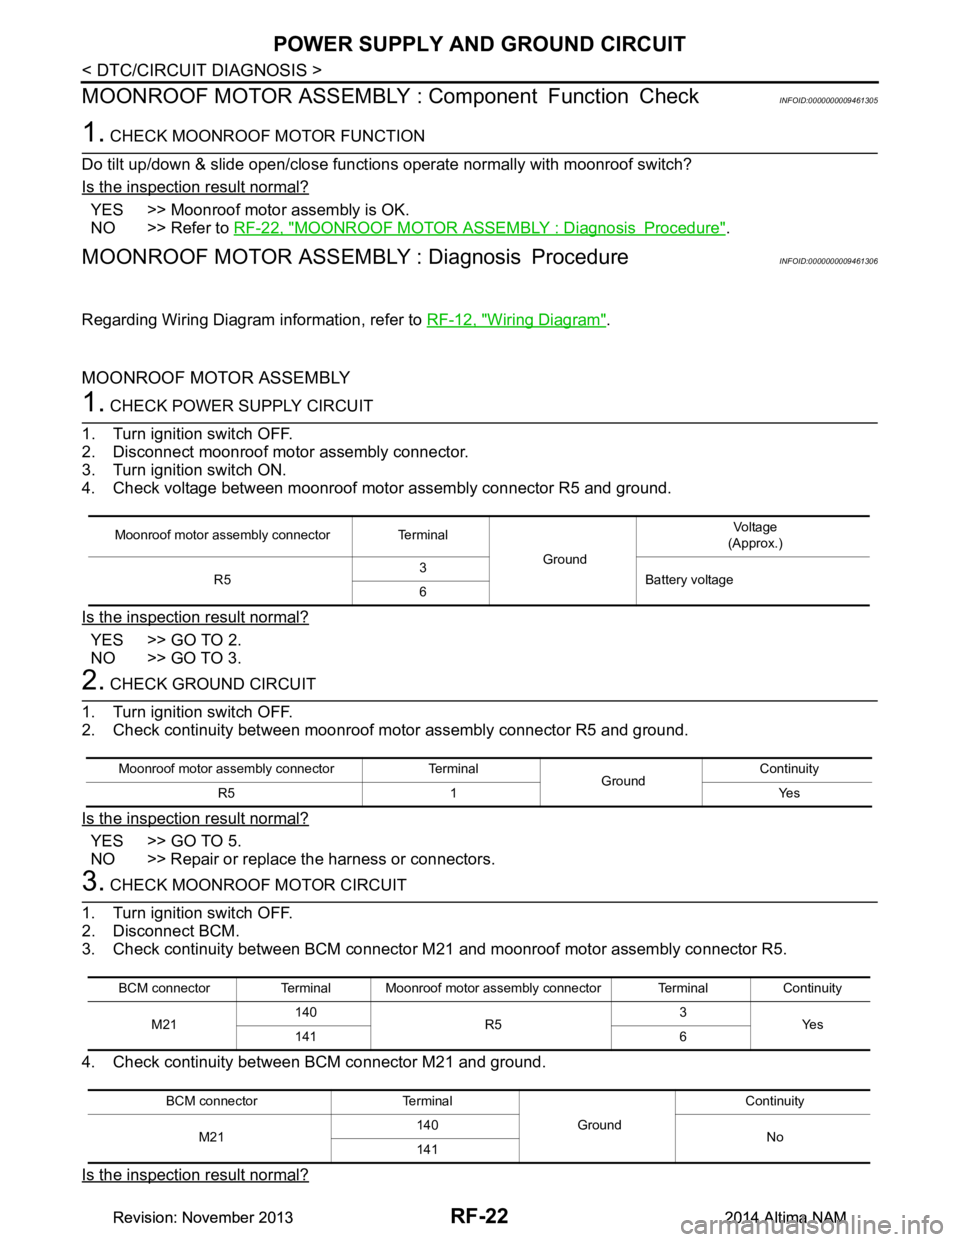
1. CHECK POWER SUPPLY CIRCUIT
1. Turn ignition switch OFF.
2. Disconnect moonroof motor assembly connector.
3. Turn ignition switch ON.
4. Check voltage between moonroof motor assembly connector R5 and ground.
Is the inspection result normal?
YES >> GO TO 2.
NO >> GO TO 3.
2. CHECK GROUND CIRCUIT
1. Turn ignition switch OFF.
2. Check continuity between moonroof motor assembly connector R5 and ground.
Is the inspection result normal?
YES >> GO TO 5.
NO >> Repair or replace the harness or connectors.
3. CHECK MOONROOF MOTOR CIRCUIT
1. Turn ignition switch OFF.
2. Disconnect BCM.
3. Check continuity between BCM connector M 21 and moonroof motor assembly connector R5.
4. Check continuity between BCM connector M21 and ground.
Is the inspection result normal?
Moonroof motor assembly connector Terminal Ground Vol tag e
(Approx.)
R5 3
Battery voltage
6
Moonroof motor assembly connector Terminal GroundContinuity
R5 1 Yes
BCM connector Terminal Moonroof motor assembly connector Terminal Continuity
M21 140
R5 3
Ye s
141 6
BCM connector Terminal GroundContinuity
M21 140
No
141
Revision: November 20132014 Altima NAMRevision: November 20132014 Altima NAM
Page 3688 of 4801
POWER SUPPLY AND GROUND CIRCUITRF-23
< DTC/CIRCUIT DIAGNOSIS >
C
D E
F
G H
I
J
L
M A
B
RF
N
O P
YES >> GO TO 4.
NO >> Repair or replace the harness or connectors.
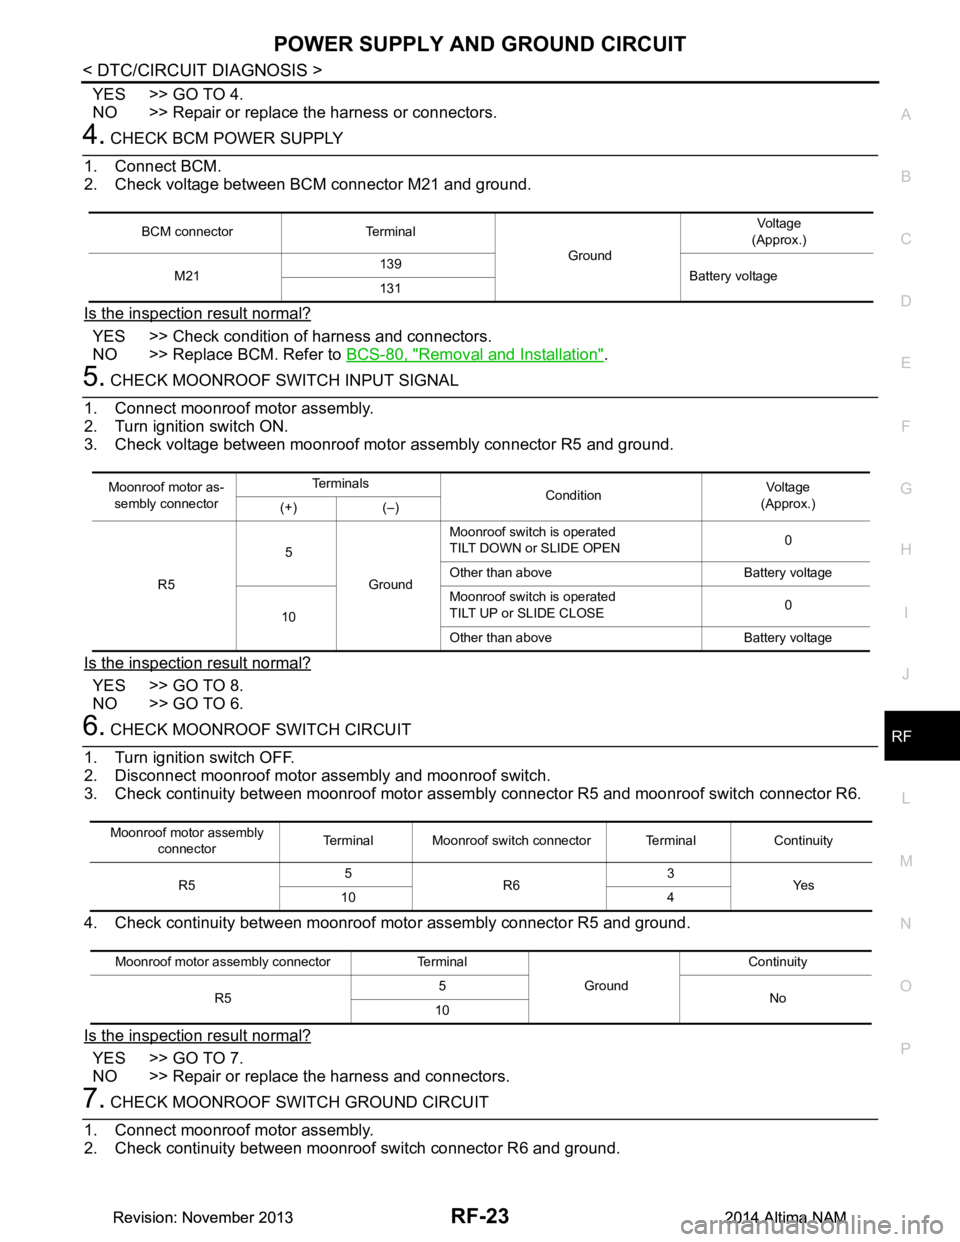
4. CHECK BCM POWER SUPPLY
1. Connect BCM.
2. Check voltage between BCM connector M21 and ground.
Is the inspection result normal?
YES >> Check condition of harness and connectors.
NO >> Replace BCM. Refer to BCS-80, "Removal and Installation"
.
5. CHECK MOONROOF SWITCH INPUT SIGNAL
1. Connect moonroof motor assembly.
2. Turn ignition switch ON.
3. Check voltage between moonroof motor assembly connector R5 and ground.
Is the inspection result normal?
YES >> GO TO 8.
NO >> GO TO 6.
6. CHECK MOONROOF SWITCH CIRCUIT
1. Turn ignition switch OFF.
2. Disconnect moonroof motor assembly and moonroof switch.
3. Check continuity between moonroof motor assemb ly connector R5 and moonroof switch connector R6.
4. Check continuity between moonroof mo tor assembly connector R5 and ground.
Is the inspection result normal?
YES >> GO TO 7.
NO >> Repair or replace the harness and connectors.
7. CHECK MOONROOF SWITCH GROUND CIRCUIT
1. Connect moonroof motor assembly.
2. Check continuity between moonroof switch connector R6 and ground.
BCM connector Terminal
GroundVo l ta g e
(Approx.)
M21 139
Battery voltage
131
Moonroof motor as-
sembly connector Te r m i n a l s
ConditionVo l ta g e
(Approx.)
(+) (–)
R5 5
GroundMoonroof switch is operated
TILT DOWN or SLIDE OPEN 0
Other than above Battery voltage
10 Moonroof switch is operated
TILT UP or SLIDE CLOSE 0
Other than above Battery voltage
Moonroof moto r assembly
connector Terminal Moonroof switch connector Terminal Continuity
R5 5
R6 3
Ye s
10 4
Moonroof motor assembly connector Terminal GroundContinuity
R5 5
No
10
Revision: November 20132014 Altima NAMRevision: November 20132014 Altima NAM
Page 3691 of 4801

RF-26
< DTC/CIRCUIT DIAGNOSIS >
MOONROOF SWITCH
MOONROOF SWITCH
DescriptionINFOID:0000000009461309
Transmits switch operation signal to moonroof motor assembly.
Diagnosis ProcedureINFOID:0000000009461310
Regarding Wiring Diagram information, refer to RF-12, "Wiring Diagram".
1.CHECK MOONROOF SWITCH INPUT SIGNAL
1. Turn ignition switch ON.
2. Check voltage between moonroof motor assembly harness connector R5 and ground.
Is the inspection result normal?
YES >> Inspection End.
NO >> GO TO 2.
2.CHECK MOONROOF SWITCH CIRCUIT
1. Turn ignition switch OFF.
2. Disconnect moonroof motor assembly connector and moonroof switch connector.
3. Check continuity between moonroof motor assemb ly harness connector R5 and moonroof switch harness
connector R6.
4. Check continuity between moonroof moto r assembly harness connector R5 and ground.
Is the inspection result normal?
YES >> GO TO 3.
NO >> Repair or replace the harness or connectors.
3.CHECK MOONROOF SWITCH GROUND CIRCUIT
Check continuity between moonroof switch harness connector R6 and ground.
(+)
(–) Condition Voltag e
(Approx.)
Moonroof motor assembly
Connector Terminals
R5 5
GroundMoonroof switch is operated
TILT DOWN or SLIDE
OPEN 0
Other than above Battery voltage
10 Moonroof switch is operated
TILT UP or SLIDE CLOSE 0
Other than above Battery voltage
Moonroof motor assembly Moonroof switch Continuity
Connector Terminal Connector Terminal
R5 5
R6 3
Ye s
10 4
Moonroof motor assembly GroundContinuity
Connector Terminal
R5 5
No
10
Revision: November 20132014 Altima NAMRevision: November 20132014 Altima NAM
Page 3712 of 4801
MOONROOF UNIT ASSEMBLYRF-47
< REMOVAL AND INSTALLATION >
C
D E
F
G H
I
J
L
M A
B
RF
N
O P
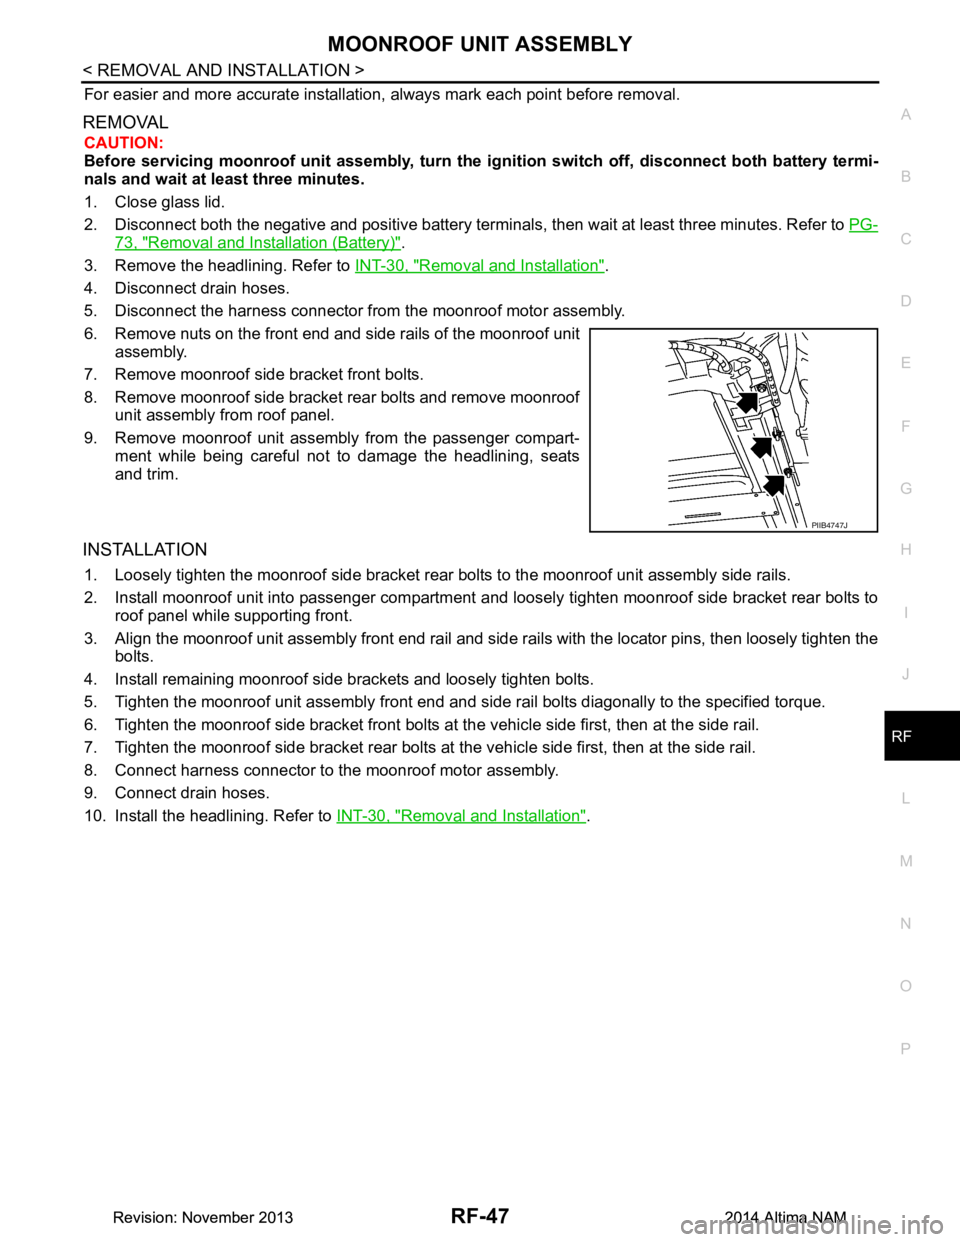
For easier and more accurate installation, always mark each point before removal.
REMOVAL
CAUTION:
Before servicing moonroof unit assembly, turn the ig nition switch off, disconnect both battery termi-
nals and wait at least three minutes.
1. Close glass lid.
2. Disconnect both the negative and positive battery terminal s, then wait at least three minutes. Refer to PG-
73, "Removal and Installation (Battery)".
3. Remove the headlining. Refer to INT-30, "Removal and Installation"
.
4. Disconnect drain hoses.
5. Disconnect the harness connector from the moonroof motor assembly.
6. Remove nuts on the front end and side rails of the moonroof unit assembly.
7. Remove moonroof side bracket front bolts.
8. Remove moonroof side bracket rear bolts and remove moonroof unit assembly from roof panel.
9. Remove moonroof unit assembly from the passenger compart- ment while being careful not to damage the headlining, seats
and trim.
INSTALLATION
1. Loosely tighten the moonroof side bracket rear bolts to the moonroof unit assembly side rails.
2. Install moonroof unit into passenger compartment a nd loosely tighten moonroof side bracket rear bolts to
roof panel while supporting front.
3. Align the moonroof unit assembly front end rail and side rails with the locator pins, then loosely tighten the
bolts.
4. Install remaining moonroof side brackets and loosely tighten bolts.
5. Tighten the moonroof unit assembly front end and si de rail bolts diagonally to the specified torque.
6. Tighten the moonroof side bracket front bolts at the vehicle side first, then at the side rail.
7. Tighten the moonroof side bracket rear bolts at the vehicle side first, then at the side rail.
8. Connect harness connector to the moonroof motor assembly.
9. Connect drain hoses.
10. Install the headlining. Refer to INT-30, "Removal and Installation"
.
PIIB4747J
Revision: November 20132014 Altima NAMRevision: November 20132014 Altima NAM
Page 3719 of 4801

RSU-2
< PRECAUTION >
PRECAUTIONS
PRECAUTION
PRECAUTIONS
Precaution for Supplemental Restraint System (SRS) "AIR BAG" and "SEAT BELT
PRE-TENSIONER"
INFOID:0000000009951707
The Supplemental Restraint System such as “A IR BAG” and “SEAT BELT PRE-TENSIONER”, used along
with a front seat belt, helps to reduce the risk or severi ty of injury to the driver and front passenger for certain
types of collision. Information necessary to service the system safely is included in the SR and SB section of
this Service Manual.
WARNING:
• To avoid rendering the SRS inopera tive, which could increase the risk of personal injury or death in
the event of a collision which would result in air bag inflation, all maintenance must be performed by
an authorized NISS AN/INFINITI dealer.
• Improper maintenance, including in correct removal and installation of the SRS, can lead to personal
injury caused by unintent ional activation of the system. For re moval of Spiral Cable and Air Bag
Module, see the SR section.
• Do not use electrical test equipmen t on any circuit related to the SRS unless instructed to in this
Service Manual. SRS wiring harn esses can be identified by yellow and/or orange harnesses or har-
ness connectors.
PRECAUTIONS WHEN USING POWER TOOLS (AIR OR ELECTRIC) AND HAMMERS
WARNING:
• When working near the Airbag Diagnosis Sensor Unit or other Airbag System sensors with the Igni-
tion ON or engine running, DO NOT use air or electri c power tools or strike near the sensor(s) with a
hammer. Heavy vibration could activate the sensor( s) and deploy the air bag(s), possibly causing
serious injury.
• When using air or electric power tools or hammers , always switch the Ignition OFF, disconnect the
battery and wait at least three minutes before performing any service.
General PrecautionsINFOID:0000000009464451
• When installing rubber bushings, the final tightening mu st be carried out under unladen conditions with tires
on ground. Oil might shorten the life of rubber bushings. Be sure to wipe off any spilled oil.
- Unladen conditions mean that fuel, engine coolant and lubricant are full. Spare tire, jack, hand tools and mats are in designated positions.
• After servicing suspension parts, be sure to check wheel alignment.
• Self-lock nuts are not reusable. Always use new ones when installing. Since new self-lock nuts are pre-oiled,
tighten as they are.
Revision: November 20132014 Altima NAM
Page 3737 of 4801
SB-2
< PRECAUTION >
PRECAUTIONS
PRECAUTION
PRECAUTIONS
Precaution for Supplemental Restraint System (SRS) "AIR BAG" and "SEAT BELT
PRE-TENSIONER"
INFOID:0000000009951757
The Supplemental Restraint System such as “A IR BAG” and “SEAT BELT PRE-TENSIONER”, used along
with a front seat belt, helps to reduce the risk or severi ty of injury to the driver and front passenger for certain
types of collision. Information necessary to service the system safely is included in the SR and SB section of
this Service Manual.
WARNING:
• To avoid rendering the SRS inopera tive, which could increase the risk of personal injury or death in
the event of a collision which would result in air bag inflation, all maintenance must be performed by
an authorized NISS AN/INFINITI dealer.
• Improper maintenance, including in correct removal and installation of the SRS, can lead to personal
injury caused by unintent ional activation of the system. For re moval of Spiral Cable and Air Bag
Module, see the SR section.
• Do not use electrical test equipmen t on any circuit related to the SRS unless instructed to in this
Service Manual. SRS wiring harn esses can be identified by yellow and/or orange harnesses or har-
ness connectors.
PRECAUTIONS WHEN USING POWER TOOLS (AIR OR ELECTRIC) AND HAMMERS
WARNING:
• When working near the Airbag Diagnosis Sensor Unit or other Airbag System sensors with the Igni-
tion ON or engine running, DO NOT use air or electri c power tools or strike near the sensor(s) with a
hammer. Heavy vibration could activate the sensor( s) and deploy the air bag(s), possibly causing
serious injury.
• When using air or electric power tools or hammers , always switch the Ignition OFF, disconnect the
battery and wait at least three minutes before performing any service.
Precaution for Seat Belt ServiceINFOID:0000000009462957
CAUTION:
• Before removing the seat belt pre-tensioner assembl y, turn the ignition switch OFF, disconnect both
battery terminals and wait at least three minutes. For approximately three minutes after the battery
terminals have been removed, it is still possible for the air bag and seat belt pre-tensioner to deploy.
Therefore, do not attempt work on any SRS conn ectors or wires until at least three minutes have
passed.
• After replacing or reinstalling seat belt pre -tensioner assembly or reconnecting seat belt pre-ten-
sioner assembly connector, make sure entire SRS operates properly. Refer to SRC-15, "SRS Opera-
tion Check".
• Do not disassemble buckle or seat belt assembly.
• Replace anchor bolts if th ey are deformed or worn out.
• Do not oil tongue or buckle.
• If any component of seat belt assembly is questionable, do not re pair. Replace the whole seat belt
assembly.
• If webbing is cut, frayed or damaged, replace seat belt assembly.
• When replacing seat belt assembly, use a genuine NISSAN seat belt assembly.
Precaution for WorkINFOID:0000000009462958
• When removing or disassembling each component, be careful not to damage or deform it. If a component may be subject to interference, be sure to protect it with a shop cloth.
• When removing (disengaging) components with a screwdriver or similar tool, be sure to wrap the component with a shop cloth or vinyl tape to protect it.
• Protect the removed parts with a s hop cloth and prevent them from being dropped.
• Replace a deformed or damaged clip.
• If a part is specified as a non-reusable part, always replace it with a new one.
• Be sure to tighten bolts and nuts securely to the specified torque.
• After installation is complete, be sure to check that each part works properly.
Revision: November 20132014 Altima NAM
Page 3743 of 4801
SB-8
< REMOVAL AND INSTALLATION >
FRONT SEAT BELT
REMOVAL AND INSTALLATION
FRONT SEAT BELT
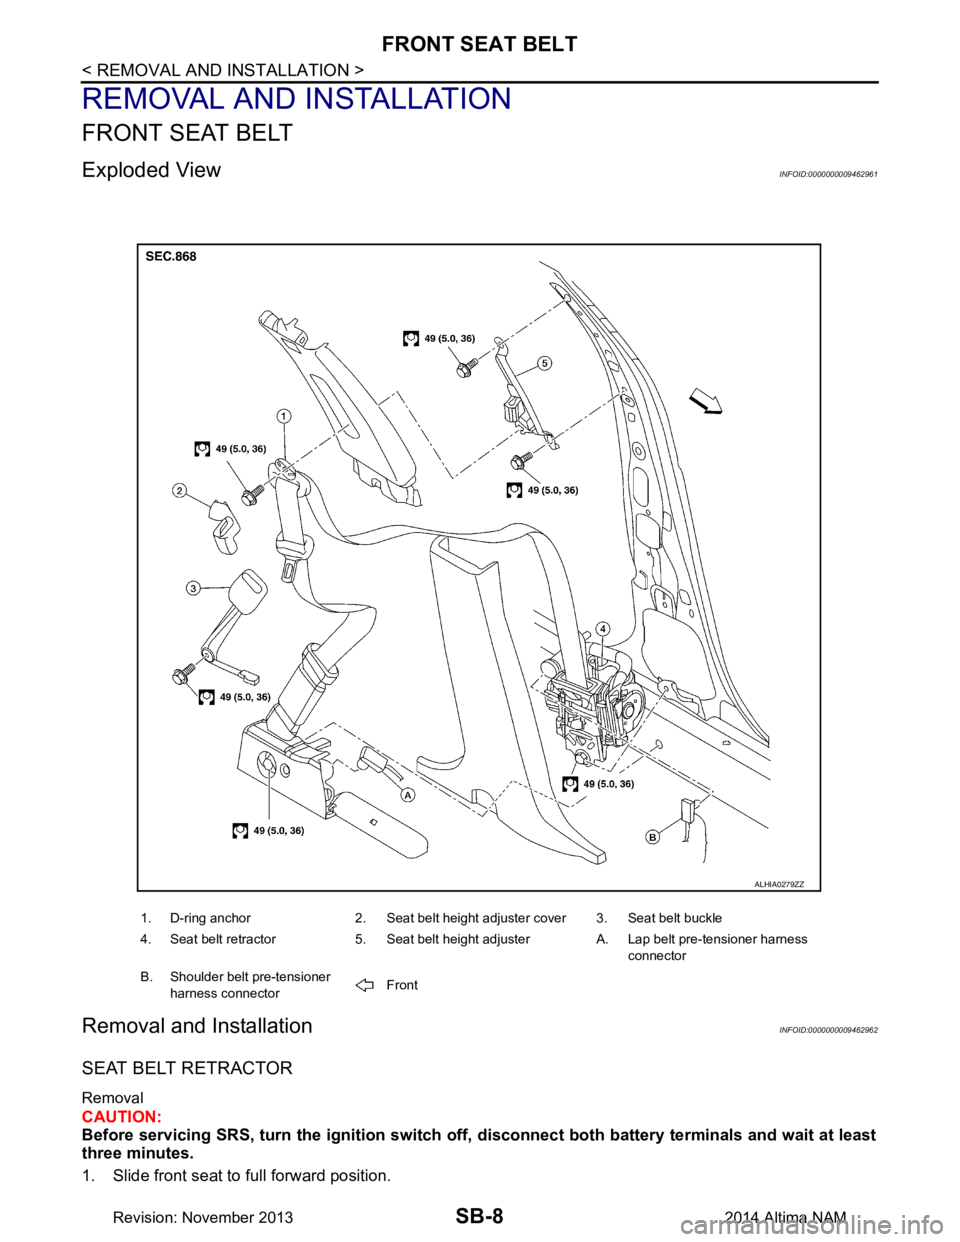
Exploded ViewINFOID:0000000009462961
Removal and InstallationINFOID:0000000009462962
SEAT BELT RETRACTOR
Removal
CAUTION:
Before servicing SRS, turn the igni tion switch off, disconnect both battery terminals and wait at least
three minutes.
1. Slide front seat to full forward position.
1. D-ring anchor 2. Seat belt height adjuster cover 3. Seat belt buckle
4. Seat belt retractor 5. Seat belt height adjuster A. Lap belt pre-tensioner harness connector
B. Shoulder belt pre-tensioner harness connector Front
ALHIA0279ZZ
Revision: November 20132014 Altima NAM