2014 MITSUBISHI OUTLANDER SPORT light
[x] Cancel search: lightPage 83 of 388
Front seats5-4 Seat and seat belts
5
E00401102137
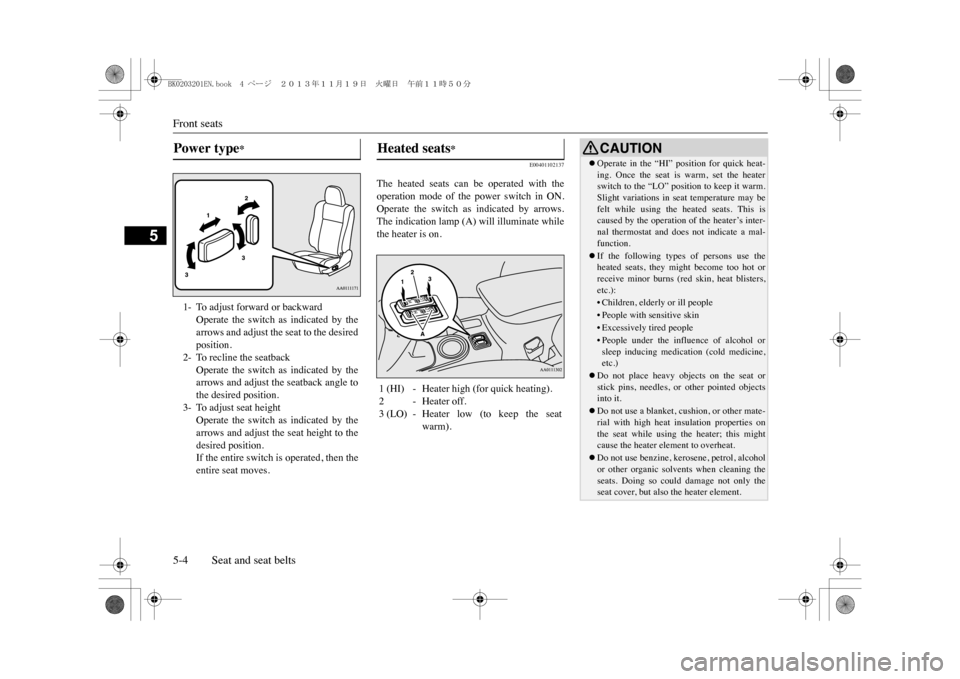
The heated seats can be operated with theoperation mode of the power switch in ON.Operate the switch as indicated by arrows.The indication lamp (A) will illuminate whilethe heater is on.
Power type
*
1- To adjust forward or backward
Operate the switch as indicated by thearrows and adjust the seat to the desiredposition.
2- To recline the seatback
Operate the switch as indicated by thearrows and adjust the seatback angle tothe desired position.
3- To adjust seat height
Operate the switch as indicated by thearrows and adjust the seat height to thedesired position.If the entire switch is operated, then theentire seat moves.
Heated seats
*
1 (HI) - Heater high (for quick heating).2-Heater off.3 (LO) - Heater low (to keep the seat
warm).
CAUTIONzOperate in the “HI” position for quick heat-ing. Once the seat is warm, set the heaterswitch to the “LO” position to keep it warm.Slight variations in seat temperature may befelt while using the heated seats. This iscaused by the operation of the heater’s inter-nal thermostat and doe
s not indicate a mal-
function.zIf the following types of persons use theheated seats, they might become too hot orreceive minor burns (red skin, heat blisters,etc.):•Children, elderly or ill people•People with sensitive skin•Excessively tired people•People under the influence of alcohol orsleep inducing medicat
ion (cold medicine,
etc.)
zDo not place heavy objects on the seat orstick pins, needles, or
other pointed objects
into it.zDo not use a blanket, cushion, or other mate-rial with high heat insulation properties onthe seat while using the heater; this mightcause the heater element to overheat.zDo not use benzine, kerosene, petrol, alcoholor other organic solvents when cleaning theseats. Doing so could damage not only theseat cover, but also the heater element.
BK0203201EN.book 4 ページ 2013年11月19日 火曜日 午前11時50分
Page 89 of 388
Seat belts5-10 Seat and seat belts
5
E00404902543
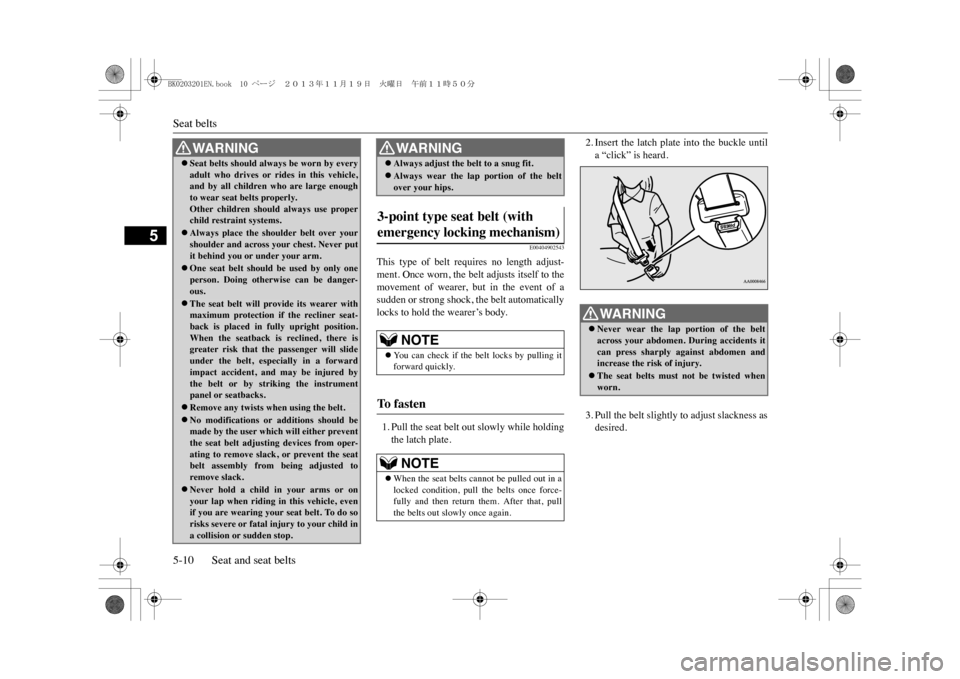
This type of belt requires no length adjust-ment. Once worn, the belt adjusts itself to themovement of wearer, but in the event of asudden or strong shock, the belt automaticallylocks to hold the wearer’s body.1. Pull the seat belt out slowly while holdingthe latch plate.
2. Insert the latch plate into the buckle untila “click” is heard. 3. Pull the belt slightly to adjust slackness asdesired.
WA R N I N GzSeat belts should alw
ays be worn by every
adult who drives or rides in this vehicle,and by all children who are large enoughto wear seat belts properly.Other children should
always use proper
child restraint systems.zAlways place the sh
oulder belt over your
shoulder and across your chest. Never putit behind you or under your arm.zOne seat belt should
be used by only one
person. Doing otherwise can be danger-ous.zThe seat belt will provide its wearer withmaximum protection if the recliner seat-back is placed in fully upright position.When the seatback is reclined, there isgreater risk that the passenger will slideunder the belt, especially in a forwardimpact accident, and may be injured bythe belt or by striking the instrumentpanel or seatbacks.zRemove any twists when using the belt.zNo modifications or
additions should be
made by the user which will either preventthe seat belt adjustin
g devices from oper-
ating to remove slack, or prevent the seatbelt assembly from being adjusted toremove slack.zNever hold a child in your arms or onyour lap when riding in this vehicle, evenif you are wearing your seat belt. To do sorisks severe or fatal injury to your child ina collision or sudden stop.
zAlways adjust the belt to a snug fit.zAlways wear the lap portion of the beltover your hips.
3-point type seat belt (with emergency locking mechanism)
NOTE
zYo u c a n c h e c k i f t h e b e l t l o c k s b y p u l l i n g i tforward quickly.
To f a s t e n
NOTE
zWhen the seat belts cannot be pulled out in alocked condition, pull the belts once force-fully and then return them. After that, pullthe belts out slowly once again.WA R N I N G
WA R N I N GzNever wear the lap portion of the beltacross your abdomen. During accidents itcan press sharply against abdomen andincrease the risk of injury. zThe seat belts must not be twisted whenworn.
BK0203201EN.book 10 ページ 2013年11月19日 火曜日 午前11時50分
Page 92 of 388
Seat belts
Seat and seat belts 5-13
5
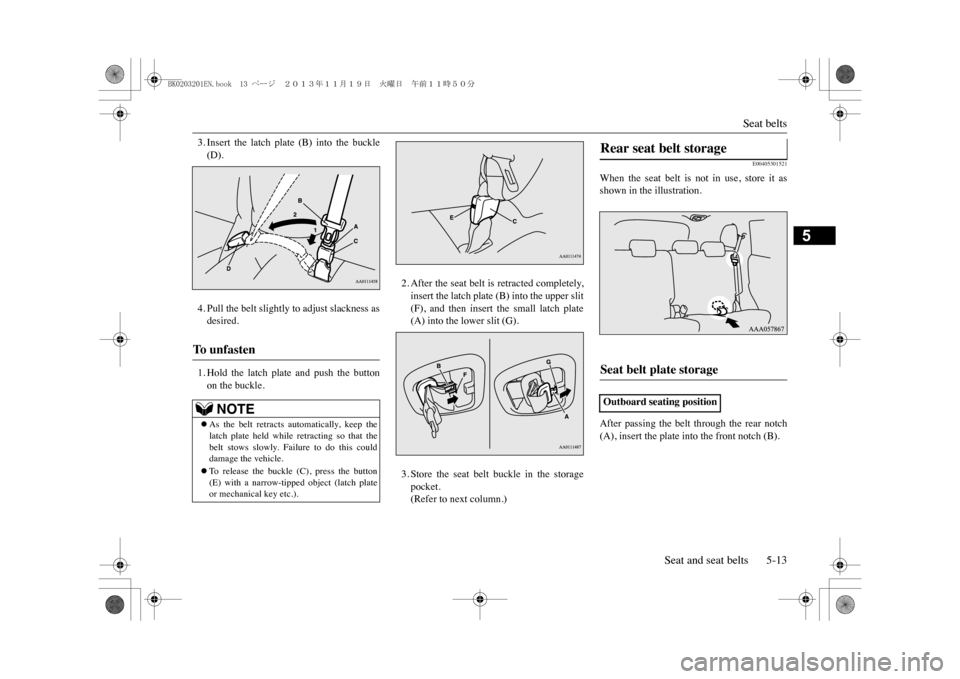
3. Insert the latch plate (B) into the buckle(D).4. Pull the belt slightly to adjust slackness asdesired.1. Hold the latch plate and push the buttonon the buckle.
2. After the seat belt is retracted completely,insert the latch plate (B) into the upper slit(F), and then insert the small latch plate(A) into the lower slit (G).3. Store the seat belt buckle in the storagepocket.(Refer to next column.)
E00405301521
When the seat belt is not in use, store it asshown in the illustration.After passing the belt through the rear notch(A), insert the plate into the front notch (B).
To u n f a s t e n
NOTE
zAs the belt retracts au
tomatically, keep the
latch plate held while retracting so that thebelt stows slowly. Failure to do this coulddamage the vehicle.zTo r e l e a s e t h e b u c k l e ( C ) , p r e s s t h e b u t t o n(E) with a narrow-tipped object (latch plateor mechanical key etc.).
Rear seat belt storage Seat belt plate storage Outboard seating position
BK0203201EN.book 13 ページ 2013年11月19日 火曜日 午前11時50分
Page 101 of 388
Supplemental restrain
t system (SRS)-airbag
5-22 Seat and seat belts
5
E00407302812
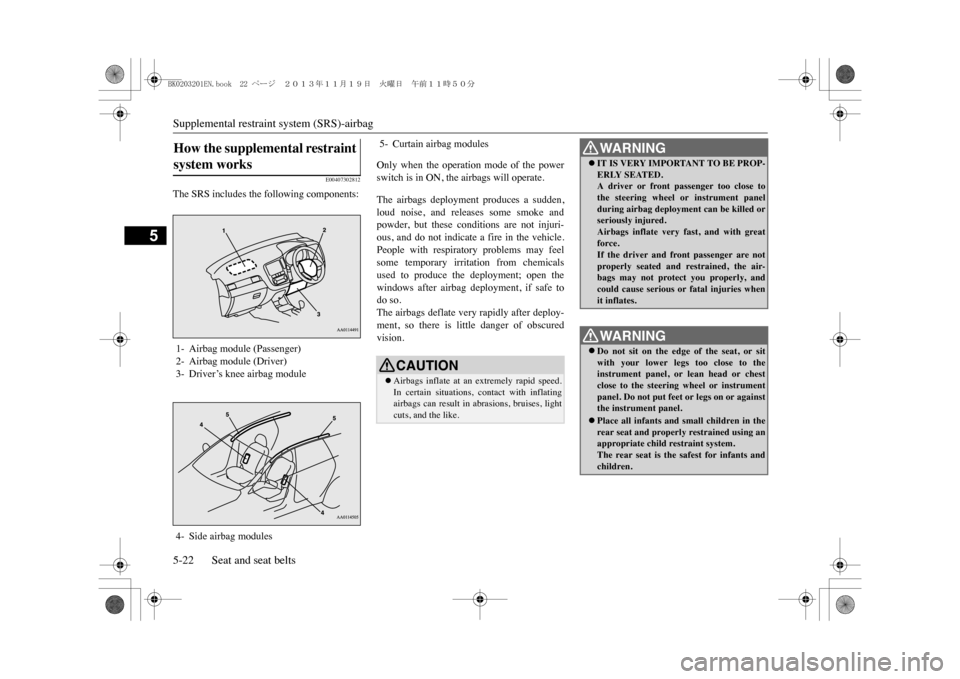
The SRS includes the following components:
Only when the operation mode of the powerswitch is in ON, the airbags will operate.The airbags deployment produces a sudden,loud noise, and releases some smoke andpowder, but these conditions are not injuri-ous, and do not indicate a fire in the vehicle.People with respiratory problems may feelsome temporary irritation from chemicalsused to produce the deployment; open thewindows after airbag deployment, if safe todo so.The airbags deflate very rapidly after deploy-ment, so there is little danger of obscuredvision.
How the supplemental restraint system works 1- Airbag module (Passenger)2- Airbag module (Driver)3- Driver’s knee airbag module4- Side airbag modules
5- Curtain airbag modules
CAUTIONzAirbags inflate at an extremely rapid speed.In certain situations, contact with inflatingairbags can result in abrasions, bruises, lightcuts, and the like.
WA R N I N GzIT IS VERY IMPORTANT TO BE PROP-ERLY SEATED.A driver or front passenger too close tothe steering wheel or instrument panelduring airbag deployment can be killed orseriously injured.Airbags inflate very
fast, and with great
force.If the driver and front passenger are notproperly seated and restrained, the air-bags may not protect you properly, andcould cause serious or fatal injuries whenit inflates.WA R N I N GzDo not sit on the edge
of the seat, or sit
with your lower legs too close to theinstrument panel, or lean head or chestclose to the steering wheel or instrumentpanel. Do not put feet or legs on or againstthe instrument panel.zPlace all infants and small children in therear seat and properly restrained using anappropriate child restraint system.The rear seat is the safest for infants andchildren.
BK0203201EN.book 22 ページ 2013年11月19日 火曜日 午前11時50分
Page 114 of 388
Multi information display
Instruments and controls 6-5
6
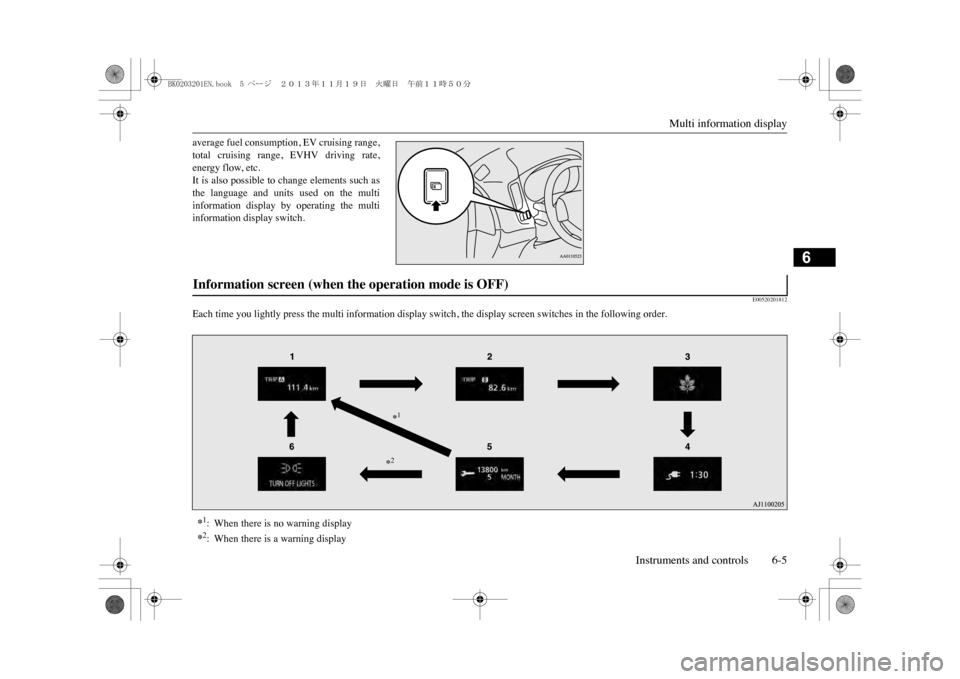
average fuel consumption, EV cruising range,total cruising range,
EVHV driving rate,
energy flow, etc.It is also possible to change elements such asthe language and units used on the multiinformation display by operating the multiinformation display switch.
E00520201812
Each time you lightly press the multi info
rmation display switch, the display screen switches in the following order.
Information screen (when the operation mode is OFF) *1:When there is no warning display*2:When there is a warning display
*1*2
BK0203201EN.book 5 ページ 2013年11月19日 火曜日 午前11時50分
Page 116 of 388
Multi information display
Instruments and controls 6-7
6
E00521101788
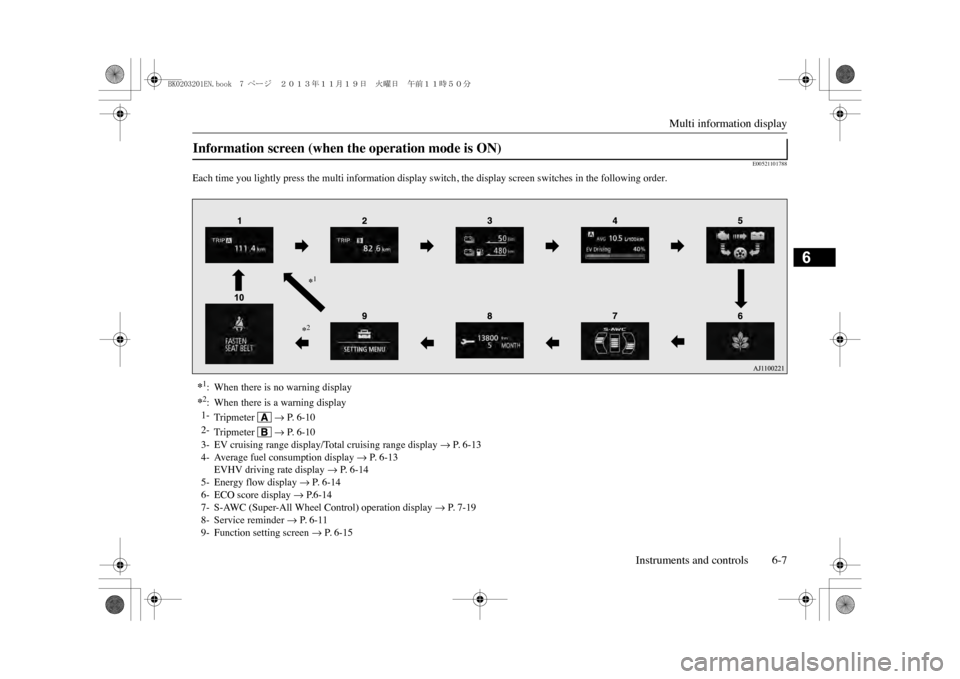
Each time you lightly press the multi info
rmation display switch, the display screen switches in the following order.
Information screen (when the operation mode is ON) *1:When there is no warning display*2:When there is a warning display1-
Tripmeter
m P. 6-10
2-
Tripmeter
m P. 6-10
3- EV cruising range display/Total cruising range display
m P. 6-13
4- Average fuel consumption display
m P. 6-13
EVHV driving rate display
m P. 6-14
5- Energy flow display
m P. 6-14
6- ECO score display
m P.6-14
7- S-AWC (Super-All Wheel Control) operation display
m P. 7-19
8- Service reminder
m P. 6-11
9- Function setting screen
m P. 6-15
*1*2
BK0203201EN.book 7 ページ 2013年11月19日 火曜日 午前11時50分
Page 117 of 388
Multi information display6-8 Instruments and controls
6
E00522001885
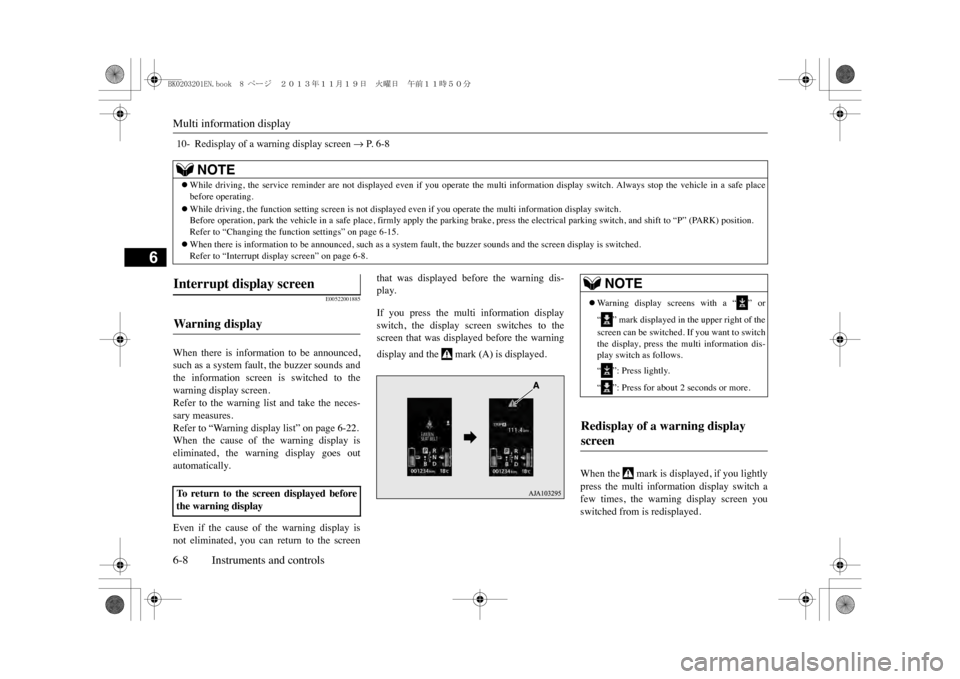
When there is information to be announced,such as a system fault, the buzzer sounds andthe information screen is switched to thewarning display screen.Refer to the warning list and take the neces-sary measures. Refer to “Warning display list” on page 6-22.When the cause of the warning display iseliminated, the warning display goes outautomatically.Even if the cause of the warning display isnot eliminated, you can return to the screen
that was displayed before the warning dis-play.If you press the multi information displayswitch, the display screen switches to thescreen that was displayed before the warningdisplay and the mark (A) is displayed.
When the mark is displayed, if you lightlypress the multi information display switch afew times, the warning display screen youswitched from is redisplayed.
10- Redisplay of a warning display screen
m P. 6-8
NOTE
zWhile driving, the service reminder are not displayed even if you operate the multi in
formation display switch. Always stop the
vehicle in a safe place
before operating.zWhile driving, the function setting screen
is not displayed even if you operate
the multi information display switch.
Before operation, park the vehicle in a sa
fe place, firmly apply the parking brake,
press the electrical
parking switch, and sh
ift to “P” (PARK) position.
Refer to “Changing the functi
on settings” on page 6-15.
zWhen there is information to be announced
, such as a system fault, the buzzer s
ounds and the screen display is switched.
Refer to “Interrupt disp
lay screen” on page 6-8.
Interrupt display screen Warning display To r e t u r n t o t h e s c r e e n d i s p l a y e d b e f o r ethe warning display
NOTE
zWa r n i n g d i s p l a y s c r e e n s w i t h a “ ” o r“” mark displayed in the upper right of thescreen can be switched. If you want to switchthe display, press the multi information dis-play switch as follows.“”: Press lightly.“”: Press for about 2 seconds or more.
Redisplay of a warning display screen
BK0203201EN.book 8 ページ 2013年11月19日 火曜日 午前11時50分
Page 121 of 388
Multi information display6-12 Instruments and controls
6
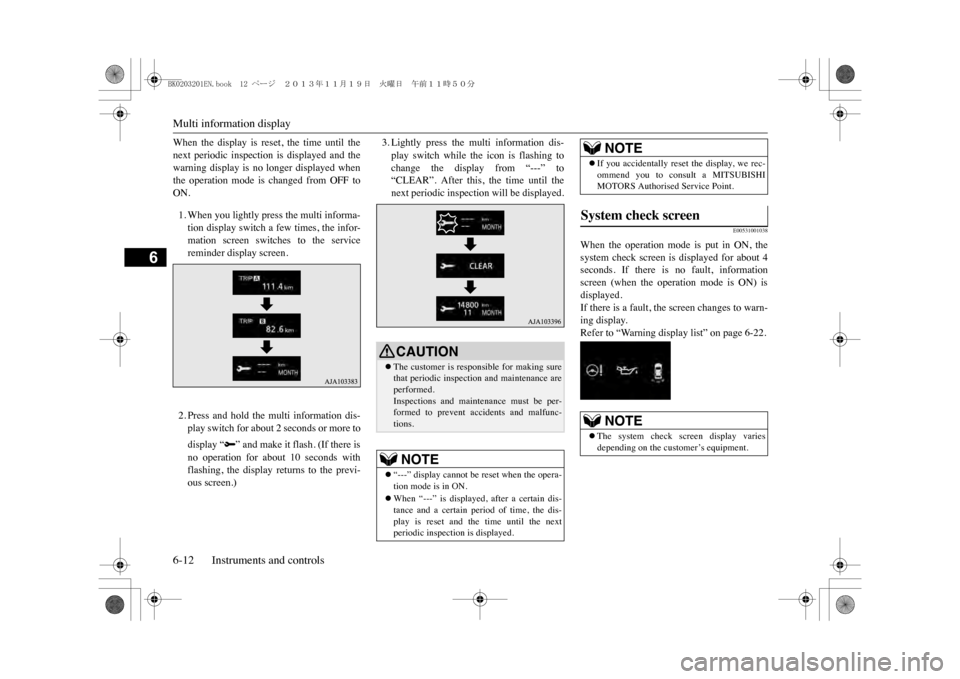
When the display is reset, the time until thenext periodic inspection is displayed and thewarning display is no longer displayed whenthe operation mode is changed from OFF toON.1. When you lightly press the multi informa-tion display switch a few times, the infor-mation screen switches to the servicereminder display screen.2. Press and hold the multi information dis-play switch for about 2 seconds or more todisplay “ ” and make it flash. (If there isno operation for about 10 seconds withflashing, the display returns to the previ-ous screen.)
3. Lightly press the multi information dis-play switch while the icon is flashing tochange the display from “---” to“CLEAR”. After this, the time until thenext periodic inspection will be displayed.
E00531001038
When the operation mode is put in ON, thesystem check screen is displayed for about 4seconds. If there is no fault, informationscreen (when the operation mode is ON) isdisplayed.If there is a fault, the screen changes to warn-ing display.Refer to “Warning display list” on page 6-22.
CAUTIONzThe customer is responsible for making surethat periodic inspection and maintenance areperformed.Inspections and maintenance must be per-formed to prevent accidents and malfunc-tions.NOTE
z“---” display cannot be reset when the opera-tion mode is in ON.zWhen “---” is displayed, after a certain dis-tance and a certain period of time, the dis-play is reset and the time until the nextperiodic inspection is displayed.
zIf you accidentally reset the display, we rec-ommend you to consult a MITSUBISHIMOTORS Authorised Service Point.
System check screen
NOTE
zThe system check screen display variesdepending on the customer’s equipment.NOTE
BK0203201EN.book 12 ページ 2013年11月19日 火曜日 午前11時50分