Page 73 of 244
.
The parking b rake warning light _
(USA)/ . (CON)")
The parking brake warning comes on only af
ter you hav e drive n for longer than 3 seconds
and faster than 5 mph (5 km/h).
The parking b rake warning light _
(USA)/ . (CON) illuminates when the parking
brake is set and you switc h on the ignition .
A WARNING
Always release the parking brake com
pletely. A partially engaged brake will
overheat the rear brakes, reduce the ir ef
fectiveness and cause excess ive wear . This
could lead to brake failure and an accident .
On ly after the vehicle has come to com
plete stop, should you f irm ly set the park
ing brake and move the gearshift lever into
a gear.
Parking
Parking
"' Stop the vehicle using the brake pedal.
"' Set the parking brake firmly.
"' Swi tch off the e ngine .
"' Engage a gear
~ ,&. .
In addition on inclines and grad es
"' Turn the steer ing whee l so that your vehicle
will ro ll against the curb i n case it should
sta rt to move .
A WARNING
This is how yo u can reduce the risk of in
jury when leaving your veh icle.
- Never pa rk the vehicle whe re it can come
in contac t wi th dry grass, spille d fu el or
any othe r flammable materials.
- Never allow a nyone - especially small
children -to remain in the vehicle when
it is locked. Locked doors ma ke it mo re
difficult for rescuers to access the pas
senger compartment in the event of an emergency . Danger to life!
- Never leave c hildren unsupervised in the
vehicle . Children co uld re lease the park-
-
On th e ro ad 71
ing brake or move the gearsh ift leve r out
of gear. The vehicle could start to ro ll
away and cause an acc ident.
- No matter what the season is, the tem
perature in a parked ve hicle can reach
dangerous leve ls.
Starting on hills
App lies to vehicles : wi th hill ho ld assist
Hill ho ld assist makes it eas ier to start on
hill s.
The system is activated when the brake peda l
is depressed
for a few second s.
After releasing the brake ped al, the brake
power is held for a
brief moment t o p reven t
the ve hicle from rolling back when starting . A t
this time, you can easi ly begin to move your
vehicle.
A WARNING
- If you did not begin moving immed iate ly
after releasing the brake pedal, under
certa in circumstances, the vehicle would
begin to roll backwa rd . Dep ress the
brake peda l imm ediate ly o r engage the
hand b rake.
- Should t he eng in e sta ll, dep ress th e
bra ke peda l immediate ly o r engage the
ha nd br ake.
- In o rder to prevent the vehicl e from roll
ing back unintentionally whe n starti ng in
s top-and-go tr affic, keep the br ake ped al
depressed fo r a few seconds be fore driv
in g off .
(D Tips
You can find o ut if yo ur vehicle is equ ipped
wi th "Hi ll hold ass ist" at a n au thori ze d
A udi dealersh ip.
Page 74 of 244

7 2 On the road
Speed warning system
Speed warning system
The speed warning system helps you to keep
your driving speed below a set speed limit.
Fi g. 7 6 D isplay: Speed warning
The speed warning sys tem warns the d river if
he exceeds a prev iously stored maxim um
speed. A warning tone will sou nd as soon as
the vehicle speed exceeds the set speed by
about 3 mph (3 km/h). At the same t ime, a
warn ing symbol appears in the display
¢fig. 76.
The speed warning system has
two warning
th reshold s that function independently of
each other and that have somewhat different
purposes:
Speed warn ing 1 HIil/iS) ( Canada model s)
You can use speed warning 1 to set the maxi
m um speed w hile you are driving. This setting
will remain in effect until you t urn off the igni
tion, assuming that you have not changed or
reset the setting.
The speed warning symbo l
[l;[i] (Canada
models) in the warn ing 1 display appears
when you exceed the maximum speed. It goes
out when the speed falls be low the stored
maximum speed .
The speed warning symbo l w ill also go out if
the speed
exceeds the stored max imum speed
by more than about 25 mph (40 km/h) for at
least 10 seconds. The stored maximum speed
i s deleted.
Sett ing speed warning 1
¢page 72.
Speed warning 2 [Cl!r.t] (Canada models)
Stor ing warning 2 is recommende d if you al
ways
want to be reminded of a ce rtain speed,
for example when you are t rave ling in a co un
try that has a general maxim um speed limit,
or if you do not want to exceed a specified
speed for winter tires.
The speed warn ing 2 symbol,
tt]/[f] (Canada
models) appears in t he display when yo u ex
ceed the stored speed limit. Unlike warning 1,
it will not go o ut until the vehicle speed drops
below the stored speed limit .
Setting speed warn ing 2
¢ page 73.
a) Tips
Even though your vehicle is eq uipped w ith
a speed war ning system, you sho uld still
watc h the speedometer to ma ke s ure yo u
are not driv ing faster than the speed limit.
Speed warning 1: setting a speed limit
Warning threshold 1 is set by the button .
Fig. 77 Section of ins trumen t cl uster: Set/C heck bu t
ton
Storing the maximum speed
" Dr ive at the des ired maximum speed.
" Press the knob but ton¢
fig. 77 until the
sym bo l
i=!:> page 72, fig . 76 appears .
Resetting the maximum speed
" Dr ive the veh icle at a speed of at least
3 mph (5 km/h)
" Press the knob for mo re tha n 2 seconds .
The speed warn ing symbol
[CJ (USA mode ls)/
i•j (Canada models) will appea r briefly in the
display when you release the but ton to
Ill>
Page 75 of 244

indicate that the maximum speed has been
stored successfully. The maximum speed re mains stored until it is changed by pressing
the button again briefly or until it is deleted
by a lengthy push on the button.
Speed warning 2: setting a speed limit
Switches in the wiper arm ore used to operate warning threshold 2.
--------, @
Fig. 78 Controls
To store maximum speed
"'Turn off the ignition.
"'Br iefly press the button in the instrument
cluster
c::> page 72, fig. 77. The odometer
and the digital clock are now illuminated.
"' Press the button for at least 2 seconds. The
currently stored maximum speed appears in
the display
or the crossed out symbol for
warning threshold 2, if no maximum speed
was set previous ly.
"' Press the function selector switch in the
wiper lever @
c::> fig. 78 up or down to
change the set value . Values run up or down
in steps of 6 mph (10 km/h).
To delete maximum speed
"'Turn off the ignition.
"' Briefly press the button in the instrument
cluster
c::> page 72, fig. 77 . The odometer
and the digital clock are now illuminated.
"' Press the button for at least 2 seconds . The
currently stored maximum speed appears in
the display.
"' Press the
l"'R-=E =s =ET =I button in the wiper lever
® c::> fig . 78 until the crossed out speed
warning symbo l for warning threshold 2 ap
pears in the display.
On the road 73
A few seconds after the adjustment is com
pleted, the illumination for the odometer and
the d igital clock will go out.
(D Tips
This warning threshold can also be con
trolled through the trip computer
c::> page 23, Navigating the menu.
Cruise control
Switching the system on
The cruise control system makes it possible to
drive at a constant speed starting at 20 mph (30 km/h).
®-
Fig. 79 Control lever with set button
Fig. 80 D isplay: Se lected speed
"' Pull the lever to position (D c::> fig. 79 to
switch the system on.
"' Drive at the speed you wish to set.
"' Press button @ to set that speed.
T he disp lay
c::> fig. 80 will show the set speed.
The display may vary depending on the type of
display in your vehicle. The indicator light
M;W~1~ (US model) I. (Canadian model) will
also light up in the instrument cluster . .,..
Page 76 of 244

74 On the road
8_ WARNING
-Always pay attention to traffic even when
the cruise control is switched on. You are
always responsible for your speed and
the distance between your vehicle and
other vehicles.
- For safety reasons, the cruise control
should not be used in the city, in stop
and-go traffic, on twisting roads and
when road conditions are poor (such as
ice, fog, gravel, heavy rain and hydro
planing) -risk of accident.
- Turn
off the cruise control temporarily
when entering turn lanes, highway exit
lanes or in construction zones.
- Please note that inadvertently "resting"
your foot on the accelerator pedal causes
the cruise control not to brake. This is
because the cruise control is overridden
by the driver's acceleration.
@ Tips
- Vehicles with manual transmission: You
can attain the set speed only if the cur
rently engaged gear allows it and the en
gine is not stressed. Shifting to a higher
or lower gear promptly will allow the en
gine to run smoothly .
- The cruise control cannot maintain a
constant speed when driving downhill.
The vehicle will accelerate under its own
weight. Downshift to a lower gear or use
the brakes to slow down.
Changing speed
.,. Press lever in the 0 or 0 direction
¢ page 73, fig. 79 to increase or decrease
your speed.
.,. Release the lever to save that speed.
You can also press the accelerator pedal down
to increase your speed, e.g. if you want to
pass someone. The speed you saved earlier
will resume as soon as you release the acceler ator pedal.
If, however, you exceed your saved speed by
S mph (10 km/h) for longer than 5 minutes,
the cruise control will turn
off temporarily.
The symbol will go out but the saved speed
will be retained .
Presetting your speed
You can preset your desired speed while the
vehicle is not moving.
.,. Turn on the ignition.
.,. Pull lever into position@~
page 73,
fig. 79.
.,. Press the lever in the 0 or 0 direction to
increase or decrease your speed.
.,. Release the lever to save that speed .
This function makes it possible, for example,
to save the speed you want before driving on
the highway. Once on the highway, activate
the cruise control by pulling the lever toward
CD-
Switching the system off
Temporary deactivation
.,. Press the brake pedal , or
.,. Keep the clutch pedal pressed down longer,
or
.,. Press the lever into position @ (not clicked
into place)
~ page 73, fig. 79 , or
.,. Drive for longer than S minutes at more
than 5 mph (10 km/h) above the stored
speed.
Switching off completely
.,. Press lever into position @(clicked into
place), or
.,. Switch the ignition
off.
The system retains the saved speed if you de
activate the cruise control temporarily. To re
sume the saved speed, release the brake or
clutch pedal and pull the lever to position
(D .
Switching the ignition off erases the saved
speed.
Page 77 of 244

_& WARNING
You should only return to the saved speed if it is not too fast for the current traffic
conditions - risk of an accident!
Audi magnetic ride
Damping can be adjusted to the driver's pref
erence and it adapts automatically to the cur
rent driving situation.
SPORT •
Fig. 81 Center conso le : Switch for Audi magnetic ride
.,. To turn sport setting on/off, press the
switch
¢fi g. 81 .
Aud i magnetic ride is an electronica lly con
trolled damping system . This chassis system
assists the driver by adapting to the particu lar
situation through imperceptible control proc
esses. The damping provides individual modu
lation of damping forces. For example, with
damping characteristics set to prov ide greater
comfort, damping is set somewhat harder for
a brief period only as required, when rounding
a curve and when brak ing.
Standard setting
Select the standard setting if you prefer a sus
pension setting emphasizing comfort.
Sport setting
Select the sport setting if you prefer a sporty
suspension setting. The LED in the button
II]
comes on to indicate sport setting.
@ Tips
The warning/indicator light Bin the instru
ment cluster comes on in the event of a
malfunction. Drive to the closest author-
On the road 75
ized Audi dealer as soon as possible and
have the malfunction repaired.
Sporty driving
Warming up and cooling down
By carefully warming up and cooling down
you r vehicle, you can help ensure that it is not
overstressed unnecessar ily during sporty driv
ing .
When warm ing up, the vehicle is driven at a
maximum engine speed of 6000 RPM
(Vl0 engine) or 7000 RPM (V8 engine) in or
der to raise the engine oil temperature to a
minimum of 140 °F (60 °C). The tires also on
ly reach their full road holding capability once
they have warmed up.
The cooling fan can cont inue to run in your ve
hicle after the engine is switched off. Howev
er, driving the vehicle to coo l it down is partic
ularly important. During sporty driving, the
engine and brakes, the exhaust system, and
the transmission all become extremely hot.
Before you park the vehicle, you should drive
it for a few m iles/kilometers at light load in
the low rpm range to allow it to cool down.
Driving on a track
Before you take your vehicle out on a track ,
ensure that it is in perfect condition. For ex
amp le, you should check the tire tread and the
brake pads. It is best to increase tire pressure
by about 0.3 bar.
When driving on a track, oil consumption may
be somewhat higher than in "normal" opera
tion
r=> page 178.
You should definitely inspect your vehicle af
ter subject ing it to severe conditions . Are the
brake pads OK? Is there anything unusual
about the tires, including the inner and outer
sidewalls (e.g. tread, blistering)? Are the air
intakes free of leaves and tire dust? Is the oil
level OK? .,,.
Page 78 of 244
76 On the road
Your authorized Audi dealer or qualified work
shop will be happy to undertake an inspection
before and after use on the race track .
_& WARNING
-
Some race tracks (e.g. steeply banked
turns) may affect the response of the ESC.
@ Tips
-Review the track requirements and con
ditions before you start driving.
- When driven on a race track, all vehicle
parts are severely stressed. This can re
su lt in increased wear.
Page 79 of 244

Transmission Manual transmission
Gearshift lever
App lies to vehicles: with manual transmission
The clutch pedal must be depressed all the
way before you can start the engine.
The manual transmission in your Audi is
equipped with an
interlock-feature.
• Depress the clutch pedal all the way.
• Start the engine with the gearshift lever in
Neutral and the clutch pedal depressed.
(D Note
Always depress the clutch pedal fully when
changing gears . Do not hold the vehicle on
a hill with the clutch pedal partially de
pressed. This may cause premature clutch
wear or damage .
@ Tips
-Resting your hand on the gearshift lever
knob while driving will cause premature
wear in the transmission.
- The back-up lights go on when you shift
into Reverse w ith the ignition on.
Gearshift pattern (6-speed manual
transmission)
Applies to vehicles: with 6-speed manual transmission
Fig. 82 Gears hift patte rn: 6 -speed manual tran smis
sion
Drive in 6th gear for optim um fuel economy
when cruising . However, if more acceleration
is required (when passing, for example), shift
down.
Transmission 77
Engaging reverse gear (R)
• Move the shift lever all the way to the left,
press it down , then push it backward.
Especially after driving forward, stop the vehi
cle completely, sh ift into
Neutral and rest the
shift lever br iefly in Neutra l before shift ing in
to
Reverse .
Launch Control Program
Applies to vehicles: with VlO eng ine and manual t ra ns·
miss ion
The Launch Control Program enables maxi
mum acceleration .
Requirement: The engine must be at operat
ing temperature and the steering wheel must
not be turned .
• With the engine running, press the button
[g] one time. The ESC indicator light I in the
Driver Informat ion System display illumi
nates and the message
ESC sport - Warn
ing! Restricted stability
appears.
• Press the clutch and hold it down .
• Engage the first gear.
• Press the accelerator pedal all the way down
until the engine speed remains steady at
6500 RPM.
• Release the clutch carefully¢.&, .
A WARNING
-Always adapt your dr iving to the traffic
flow.
- Only use Launch Control when road and
traffic conditions allow it and other dr iv
ers will not be endangered or annoyed by
your driving and the vehicle's accelera
tion .
- Please note that the driving wheels can
spin and the vehicle can break away
when ESC is switched off, especially
when the road is slippery.
- Once you have accelerated, you sho uld
sw itch the ESC back on by pressing the
button @.
Page 80 of 244

78 Transmission
@ Tips
-When accelerating using the Launch
Control program, all vehicle parts are
subject to heavy loads. This can result in
increased wear.
- The Launch Control Program only func
tions when the parking brake is released
and the vehicle speed is less than
3 mph
(5 km/h).
S tronic®
Description
Applies to vehicles: with S tronic
Fig. 83 Shift pattern
Fig. 84 Display: selected gears
Your vehicle is equipped with an electronical
ly-controlled manual transmission called S
tronic ®. Two independent clutches transfer
the powe r between the engine and transmis
sion. They replace the torque converter used
in conventional automatic transmissions and
allow the vehicle to accelerate without a no
ticeable interruption in traction.
The selected mode of operation, the gear en
gaged and the sport function are shown in the
Driver Information System display ¢
fig. 84.
M -Manual operation
In this operating mode, you shift the forward
gears using the selector lever ¢
page 79 or
the shift paddles on the multifunction steer
ing wheel¢
page 81.
A - Automatic operation
In this opera ting mode, the forward gears are
shifted up or down depending on engine load
and vehicle speed ¢
page 80.
R- Reverse
Only shift into reverse gear when the vehicle is
stationary and the engine is running at idle
speed~ ,&..
To engage reverse gear, you have to press the
brake pedal, move the selector lever to the
right and tip it towards R . In reverse gear, the
backup lights illuminate when the ignit ion is
on .
N -Neutral
To engage neutral, you have to move these
lector lever to the left or to the right.
If re
verse gear is engaged, move the selector lever
to the left.
If a forward gear is engaged, move
the selector lever to the right.
Sport function
The sport function is sw itched on by pressing
the
I SPOR T I button on the selector lever cover.
Upshifting at a higher RPM makes full use of
the engine's power. Shift time is decreased
and acce le rator pedal response is improved.
In addition, in manual operation the engine
does
not shift automatically into the next
gear before it has reached the maximum per
missible engine speed. In automatic opera
tion, upshifting continues automatically.
P - Automatic parking lock
The automatic parking lock is engaged imme
diately after you remove the key. The auto
matic parking lock is also engaged if you turn
off the engine while in the A, R, or manual
mode positions. .,..
 1
1 2
2 3
3 4
4 5
5 6
6 7
7 8
8 9
9 10
10 11
11 12
12 13
13 14
14 15
15 16
16 17
17 18
18 19
19 20
20 21
21 22
22 23
23 24
24 25
25 26
26 27
27 28
28 29
29 30
30 31
31 32
32 33
33 34
34 35
35 36
36 37
37 38
38 39
39 40
40 41
41 42
42 43
43 44
44 45
45 46
46 47
47 48
48 49
49 50
50 51
51 52
52 53
53 54
54 55
55 56
56 57
57 58
58 59
59 60
60 61
61 62
62 63
63 64
64 65
65 66
66 67
67 68
68 69
69 70
70 71
71 72
72 73
73 74
74 75
75 76
76 77
77 78
78 79
79 80
80 81
81 82
82 83
83 84
84 85
85 86
86 87
87 88
88 89
89 90
90 91
91 92
92 93
93 94
94 95
95 96
96 97
97 98
98 99
99 100
100 101
101 102
102 103
103 104
104 105
105 106
106 107
107 108
108 109
109 110
110 111
111 112
112 113
113 114
114 115
115 116
116 117
117 118
118 119
119 120
120 121
121 122
122 123
123 124
124 125
125 126
126 127
127 128
128 129
129 130
130 131
131 132
132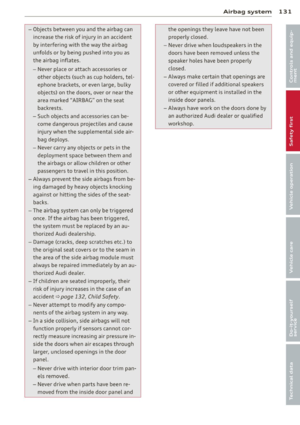 133
133 134
134 135
135 136
136 137
137 138
138 139
139 140
140 141
141 142
142 143
143 144
144 145
145 146
146 147
147 148
148 149
149 150
150 151
151 152
152 153
153 154
154 155
155 156
156 157
157 158
158 159
159 160
160 161
161 162
162 163
163 164
164 165
165 166
166 167
167 168
168 169
169 170
170 171
171 172
172 173
173 174
174 175
175 176
176 177
177 178
178 179
179 180
180 181
181 182
182 183
183 184
184 185
185 186
186 187
187 188
188 189
189 190
190 191
191 192
192 193
193 194
194 195
195 196
196 197
197 198
198 199
199 200
200 201
201 202
202 203
203 204
204 205
205 206
206 207
207 208
208 209
209 210
210 211
211 212
212 213
213 214
214 215
215 216
216 217
217 218
218 219
219 220
220 221
221 222
222 223
223 224
224 225
225 226
226 227
227 228
228 229
229 230
230 231
231 232
232 233
233 234
234 235
235 236
236 237
237 238
238 239
239 240
240 241
241 242
242 243
243