Page 145 of 177

Radio145
3. Select one of the 29 programmetypes e.g. News or
Entertainment with m or n .
4. Hold down m or n until the
station search begins.
After station search starts the radio
display appears.
If the radio does not find an
appropriate station, it plays the
station to which the radio was most
recently tuned.
Regional programmes Some RDS stations transmit different
regional programmes over different
frequencies at certain times.
Switching on/off regionalisation
The RDS function must be switched
on.
Press the REG button briefly to switch
regionalisation on or off.
If regionalisation is switched on,
REG is shown on the display.
The radio remains tuned to the
regional programme while seeking
the best receivable station frequency.If regionalisation is switched off (no
REG on display), the radio allows
switching to another regional
programme.
Automatic regionalisation
If automatic regionalisation is
switched on ( REG Auto On ): the radio
remains tuned to the regional
programme while seeking the
transmission frequency with the
strongest reception (AF) for a radio
programme until the programme can no longer be received without
interference.
If the reception quality of the regional programme is no longer sufficient for
interference-free reception, the radio
switches to another regional
programme.
To switch automatic regionalisation
on/off:
Press the REG button until
REG Auto On or Off are displayed,
indicating the current state of
automatic regionalisation.
Release the REG button to change
the current state.Traffic programme (TP)
Traffic programme stations are FM
RDS stations which broadcast traffic
news.
Traffic stations can be recognised by
the TP symbol in the display.
Switching traffic programme on/off ■ If radio traffic announcement is enabled, [TP] or [ ] is displayed.
■ If the current station is a traffic programme station, [TP] appears in
the display.
■ If the current station is a not traffic programme station, the radio will
automatically search for the traffic
station with the best reception.
[ ] does not appear on the display.
Press the TP button to switch on
TP.
[ ] is displayed.
■ The automatic station search feature searches only for traffic
announcements.
■ During automatic search or if reception of a traffic programme isnot possible, [ ] is displayed.
Page 146 of 177

146Radio
■ If on standby for trafficannouncement is switched on, thenCD playback or DAB reception are
interrupted during a traffic
announcement.
■ Traffic announcements are played at the preset traffic announcement
volume 3 139.
Press the TP button again to switch
TP off.
[ ] is no longer displayed.
Traffic programme station search
This function is only possible within
the FM waveband.
Keep the m or n pressed for
approximately 1 second.
The radio only searches for traffic
programme stations.
Hearing traffic announcements only Being on standby for traffic
announcements must be enabled.
Turn the knob o to the left to
reduce the volume to zero.Traffic announcements are played at
the preset volume for traffic
announcement 3 139.
Deactivating traffic announcements To switch off a traffic announcement,
e.g. during CD playback, proceed as
follows:
Press TP button.
The traffic announcement is stopped.
The most recent CD/MP3 track plays. On standby for traffic announcement
remains switched on.
Traffic announcement whilst an
external source is active
The external source (e.g. mobile
phone) has priority over traffic
announcements.
During the phone call no traffic
announcement will be heard or
displayed.
Digital audio broadcasting Digital audio broadcasting (DAB) is
an innovative and universal
broadcast system.DAB stations are indicated by the
programme name instead of the
broadcasting frequency.General information ■ With DAB, several radio programmes (services) can be
broadcast on a single frequency (ensemble).
■ As long as a given DAB receiver can pick up the signal sent out by a
broadcasting station (even if the signal is very weak), sound
reproduction is ensured.
■ There is no fading (weakening of the sound) that is typical of AM or
FM reception. The DAB signal is
reproduced at a constant volume.
■ If the DAB signal is too weak to be picked up by the receiver, receptionis interrupted completely. This can
be avoided by activating DAB AF
and/or DAB FM in the audio
settings menu.
■ Interference caused by stations that are on nearby frequencies (aphenomenon that is typical of AM
and FM reception) does not occur
with DAB.
Page 147 of 177

Radio147
■ If the DAB signal is reflected bynatural obstacles or buildings, the
reception quality of DAB is
improved, whereas AM or FM
reception is considerably impaired
in such cases.
■ The radio is also capable of reveicing DAB+ and DMB-Audio.
Ensemble
Several programmes are always
combined into a so-called ensemble on a frequency.
Scrolling through ensembles
You can scroll through ensembles
which you have already received
once (the ensembles need to be
receivable).
The DAB waveband must be
selected.
Press and hold the rocker switch m
or n .
The first available programme of the
ensemble is played.DAB AF
By setting DAB AF to On you can
define that when you drive into
another ensemble area, the same
station is received as in the previous
ensemble area.
This function can only be performed if the station is included in the new
ensemble.
The DAB waveband must be
selected.
Press the SETTINGS button to
display the Settings menu.
Press the SETTINGS button again to
display DAB AF On or Off, indicating
the current state of that setting.
Press the rocker switch m or n to
change the setting.
Press the TUNER button to return to
the radio menu.
DAB FM
By setting DAB FM to On you can
define that when the DAB signal is too weak to be picked up by the receiver,
the system switches over to acorresponding FM station (if
available) of the active DAB
programme.
The DAB waveband must be
selected.
Press the SETTINGS button to
display the Settings menu.
Press the SETTINGS button twice to
display DAB FM On or Off, indicating
the current state of that setting.
Press the rocker switch m or n to
change the setting.
Press the TUNER button to return to
the radio menu.
Page 148 of 177

148CD PlayerCD PlayerGeneral information...................148
Usage ........................................ 149General information
With the CD player you can play
standard commercial CDs with a
diameter of 12 cm.Caution
Under no circumstances place
DVDs, single-CDs with a diameter
of 8 cm or shaped CDs in the audio
player.
You must not put any stickers on
CDs. These discs can get jammed
in the CD drive and ruin the drive.
An expensive replacement of the
device will then be necessary.
■ The format of the CD must be ISO 9660 Level 1, Level 2 or
JOLIET. All other formats cannot be played back reliably.
■ Audio CDs with copy protection, which are not in compliance with
the audio CD standard, may not
play correctly or not at all.
■ You can also use the Infotainment system to play CDs containing MP3
music data and Mixed Mode CDs.
■ Self-recorded CD-Rs and CD-RWs
are more vulnerable to mishandling
than prerecorded CDs. Correct
handling, especially in the case of
self-recorded CD-Rs and CD-RWs, must be ensured. See below.
■ Self-recorded CD-Rs and CD-RWs
may not play correctly or not at all.
In such cases it is not the
equipment that is at fault.
■ Avoid leaving fingerprints when you
change CDs.
■ Put CDs back in their sleeves immediately after removing them
from the CD player in order to
protect them from damage and dirt.
■ Dirt and liquids on CDs can smear the lens of the CD player inside the
device and cause faults.
■ Protect CDs from heat and direct sunlight.
■ The following restrictions apply for data stored on an MP3 CD:
When naming albums and tracks,
umlauts or special characters
should not be included.
Page 149 of 177
 the MP3 files from audio data, a bitrate of up
to max. 256 kbit/s should be used.
To use MP3 files in the Infotain")
CD Player149
Applicable playlist extensions:
"m3u" or "pls".
When generating (coding) the MP3 files from audio data, a bitrate of up
to max. 256 kbit/s should be used.
To use MP3 files in the Infotainment system, the MP3 files must have
the file extension ".mp3".
■ A total of 367 playable tracks can be stored on one CD. It will not be
possible to play any additional
tracks.
■ A maximum of 99 albums can be saved on an MP3 CD for use with
the Infotainment System. The
albums can be selected individually with the Infotainment system.
Usage Inserting a CDInsert the CD with the printed side up
into the CD slot.
The CD is automatically drawn in.
Do not prevent or assist the CD being drawn in.Read CD and CD in appears on the
display, then the number of CD tracks
is displayed.
As soon as the first track starts to
play, the display shows Track 1 and
the playing time or information about
the track (title, artist).
With MP3 CD, MP3 appears on the
display and the first album name is
displayed.
Information about the track (title,
artist) are displayed as soon as the
first track starts to play.
CD playback
Switch from radio mode to CD mode as follows:
Press the MEDIA button.
The CD track last played is displayed and starts to play.
Track selection
To select a track while a CD is
playing, tap on m or n repeatedly
until the desired track is displayed.
The track is played.
Fast search forwards/
backwards To find a certain point on a CD,
proceed as follows:
You're listening to a track.
Keep m or n pressed until you
reach the point you want.
The CD plays at increased speed and
reduced volume.
MP3 with fast search backward, the
search stops at the beginning of the current track.
Album selection for MP3 CDs You are listening to a track from an
album.
Press the MEDIA button.
The CD track last played is displayed. Tap on m or n repeatedly until the
desired album is displayed.
Page 150 of 177

When random play is selected, the")
150CD Player
The first track on the album is
displayed and played.
All albums which do not contain MP3
files are automatically skipped.
Random mode
Random CD (Random)
When random play is selected, the
tracks on a CD will be played in
random order.
Press the MEDIA button three times.
The current random setting is
displayed.
Tap on m or n to select a setting.
Audio CD: ■ Random on : activates random
mode
■ Random off : deactivates random
modeMP3 CD:
■ Random album : Random playback
of the tracks of an album
■ Random CD : Random playback of
the tracks on a CD
■ Random off : deactivates random
mode
If the random function is enabled RDM or g appears on the display.
Changing the display type
Different information can be
displayed.
Press the CD/MP3 button twice.
CD info appears on the display.
Tap on m or n to select a display
type.
Depending on the CD type (audio CD with or without CD text, MP3 CD with
or without track name (ID3 tags)), the following may be displayed.
Audio CD without CD text:
Track number and playing timeAudio CD with CD text:
■ Track name
■ Artist name
■ CD name
■ Track number and playing time
MP3 CD without ID3 tags ■ File name
■ Track number and playing time
■ Album name
MP3 CD with ID3 tags ■ Track name
■ Artist name
■ Album name
■ Track number and playing time
Traffic announcement in CD mode
Traffic announcements can be
received while a CD is playing. Traffic programme (TP) 3 143.
A traffic announcement can be
terminated with the TP button and the
current CD will continue to play.
Removing a CD Press the j button.
Page 151 of 177
CD Player151
Eject CD appears on the display.
If a CD is ejected, the last radio station used will automatically be played.
A CD can be ejected even if the
appliance is turned off. The appliance
switches off after the CD has been
removed.
If the CD is not removed, it will return
to the player automatically after a
short time.
Page 152 of 177

152AUX inputAUX inputGeneral information...................152
Usage ........................................ 152General information
In the centre console in front of the
gearshift lever there is an AUX socket
for the connection of external audio
sources.
Notice
The socket must always be kept clean and dry.
It is possible, for example, to connect a portable CD player with a 3.5 mm
jack plug to the AUX input.
Usage To play back an audio source
connected to the AUX input of the
vehicle, e.g. a portable CD player, via
the Infotainment system
loudspeakers, the audio source has
to be enabled:
When the radio is on.
Connect the audio source to the AUX input of the vehicle.
Press the MEDIA button until Aux
appears on the display.The external audio source is
transferred through on the
Infotainment system.
Enable the external audio source and
set it to maximum volume.
If required: adjust the AUX input level in relation to the connected external
source 3 139.
The audio source signal is played
back via the Infotainment system
loudspeakers.
 1
1 2
2 3
3 4
4 5
5 6
6 7
7 8
8 9
9 10
10 11
11 12
12 13
13 14
14 15
15 16
16 17
17 18
18 19
19 20
20 21
21 22
22 23
23 24
24 25
25 26
26 27
27 28
28 29
29 30
30 31
31 32
32 33
33 34
34 35
35 36
36 37
37 38
38 39
39 40
40 41
41 42
42 43
43 44
44 45
45 46
46 47
47 48
48 49
49 50
50 51
51 52
52 53
53 54
54 55
55 56
56 57
57 58
58 59
59 60
60 61
61 62
62 63
63 64
64 65
65 66
66 67
67 68
68 69
69 70
70 71
71 72
72 73
73 74
74 75
75 76
76 77
77 78
78 79
79 80
80 81
81 82
82 83
83 84
84 85
85 86
86 87
87 88
88 89
89 90
90 91
91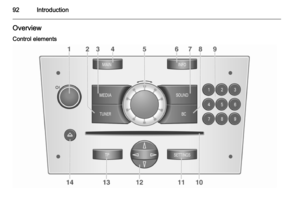 92
92 93
93 94
94 95
95 96
96 97
97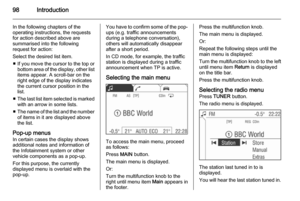 98
98 99
99 100
100 101
101 102
102 103
103 104
104 105
105 106
106 107
107 108
108 109
109 110
110 111
111 112
112 113
113 114
114 115
115 116
116 117
117 118
118 119
119 120
120 121
121 122
122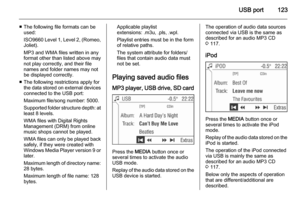 123
123 124
124 125
125 126
126 127
127 128
128 129
129 130
130 131
131 132
132 133
133 134
134 135
135 136
136 137
137 138
138 139
139 140
140 141
141 142
142 143
143 144
144 145
145 146
146 147
147 148
148 149
149 150
150 151
151 152
152 153
153 154
154 155
155 156
156 157
157 158
158 159
159 160
160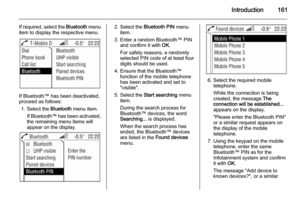 161
161 162
162 163
163 164
164 165
165 166
166 167
167 168
168 169
169 170
170 171
171 172
172 173
173 174
174 175
175 176
176