2013 MERCEDES-BENZ B-CLASS SPORTS ignition
[x] Cancel search: ignitionPage 289 of 336
Installing/removing the towing eye
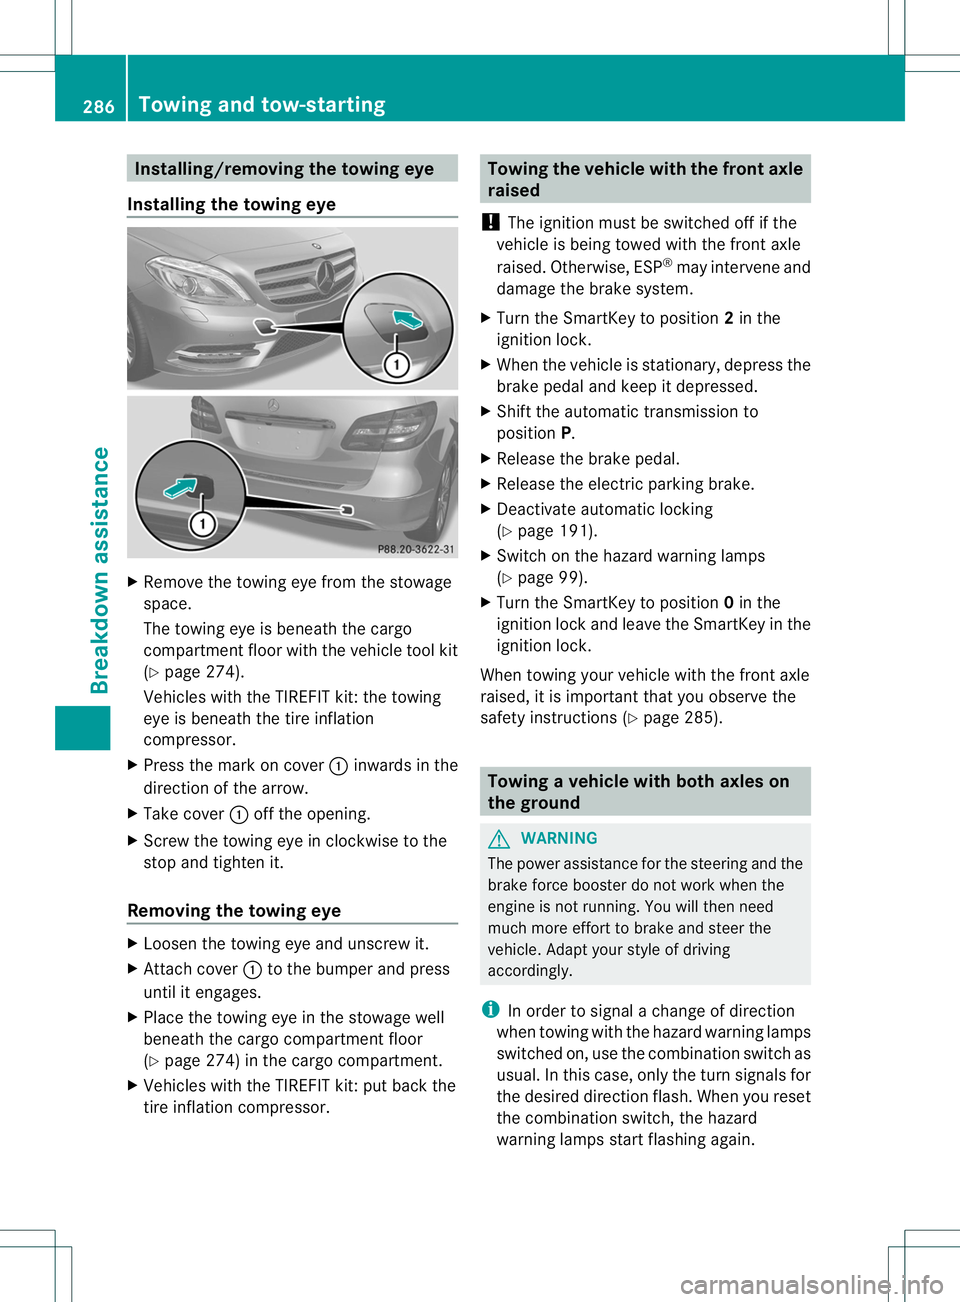
Installing the towing eye X
Remove the towing eye from the stowage
space.
The towing eye is beneath the cargo
compartmen tfloor with the vehicle tool kit
(Y page 274).
Vehicles with the TIREFIT kit :the towing
eye is beneath the tire inflation
compressor.
X Press the mark on cover :inwards in the
direction of the arrow.
X Take cover :off the opening.
X Screw the towing eye in clockwise to the
stop and tighten it.
Removing the towing eye X
Loosen the towing eye and unscrew it.
X Attach cover :to the bumper and press
until it engages.
X Place the towing eye in the stowage well
beneath the cargo compartmentf loor
(Y page 274) in the cargo compartment.
X Vehicles with the TIREFIT kit: put back the
tire inflation compressor. Towing the vehicle with the front axle
raised
! The ignition must be switched off if the
vehicle is being towed with the front axle
raised. Otherwise, ESP ®
may intervene and
damage the brake system.
X Turn the SmartKey to position 2in the
ignition lock.
X When the vehicle is stationary, depress the
brake pedal and keep it depressed.
X Shift the automatic transmission to
position P.
X Release the brake pedal.
X Release the electric parking brake.
X Deactivate automatic locking
(Y page 191).
X Switch on the hazard warning lamps
(Y page 99).
X Turn the SmartKey to position 0in the
ignition lock and leave the SmartKey in the
ignition lock.
When towing your vehicle with the front axle
raised, it is importan tthat you observe the
safety instructions (Y page 285). Towing
avehicle with both axles on
the ground G
WARNING
The power assistance for the steering and the
brake force booster do not work when the
engine is not running. You will then need
much more effort to brake and steer the
vehicle .Adapt your style of driving
accordingly.
i In order to signal a change of direction
when towing with the hazard warning lamps
switched on, use the combination switch as
usual. In this case, only the turn signals for
the desired direction flash. When you reset
the combination switch, the hazard
warning lamps start flashing again. 286
Towing and tow-startingBreakdown assistance
Page 290 of 336
The automatic transmission automatically
shifts to position
Pwhen you open the driver's
or front-passenger door or when you remove
the SmartKey from the ignition lock. In order
to ensure that the automatic transmission
stays in position Nwhen towing the vehicle,
you must observe the following points:
X Make sure that the vehicle is stationary.
X Turn the SmartKey to position 2in the
ignition lock.
X Depress and hold the brake pedal.
X Shift the automatic transmission to
position N.
X Leave the SmartKey in position 2in the
ignition lock.
X Release the brake pedal.
X Release the electric parking brake.
X Switch on the hazard warning lamps
(Y page 99).
It is importan tthat you observe the safety
instructions when towing away your vehicle
(Y page 285). Transporting the vehicle
! Only lash the vehicle down by the wheels
or wheel rims, not by parts of the vehicle
such as axle or steering components.
Otherwise, the vehicle could be damaged.
X Turn the SmartKey to position 2in the
ignition lock.
X Shift the transmission to position N.
As soon as the vehicle is loaded:
X Prevent the vehicle from rolling away by
applying the electric parking brake.
X Shift the transmission to position P.
X Turn the SmartKey to position 0in the
ignition lock and remove it.
X Secure the vehicle.
The towing eye can be used to pull the vehicle
onto a trailer or transporter for transporting
purposes. Tow-starting (emergency starting)
! Vehicles with automatic transmission
must not be tow-started. You could
otherwise damage the automatic
transmission.
When tow-starting, it is important that you
observe the safety instructions (Y page 285). Fuses
Important safety notes
G
WARNING
Only use fuses that have been approved for
Mercedes-Ben zvehicles and that have the
correct fuse rating for the systems
concerned. Do not attempt to repair or bridge
faulty fuses. Using fuses that have not been
approved or attempting to repair or bridge
faulty fuses could cause the fuse to be
overloaded and result in afire. Have the cause
traced and rectified at a qualified specialist
workshop.
! Only use fuses that have been approved
for Mercedes-Ben zvehicles and which
have the correct fuse rating for the system
concerned. Only use fuses marked with an
"S". Otherwise, components or systems
could be damaged.
The fuses in your vehicle serve to close down
faulty circuits. If afuse blows, all the
components on the circuit and their functions
stop operating.
Blown fuses must be replace dwith fuses of
the same rating, which you can recognize by
the color and value. The fuse ratings are listed
in the fuse allocation chart.
If a newly inserted fuse also blows, have the
cause traced and rectified at a qualified
specialist workshop, e.g. an authorized
Mercedes-Ben zCenter. Fuses
287Breakdown assistance Z
Page 291 of 336
Before changing a fuse
X Secure the vehicle against rolling away
(Y page 141).
X Switch off all electrical consumers.
X Turn the SmartKey to position 0in the
ignition lock and remove it (Y page 127).
All indicator lamps in the instrument cluster
must be off.
The fuses are located in various fuse boxes:
R Fuse bo xinthe engine compartmentont he
left-hand side of the vehicle, when viewed
in the direction of travel
R Fuse box in the front-passenger footwell
The fuse allocation chart is on the fuse box in
the front-passenger footwell (Y page 288).Fuse box in the engine compartment
! Make sure that no moisture can enter the
fuse box when the cover is open.
! When closing the cover, make sure that it
is lying correctly on the fuse box. Moisture
seeping in or dirt could otherwise impair
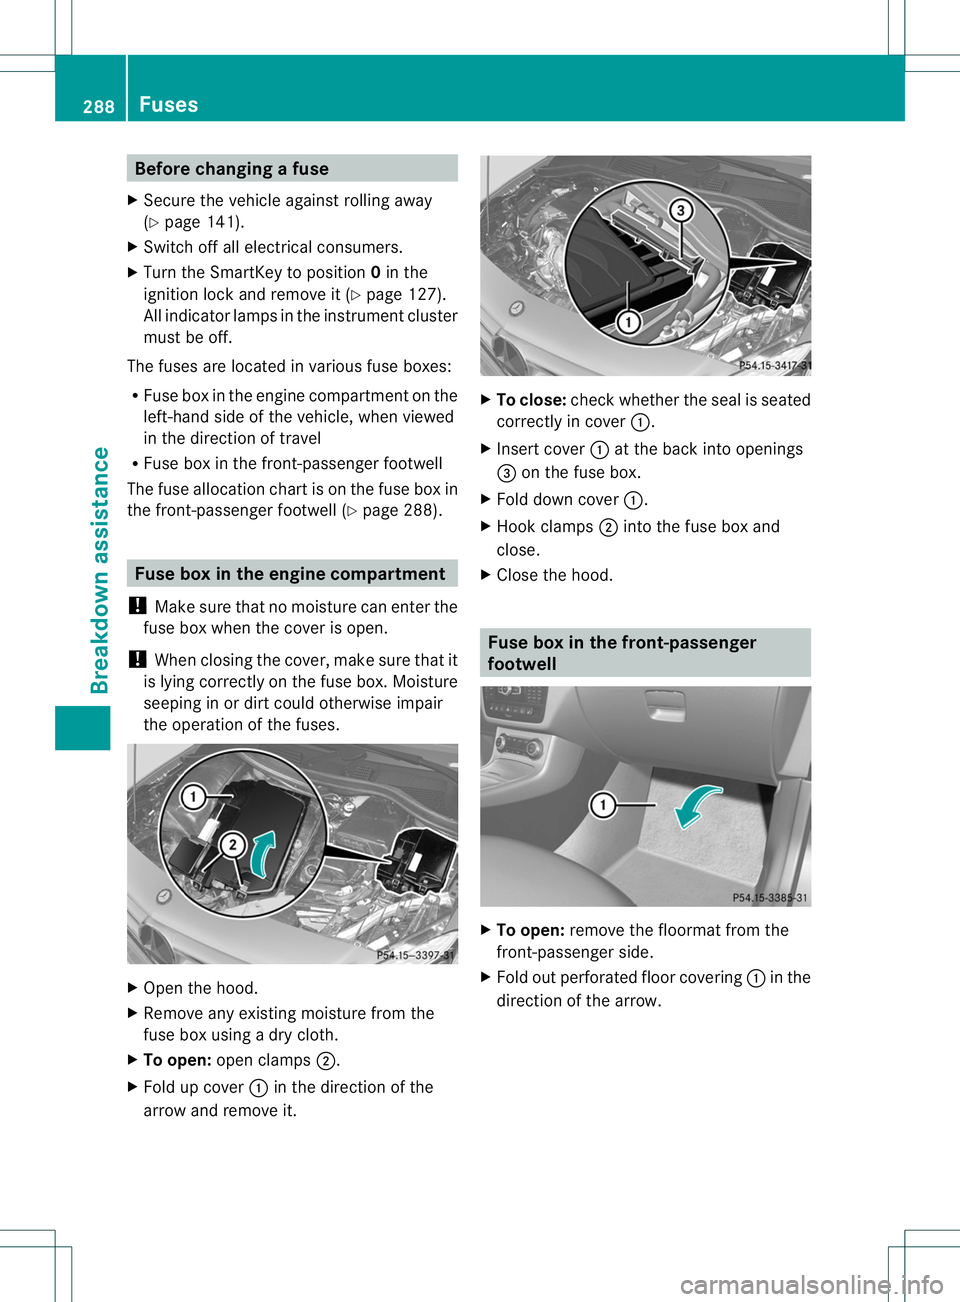
the operation of the fuses. X
Open the hood.
X Remove any existing moisture from the
fuse box using a dry cloth.
X To open: open clamps ;.
X Fold up cover :in the direction of the
arrow and remove it. X
To close: check whether the seal is seated
correctly in cover :.
X Insert cover :at the back into openings
= on the fuse box.
X Fold down cover :.
X Hook clamps ;into the fuse box and
close.
X Close the hood. Fuse box in the front-passenger
footwell
X
To open: remove the floormat from the
front-passenger side.
X Fold out perforated floor covering :in the
direction of the arrow. 288
FusesBreakdown assistance
Page 302 of 336
a loss of pressure, a corresponding warning
message will appear in the multifunction
display.
The tire pressure warning system does not
warn you of an incorrectly set tire pressure.
Observe the notes on the recommended tire
pressure (
Ypage 295).
The tire pressure loss warning system does
no treplace the need to regularly chec kyour
vehicle's tire pressures, since an even loss of
pressure on several tires at the same time
cannot be detected by the tire pressure loss
warning system.
The tire pressure loss warning system is not
able to warn you of a sudden loss of pressure,
e.g. if the tire is penetrated by a foreign
object. In the event of a sudden loss of
pressure, bring the vehicle to a halt by braking
carefully. Avoid abrupt steering maneuvers.
The function of the tire pressure loss warning
system is limited or delayed if:
R snow chains are mounted to your vehicle's
tires.
R road conditions are wintry.
R you are driving on sand or gravel.
R you adopt a very sporty driving style
(cornering at high speeds or driving with
high rates of acceleration).
R you are driving with a heavy load (in the
vehicle or on the roof).
Restarting the tire pressure loss
warning system Restart the tire pressure loss warning system
if you have:
R
changed the tire pressure
R changed the wheels or tires
R mounted new wheels or tires
X Before restarting, make sure that the tire
pressures are set properly on all four tires
for the respective operating conditions.
The recommended tire pressures can be
found in the table on the fuel filler flap. The tire pressure loss warning system can
only give reliable warnings if you have set
the correct tire pressure. If an incorrect tire
pressure is set, these incorrect values will
be monitored.
X Observe the notes on tire pressure
(Y page 295).
X Make sure that the SmartKey is in
position 2(Y page 127) in the ignition lock.
X Press =or; on the steering wheel
to select the Service menu.
X Press the 9or: button to select
Tire Pressure .
X Press the abutton.
The Run Flat Indicator Active Press 'OK' to Restart message
appears in the multifunction display.
If you wish to confirm the restart:
X Press the abutton.
The Tire Pressure Now OK? message
appears in the multifunction display.
X Press the 9or: button to select
Yes .
X Press the abutton.
The Run Flat Indicator Restarted message appears in the multifunction
display.
After a teach-in period, the tire pressure
loss warning system will monitor the set
tire pressures of all four tires.
or
If you wish to cancel the restart:
X Press the %button.
or
X If the Tire Pressure Now OK? message
appears, use the 9or: button to
select Cancel .
X Press the abutton.
The tire pressure values stored at the last
restart will continue to be monitored. Tire pressure
299Wheels and tires Z
Page 316 of 336
X
Switch off the engine.
X Remove the SmartKey from the ignition
lock.
X If included in the vehicl eequipment, take
the tire-change tool kit out of the vehicle.
X Secure the vehicle to preven titfrom rolling
away.
Securing the vehicle to prevent it from
rolling away If yourv
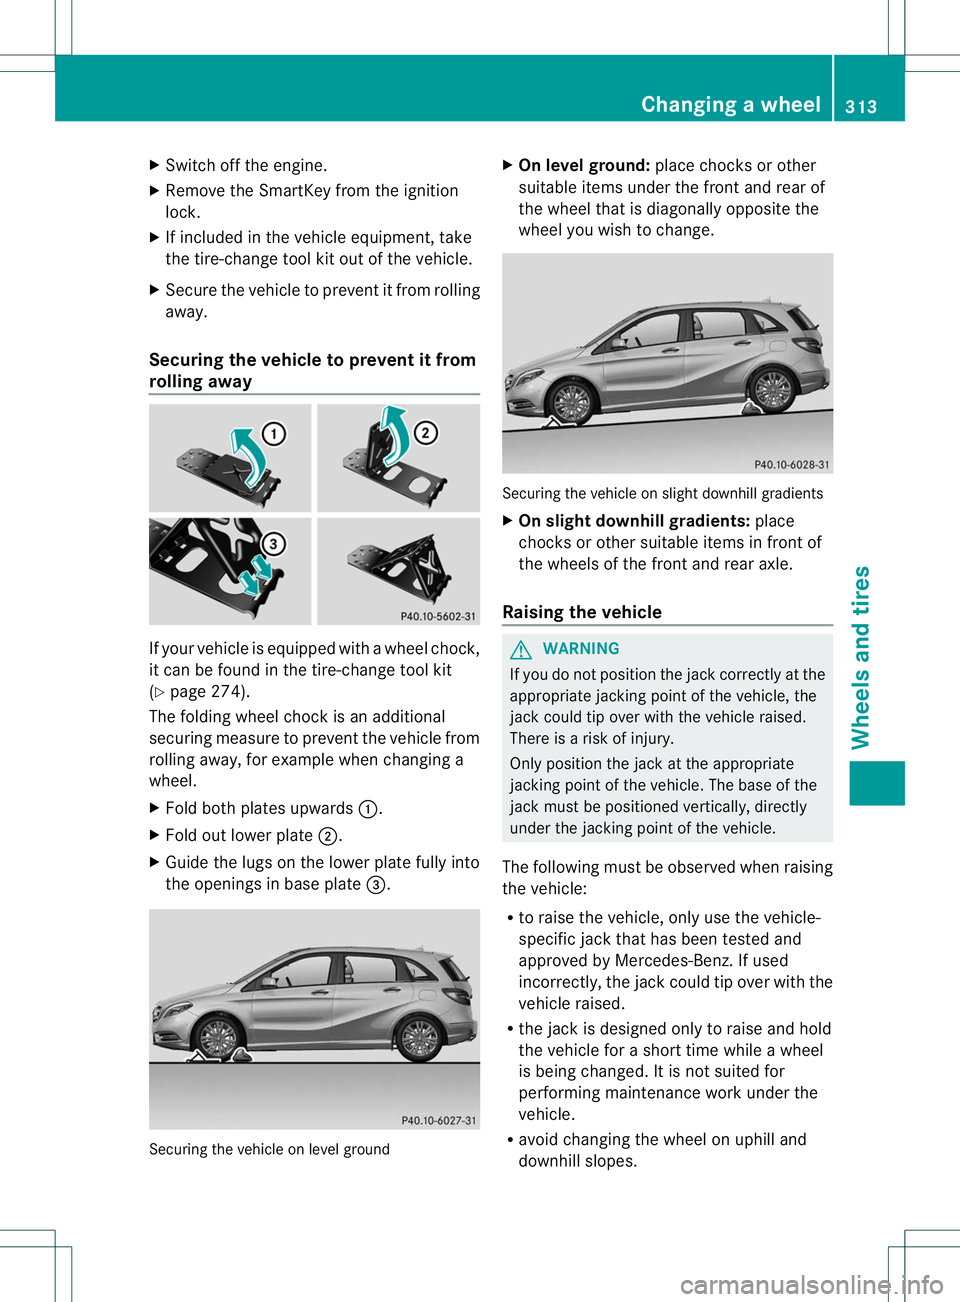
ehicle is equipped with a wheel chock,
it can be found in the tire-change tool kit
(Y page 274).
The folding wheel choc kis an additional
securing measure to prevent the vehicle from
rolling away, for example when changing a
wheel.
X Fold both plates upwards :.
X Fold out lower plate ;.
X Guide the lugs on the lower plate fully into
the openings in base plate =.Securing the vehicle on level ground X
On level ground: place chocks or other
suitable items under the front and rear of
the wheel that is diagonally opposite the
wheel you wish to change. Securing the vehicle on slight downhill gradients
X
On slight downhill gradients: place
chocks or other suitable items in front of
the wheels of the front and rear axle.
Raising the vehicle G
WARNING
If you do not position the jack correctly at the
appropriate jacking point of the vehicle, the
jack could tip over with the vehicle raised.
There is a risk of injury.
Only position the jack at the appropriate
jacking point of the vehicle. The base of the
jack must be positioned vertically, directly
under the jacking point of the vehicle.
The following must be observed when raising
the vehicle:
R to raise the vehicle, only use the vehicle-
specific jack that has been tested and
approved by Mercedes-Benz.Ifu sed
incorrectly, the jack could tip over with the
vehicle raised.
R the jack is designed only to raise and hold
the vehicle for a short time while a wheel
is being changed. It is not suited for
performing maintenance work under the
vehicle.
R avoid changing the wheel on uphill and
downhill slopes. Changing
awheel
313Wheels and tires Z
Page 328 of 336
G
WARNING
Fuel is poisonous and hazardous to health.
There is a risk of injury.
You must make sure that fuel does not come
into contact with your skin, eyes or clothing
and that it is not swallowed.D o not inhale fuel
vapors. Keep fuel away from children.
If you or others come into contact with fuel,
observe the following:
R Wash away fuel from skin immediately
using soap and water.
R If fuel comes into contact with your eyes,
immediately rinse them thoroughly with
clean water. Seek medical assistance
without delay.
R If fuel is swallowed, seek medical
assistance without delay. Do not induce
vomiting.
R Immediately change out of clothing which
has come into contact with fuel.
Tank capacity Model Total
capacity B2
50 BlueEFFICIENCY 13.2 US gal
(50.0 l) Model Of which
reserve B2
50 BlueEFFICIENCY Approx.
1.6 US gal (6.0 l) Gasoline
Fuel grade
!
Do not use diesel to refuel vehicles with a
gasoline engine. Do not switch on the
ignition if you accidentally refuel with the
wrong fuel. Otherwise, the fuel will enter
the fuel system. Even small amounts of the
wrong fuel could result in damage to the
fuel system and the engine. The repair costs are high. Notify
aqualified specialist
workshop and have the fuel tan kand fuel
lines drained completely.
! You should only refuel with unleaded
premium-grade gasoline as thi savoids
damaging the catalytic converter.
If engine running problems are apparent,
have the cause checked immediately and
repaired.E xcess unburned fuel can
otherwise enter the catalytic converter,
leading to overheating and possibly
causing a fire.
! To ensure the longevity and full
performance of the engine, only premium-
grade unleaded gasoline may be used.
If there is no premium-grade unleaded
gasoline available and regular unleaded
gasoline must be used, please observe the
following precautions:
R only fill the fuel tank to half full with
regular unleaded gasoline and fill the rest
with premium-grade unleaded gasoline
as soo nas possible.
R do not drive at the maximum speed.
R avoid sudden acceleration.
R if the vehicle is carrying a light load, e.g.
two passengers without luggage, do not
allow the engine to rev above 3000 rpm.
R if the vehicle is fully loaded or is being
operated in mountainous terrain, do not
depress the accelerator pedal further
than Ôof the pedal travel.
Only refuel using premium-grade unleaded
gasoline with a minimum octane rating of 91.
Reformulated Gasoline (RFG) and/or
unleaded gasoline with additives can be used.
The concentration of additives in the fuel,
however, must not exceed 10%, e.g.:
R Ethanol
R TAME
R ETBE
R IPA
R TBA Service products and filling capacities
325Technical data Z