2013 MERCEDES-BENZ B-CLASS SPORTS ignition
[x] Cancel search: ignitionPage 263 of 336
Useful information
i This Operator's Manual describes all
models and all standard and optional
equipment of your vehicle available at the
time of publication of the Operator's
Manual. Country-specific differences are
possible. Please note that your vehicle may
not be equipped with all features
described. This also applies to safety-
related systems and functions.
i Please read the information on qualified
specialist workshops (Y page 23).Engine compartment
Hood
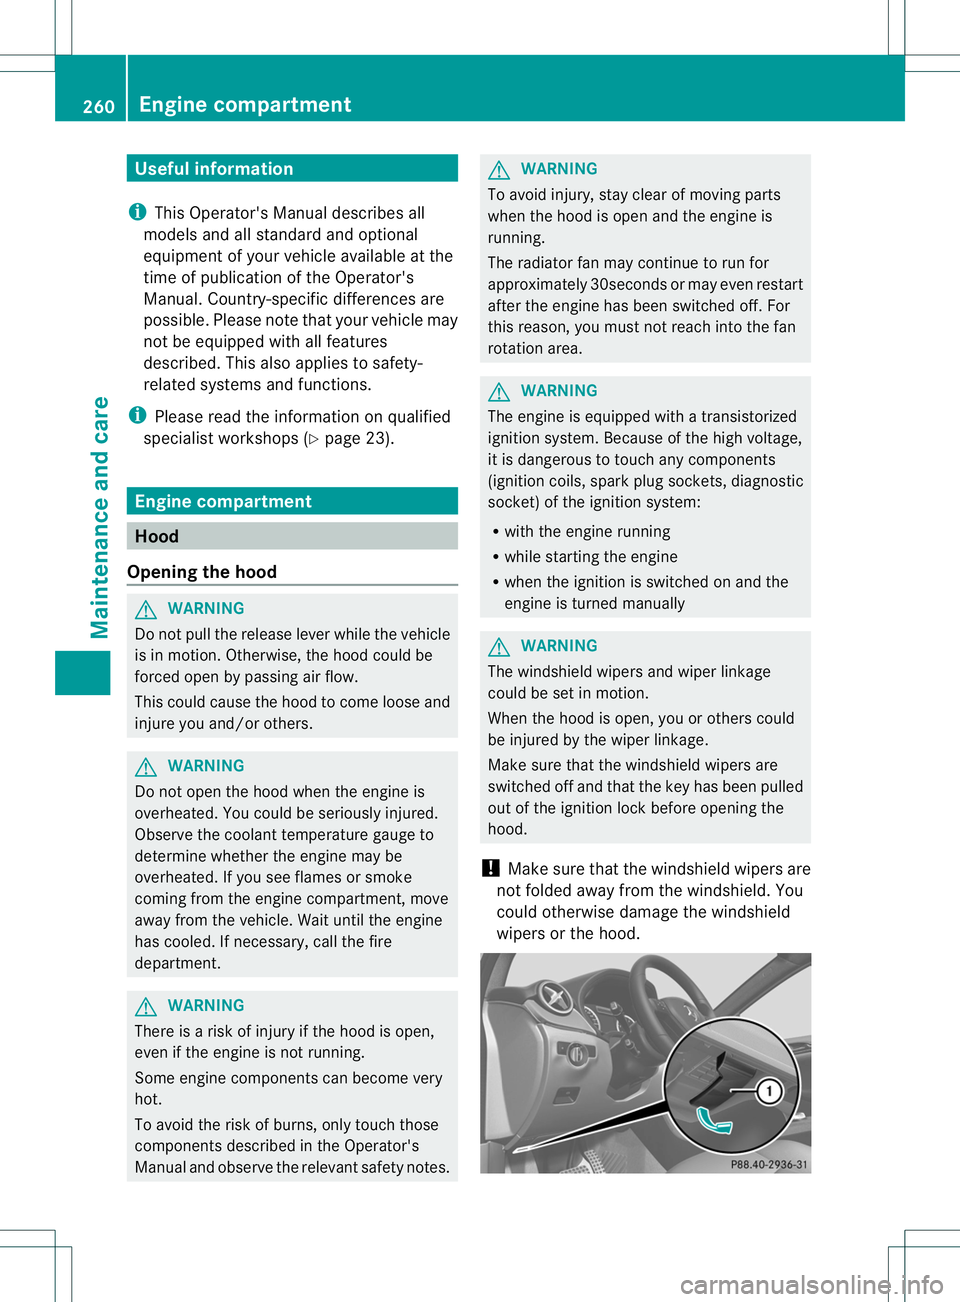
Opening the hood G
WARNING
Do not pull the release lever while the vehicle
is in motion. Otherwise, the hood could be
forced open by passing air flow.
This could cause the hood to come loose and
injure you and/oro thers.G
WARNING
Do not open the hood when the engine is
overheated. You could be seriously injured.
Observe the coolant temperature gauge to
determine whether the engine may be
overheated. If you see flames or smoke
coming from the engine compartment, move
away fro mthe vehicle. Wait until the engine
has cooled. If necessary, call the fire
department. G
WARNING
There is a risk of injury if the hood is open,
even if the engine is not running.
Some engine components can become very
hot.
To avoid the risk of burns, only touch those
components described in the Operator's
Manual and observe the relevant safety notes. G
WARNING
To avoid injury, stay clear of moving parts
when the hood is open and the engine is
running.
The radiator fan may continue to run for
approximately 30seconds or may even restart
after the engine has been switched off. For
this reason, you must not reach into the fan
rotation area. G
WARNING
The engine is equipped with a transistorized
ignition system. Because of the high voltage,
it is dangerous to touch any components
(ignition coils, spark plug sockets, diagnostic
socket) of the ignition system:
R with the engine running
R while starting the engine
R when the ignition is switched on and the
engine is turned manually G
WARNING
The windshield wipers and wiper linkage
could be set in motion.
When the hood is open, you or others could
be injured by the wiper linkage.
Make sure that the windshield wipers are
switched off and that the key has been pulled
out of the ignition lock before opening the
hood.
! Make sure that the windshield wipers are
not folded away from the windshield. You
could otherwise damage the windshield
wipers or the hood. 260
Engine compartmentMaintenance and care
Page 266 of 336
Additional service products
Checking the coolant level G
WARNING
In order to avoid potentially serious burns:
R use extreme caution when opening the
hood if there are any signs of steam or
coolan tleaking from the cooling system, or
if the coolant temperature display indicates
that the coolant is overheated.
R do not remove the pressure cap on the
coolant tank if the coolant temperature is
above 104 ‡ (40 †). Allow the engine to
cool down before removing the cap. The
coolant tank contains hot fluid and is under
pressure.
R using a cloth, slowly turn the cap
approximately Öturn to relieve excess
pressure. If you open the cap immediately,
scalding hot fluid and steam will be blown
out under pressure.
R do not spill antifreeze on hot engine parts.
Antifreeze contains ethylene glycol which
may burn if it comes into contact with hot
engine parts.
! The coolant may only be checked and
corrected when the engine is cool (coolant
temperature below 104 ‡ (40 †).
Checking the coolant when the coolant
temperature is above 104 ‡ (40 †) may
result in damage to the engine or to the
engine cooling system. Example
X
Park the vehicle on a level surface. Only checkt
he coolant level when the
vehicle is on a level surface and the engine
has cooled down.
X Turn the SmartKey to position 2in the
ignition lock (Y page 127).
X Check the coolant temperature display in
the instrument cluster.
The coolant temperature must be below
104 ‡ (40 †).
X Turn the SmartKey to position
0(Y page 127) in the ignition lock.
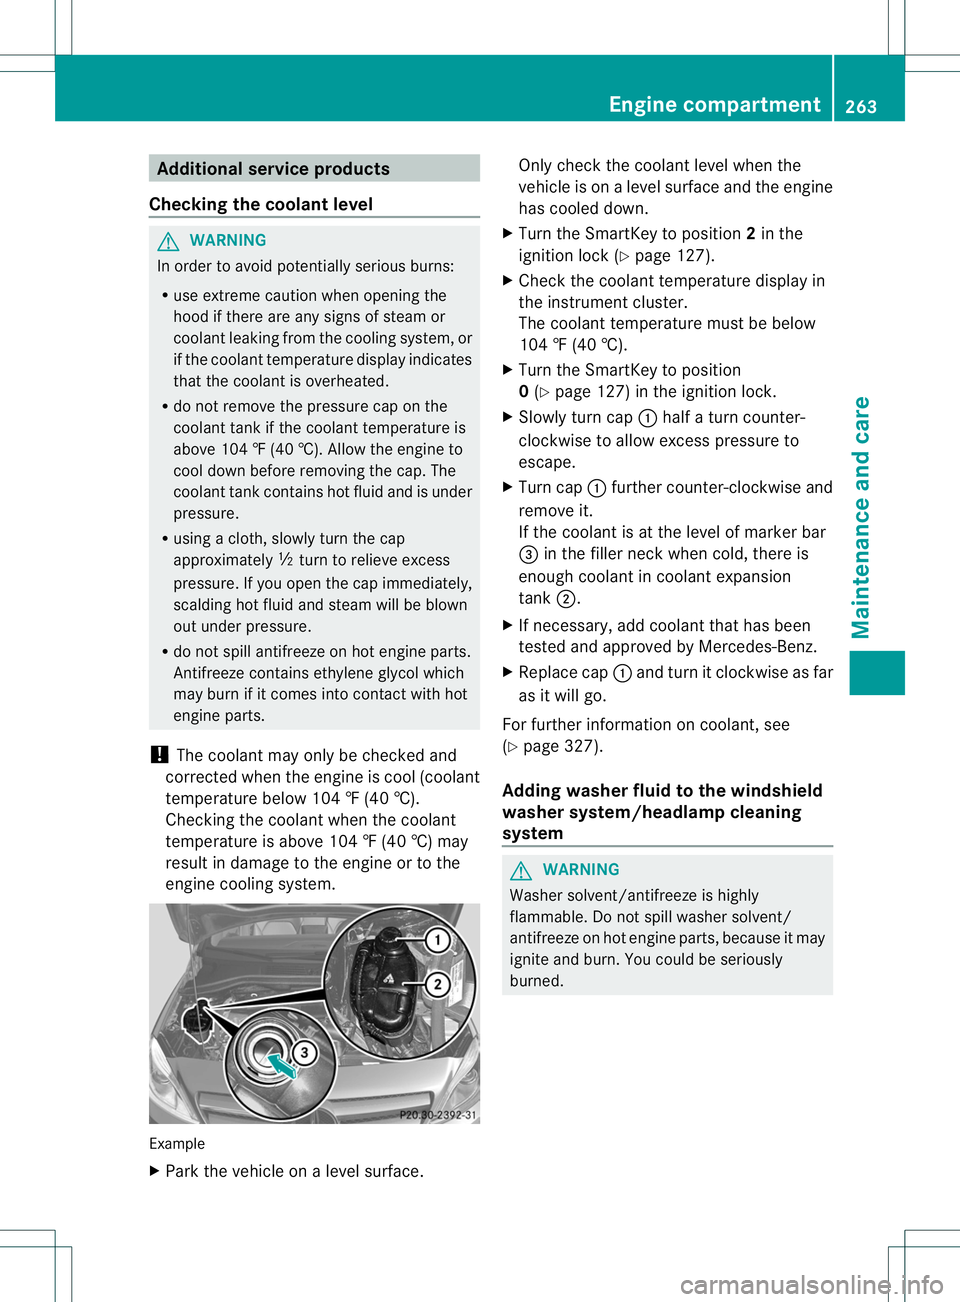
X Slowly turn cap :half a turn counter-
clockwise to allow excess pressure to
escape.
X Turn cap :further counter-clockwise and
remove it.
If the coolant is at the level of marker bar
= in the filler neck when cold, there is
enough coolant in coolant expansion
tank ;.
X If necessary, add coolant that has been
tested and approved by Mercedes-Benz.
X Replace cap :and turn it clockwise as far
as it will go.
For further information on coolant, see
(Y page 327).
Adding washer fluid to the windshield
washer system/headlam pcleaning
system G
WARNING
Washer solvent/antifreeze is highly
flammable. Do not spill washer solvent/
antifreeze on hot engin eparts, because it may
ignite and burn .You could be seriously
burned. Engine compartment
263Maintenance and care Z
Page 267 of 336
Example
X
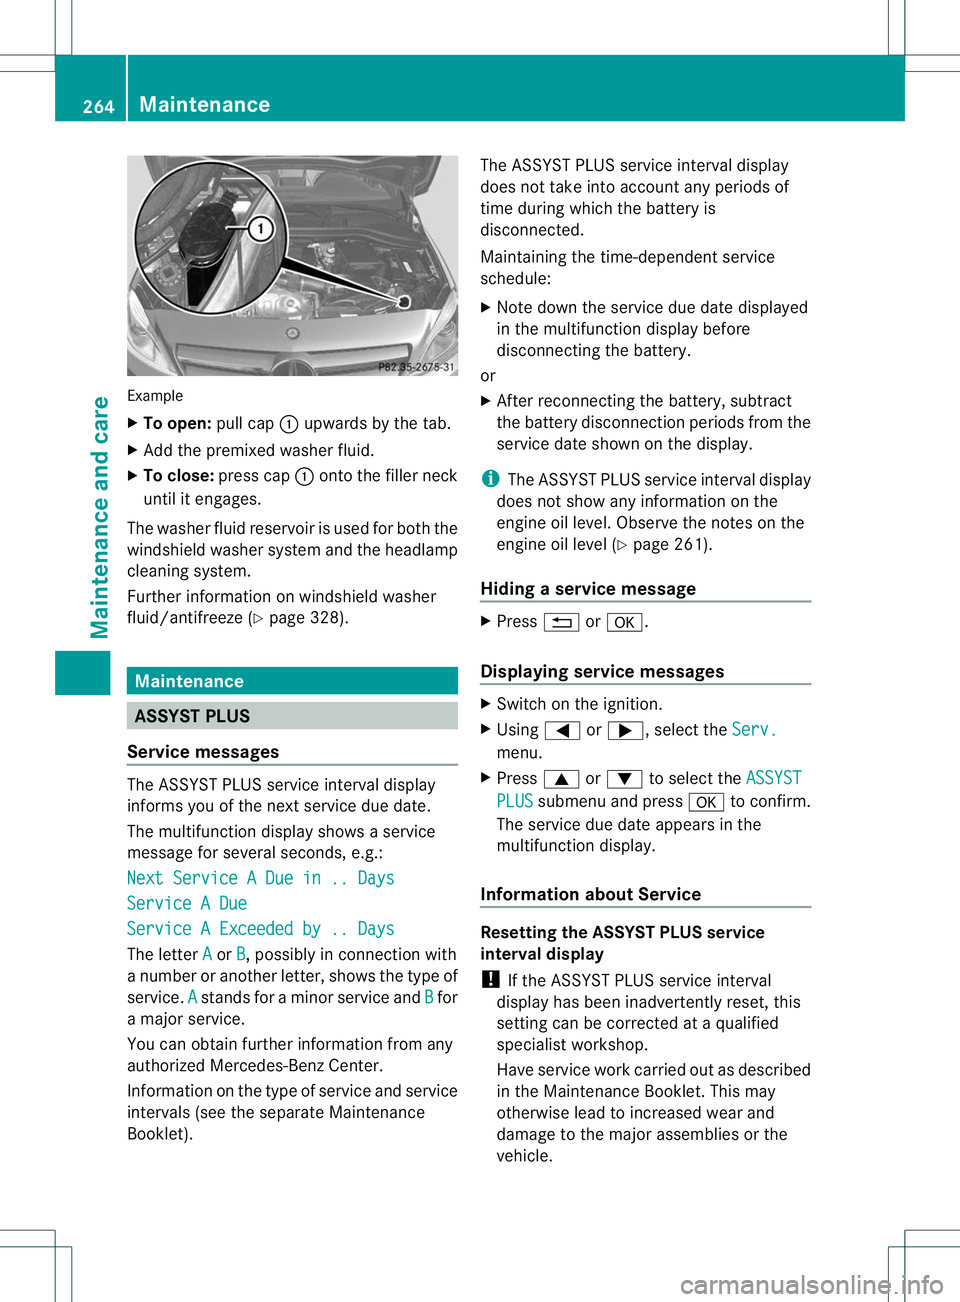
To open: pull cap:upwards by the tab.
X Add the premixed washe rfluid.
X To close: press cap :onto the filler neck
until it engages.
The washer fluid reservoir is used for both the
windshield washer system and the headlamp
cleaning system.
Further information on windshield washer
fluid/antifreeze (Y page 328).Maintenance
ASSYST PLUS
Service messages The ASSYST PLUS service interval display
informs you of the nexts
ervice due date.
The multifunction display shows a service
message for several seconds, e.g.:
Next Service A Due in .. Days Service A Due
Service A Exceeded by .. Days
The letter
A or
B , possibly in connection with
a number or another letter, shows the type of
service. A stands for a minor service and
B for
a major service.
You can obtain further information from any
authorized Mercedes-Benz Center.
Information on the type of service and service
intervals (see the separate Maintenance
Booklet). The ASSYST PLUS service interval display
does not take into accoun
tany periods of
time during which the battery is
disconnected.
Maintaining the time-dependent service
schedule:
X Note down the service due date displayed
in the multifunctio ndisplay before
disconnecting the battery.
or
X After reconnecting the battery, subtract
the battery disconnection periods fro mthe
service date shown on the display.
i The ASSYST PLUS service interval display
does not show any information on the
engine oil level. Observe the notes on the
engine oil level (Y page 261).
Hiding aservice message X
Press %ora.
Displaying service messages X
Switch on the ignition.
X Using =or;, selec tthe Serv. menu.
X Press 9or: to select the ASSYST PLUS submenu and press
ato confirm.
The service due date appears in the
multifunction display.
Information about Service Resetting the ASSYST PLUS service
interval display
!
If the ASSYST PLUS service interval
display has been inadvertently reset, this
setting can be corrected at a qualified
specialist workshop.
Have service work carried out as described
in the Maintenance Booklet. This may
otherwise lead to increased wear and
damage to the major assemblies or the
vehicle. 264
MaintenanceMaintenance and care
Page 271 of 336
These notes also apply to light alloy wheels
with a clear matte finish.
i
The vehicle should preferably be washed
by hand using a soft sponge, car shampoo
and plenty of water.
i Use only insect remover and car shampoo
from the range of recommended and
approved Mercedes-Benz care products.
Cleaning the windows G
WARNING
Switch off the windshield wipers and remove
the SmartKey from the ignition lock before
cleaning the windshield or the wiper blades.
The windshield wipers could otherwise move
and injure you.
! Only fold the windshield wipers away from
the windshield when vertical. Otherwise,
you will damage the hood.
! Do not use dry cloths, abrasive products,
solvents or cleaning agents containing
solvents to clean the inside of the windows.
Do not touch the insides of the windows
with hard objects, e.g. an ice scraper or
ring. There is otherwise a risk of damaging
the windows.
! Clean the water drainage channels of the
windshield and the rear window at regular
intervals. Deposits such as leaves, petals
and pollen may under certain
circumstances prevent water from draining
away.T his can lead to corrosion damage
and damage to electronic components.
X Cleant he inside and outside of the
windows with a damp cloth and a cleaning
agent that is recommended and approved
by Mercedes-Benz.
Cleaning the wiper blades G
WARNING
Switch off the windshield wipers and remove
the SmartKey from the ignition lock before cleaning the windshield or the wiper blades.
The windshield wipers could otherwise move
and injure you.
! Only fold the windshield wipers away from
the windshield when vertical. Otherwise,
you will damage the hood.
! Do not pull the wiper blade. Otherwise,
the wiper blade could be damaged.
! Do not clean wiper blades too often and
do not rub them too hard. Otherwise, the
graphite coating could be damaged. This
could cause wiper noise.
X Fold the windshield wiper arms away from
the windshield.
X Carefully clean the wiper blades with a
damp cloth.
X Fold the windshield wiper arms back again
before switching on the ignition.
! Hold the wiper arm securely when folding
back. The windshield could be damaged if
the wiper arm smacks against it suddenly.
Cleaning the exterior lighting !
Only use cleaning agents or cleaning
cloths which are suitable for plastic light
lenses. Unsuitable cleaning agents or
cleaning cloths could scratch or damage
the plastic light lenses.
X Cleant he plastic lenses of the exterior
lighting using a wet sponge and a mild
cleaning agent, e.g. Mercedes-Ben zcar
shampoo or cleaning cloths.
Cleaning the mirror turn signals !
Only use cleaning agents or cleaning
cloths that are suitable for plastic lenses.
Unsuitable cleaning agents or cleaning
cloths could scratch or damage the plastic
lenses of the mirror tur nsignals.
X Clean the plasti clenses of the mirror turn
signals in the exterior mirror housing using
a wet sponge and a mild cleaning agent, 268
CareMaintenance and care
Page 278 of 336
X
Open the tailgate.
X Lift the cargo compartment floor up
(Y page 239).
i Towing eye ;is located under tire
inflation compressor :.
Vehicles with atire-change tool kit X
Open the tailgate.
X Lift the cargo compartment floor up
(Y page 239).
X Remove the tire-change toolk it.
The tire-change tool kit contains:
R Jack
R Lug wrench
R One pair of gloves
R Folding wheel chock Flat tire
Preparing the vehicle
Your vehicle may be equipped with:
R MOExtended tires (tires with run-flat
properties) (Y page 275)
R a TIREFIT kit
Information on mounting a wheel
(Y page 312).
Vehicle preparation is not necessary on
vehicles with MOExtended tires.
X Stop the vehicle on solid, non-slippery and
level ground, as far away as possible from
traffic.
X Switch on the hazard warning lamps.
X Secure the vehicle against rolling away
(Y page 141).
X If possible, bring the front wheels into the
straight-ahead position.
X Switch off the engine.
X Remove the SmartKey from the ignition
lock. X
All occupants must get out of the vehicle.
Make sure that they are not endangered as
they do so.
X Make sure that no one is near the danger
area while a wheel is being changed.
Anyone who is not directly assisting in the
wheel change should, for example, stand
behind the barrier.
X Get out of the vehicle. Pay attention to
traffic conditions when doing so.
X Close the driver's door.
i Vehicles equipped with MOExtended tires
are not equipped with a TIREFIT kit at the
factory. It is therefore recommended that
you additionally equip your vehicle with a
TIREFIT kit if you mount tires that do not
feature run-flat properties, e.g. winter tires.
A TIREFIT kit can be obtained from a
qualified specialist workshop. MOExtended tires (tires with run-flat
properties)
G
WARNING
When driving in emergency mode, the driving
characteristics deteriorate, e.g. when
cornering, accelerating quickly and when
braking. There is a risk of an accident.
Do not exceed the stated maximum speed.
Avoid abrupt steering and driving maneuvers,
and driving over obstacles (curbs, potholes,
off-road). This applies in particular to a laden
vehicle.
Stop driving in emergency mode if:
R you hear banging noises.
R the vehicle starts to shake.
R you see smoke and smell rubber.
R ESP ®
is intervening constantly.
R there are tears in the sidewalls of the tire.
After driving in emergency mode, have the
wheel rims checked at a qualified specialist
workshop with regard to their further use. The
defective tire must be replaced in every case. Flat tire
275Breakdown assistance Z
Page 280 of 336
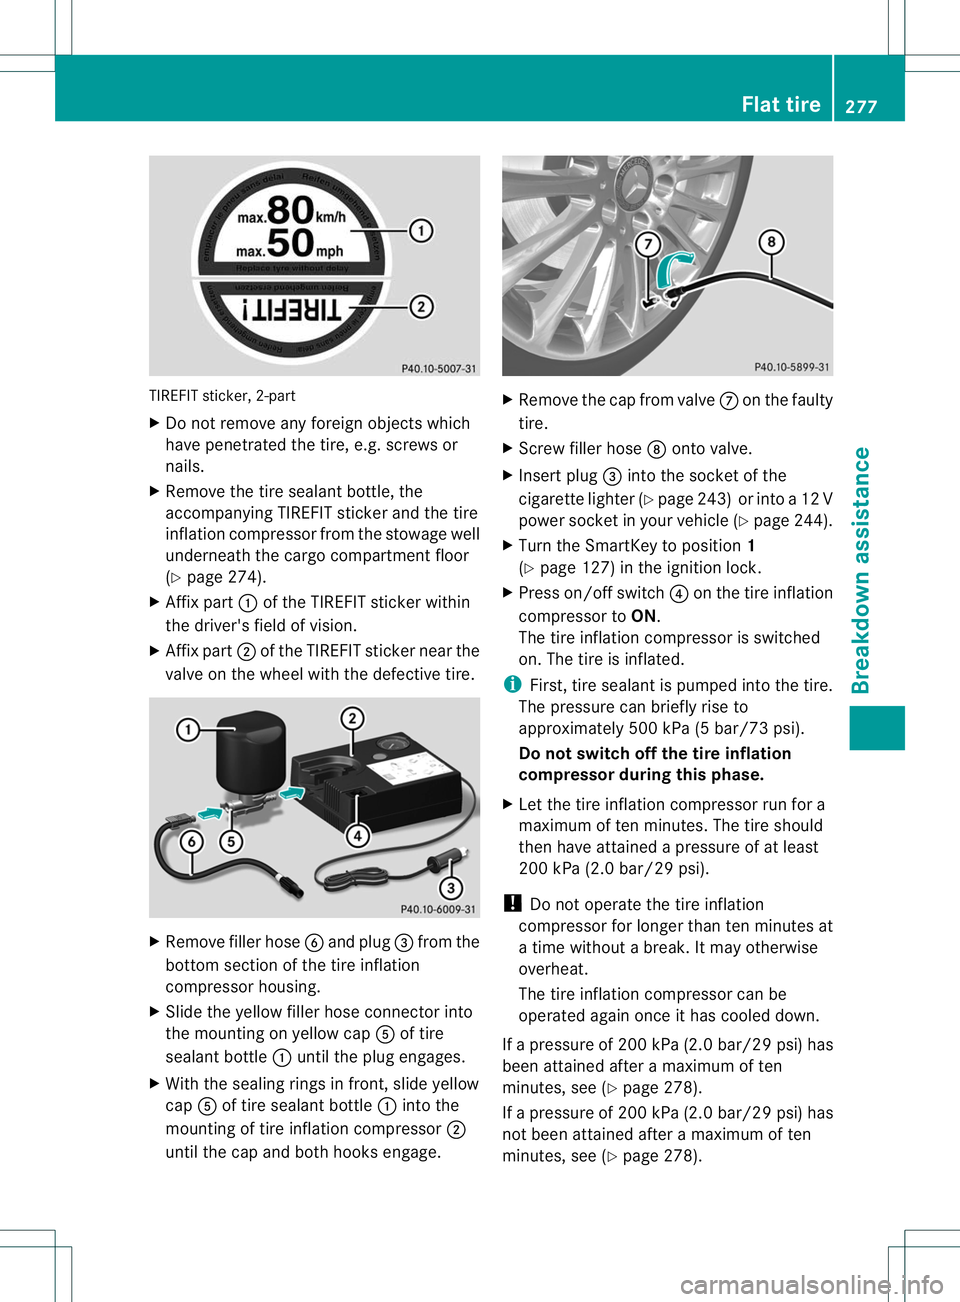
TIREFIT sticker, 2-part
X
Do not remove any foreign objects which
have penetrated the tire, e.g. screws or
nails.
X Remove the tire sealant bottle, the
accompanying TIREFIT sticker and the tire
inflation compressor from the stowage well
underneath the cargo compartment floor
(Y page 274).
X Affix part :of the TIREFIT sticker within
the driver's field of vision.
X Affix part ;of the TIREFIT sticker near the
valve on the wheel with the defective tire. X
Remove filler hose Band plug =from the
bottom section of the tire inflation
compressor housing.
X Slide the yellow filler hose connector into
the mounting on yellow cap Aof tire
sealant bottle :until the plug engages.
X With the sealing rings in front, slide yellow
cap Aof tire sealant bottle :into the
mounting of tire inflation compressor ;
until the cap and both hooks engage. X
Remove the cap from valve Con the faulty
tire.
X Screw filler hose Donto valve.
X Insert plug =into the socket of the
cigarette lighter (Y page 243) or into a 12 V
power socket in your vehicle (Y page 244).
X Turn the SmartKey to position 1
(Y page 127) in the ignition lock.
X Press on/offs witch?on the tire inflation
compressor to ON.
The tire inflatio ncompressor is switched
on. The tire is inflated.
i First, tire sealant is pumped into the tire.
The pressure can briefly rise to
approximately 500 kPa (5 bar/73 psi).
Do not switch off the tire inflation
compressor during this phase.
X Let the tire inflation compressor run for a
maximum of ten minutes. The tire should
then have attained a pressure of at least
200 kPa (2.0 bar/29 psi).
! Do not operate the tire inflation
compressor for longer than ten minutes at
a time without a break. It may otherwise
overheat.
The tire inflation compressor can be
operated again once it has cooled down.
If ap ressure of 200 kPa (2.0 bar/ 29 psi) has
been attained after a maximum of ten
minutes, see (Y page 278).
If ap ressure of 200 kPa (2.0 bar/ 29 psi) has
not been attained after a maximum of ten
minutes, see (Y page 278). Flat tire
277Breakdown assistance Z
Page 287 of 336
R
If the battery is fully discharged, leave the battery that is being used to jump-start connected
for a few minutes before attempting to start. This charges the empty battery a little.
R Make sure that the two vehicles do not touch.
Make sure that:
R the jumper cables are not damaged.
R bare parts of the terminal clamp do not come into contact with other metal parts while the
jumper cables are connected to the battery.
R the jumper cables cannot come into contact with parts such as the V-belt pulley or the fan.
These parts move when the engine is started and while it is running.
X Secure the vehicle by applying the electric parking brake.
X Shift the transmission to position P.
X Turn the SmartKey to position 0in the ignition lock and remove it.
X Switch off all electrical consumers (e.g. radio, blower, etc.).
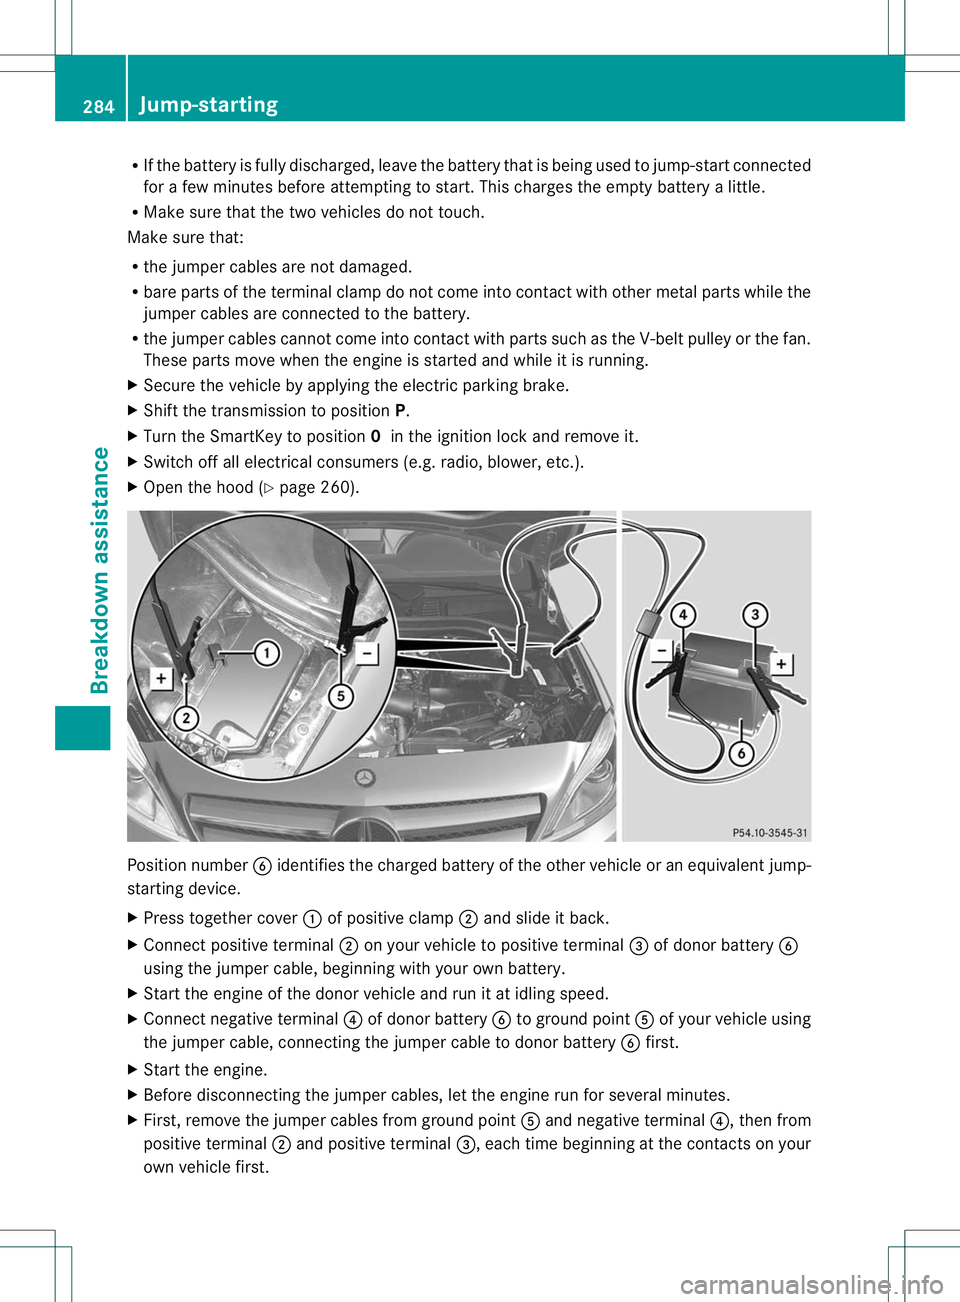
X Open the hood (Y page 260).Positio
nnumber Bidentifies the charged battery of the other vehicle or an equivalen tjump-
starting device.
X Press together cover :of positive clamp ;and slide it back.
X Connect positive terminal ;on your vehicle to positive terminal =of donor battery B
using the jumper cable, beginning with your own battery.
X Start the engine of th edonor vehicle and run it at idling speed.
X Connect negative terminal ?of donor battery Bto ground point Aof your vehicle using
the jumper cable, connecting the jumper cable to donor battery Bfirst.
X Start the engine.
X Before disconnecting the jumper cables, let the engine run for several minutes.
X First, remove the jumper cables from ground point Aand negative terminal ?, then from
positive terminal ;and positive terminal =, each time beginning at the contacts on your
own vehicle first. 284
Jump-startingBreakdown assistance
Page 288 of 336
X
Close cover :of positive terminal ;after removing the jumper cables.
X Have the battery checked at a qualified specialist workshop.
i Jump-starting is no tconsidered to be a normal operating condition.
i Jumper cables and further information regarding jump starting can be obtained at any
qualified specialist workshop. Towing and tow-starting
Important safety notes
G
WARNING
Functions relevant to safety are restricted or
no longer available if:
R the engine is not running.
R the brake system or the power steering is
malfunctioning.
R there is a malfunction in the voltage supply
or the vehicle's electrical system.
If your vehicle is being towed, much more
force may be necessary to steer or brake.
There is a risk of an accident.
In such cases, use a tow bar. Before towing,
make sure that the steering moves freely. G
WARNING
If the weight of the vehicle to be towed or tow-
started is greater than the permissible gross
weight of your vehicle:
R the towing eye could detach itself
R the vehicle/trailer combination could
rollover.
There is a risk of an accident.
When towing or tow-starting another vehicle,
its weight should not be greater than the
permissible gross weight of your vehicle.
Information on your vehicle's gross vehicle
weight rating can be found on the vehicle
identification plate (Y page 323).G
WARNING
The vehicle is braked if the HOLD function is
activated. Therefore, deactivate HOLD if the
vehicle is to be towed. !
Only secure the tow rope or tow bar at the
towing eyes. Otherwise, the vehicle could
be damaged.
! Do not use the towing eye for recovery,
as this could damage the vehicle. If in
doubt, recover the vehicle with a crane.
! When towing, pull away slowly and
smoothly. If the tractive power is too high,
the vehicles could be damaged.
! The vehicle can be towed a maximum of
30 miles (50km). The towing speed of
30 mph (50km/h) must not be exceeded.
If the vehicle has to be towed more than
30 miles (50km), the front axle must be
raised or the entire vehicle raised and
transported.
! Do not tow with sling-type equipment.
This could damage the vehicle.
! Vehicles with automatic transmission
must not be started by tow-starting. This
could otherwise damage the transmission.
It is better to have the vehicle transported
than to have it towed.
When towing a vehicle, the transmission must
be in position N.
The battery must be connected and charged.
Otherwise, you:
R cannot turn the SmartKey to position 2in
the ignition lock
R cannot shift the transmission to position
N.
i Deactivate the automatic locking feature
(Y page 191). You could otherwise be
locked out when pushing or towing the
vehicle. Towing and tow-starting
285Breakdown assistance Z