2013 MERCEDES-BENZ B-CLASS SPORTS ignition
[x] Cancel search: ignitionPage 165 of 336
PARKTRONIC is activated automatically when
you:
R
switch on the ignition
R shift the transmission to position D,Ror N
R release the electric parking brake
PARKTRONIC is deactivated at speeds above
11 mph (18 km/h). It is reactivated at lower
speeds.
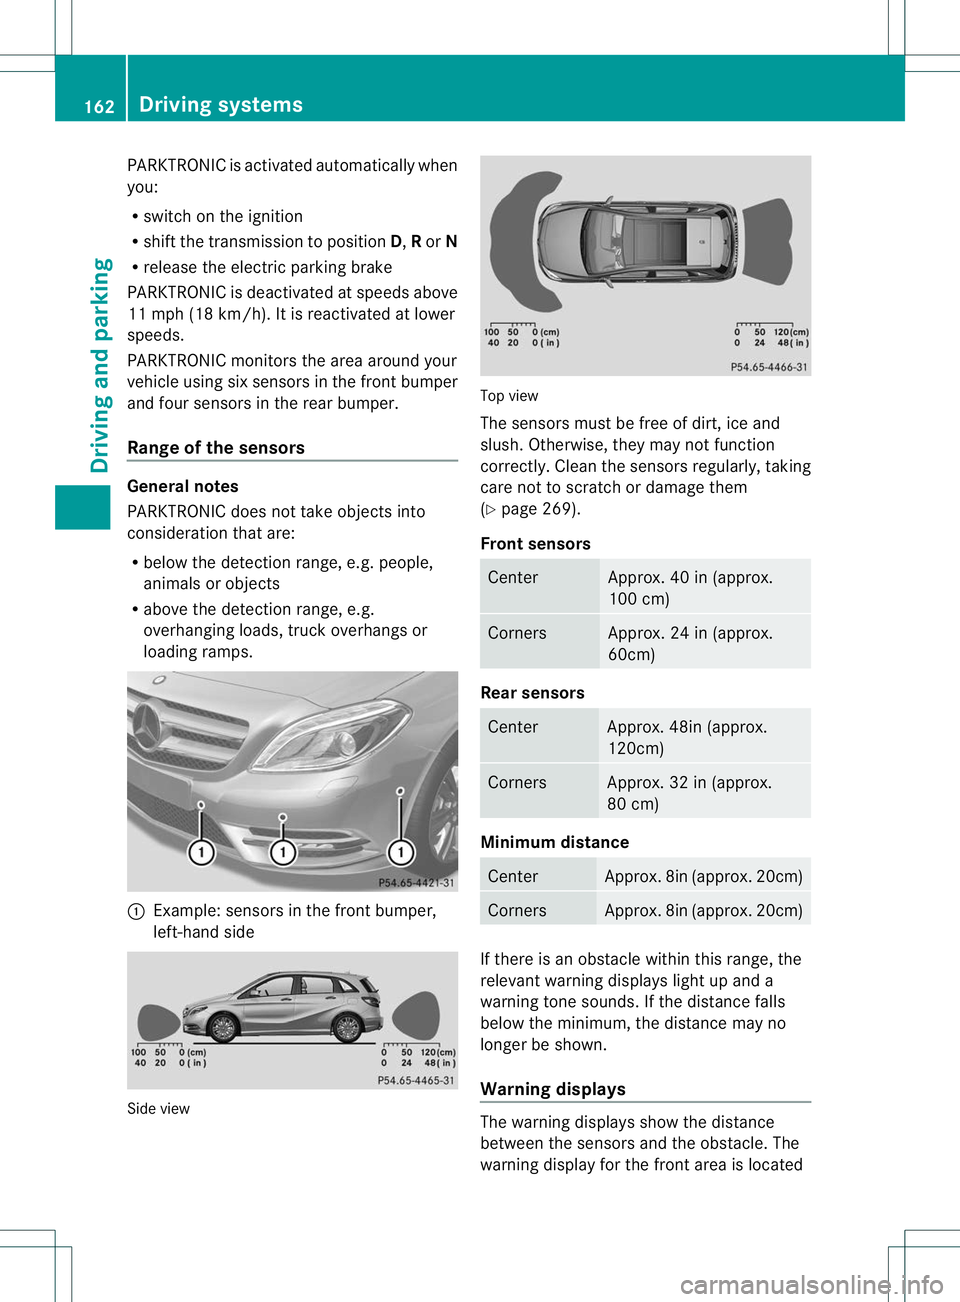
PARKTRONIC monitors the area around your
vehicle using six sensors in the frontb umper
and four sensors in the rear bumper.
Range of the sensors General notes
PARKTRONIC does no
ttake objects into
consideratio nthat are:
R below the detection range, e.g. people,
animals or objects
R above the detection range, e.g.
overhanging loads, truck overhangs or
loading ramps. :
Example: sensors in the front bumper,
left-hand side Side view Top view
The sensors must be free of dirt, ice and
slush. Otherwise, they may not function
correctly. Cleant
he sensors regularly, taking
care not to scratch or damage them
(Y page 269).
Front sensors Center Approx. 40 in (approx.
100 cm)
Corners Approx. 24 in (approx.
60cm)
Rear sensors
Center Approx. 48in (approx.
120cm)
Corners Approx. 32 in (approx.
80 cm)
Minimum distance
Center Approx. 8in (approx. 20cm)
Corners Approx. 8in (approx. 20cm)
If there is an obstacle within this range, the
relevant warning displays light up and a
warning tone sounds. If the distance falls
below the minimum, the distance may no
longer be shown.
Warning displays
The warning displays show the distance
between the sensors and the obstacle. The
warning display for the front area is located162
Driving systemsDriving and parking
Page 166 of 336
on the dashboard above the center air vents.
The warning display for the rear area is
located on the headliner in the rear
compartment.
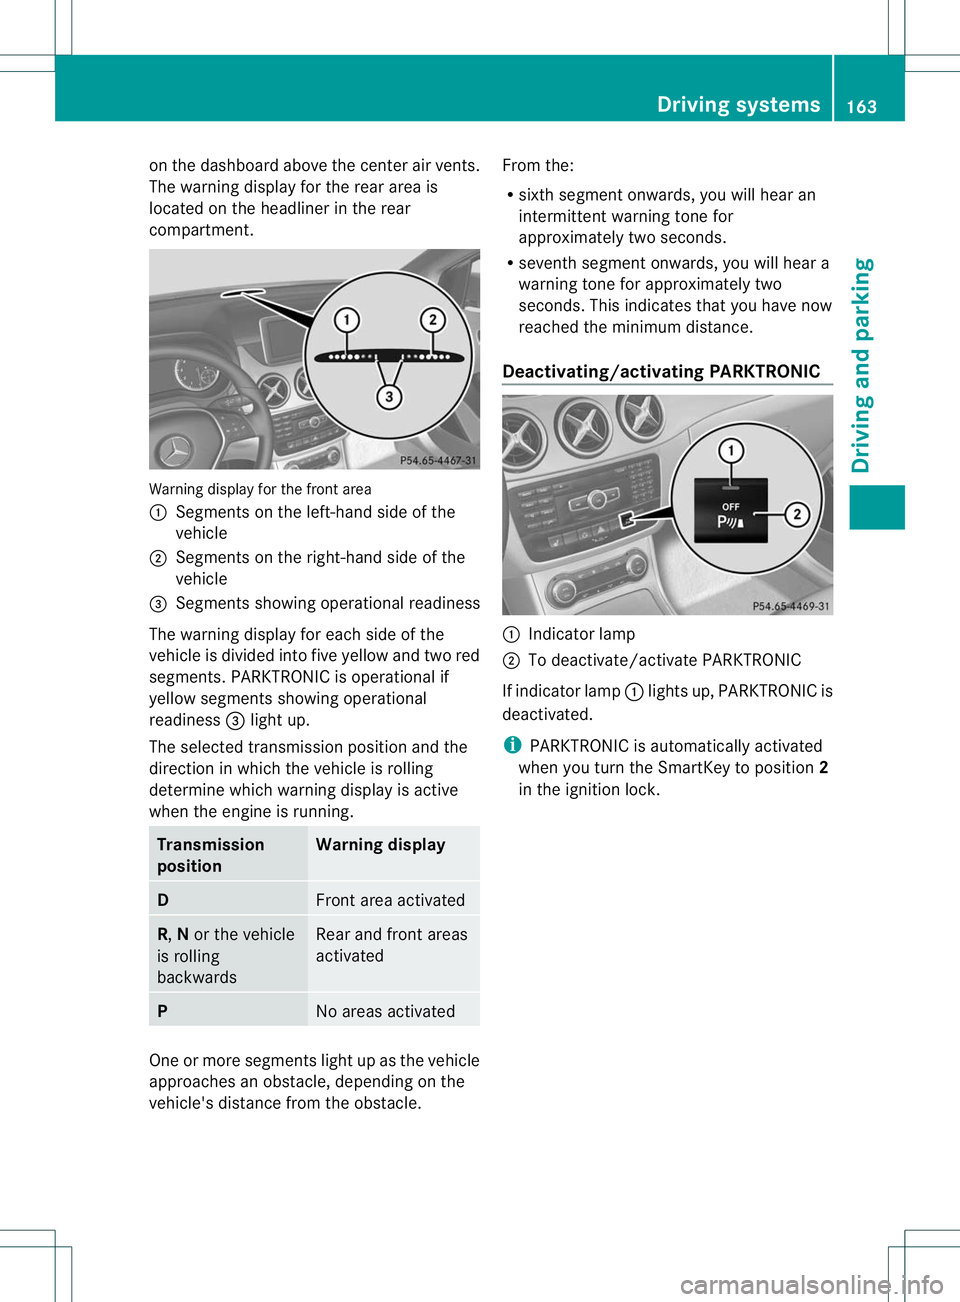
Warning display for the front area
:
Segments on the left-hand side of the
vehicle
; Segments on the right-hand side of the
vehicle
= Segments showing operational readiness
The warning display for each side of the
vehicle is divided into five yellow and two red
segments. PARKTRONIC is operational if
yellow segments showing operational
readiness =light up.
The selected transmission position and the
direction in which the vehicle is rolling
determine which warning display is active
when the engine is running. Transmission
position Warning display
D
Front area activated
R,
Nor the vehicle
is rolling
backwards Rear and front areas
activated
P
No areas activated
One or more segments light up as the vehicle
approaches an obstacle, depending on the
vehicle's distance from the obstacle. From the:
R
sixth segment onwards, you will hear an
intermittent warning tonef or
approximately two seconds.
R seventh segment onwards, you will hear a
warning tone for approximately two
seconds. This indicates that you have now
reached the minimum distance.
Deactivating/activating PARKTRONIC :
Indicator lamp
; To deactivate/activate PARKTRONIC
If indicator lamp :lights up, PARKTRONIC is
deactivated.
i PARKTRONIC is automatically activated
when you turn the SmartKey to position 2
in the ignition lock. Driving systems
163Driving and parking Z
Page 167 of 336
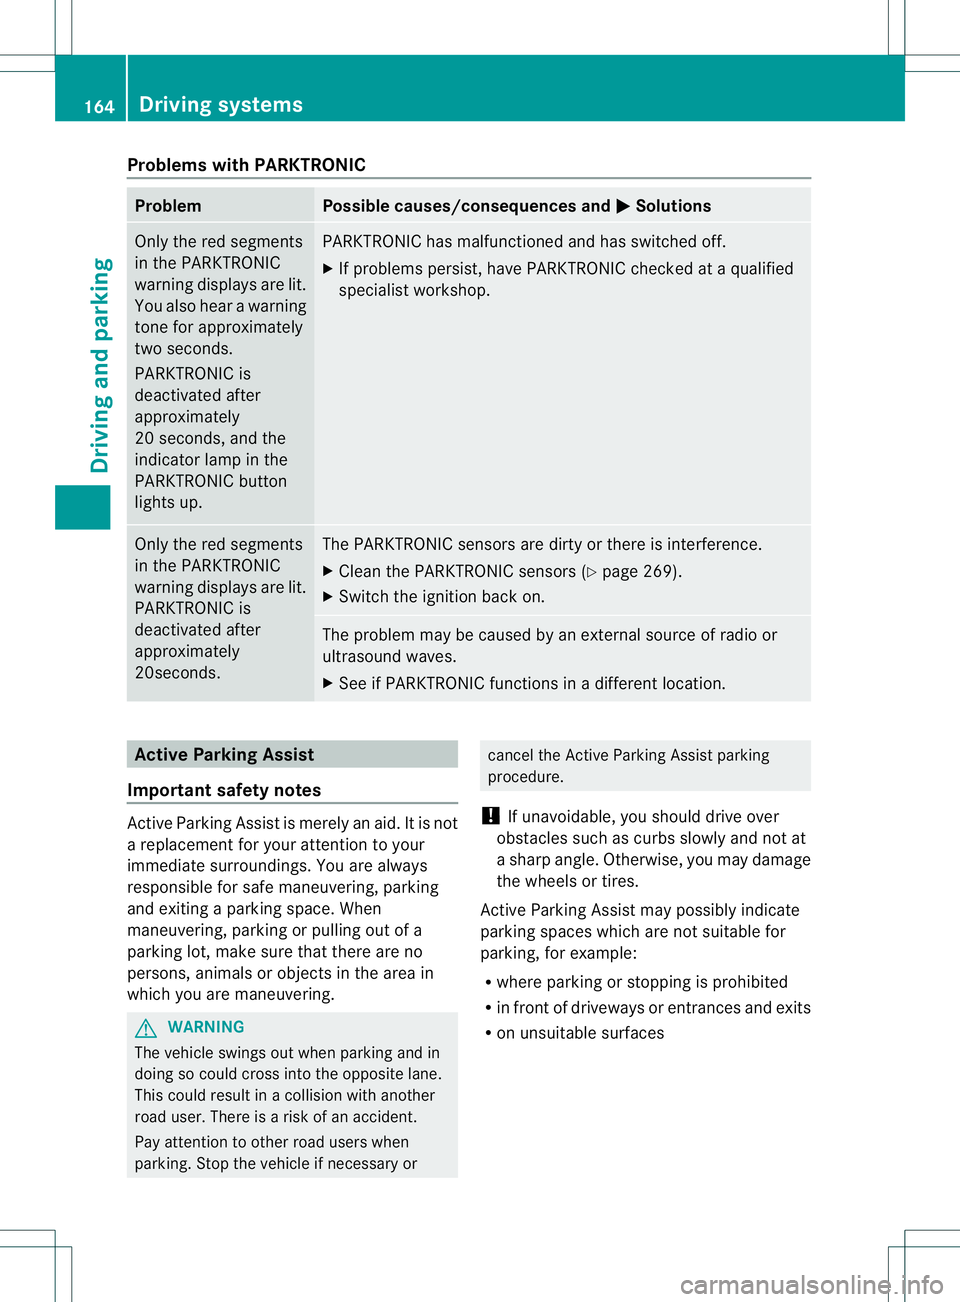
Problems with PARKTRONIC
Problem Possible causes/consequences and
M Solutions
Only the red segments
in the PARKTRONIC
warning displays are lit.
You also hear a warning
tone for approximately
two seconds.
PARKTRONIC is
deactivated after
approximately
20 seconds, and the
indicator lamp in the
PARKTRONIC button
lights up. PARKTRONIC has malfunctioned and has switched off.
X
If problems persist, have PARKTRONIC checked at a qualified
specialist workshop. Only the red segments
in the PARKTRONIC
warning displays are lit.
PARKTRONIC is
deactivated after
approximately
20seconds. The PARKTRONIC sensors are dirty or there is interference.
X
Cleant he PARKTRONIC sensors (Y page 269).
X Switch the ignition back on. The problem may be caused by an external source of radio or
ultrasound waves.
X
See if PARKTRONIC functions in a different location. Active Parking Assist
Important safety notes Active Parking Assist is merely an aid. It is not
a replacement for your attention to your
immediate surroundings. You are always
responsible for safe maneuvering, parking
and exiting a parking space. When
maneuvering, parking or pulling out of a
parking lot, make sure that there are no
persons, animals or objectsint
he area in
which you are maneuvering. G
WARNING
The vehicle swings out when parking and in
doing so could cross into the opposite lane.
This could result in a collision with another
road user. There is a risk of an accident.
Pay attention to other road users when
parking. Stop the vehicle if necessary or cancel the Active Parking Assist parking
procedure.
! If unavoidable, you should drive over
obstacles such as curbs slowly and not at
a sharp angle. Otherwise, you may damage
the wheels or tires.
Active Parking Assist may possibly indicate
parking spaces which are not suitable for
parking, for example:
R where parking or stopping is prohibited
R in front of driveways or entrances and exits
R on unsuitable surfaces 164
Driving systemsDriving and parking
Page 172 of 336
Activating/deactivating the rea
rview
camera X
To activate: make sure that the SmartKey
is in position 2in the ignition lock.
X Make sure that in the audio system/
COMAND, the "Activation by R gear"
function is selected; see the separate
operating instructions for the audio
system/COMAND.
X Engage reverse gear.
Guide lines are used to show the area
behind the vehicle in the Audio/COMAND
display.
To deactivate: the rear view camera is
deactivated if you:
R selec ttransmission position P(vehicles
with automatic transmission)
R drive forward ten meters
R shift the transmission from Rto another
position (after 15 seconds)
R drive forwards at a speed of over 5mph
(10km/h)
Displays in the Audio/COMAND display The rear view camera may show a distorted
view of obstacles, show them incorrectly or
not at all. The rear view camera does not show
objects in the following positions:
R
very close to the rear bumper
R under the rear bumper
R in the area immediately above the tailgate
handle
! Objects not at ground level may appear to
be further away than they actually are, e.g.:
R the bumper of a parked vehicle
R the drawbar of a trailer
R the ball coupling of a trailer tow hitch
R the rear section of an HGV
R a slanted post
Use the guidelines only for orientation.
Approach objects no further than the
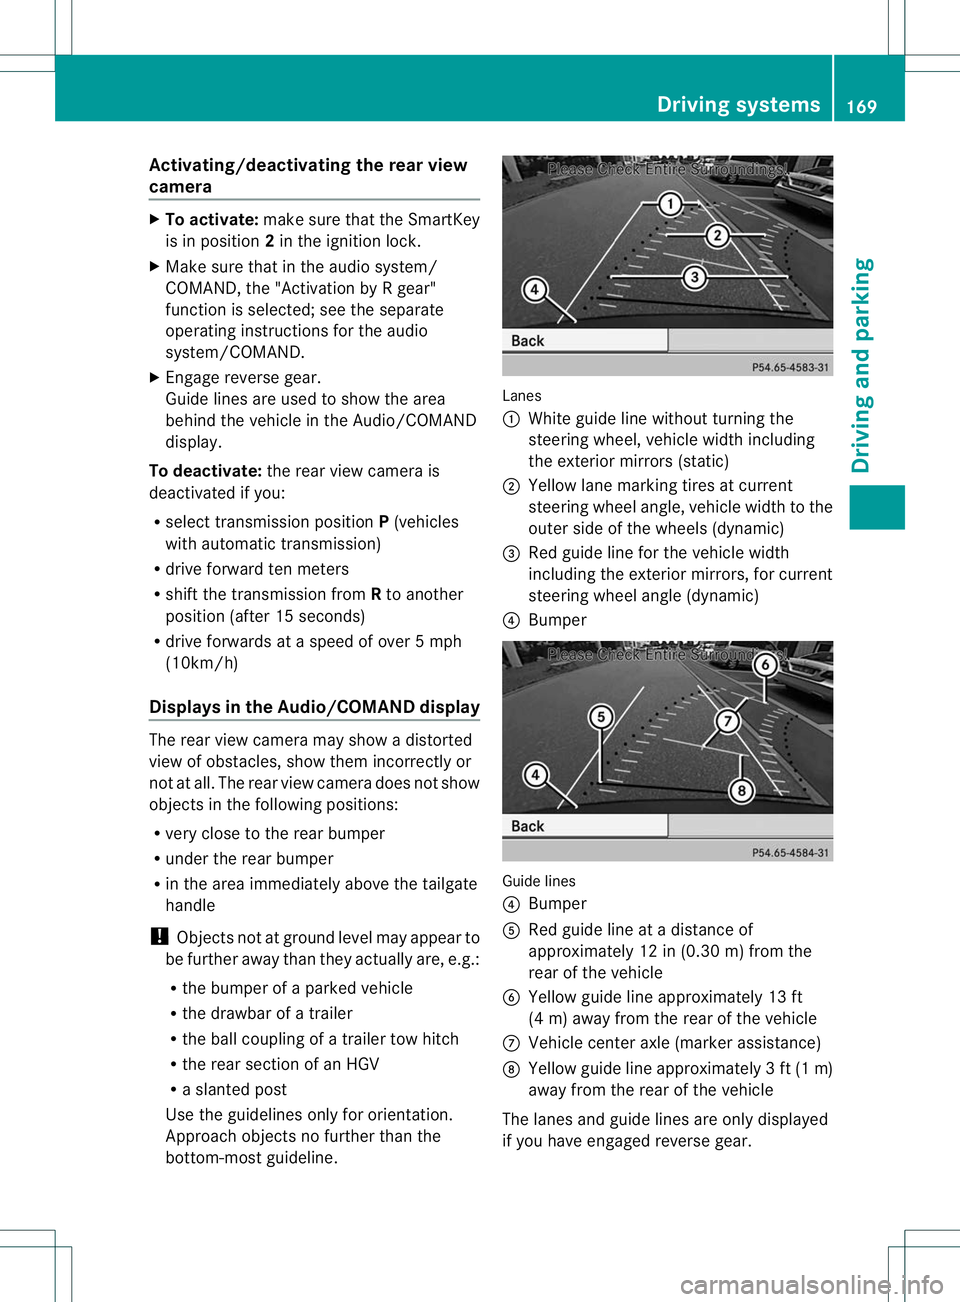
bottom-most guideline. Lanes
:
White guide line without turning the
steering wheel, vehicle width including
the exterior mirrors (static)
; Yellow lane marking tires at current
steering wheel angle, vehicle width to the
outer side of the wheels (dynamic)
= Red guide line for the vehicle width
including the exterior mirrors, for current
steering wheel angle (dynamic)
? Bumper Guide lines
?
Bumper
A Red guide line at a distance of
approximately 12 in (0.30 m) from the
rear of the vehicle
B Yellow guide line approximately 13 ft
(4 m) away from the rear of the vehicle
C Vehicle center axle (marker assistance)
D Yellow guide line approximately 3ft(1m)
away from the rear of the vehicle
The lanes and guide lines are only displayed
if you have engaged revers egear. Driving systems
169Driving and parking Z
Page 177 of 336
If the lanes are narrow, vehicles driving in the
lane beyond the lane next to yourv
ehicle may
be indicated, especially if the vehicles are not
driving in the middle of their lane. This may
be the case if the vehicles are driving on the
inner side of their lane.
Due to the nature of the system:
R warnings may be issued in error when
driving close to crash barriers or similar
solid lane borders.
R warnings may be interrupted when driving
alongside particularly long vehicles, for
example trucks, for a prolonged time.
The two sensors for Blind Spot Assist are
integrated into the sides of the rear bumper.
Make sure that the bumper is free from dirt,
ice or slush around the sensors. The rear
sensors must not be covered, for example by
bicycle racks or overhanging loads. Following
a severe impact or in the event of damage to
the bumpers, have the function of the radar
sensors checked at a qualified specialist
workshop. Blind Spot Assist may otherwise
not work properly.
Indicator and warning display
Blind Spot Assist is not active at speeds below
approximately 20 mph (30 km/h) .Vehicles in
the monitoring range are then not indicated. :
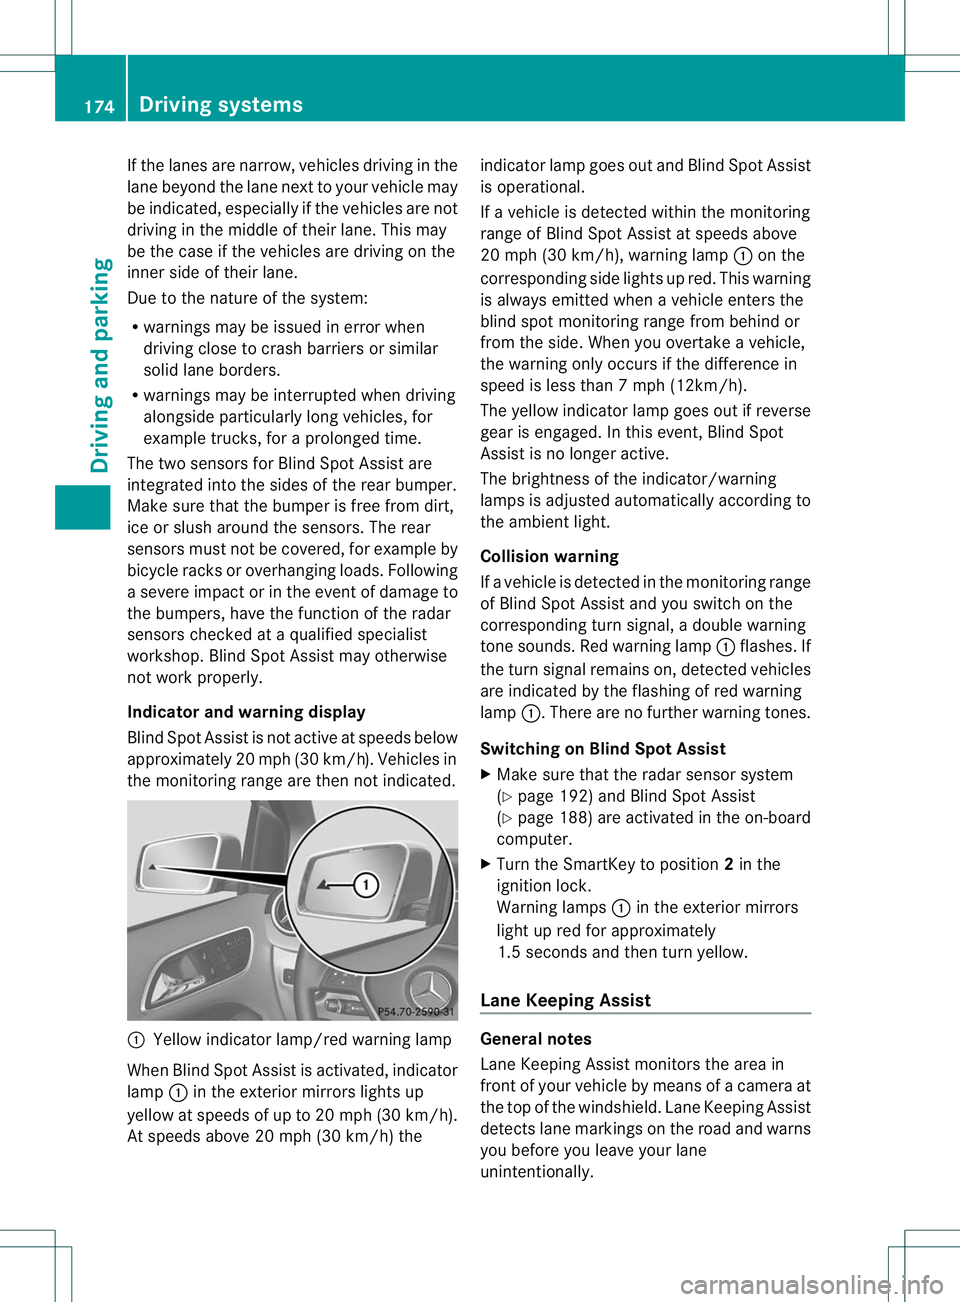
Yellow indicator lamp/red warning lamp
When Blind Spot Assist is activated, indicator
lamp :in the exterior mirrors lights up
yellow at speeds of up to 20 mph (30k m/h).
At speeds above 20 mph (30 km/h) the indicator lamp goes out and Blind Spot Assist
is operational.
If a vehicle is detected withi
nthe monitoring
range of Blind Spot Assist at speeds above
20 mph (30 km/h), warning lamp :on the
corresponding side lights up red. This warning
is always emitted when a vehicle enters the
blind spot monitoring range from behind or
from the side. When you overtake a vehicle,
the warning only occurs if the difference in
speed is less than 7mph (12km/h).
The yellow indicator lamp goes out if reverse
gear is engaged. In this event, Blind Spot
Assist is no longer active.
The brightness of the indicator/warning
lamps is adjusted automatically according to
the ambient light.
Collision warning
If a vehicle is detected in the monitoring range
of Blind Spot Assist and you switch on the
corresponding turn signal, a double warning
tone sounds. Red warning lamp :flashes. If
the turn signal remains on, detected vehicles
are indicated by the flashing of red warning
lamp :.There are no further warning tones.
Switching on Blind Spot Assist
X Make sure that the radar sensor system
(Y page 192) and Blind Spot Assist
(Y page 188) are activated in the on-board
computer.
X Turn the SmartKey to position 2in the
ignition lock.
Warning lamps :in the exterior mirrors
light up red for approximately
1.5 seconds and then turn yellow.
Lane Keeping Assist General notes
Lane Keeping Assist monitors the area in
front of your vehicle by means of a camera at
the top of the windshield. Lane Keeping Assist
detects lane markings on the road and warns
you before you leave your lane
unintentionally.174
Driving systemsDriving and parking
Page 183 of 336
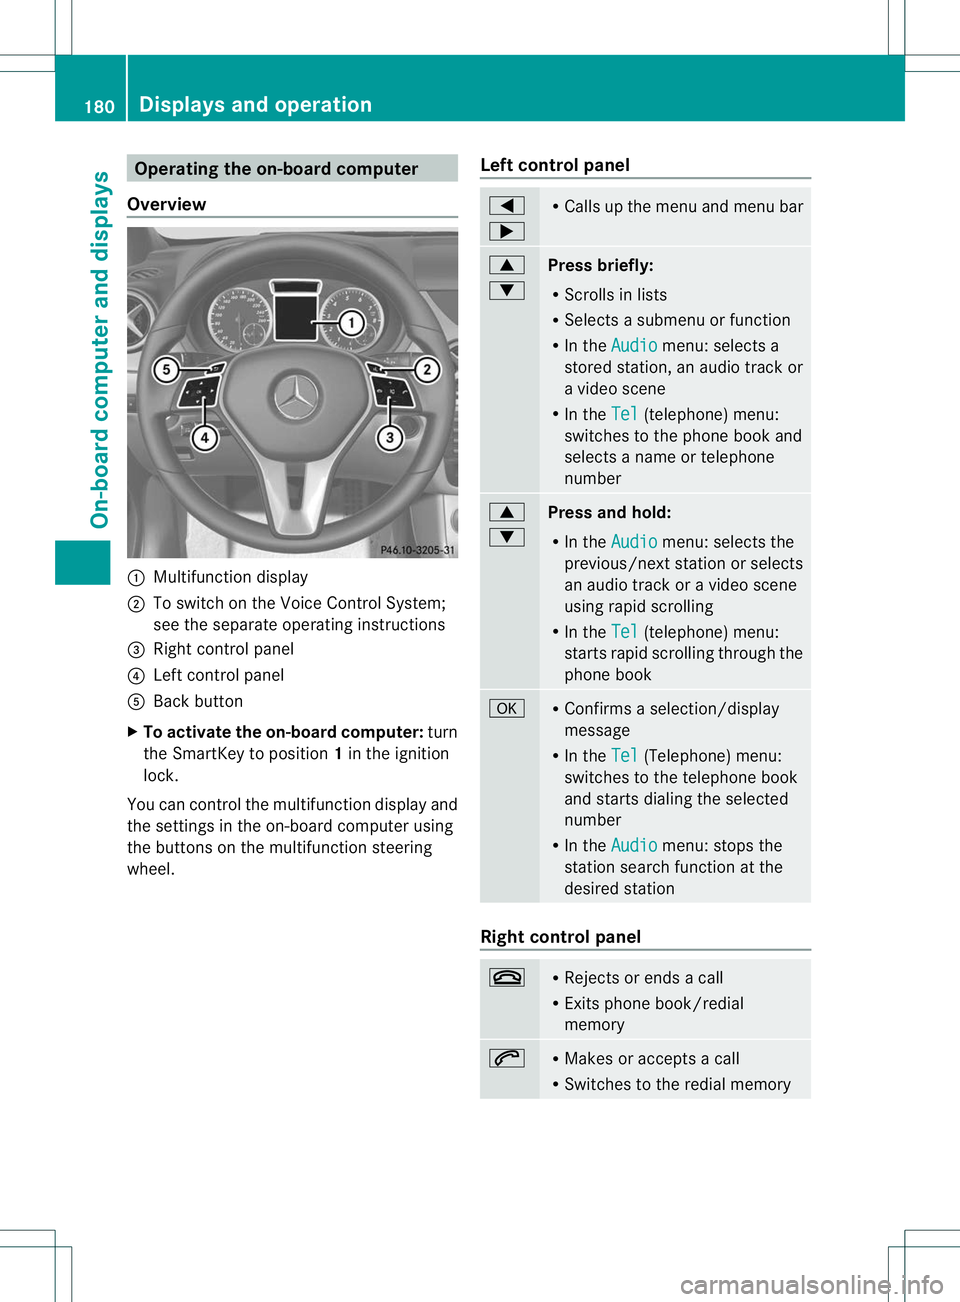
Operating the on-board computer
Overview :
Multifunction display
; To switch on the Voice Control System;
see the separate operating instructions
= Right control panel
? Left control panel
A Back button
X To activate the on-board computer: turn
the SmartKey to position 1in the ignition
lock.
You can control the multifunction display and
the settings in the on-board computer using
the buttons on the multifunction steering
wheel. Left control panel =
; R
Calls up the menu and menu bar 9
:
Press briefly:
R
Scrolls in lists
R Selects a submenu or function
R In the Audio menu: selects a
stored station, an audio trackor
a video scene
R In the Tel (telephone) menu:
switches to the phone book and
selects a name or telephone
number 9
:
Press and hold:
R
In the Audio menu: selects the
previous/next statio norselects
an audio trac koravideo scene
using rapid scrolling
R In the Tel (telephone) menu:
starts rapid scrolling through the
phone book a R
Confirms a selection/display
message
R In the Tel (Telephone) menu:
switches to the telephone book
and starts dialing the selected
number
R In the Audio menu: stops the
station search function at the
desired station Right control panel
~ R
Rejects or ends a call
R Exits phone book/redial
memory 6 R
Makes or accepts a call
R Switches to the redial memory 180
Displays and operationOn-board computer and displays
Page 185 of 336
Menus and submenus
Menu overview
Operating the on-board computer (Y page 180).
Depending on the equipment installed in the vehicle, you can call up the following menus:
R Trip menu (Y
page 182)
R Navi menu (navigationi
nstructions) (Ypage 184)
R Audio menu (Y
page 185)
R Tel menu (telephone) (Y
page 186)
R DriveAssist menu (assistance) (Y
page 187)
R Serv. menu (Y
page 189)
R Sett. menu (Y
page 189)
The Audio ,
Navi and
Tel menus differ slightly in vehicles with Audio 20 and in vehicles with
COMAND. The examples given in this Operator's Manual apply to vehicles equipped with
COMAND. Trip menu
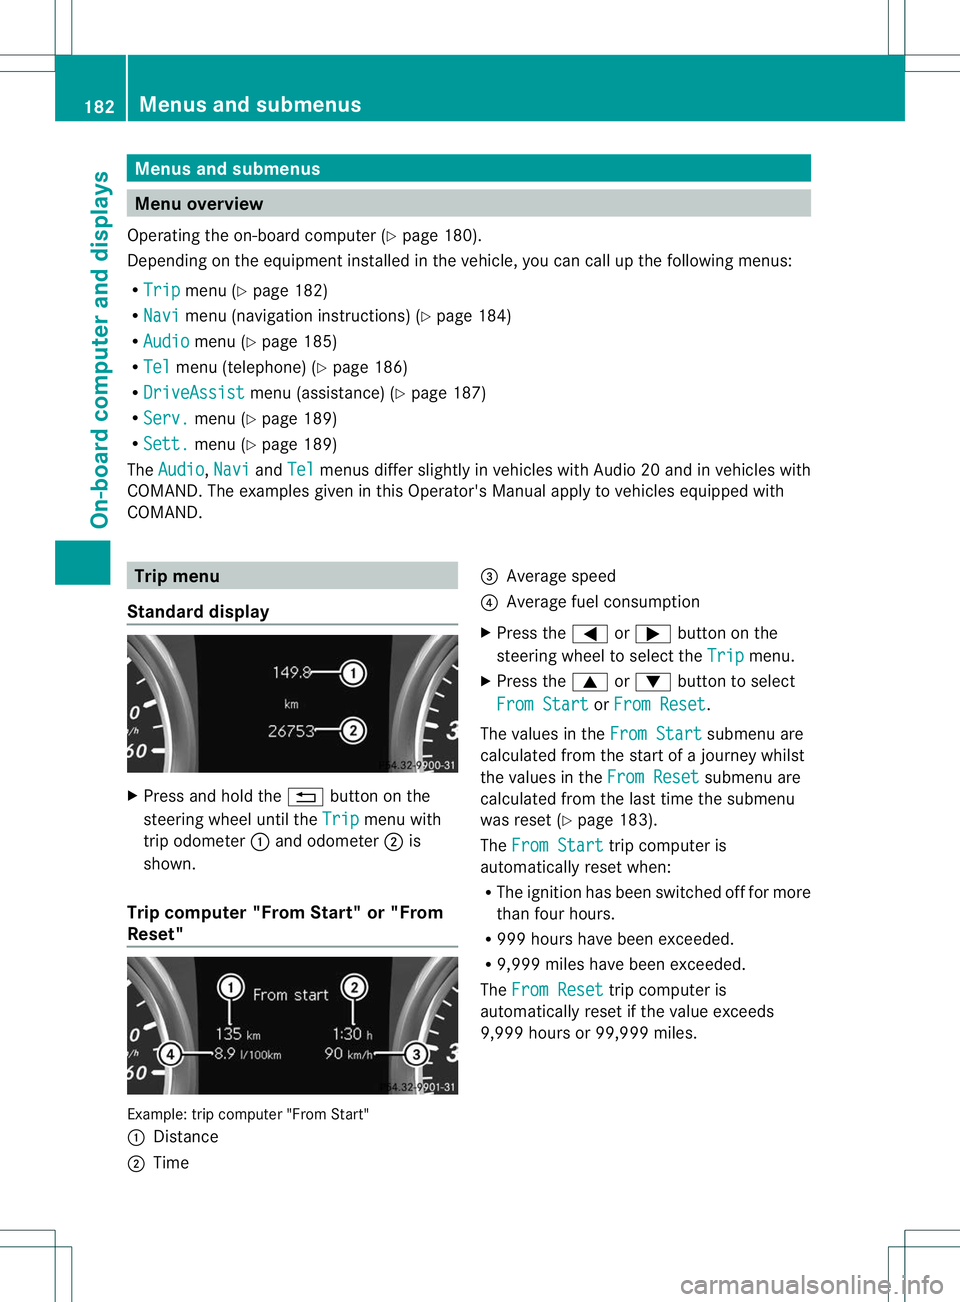
Standard display X
Press and hold the %button on the
steering wheel until the Trip menu with
trip odometer :and odometer ;is
shown.
Trip computer "From Start" or "From
Reset" Example: trip computer "From Start"
:
Distance
; Time =
Average speed
? Average fuel consumption
X Press the =or; button on the
steering wheel to select the Trip menu.
X Press the 9or: button to select
From Start or
From Reset .
The values in the From Start submenu are
calculated from the start of a journey whilst
the values in the From Reset submenu are
calculated from the last time the submenu
was reset (Y page 183).
The From Start trip computer is
automatically reset when:
R The ignition has been switched off for more
tha nfour hours.
R 999 hours have been exceeded.
R 9,999 miles have been exceeded.
The From Reset trip computer is
automatically reset if the value exceeds
9,999 hours or 99,999 miles. 182
Menus and submenusOn-board computer and displays
Page 186 of 336
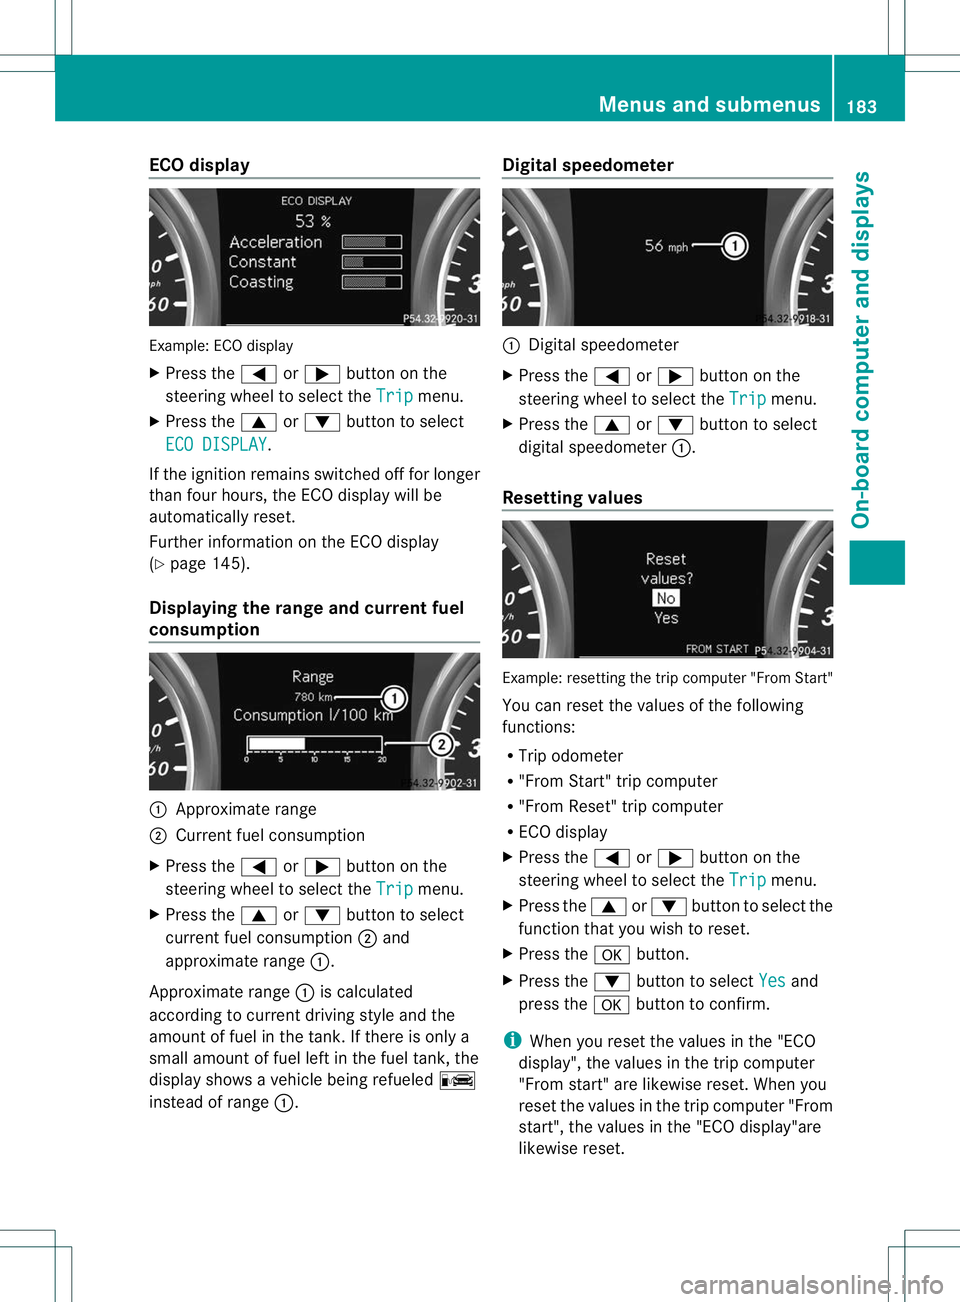
ECO display
Example
:ECO display
X Press the =or; button on the
steering wheel to selec tthe Trip menu.
X Press the 9or: button to select
ECO DISPLAY .
If the ignition remains switched off for longer
than four hours, the ECO display will be
automatically reset.
Further information on the ECO display
(Y page 145).
Displaying the range and current fuel
consumption :
Approximate range
; Current fuel consumption
X Press the =or; button on the
steering wheel to select the Trip menu.
X Press the 9or: button to select
current fuel consumption ;and
approximate range :.
Approximate range :is calculated
according to current driving style and the
amount of fuel in the tank. If there is only a
small amount of fuel left in the fuel tank, the
display shows a vehicle being refueled C
instead of range :. Digital speedometer :
Digital speedometer
X Press the =or; button on the
steering wheel to select the Trip menu.
X Press the 9or: button to select
digital speedometer :.
Resetting values Example: resetting the trip computer "From Start"
You can reset the values of the following
functions:
R
Trip odometer
R "From Start" trip computer
R "From Reset" trip computer
R ECO display
X Press the =or; button on the
steering wheel to select the Trip menu.
X Press the 9or: button to select the
function that you wish to reset.
X Press the abutton.
X Press the :button to select Yes and
press the abutton to confirm.
i When you reset the values in the "ECO
display", the values in the trip computer
"From start" are likewise reset. When you
reset the values in the trip computer "From
start", the values in the "ECO display"are
likewise reset. Menus and submenus
183On-board computer and displays Z