2012 MERCEDES-BENZ SL ROADSTER window
[x] Cancel search: windowPage 535 of 637
Selecting TV channels
Selecting channels using the control
menu
X Press the =or; button on the
remote control while the display window is active.
or
X Press the EorF button.
The TV tuner selects the previous or next
channel from the alphabetical channel list.
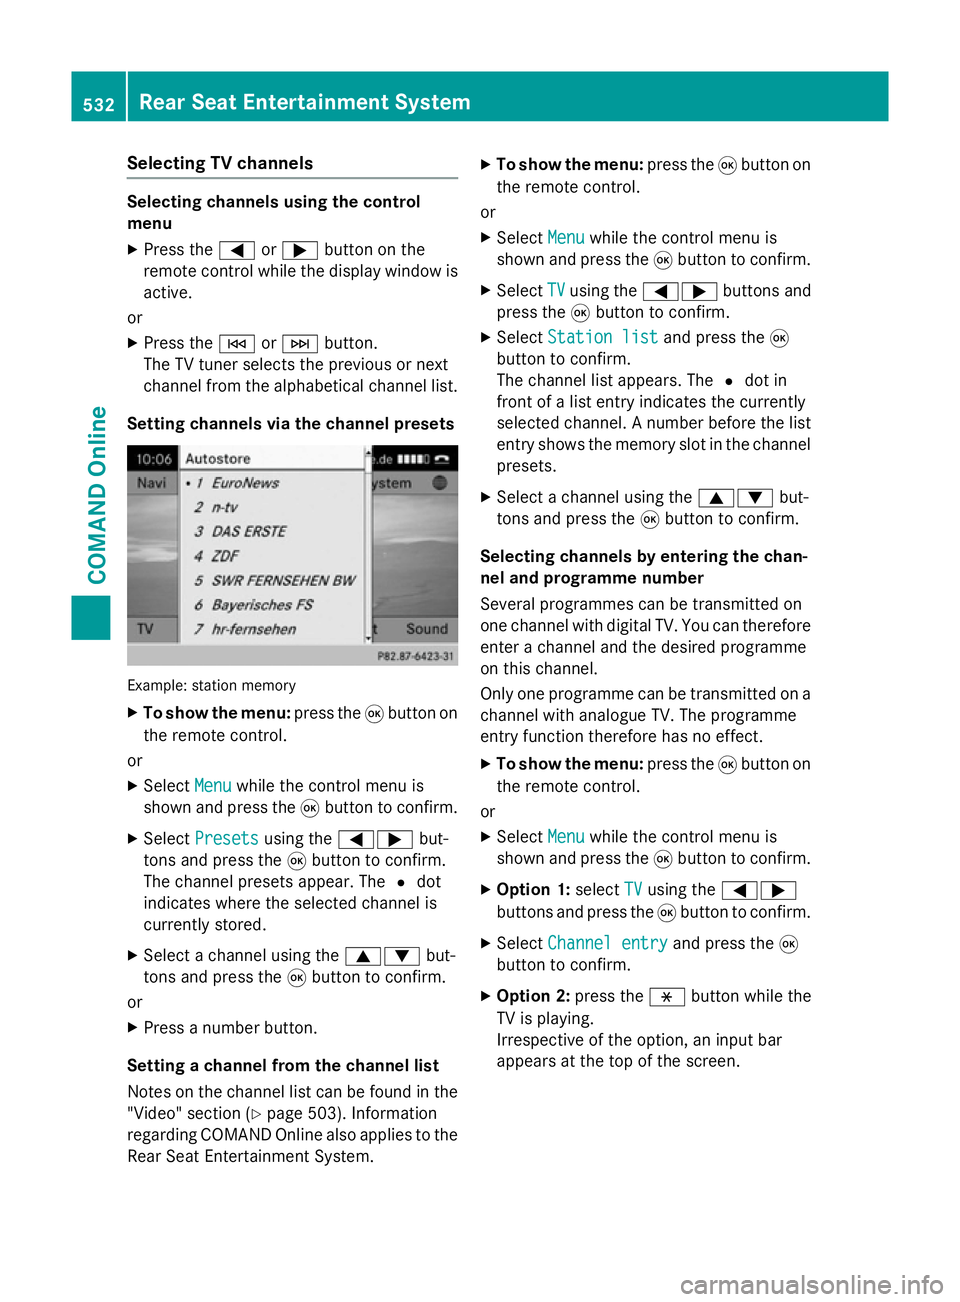
Setting channels via the channel presets Example: station memory
X
To show the menu: press the9button on
the remote control.
or
X Select Menu Menuwhile the control menu is
shown and press the 9button to confirm.
X Select Presets
Presets using the =; but-
tons and press the 9button to confirm.
The channel presets appear. The #dot
indicates where the selected channel is
currently stored.
X Select a channel using the 9:but-
tons and press the 9button to confirm.
or X Press a number button.
Setting a channel from the channel list
Notes on the channel list can be found in the
"Video" section (Y page 503). Information
regarding COMAND Online also applies to the
Rear Seat Entertainment System. X
To show the menu: press the9button on
the remote control.
or
X Select Menu
Menu while the control menu is
shown and press the 9button to confirm.
X Select TV TVusing the =; buttons and
press the 9button to confirm.
X Select Station list
Station list and press the9
button to confirm.
The channel list appears. The #dot in
front of a list entry indicates the currently
selected channel. A number before the list entry shows the memory slot in the channel
presets.
X Select a channel using the 9:but-
tons and press the 9button to confirm.
Selecting channels by entering the chan-
nel and programme number
Several programmes can be transmitted on
one channel with digital TV. You can therefore
enter a channel and the desired programme
on this channel.
Only one programme can be transmitted on a channel with analogue TV. The programme
entry function therefore has no effect.
X To show the menu: press the9button on
the remote control.
or
X Select Menu
Menu while the control menu is
shown and press the 9button to confirm.
X Option 1: selectTV TVusing the =;
buttons and press the 9button to confirm.
X Select Channel entry
Channel entry and press the9
button to confirm.
X Option 2: press thehbutton while the
TV is playing.
Irrespective of the option, an input bar
appears at the top of the screen. 532
Rear Seat Entertainment SystemCOMAND Online
Page 537 of 637
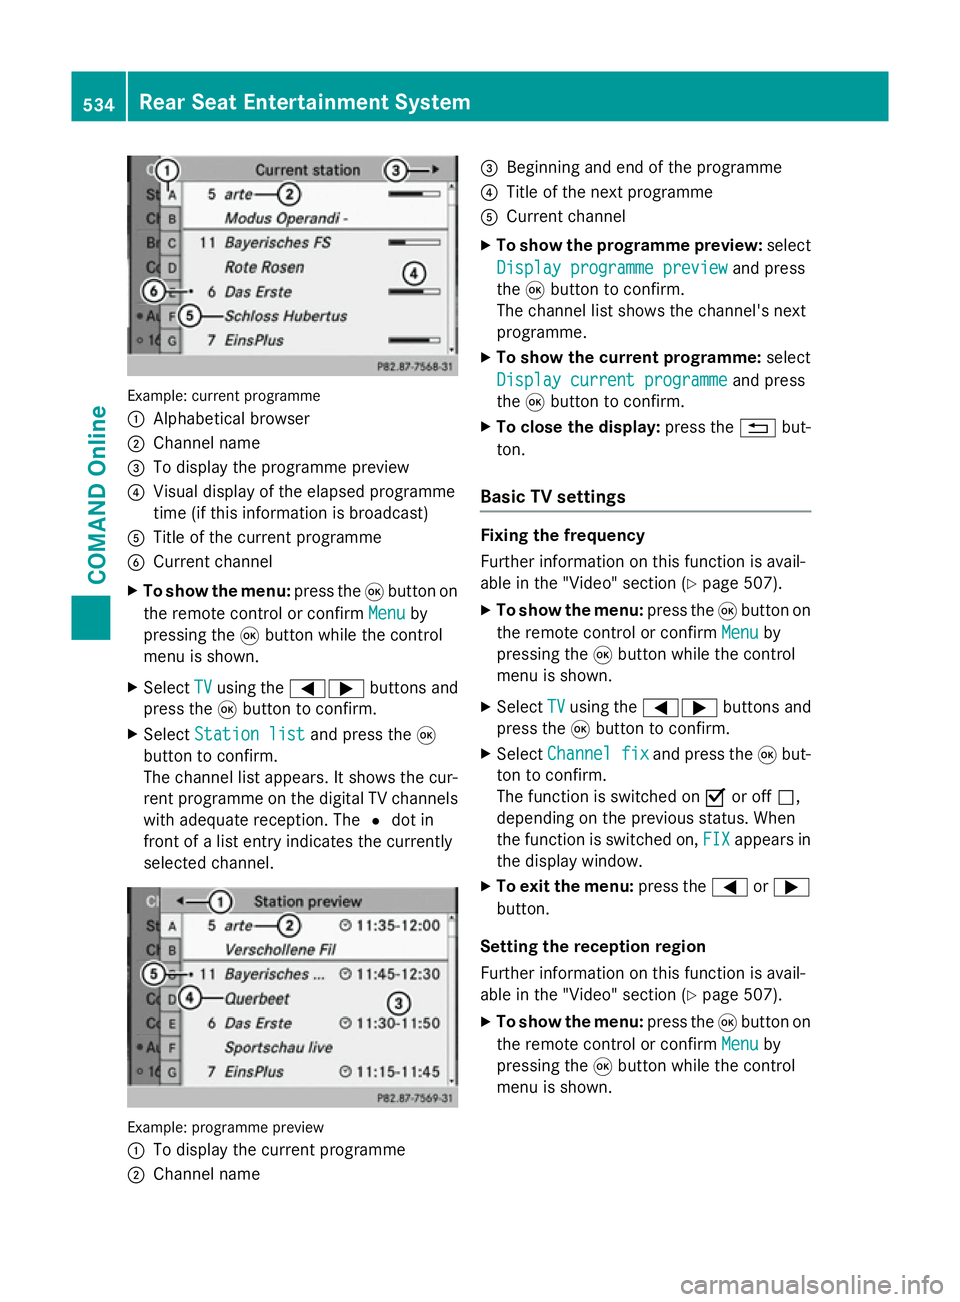
Example: current programme
:
Alphabetical browser
; Channel name
= To display the programme preview
? Visual display of the elapsed programme
time (if this information is broadcast)
A Title of the current programme
B Current channel
X To show the menu: press the9button on
the remote control or confirm Menu
Menu by
pressing the 9button while the control
menu is shown.
X Select TV
TV using the =; buttons and
press the 9button to confirm.
X Select Station list
Station list and press the9
button to confirm.
The channel list appears. It shows the cur-
rent programme on the digital TV channels
with adequate reception. The #dot in
front of a list entry indicates the currently
selected channel. Example: programme preview
:
To display the current programme
; Channel name =
Beginning and end of the programme
? Title of the next programme
A Current channel
X To show the programme preview: select
Display programme preview Display programme preview and press
the 9button to confirm.
The channel list shows the channel's next
programme.
X To show the current programme: select
Display current programme
Display current programme and press
the 9button to confirm.
X To close the display: press the%but-
ton.
Basic TV settings Fixing the frequency
Further information on this function is avail-
able in the "Video" section (Y page 507).
X To show the menu: press the9button on
the remote control or confirm Menu Menuby
pressing the 9button while the control
menu is shown.
X Select TV
TVusing the =; buttons and
press the 9button to confirm.
X Select Channel fix
Channel fix and press the9but-
ton to confirm.
The function is switched on Oor off ª,
depending on the previous status. When
the function is switched on, FIX FIXappears in
the display window.
X To exit the menu: press the=or;
button.
Setting the reception region
Further information on this function is avail-
able in the "Video" section (Y page 507).
X To show the menu: press the9button on
the remote control or confirm Menu Menuby
pressing the 9button while the control
menu is shown. 534
Rear Seat Entertainment SystemCOMAND Online
Page 545 of 637
AUX display
X Select a screen using the thumbwheel on
the remote control (Y page 520) until "L
REAR" (left-hand screen) or " RREAR" (right-
hand screen) is highlighted in the window.
X Select Aux
Aux in the menu using the
9=; buttons on the remote
control and press the 9button to confirm.
X Select Source
Source from the AUX menu and
press the 9button to confirm.
X Select Display Aux
Display Aux and press the9but-
ton to confirm.
You will see and hear the content of the
video source if it is switched to playback. If no video image is available from the AUX
source connected, you will see an audio
menu.
Setting treble and bass X
Select Treble Treble orBass
Bass in the AUX menu
and press the 9button on the remote
control to confirm.
An adjustment scale appears.
X Select a setting using the 9or:
button and press the 9button to confirm.
Adjusting the brightness, contrast or
colour X
Select Display Display Aux
AuxorDisc
Disc drive
drive Aux
Auxin
the AUX menu and press the 9button to
confirm.
X Select Brightness
Brightness, Contrast
ContrastorColour
Colour
and press the 9button to confirm.
An adjustment scale appears.
X Select a setting using the 9or:
button and press the 9button to confirm. Changing the picture format X
Select Display
Display Aux
AuxorDisc
Disc drive
drive Aux
Auxin
the AUX menu and press the 9button to
confirm.
X Select 16:9 optimised
16:9 optimised ,4:3
4:3 orWide‐
Wide‐
screen
screen using the 9: buttons and
press the 9button to confirm.
The dot in front of a menu item indicates
the current setting. 542
Rear Seat Entertainment SystemCOMAND Online
Page 562 of 637
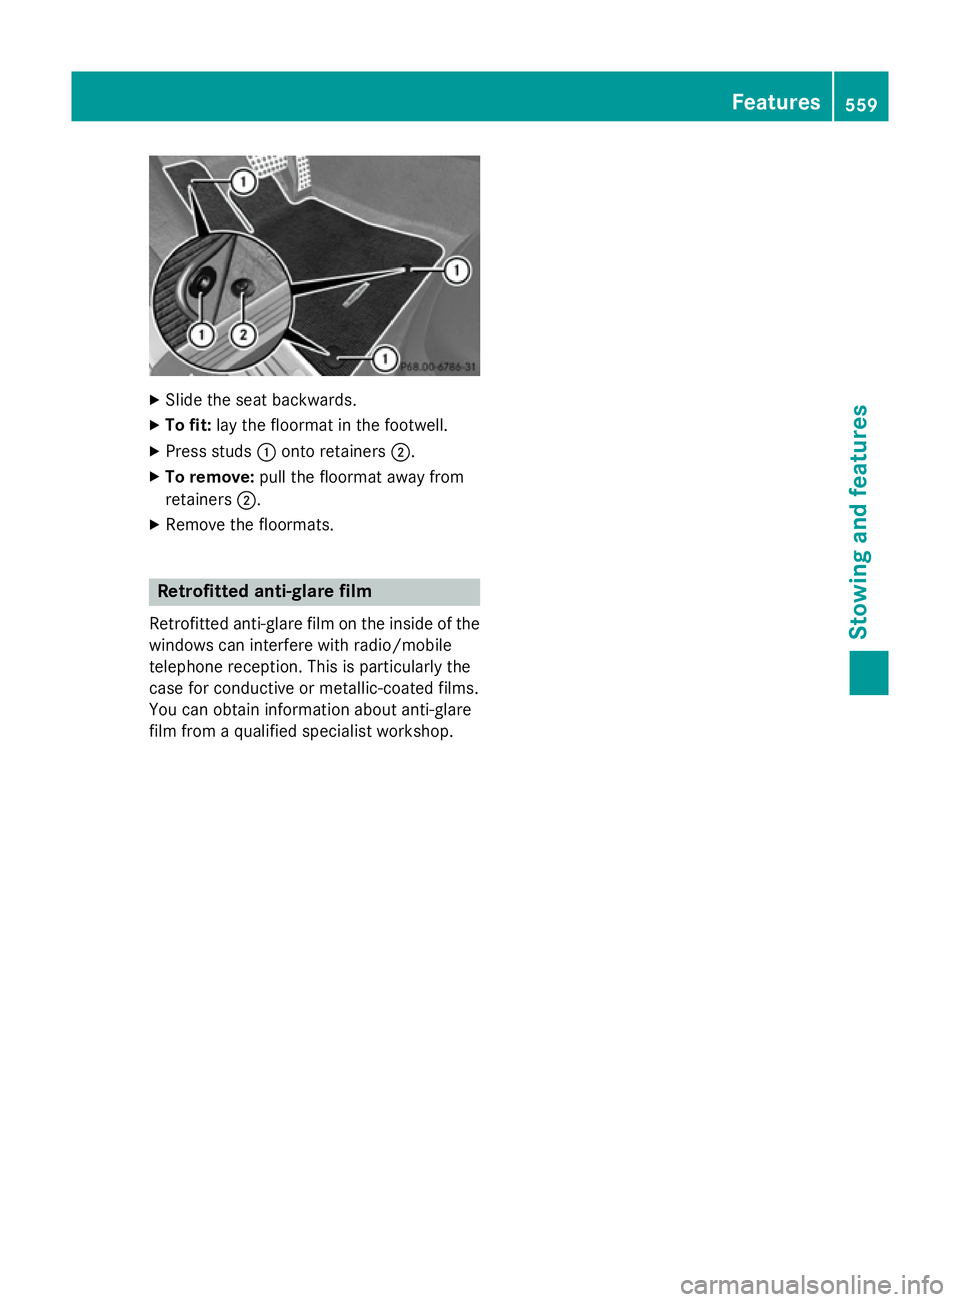
X
Slide the seat backwards.
X To fit: lay the floormat in the footwell.
X Press studs :onto retainers ;.
X To remove: pull the floormat away from
retainers ;.
X Remove the floormats. Retrofitted anti-glare film
Retrofitted anti-glare film on the inside of the
windows can interfere with radio/mobile
telephone reception. This is particularly the
case for conductive or metallic-coated films.
You can obtain information about anti-glare
film from a qualified specialist workshop. Features
559Stowing and features Z
Page 572 of 637
vehicle in a tow-through car wash. Other
transmission positions may lead to damage to the vehicle.
! Make sure that:
R the side windows and the roof are com-
pletely closed
R the climate control blower is switched off
R the windscreen wiper switch is at posi-
tion 0
The vehicle could otherwise be damaged.
You can wash the vehicle in an automatic car
wash from the very start.
Wash off excess dirt before cleaning the vehi- cle in an automatic car wash.
After using an automatic car wash, wipe wax
off the windscreen and the wiper blades. This
will prevent smears and reduce wiping noises caused by residue on the windscreen.
Washing by hand In some countries, washing by hand is only
allowed at specially equipped washing bays.
Observe the legal requirements for each indi- vidual country.
X Do not use hot water and do not wash the
vehicle in direct sunlight.
X Use a soft sponge to clean.
X Use a mild cleaning agent, such as a car
shampoo approved by Mercedes-Benz.
X Thoroughly hose down the vehicle with a
gentle jet of water.
X Do not point the water jet directly towards
the air inlet.
X Use plenty of water and rinse out the
sponge frequently.
X Rinse the vehicle with clean water and dry
thoroughly with a chamois.
X Do not let the cleaning agent dry on the
paintwork.
When using the vehicle in winter, remove all
traces of road salt deposits carefully and as
soon as possible. High-pressure cleaning equipment G
WARNING
The water jet of circular-jet nozzles (dirt grind- ers) can cause damage not visible from the
outside to tyres or chassis components. Com-
ponents damaged in this way can unexpect-
edly fail. There is a risk of an accident.
Do not use high-pressure cleaners with circu-
lar-jet nozzles to clean the vehicle. Have dam- aged tyres or chassis components replaced
immediately.
! Always maintain a distance of at least
30 cm between the vehicle and the high-
pressure cleaner nozzle. Information about
the correct distance is available from the
equipment manufacturer.
Move the high-pressure cleaner nozzle
around when cleaning your vehicle.
Do not aim directly at any of the following:
R tyres
R door gaps, roof gaps, joints etc.
R electrical components
R battery
R connectors
R lights
R seals
R trim elements
R ventilation slots
Damaged seals or electrical components
can lead to leaks or failures.
! Vehicles with HANDS-FREE ACCESS: if a
key with KEYLESS-GO is within the detec-
tion range of the KEYLESS-GO antenna, the
following situations could lead to the unin-
tentional opening of the boot lid:
R using a car wash
R using a high-pressure cleaner
Make sure that the key is at least 2 m away
from the vehicle. Care
569Maintenance and care Z
Page 573 of 637
Cleaning the paintwork
!
Do not affix:
R stickers
R films
R magnetic plates or similar items
to painted surfaces. You could otherwise
damage the paintwork.
Scratches, corrosive deposits, areas affected by corrosion and damage caused by inade-
quate care cannot always be completely
repaired. In such cases, visit a qualified spe-
cialist workshop.
X Remove impurities immediately, where
possible, whilst avoiding rubbing too hard.
X Soak insect remains with insect remover
and rinse off the treated areas afterwards.
X Soak bird droppings with water and rinse
off the treated areas afterwards.
X Remove coolant, brake fluid, tree resin,
oils, fuels and greases by rubbing gently
with a cloth soaked in petroleum ether or
lighter fluid.
X Use tar remover to remove tar stains.
X Use silicone remover to remove wax.
Care and treatment of matt paintwork !
Never polish the vehicle or the light alloy
wheels. Polishing makes the paintwork
shiny.
! The following may cause the paint to
become shiny and thus reduce the matt
effect:
R Vigorous rubbing with unsuitable mate-
rials.
R Frequent use of car washes.
R Washing the vehicle in direct sunlight.
! Never use paint cleaner, buffing or pol-
ishing products, or gloss preserver, e.g.
wax. These products are only suitable for
high-gloss surfaces. Their use on vehicles
with matt finish leads to considerable sur-
face damage (shiny, spotted areas). Always have paintwork repairs carried out
at a qualified specialist workshop.
! Do not use wash programs with a hot wax
treatment under any circumstances.
Observe these notes if your vehicle has a
clear matt finish. This will help you to avoid
damage to the paintwork due to incorrect
treatment.
These notes also apply to light-alloy wheels
with a clear matt finish.
i The vehicle should preferably be washed
by hand using a soft sponge, car shampoo
and plenty of water.
i Use only insect remover and car shampoo
from the range of recommended and
approved Mercedes-Benz care products. Cleaning vehicle parts
Cleaning the wheels !
Do not use acidic wheel cleaning products
to remove brake dust. This could damage
wheel bolts and brake components.
! Do not park up the vehicle for an extended
period straight after cleaning it, particularly after having cleaned the wheels with wheel cleaner. Wheel cleaners could cause
increased corrosion of the brake discs and
brake pads/linings. For this reason, you
should drive for a few minutes after clean-
ing. Braking heats the brake discs and the
brake pads/linings, thus drying them. The
vehicle can then be parked up.
Cleaning the windows G
WARNING
If the windscreen wipers are set in motion
when cleaning the windscreen or wiper
blades, you could become trapped. There is a danger of injury.
Always switch off the windscreen wipers and
the ignition before cleaning the windscreen orwiper blades. 570
CareMaintenance and care
Page 574 of 637
!
Only fold the windscreen wipers away
from the windscreen when vertical. Other-
wise, you will damage the bonnet.
! Do not use dry cloths, abrasive products,
solvents or cleaning agents containing sol-
vents to clean the inside of the windows. Do not touch the insides of the windows with
hard objects, e.g. an ice scraper or ring.
There is otherwise a risk of damaging the
windows.
! Clean the water drainage channels of the
windscreen and the rear window at regular intervals. Deposits such as leaves, petals
and pollen may under certain circumstan-
ces prevent water from draining away. This
can lead to corrosion damage and damage
to electronic components.
X Clean the inside and outside of the win-
dows with a damp cloth and a cleaning
agent that is recommended and approved
by Mercedes-Benz.
Cleaning the wiper blades G
WARNING
If the windscreen wipers are set in motion
when cleaning the windscreen or wiper
blades, you could become trapped. There is a danger of injury.
Always switch off the windscreen wipers and
the ignition before cleaning the windscreen or wiper blades.
! Do not pull on the wiper blade. Otherwise,
the wiper blade could be damaged.
! Do not clean wiper blades too often and
do not rub them too hard. Otherwise, the
graphite coating could be damaged. This
could cause wiper noise.
! Hold the wiper arm securely when folding
back. The windscreen could be damaged if
the wiper arm hits against it suddenly. X
Fold the wiper arms away from the wind-
screen.
X Clean the wiper blades carefully using a
damp cloth.
X Fold the windscreen wipers back again
before switching on the ignition.
Cleaning the exterior lighting !
Only use cleaning agents or cleaning
cloths that are suitable for plastic lenses.
Unsuitable cleaning agents or cleaning
cloths could scratch or damage the plastic lenses of the exterior lighting.
X Clean the plastic lenses of the exterior
lighting using a wet sponge and a mild
cleaning agent, e.g. Mercedes-Benz car
shampoo or cleaning cloths.
Mirror turn signals !
Only use cleaning agents or cleaning
cloths that are suitable for plastic lenses.
Unsuitable cleaning agents or cleaning
cloths could scratch or damage the plastic lenses of the mirror turn signals.
X Clean the plastic lenses of the mirror turn
signals in the exterior mirror housing using
a wet sponge and mild cleaning agent, e.g.
Mercedes-Benz car shampoo or cleaning
cloths.
Cleaning the sensors !
If you clean the sensors with a high-pres-
sure cleaner, make sure that you keep a
distance of at least 30 cm between the
vehicle and the high-pressure cleaner noz-
zle. Information about the correct distance is available from the equipment manufac-
turer. Care
571Maintenance and care Z
Page 590 of 637
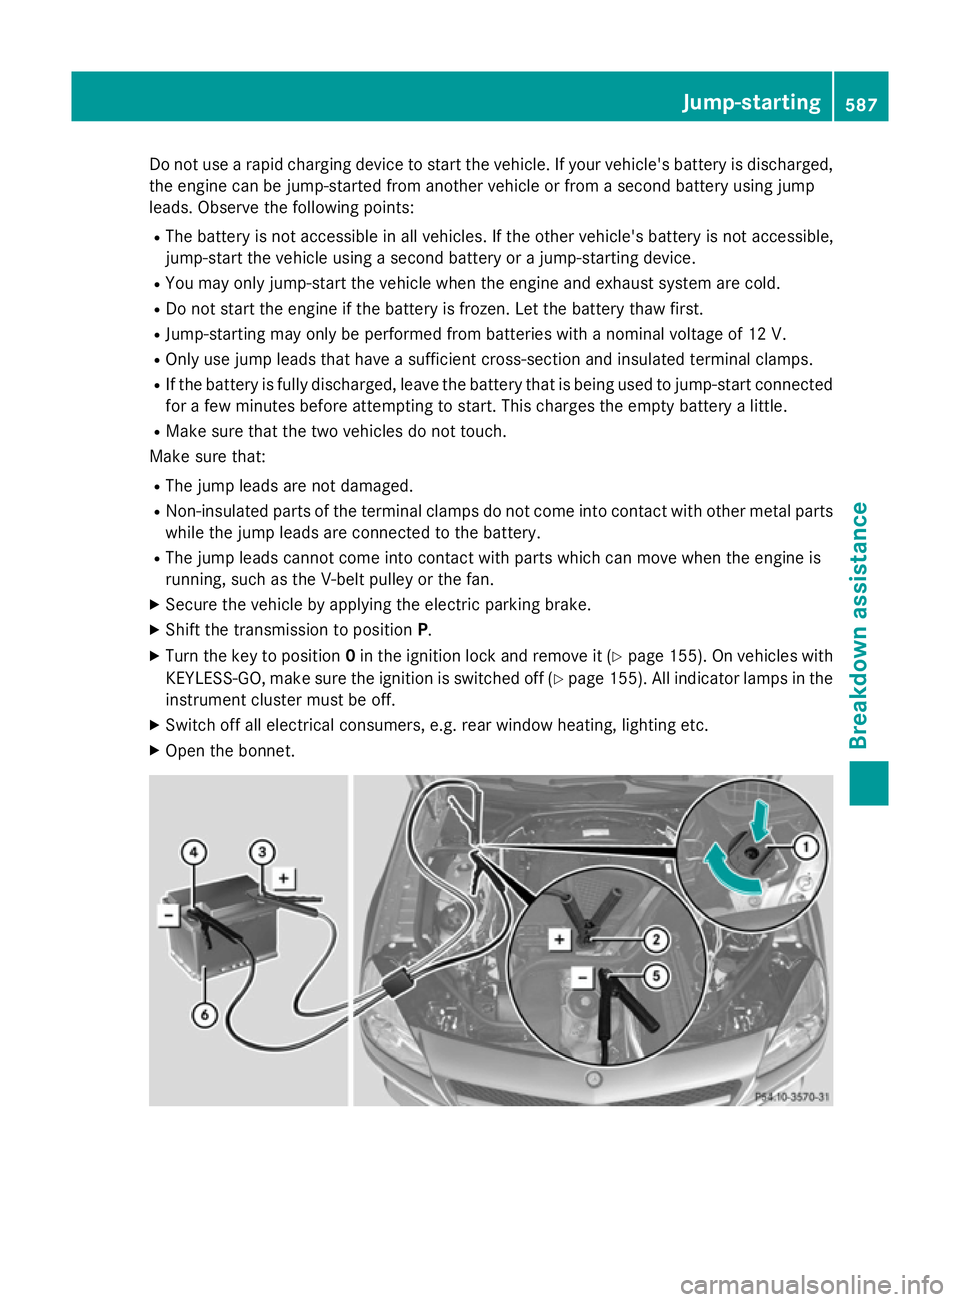
Do not use a rapid charging device to start the vehicle. If your vehicle's battery is discharged,
the engine can be jump-started from another vehicle or from a second battery using jump
leads. Observe the following points:
R The battery is not accessible in all vehicles. If the other vehicle's battery is not accessible,
jump-start the vehicle using a second battery or a jump-starting device.
R You may only jump-start the vehicle when the engine and exhaust system are cold.
R Do not start the engine if the battery is frozen. Let the battery thaw first.
R Jump-starting may only be performed from batteries with a nominal voltage of 12 V.
R Only use jump leads that have a sufficient cross-section and insulated terminal clamps.
R If the battery is fully discharged, leave the battery that is being used to jump-start connected
for a few minutes before attempting to start. This charges the empty battery a little.
R Make sure that the two vehicles do not touch.
Make sure that:
R The jump leads are not damaged.
R Non-insulated parts of the terminal clamps do not come into contact with other metal parts
while the jump leads are connected to the battery.
R The jump leads cannot come into contact with parts which can move when the engine is
running, such as the V-belt pulley or the fan.
X Secure the vehicle by applying the electric parking brake.
X Shift the transmission to position P.
X Turn the key to position 0in the ignition lock and remove it (Y page 155). On vehicles with
KEYLESS-GO, make sure the ignition is switched off (Y page 155). All indicator lamps in the
instrument cluster must be off.
X Switch off all electrical consumers, e.g. rear window heating, lighting etc.
X Open the bonnet. Jump-starting
587Breakdown assistance Z