2012 MERCEDES-BENZ SL ROADSTER remote control
[x] Cancel search: remote controlPage 544 of 637
MP3 mode
X To select a track by skipping to a track:
press the =or; button on the
remote control.
or X Press the EorF button.
The skip forward function skips to the next track.
If the elapsed track time has exceeded 8
seconds, the function skips back to the
beginning of the track.
If the elapsed track time is less than 8 sec- onds, the function skips back to the begin-
ning of the previous track.
X To select a folder: press the:button
on the remote control.
X Highlight one of the two folder symbols
with the =or; button and press 9
to confirm.
Depending on your selection, the previous
or next folder is selected and the first track
is played.
Additional setting option:
R Adjusting the sound settings (Y page 525)
Video DVD mode X To hide a menu: confirmMenu
Menu with the 9
button.
The video image is played in full screen
mode.
Additional setting options: R Adjusting the brightness, contrast and col-
our (Y page 526)
R Changing the picture format (Y page 526)
R Adjusting the sound settings (Y page 525)AUX mode
Introduction You can connect one external video source to
each of the displays of the Rear Seat Enter-
tainment System (AUX display) and also one
external video source to the rear-compart- ment drive (AUX drive) with a sound and video
signal.
Please see the corresponding operating
instructions for information on how to oper-
ate the external video source.
For further details about external video sour- ces, please consult a Mercedes-Benz Service
Centre.
Connecting AUX equipment AUX drive
The AUX drive jacks are located on the
CD/DVD drive on the right next to the
CD/DVD eject button (Y
page 521).
AUX display
The AUX display jacks are on the side of the
screen (Y page 520).
Audio and video connection X Insert the audio plugs for the left and right
signals into the corresponding Land R
jacks.
X Insert the video plug into the Vjack.
Switching to AUX mode AUX drive
X
Select Aux Auxin the menu using the
9=; buttons on the remote
control and press the 9button to confirm.
The AUX menu appears.
X Select Source
Source from the AUX menu and
press the 9button to confirm.
X Select Disc drive Aux
Disc drive Aux and press the9
button to confirm.
You will hear and see the content of the
external video source if it is connected to
the CD/DVD drive and switched to play-
back. If no video image is available from the AUX source connected, you will see an
audio menu. Rear Seat Entertainment System
541COMAND Online Z
Page 545 of 637
AUX display
X Select a screen using the thumbwheel on
the remote control (Y page 520) until "L
REAR" (left-hand screen) or " RREAR" (right-
hand screen) is highlighted in the window.
X Select Aux
Aux in the menu using the
9=; buttons on the remote
control and press the 9button to confirm.
X Select Source
Source from the AUX menu and
press the 9button to confirm.
X Select Display Aux
Display Aux and press the9but-
ton to confirm.
You will see and hear the content of the
video source if it is switched to playback. If no video image is available from the AUX
source connected, you will see an audio
menu.
Setting treble and bass X
Select Treble Treble orBass
Bass in the AUX menu
and press the 9button on the remote
control to confirm.
An adjustment scale appears.
X Select a setting using the 9or:
button and press the 9button to confirm.
Adjusting the brightness, contrast or
colour X
Select Display Display Aux
AuxorDisc
Disc drive
drive Aux
Auxin
the AUX menu and press the 9button to
confirm.
X Select Brightness
Brightness, Contrast
ContrastorColour
Colour
and press the 9button to confirm.
An adjustment scale appears.
X Select a setting using the 9or:
button and press the 9button to confirm. Changing the picture format X
Select Display
Display Aux
AuxorDisc
Disc drive
drive Aux
Auxin
the AUX menu and press the 9button to
confirm.
X Select 16:9 optimised
16:9 optimised ,4:3
4:3 orWide‐
Wide‐
screen
screen using the 9: buttons and
press the 9button to confirm.
The dot in front of a menu item indicates
the current setting. 542
Rear Seat Entertainment SystemCOMAND Online
Page 556 of 637
will find further information on charging the
battery on (Y page 582). Garage door opener
General notes The HomeLink
®
garage door opener integra-
ted in the rear-view mirror allows you to oper- ate up to three different door and gate sys-
tems.
Once programmed, the integrated garage
door opener in the rear-view mirror will
assume the function of the garage door sys-
tem's remote control. Please also read the
operating instructions for the garage door
system.
When programming a garage door opener,
park the vehicle outside the garage. Do not
run the engine while programming.
The garage door opener is only available for
certain countries. Observe the legal require-
ments for each individual country.
The HomeLink ®
garage door opener is com-
patible with most European garage and gate
opener drives. More information on Home-
Link ®
and/or compatible products is availa-
ble:
R at a qualified specialised workshop
R via the HomeLink ®
Hotline
(0) 08000 466 354 65 or alternatively
+49 (0) 6838 907-277
R on the Internet at
http://www.homelink.com
Important safety notes G
WARNING
When you operate or program the garage door with the integrated garage door opener, per-
sons in the range of movement of the garage
door can become trapped or struck by the
garage door. There is a risk of injury.
When using the integrated garage door
opener, always make sure that nobody is within the range of movement of the garage
door.
G
WARNING
Combustion engines emit poisonous exhaust
gases such as carbon monoxide. Inhaling
these exhaust gases leads to poisoning. There is a risk of fatal injury. Therefore never leave
the engine running in enclosed spaces with-
out sufficient ventilation.
Programming Programming buttons
Pay attention to the "Important safety notes"
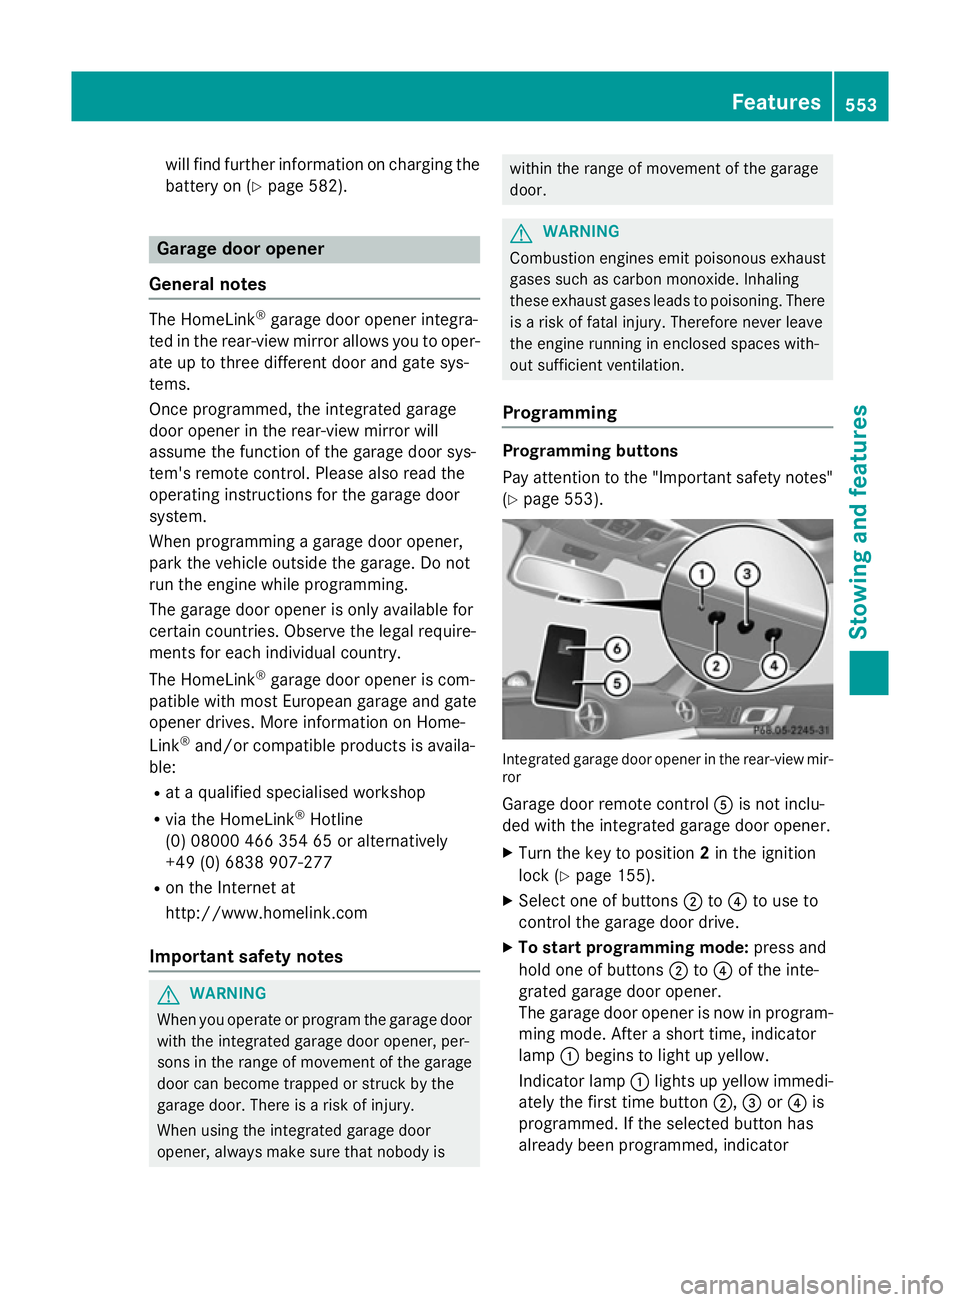
(Y page 553). Integrated garage door opener in the rear-view mir-
ror
Garage door remote control Ais not inclu-
ded with the integrated garage door opener.
X Turn the key to position 2in the ignition
lock (Y page 155).
X Select one of buttons ;to? to use to
control the garage door drive.
X To start programming mode: press and
hold one of buttons ;to? of the inte-
grated garage door opener.
The garage door opener is now in program-
ming mode. After a short time, indicator
lamp :begins to light up yellow.
Indicator lamp :lights up yellow immedi-
ately the first time button ;,=or? is
programmed. If the selected button has
already been programmed, indicator Features
553Stowing and features Z
Page 557 of 637
lamp
:lights up yellow after ten seconds
have elapsed.
X Release button ;,=or?. Indicator
lamp :flashes yellow.
X To program the remote control: point
garage door remote control Atowards
buttons ;to? on the rear-view mirror at
a distance of 5 to 20 cm.
X Press and hold button Bon remote control
A until indicator lamp :lights up green.
When indicator lamp :lights up green:
programming is finished.
When indicator lamp :flashes green: pro-
gramming was successful. The next step is to synchronise the rolling code.
X Release button Bof remote control Aof
the garage door drive.
If indicator lamp :lights up red: repeat the
programming process for the correspond-
ing button on the rear-view mirror. When
doing so, vary the distance between remote
control Aand the rear-view mirror.
The required distance between remote
control Aand the integrated garage door
opener depends on the garage door drive
system. Several attempts may be required.
You should test every position for at least
25 seconds before trying another position.
Synchronising the rolling code
Pay attention to the "Important safety notes"
(Y page 553).
If the garage door system uses a rolling code, you will also have to synchronise the garage
door system with the integrated garage door
opener in the rear-view mirror. To do this you
will need to use the programming button on
the door drive control panel. Depending on
the manufacturer, the location of the pro-
gramming button may vary. It is usually loca-
ted on the door drive unit on the garage ceil-
ing.
Familiarise yourself with the garage door
drive operating instructions, e.g. under "Pro-
gramming of additional remote controls",
before carrying out the following steps. Your vehicle must be within range of the
garage door or exterior gate drive. Make sure
that neither your vehicle nor any persons/
objects are present within the sweep of the
door or gate.
X Turn the key to position 2in the ignition
lock (Y page 155).
X Get out of the vehicle.
X Press the programming button on the door
drive unit.
Usually, you now have 30 seconds to ini-
tiate the next step.
X Get into the vehicle.
X Press previously programmed button ;,
= or? of the integrated garage door
opener until the door closes.
The rolling code synchronisation is then
complete.
Problems when programming
If you have problems when programming the
integrated garage door opener, please note
the following:
R Check the transmitter frequency used by
garage door drive remote control Aand
whether it is supported. The transmitter
frequency can usually be found on the back
of the garage door drive remote control.
R Replace the batteries in garage door
remote control A. This increases the like-
lihood that garage door remote control A
will transmit a strong and precise signal to the integrated garage door opener in the
rear-view mirror.
R When programming, hold remote control
A at varying distances and angles from the
button which you are programming. Try var- ious angles at a distance between 5and
30 cm or at the same angle but at varying
distances.
R If there is another remote control for the
same garage door drive, perform the pro-
gramming steps again using this remote
control. Before performing these steps,
make sure that new batteries have been 554
FeaturesStowing and features
Page 558 of 637
fitted in garage door drive remote control
A.
R Note that some remote controls transmit
only for a limited period (the indicator lamp
on the remote control goes out). Press but- ton Bon remote control Aagain before
transmission ends.
R Align the aerial cable of the garage door
opener unit. This can improve signal recep-
tion/transmission.
Opening or closing the garage door Once programmed, the integrated garage
door opener will assume the function of the
garage door system's remote control. Please
also read the operating instructions for the
garage door system.
X Turn the key to position 2in the ignition
lock (Y page 155).
X Press button ;,=or? which you have
programmed to operate the garage door.
Garage door system with a fixed code: indi-
cator lamp :lights up green.
Garage door system with a rolling code:
indicator lamp :flashes green.
The transmitter will transmit a signal for as
long as the button is pressed. The transmis-
sion is halted after a maximum of ten seconds
and indicator lamp :lights up yellow. Press
button ;,=or? again if necessary.
Clearing the memory Make sure that you clear the memory of the
integrated garage door opener before selling
the vehicle.
X Turn the key to position 2in the ignition
lock (Y page 155).
X Press and hold buttons ;and ?.
The indicator lamp first lights up yellow and then green.
X Release buttons ;and ?.
The memory of the integrated garage door
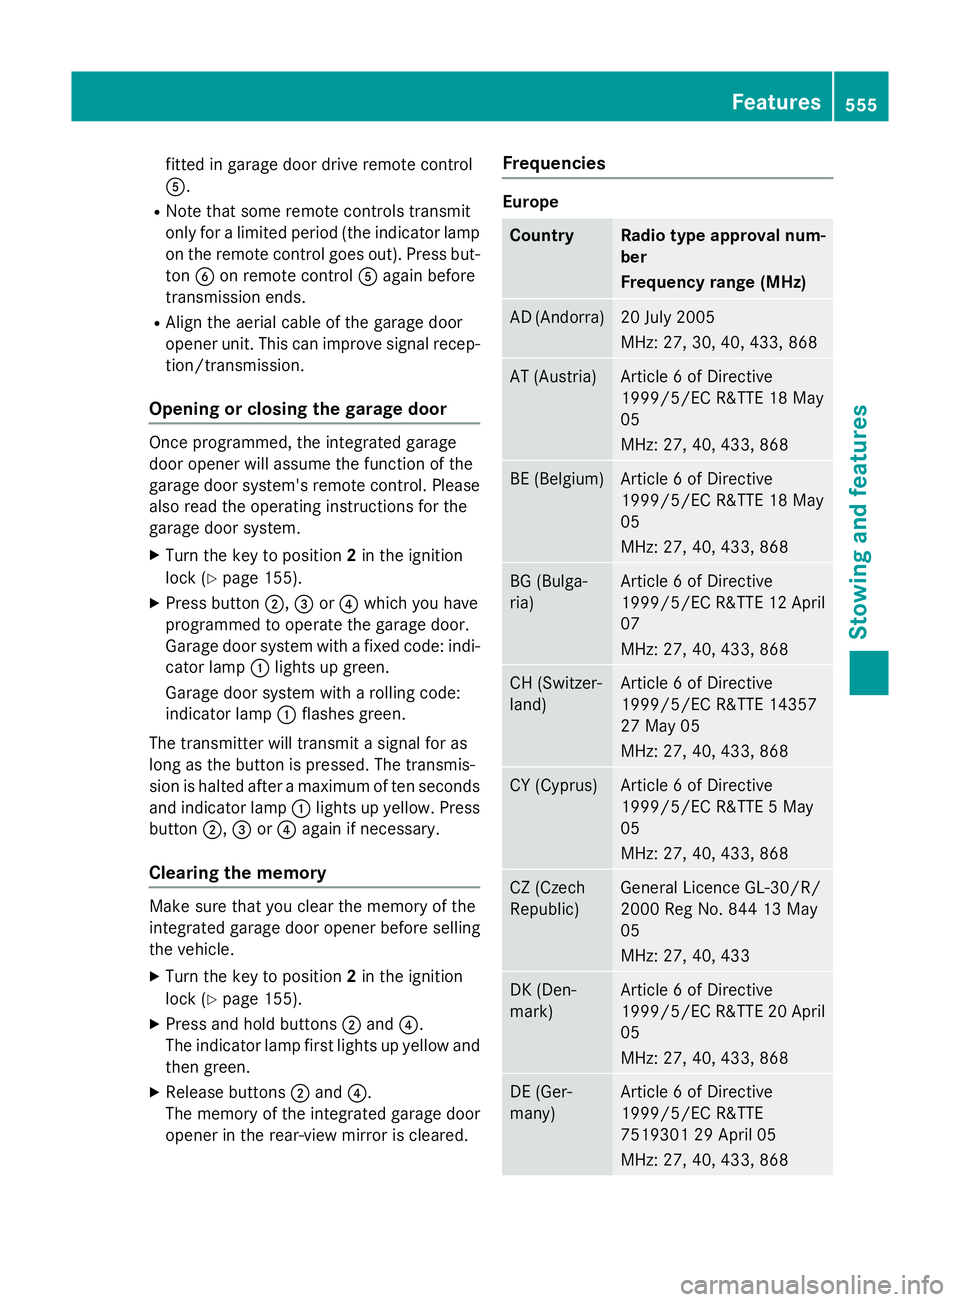
opener in the rear-view mirror is cleared. Frequencies Europe
Country Radio type approval num-
ber
Frequency range (MHz)
AD (Andorra) 20 July 2005
MHz: 27, 30, 40, 433, 868
AT (Austria) Article 6 of Directive
1999/5/EC R&TTE 18 May
05
MHz: 27, 40, 433, 868
BE (Belgium) Article 6 of Directive
1999/5/EC R&TTE 18 May
05
MHz: 27, 40, 433, 868
BG (Bulga-
ria) Article 6 of Directive
1999/5/EC R&TTE 12 April
07
MHz: 27, 40, 433, 868 CH (Switzer-
land) Article 6 of Directive
1999/5/EC R&TTE 14357
27 May 05
MHz: 27, 40, 433, 868
CY (Cyprus) Article 6 of Directive
1999/5/EC R&TTE 5 May
05
MHz: 27, 40, 433, 868
CZ (Czech
Republic) General Licence GL-30/R/
2000 Reg No. 844 13 May
05
MHz: 27, 40, 433
DK (Den-
mark) Article 6 of Directive
1999/5/EC R&TTE 20 April
05
MHz: 27, 40, 433, 868 DE (Ger-
many) Article 6 of Directive
1999/5/EC R&TTE
7519301 29 April 05
MHz: 27, 40, 433, 868 Features
555Stowing and features Z