2012 MERCEDES-BENZ SL ROADSTER remote control
[x] Cancel search: remote controlPage 401 of 637
Option 1:
X Press one of the number keys for longer
than two seconds.
The telephone basic menu displays the
selected entry. This initiates dialling.
Option 2: X Call up the telephone basic menu
(Y page 394).
X Select Call Calllists
lists by sliding VÆand turn-
ing cVd the COMAND controller and press
W to confirm.
A menu appears.
X Select Speed
Speed dial
dialpreset
preset list
listby turn-
ing cVd the COMAND controller and press
W to confirm.
The speed dial list appears.
X Select the preset and press Wto confirm.
The telephone basic menu displays the
selected entry. This initiates dialling.
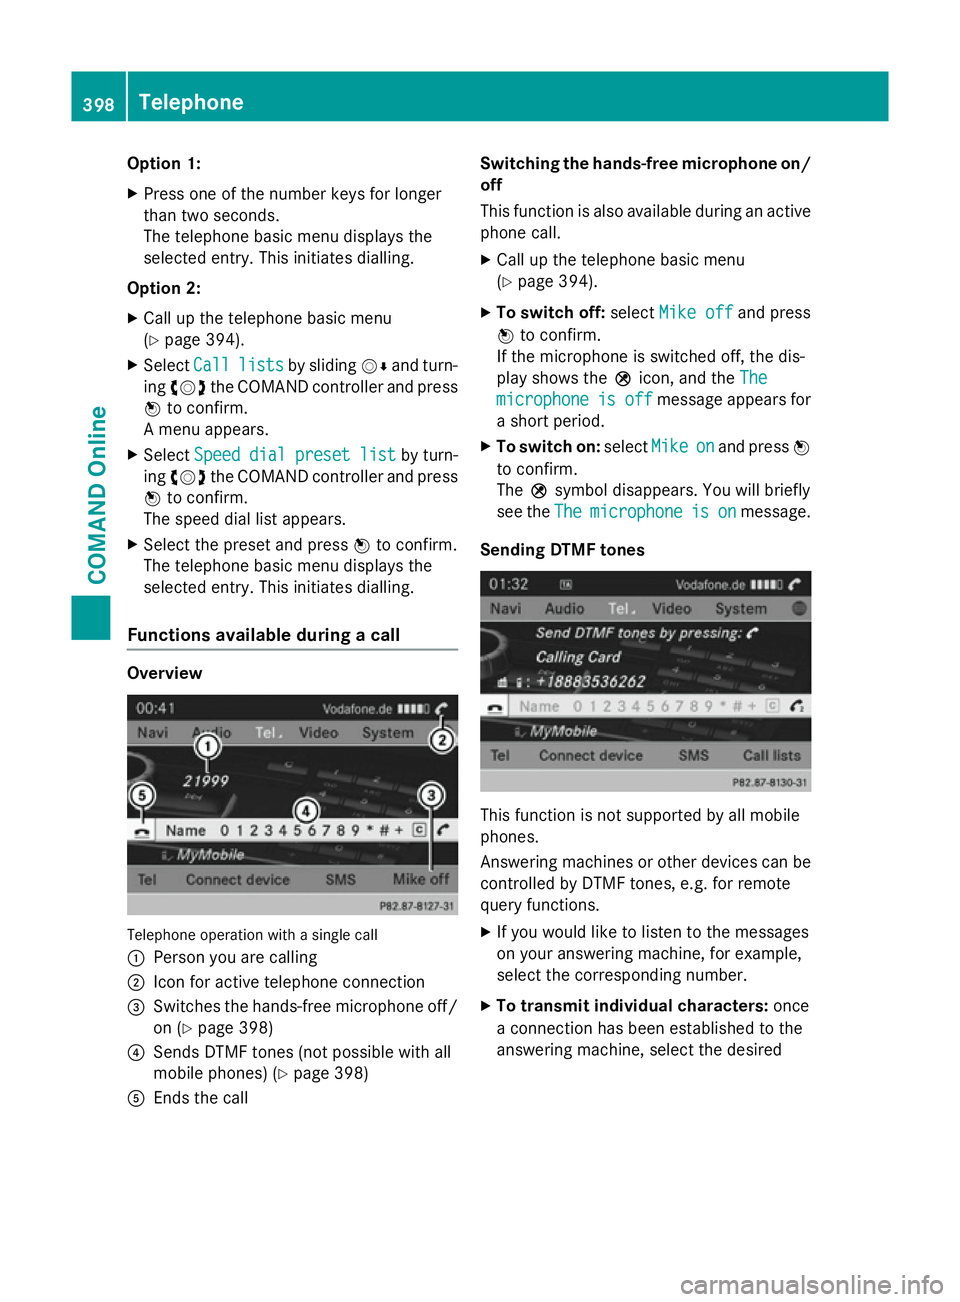
Functions available during a call Overview
Telephone operation with a single call
:
Person you are calling
; Icon for active telephone connection
= Switches the hands-free microphone off/
on (Y page 398)
? Sends DTMF tones (not possible with all
mobile phones) (Y page 398)
A Ends the call Switching the hands-free microphone on/
off
This function is also available during an active phone call.
X Call up the telephone basic menu
(Y page 394).
X To switch off: selectMike off
Mike off and press
W to confirm.
If the microphone is switched off, the dis-
play shows the Qicon, and the The The
microphone
microphone is
isoff
off message appears for
a short period.
X To switch on: selectMike
Mikeon
onand press W
to confirm.
The Qsymbol disappears. You will briefly
see the The Themicrophone
microphone is
ison
onmessage.
Sending DTMF tones This function is not supported by all mobile
phones.
Answering machines or other devices can be
controlled by DTMF tones, e.g. for remote
query functions.
X If you would like to listen to the messages
on your answering machine, for example,
select the corresponding number.
X To transmit individual characters: once
a connection has been established to the
answering machine, select the desired 398
TelephoneCOMAND Online
Page 491 of 637
Operation with Bluetooth
®
audio
Preconditions for the Bluetooth ®
audio
device Bluetooth
®
audio mode requires a Blue-
tooth ®
-capable audio device. Observe the
information in the Bluetooth ®
audio device's
operating instructions.
Before using Bluetooth ®
audio mode, you
should check your Bluetooth ®
audio device
for the following:
R Bluetooth ®
audio profile
The Bluetooth ®
audio device must support
the A2DP and AVRCP Bluetooth ®
audio
profiles.
R Bluetooth ®
visibility
Certain Bluetooth ®
audio devices require
more than simply activating the Bluetooth ®
function. In addition, your device must be
made "visible" to other devices.
R Bluetooth ®
device name
This device name is predetermined but can
usually be changed. To make a clear selec-
tion of the Bluetooth ®
device possible,
Mercedes-Benz recommends that you cus-
tomise the device name.
i A2DP (
Advanced AudioDistribution
Profile): Bluetooth ®
audio profile for audio
data transmission
AVRCP (Audio VideoRemote Control
Profile): Bluetooth ®
audio profile for audio
data playback
i Not all Bluetooth ®
audio devices available
on the market are equally suitable.
Information on suitable Bluetooth ®
audio
devices and on connecting Bluetooth ®
audio devices to COMAND Online:
R is available from your Mercedes-Benz
Service Centre
R or visit the website http://
www.mercedes-benz.com/connect X
Activate Bluetooth ®
and Bluetooth ®
visibil-
ity on the Bluetooth ®
audio device.
Preconditions in COMAND Online X
Activate the Bluetooth ®
function in
COMAND Online (Y page 313).
Connecting Bluetooth ®
audio devices General notes
Before using your Bluetooth
®
audio device
with COMAND Online for the first time, you
will need to authorise it.
When you authorise a new Bluetooth ®
audio
device, it is connected automatically. Con-
nection involves first searching for a Blue-
tooth ®
audio device and then authorising it.
You can authorise up to fifteen Bluetooth ®
devices.
i If you authorise a mobile phone that sup-
ports Bluetooth ®
audio, the A2DP and
AVRCP Bluetooth ®
audio profiles are con-
nected automatically.
The mobile phone is then entered:
R in the Bluetooth ®
telephone list
(Y page 391)
R in the Bluetooth ®
device list
(Y page 489)
Mercedes-Benz recommends authorising a mobile phone in Bluetooth ®
telephony
(Y page 391). 488
AudioCOMAND Online
Page 497 of 637
Media Interface mode
Connection options Overview
You will find the connection sockets in the
centre console stowage compartment.
Device-specific adapter cables are required
to connect external devices to the Media
Interface. These are supplied in country-spe-
cific versions with the Media Interface
(Y
page 494).
You can connect the following data carriers to
COMAND Online via the Media Interface:
R iPod ®
R iPhone ®
R certain MP3 players
i Store individual parts in a safe place.
Only use genuine Mercedes-Benz connec-
tion cables.
i iPod ®
and iPhone ®
are registered trade-
marks of Apple Inc., Cupertino, California,
USA.
i MP3 players that support MTP (
Media
Transfer Protocol) can be used.
This allows the MP3 player to be easily con- nected to the Media Interface and removed
after use. Audio data is played without
problems.
On some MP3 players, you have to activate
the relevant function; see the MP3 player
operating instructions.
Supported devices
For further details and a list of supported
devices, contact a Mercedes-Benz Service
Centre or visit the website at http://
www.mercedes-benz-mobile.com/
connect. Then, follow the instructions in the
"Media Interface" section. Connecting an external device Do not leave external devices in the vehicle.
At extreme temperatures, they cannot be
guaranteed to function correctly (see the
operating instructions of the device in ques-
tion). Examples of extreme temperatures are direct sunlight or very low outside tempera-
tures. Mercedes-Benz accepts no liability for
damage to external devices.
i Never connect more than one device at a
time. You will otherwise not be able to play
back from the external device.
USB hubs (devices with several USB con-
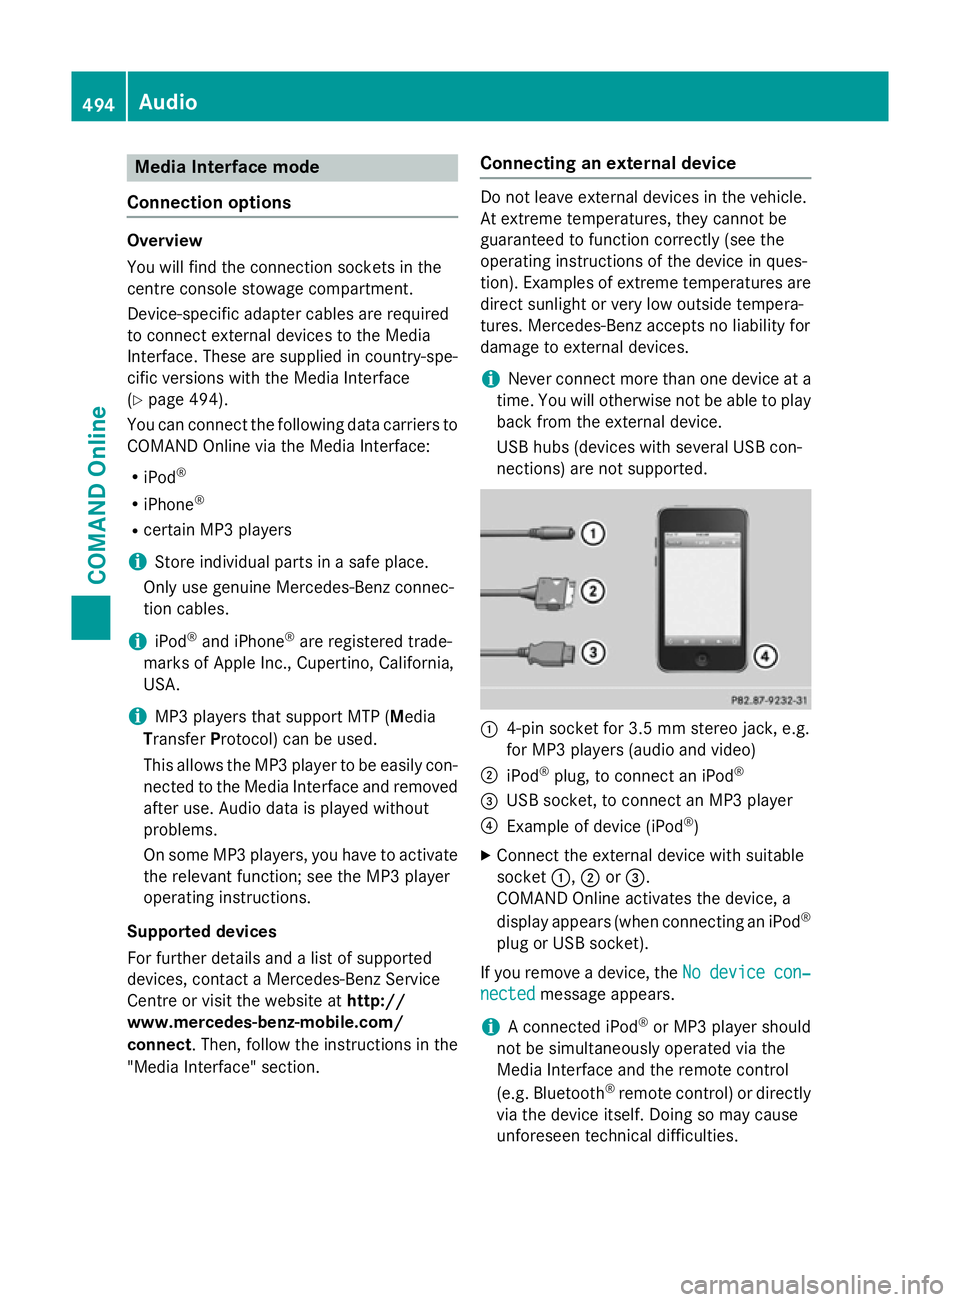
nections) are not supported. :
4-pin socket for 3.5 mm stereo jack, e.g.
for MP3 players (audio and video)
; iPod ®
plug, to connect an iPod ®
= USB socket, to connect an MP3 player
? Example of device (iPod ®
)
X Connect the external device with suitable
socket :,;or=.
COMAND Online activates the device, a
display appears (when connecting an iPod ®
plug or USB socket).
If you remove a device, the No Nodevice
device con‐
con‐
nected
nected message appears.
i A connected iPod ®
or MP3 player should
not be simultaneously operated via the
Media Interface and the remote control
(e.g. Bluetooth ®
remote control) or directly
via the device itself. Doing so may cause
unforeseen technical difficulties. 494
AudioCOMAND Online
Page 522 of 637
Rear Seat Entertainment System
Features of your COMAND Online
This Supplement describes all the standard
and optional equipment for your COMAND
Online system, as available at the time of
going to print. Country-specific differences
are possible. Please note that your
COMAND Online system may not be equip-
ped with all the features described. Overview
Important safety notes G
WARNING
The CD/DVD drive is a class 1 laser product. If you open the housing of the CD/DVD drive,
invisible laser beams may be released. These laser beams may damage your retina. There is
a risk of injury.
You must not open the casing. Always have
maintenance work and repairs carried out at a
qualified specialist workshop. G
WARNING
If objects such as headphones/headsets or
external audio/video sources are not secured in the passenger compartment, they can be
flung around and hit vehicle occupants. There
is a risk of injury, for example in the event of
sudden braking or a sudden change in direc-
tion. Always stow these items or similar objects
carefully so that they cannot be flung around,
for example in a lockable vehicle stowage
compartment.
Components The Rear Seat Entertainment System
includes:
R two screens for the rear behind the front-
seat head restraints
R a remote control
R a CD/DVD drive
R AUX jacks on both screens (AUX display)
and on the CD/DVD drive (AUX drive)
R two sets of cordless headphones Rear Seat Entertainment System
519COMAND Online Z
Page 523 of 637
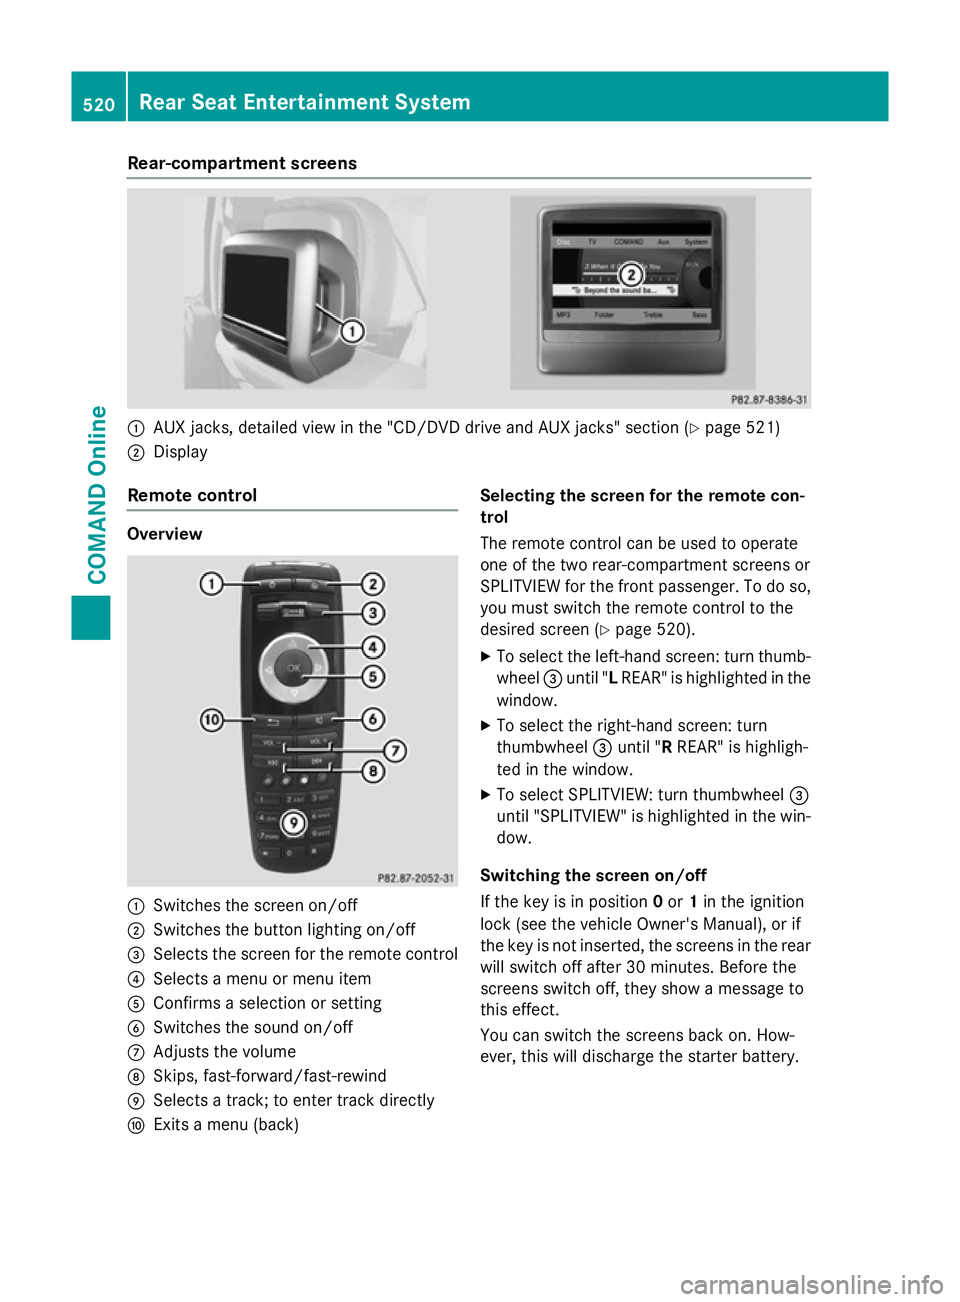
Rear-compartment screens
:
AUX jacks, detailed view in the "CD/DVD drive and AUX jacks" section (Y page 521)
; Display
Remote control Overview
:
Switches the screen on/off
; Switches the button lighting on/off
= Selects the screen for the remote control
? Selects a menu or menu item
A Confirms a selection or setting
B Switches the sound on/off
C Adjusts the volume
D Skips, fast-forward/fast-rewind
E Selects a track; to enter track directly
F Exits a menu (back) Selecting the screen for the remote con-
trol
The remote control can be used to operate
one of the two rear-compartment screens or
SPLITVIEW for the front passenger. To do so,
you must switch the remote control to the
desired screen (Y page 520).
X To select the left-hand screen: turn thumb-
wheel =until "L REAR" is highlighted in the
window.
X To select the right-hand screen: turn
thumbwheel =until "R REAR" is highligh-
ted in the window.
X To select SPLITVIEW: turn thumbwheel =
until "SPLITVIEW" is highlighted in the win-
dow.
Switching the screen on/off
If the key is in position 0or 1in the ignition
lock (see the vehicle Owner's Manual), or if
the key is not inserted, the screens in the rear
will switch off after 30 minutes. Before the
screens switch off, they show a message to
this effect.
You can switch the screens back on. How-
ever, this will discharge the starter battery. 520
Rear Seat Entertainment SystemCOMAND Online
Page 524 of 637
X
Point the remote control at the rear-com-
partment screen that has been selected for
remote operation.
X Press button :on the remote control
(Y page 520).
The respective rear screen switches on or
off.
i You can only switch the screens on using
the remote control if the ignition is
switched on.
Switching the button lighting on/off
X Press button ;on the remote control
(Y page 520).
Depending on the previous status, the but-
ton lighting is switched on or off.
i If you do not use the remote control for
about 15 seconds, the button lighting
switches off automatically.
Switching the sound on/off
X Press button Bon the remote control
(Y page 520).
The sound is switched on/off.
Selecting a menu/menu item and con-
firming your selection X Select a menu/menu item using the
=;9: buttons on the
remote control and press the 9button to
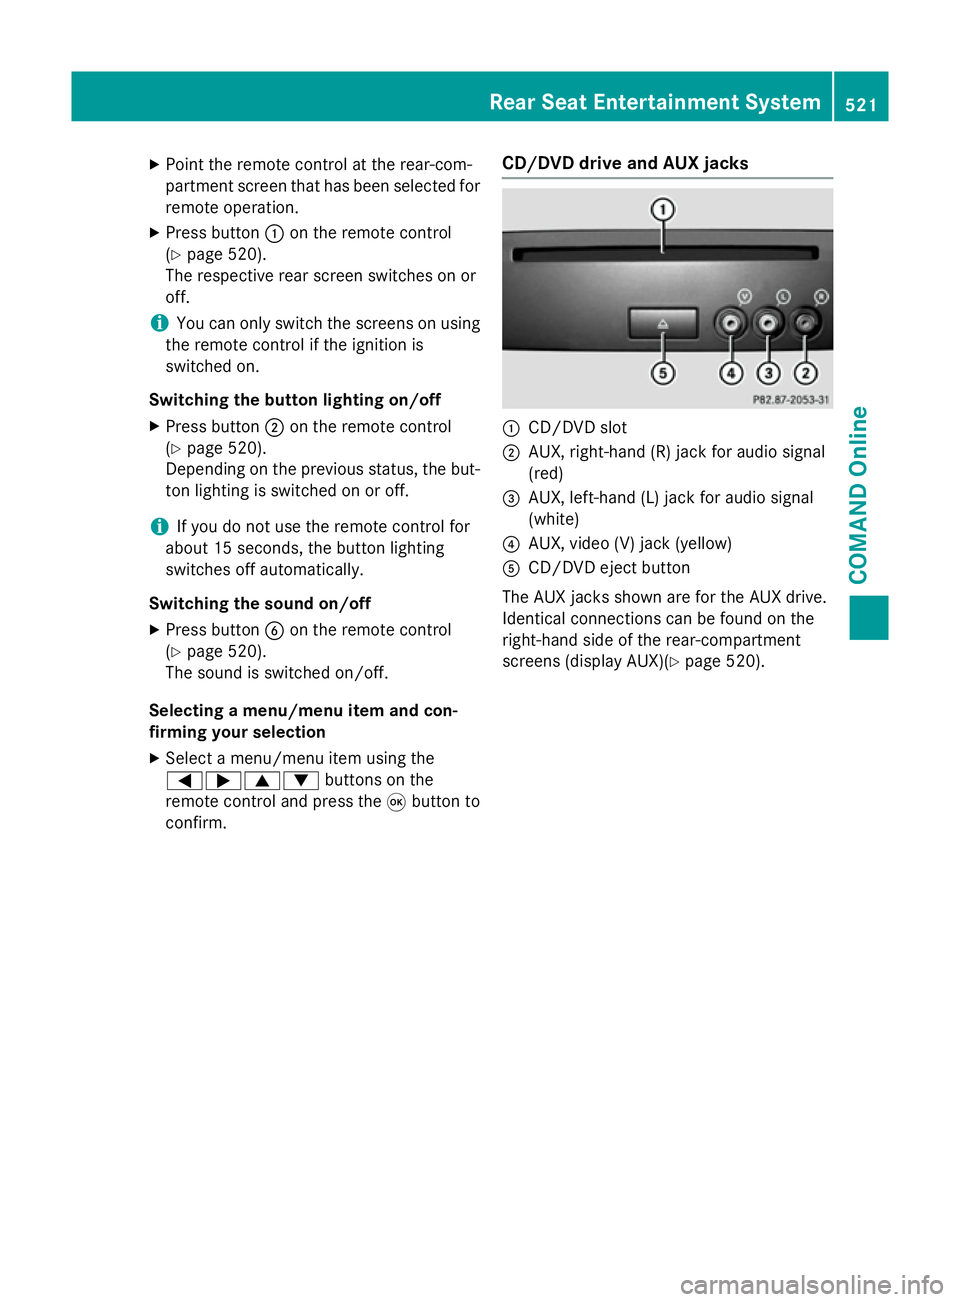
confirm. CD/DVD drive and AUX jacks :
CD/DVD slot
; AUX, right-hand (R) jack for audio signal
(red)
= AUX, left-hand (L) jack for audio signal
(white)
? AUX, video (V) jack (yellow)
A CD/DVD eject button
The AUX jacks shown are for the AUX drive.
Identical connections can be found on the
right-hand side of the rear-compartment
screens (display AUX)(Y page 520). Rear Seat Entertainment System
521COMAND Online Z
Page 526 of 637
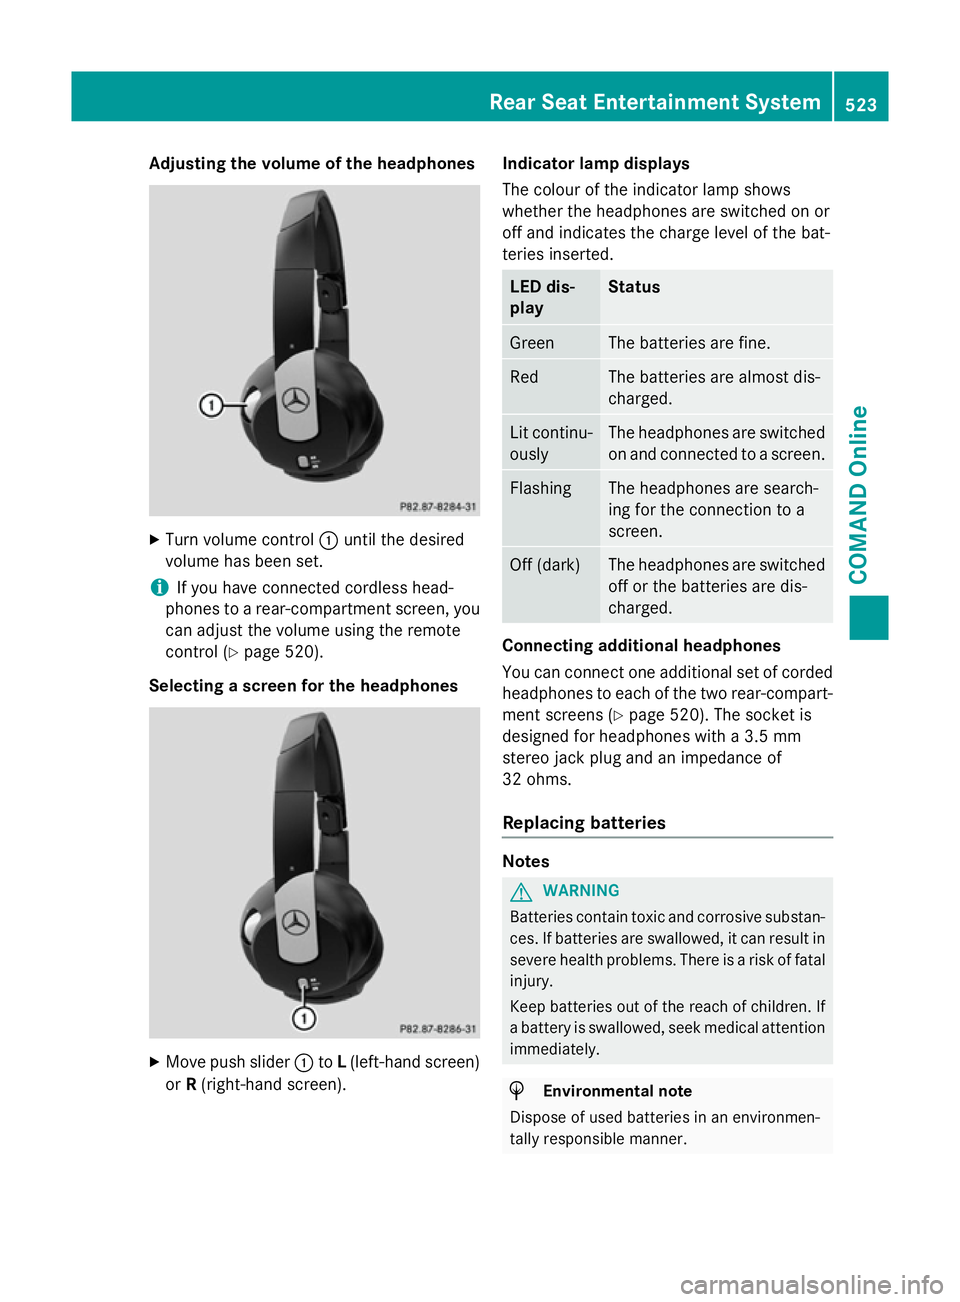
Adjusting the volume of the headphones
X
Turn volume control :until the desired
volume has been set.
i If you have connected cordless head-
phones to a rear-compartment screen, you can adjust the volume using the remote
control (Y page 520).
Selecting a screen for the headphones X
Move push slider :toL(left-hand screen)
or R(right-hand screen). Indicator lamp displays
The colour of the indicator lamp shows
whether the headphones are switched on or
off and indicates the charge level of the bat-
teries inserted. LED dis-
play Status
Green The batteries are fine.
Red The batteries are almost dis-
charged.
Lit continu-
ously The headphones are switched
on and connected to a screen. Flashing The headphones are search-
ing for the connection to a
screen.
Off (dark) The headphones are switched
off or the batteries are dis-
charged. Connecting additional headphones
You can connect one additional set of corded
headphones to each of the two rear-compart- ment screens (Y page 520). The socket is
designed for headphones with a 3.5 mm
stereo jack plug and an impedance of
32 ohms.
Replacing batteries Notes
G
WARNING
Batteries contain toxic and corrosive substan- ces. If batteries are swallowed, it can result in
severe health problems. There is a risk of fatal injury.
Keep batteries out of the reach of children. If
a battery is swallowed, seek medical attention immediately. H
Environmental note
Dispose of used batteries in an environmen-
tally responsible manner. Rear Seat Entertainment System
523COMAND Online Z
Page 527 of 637
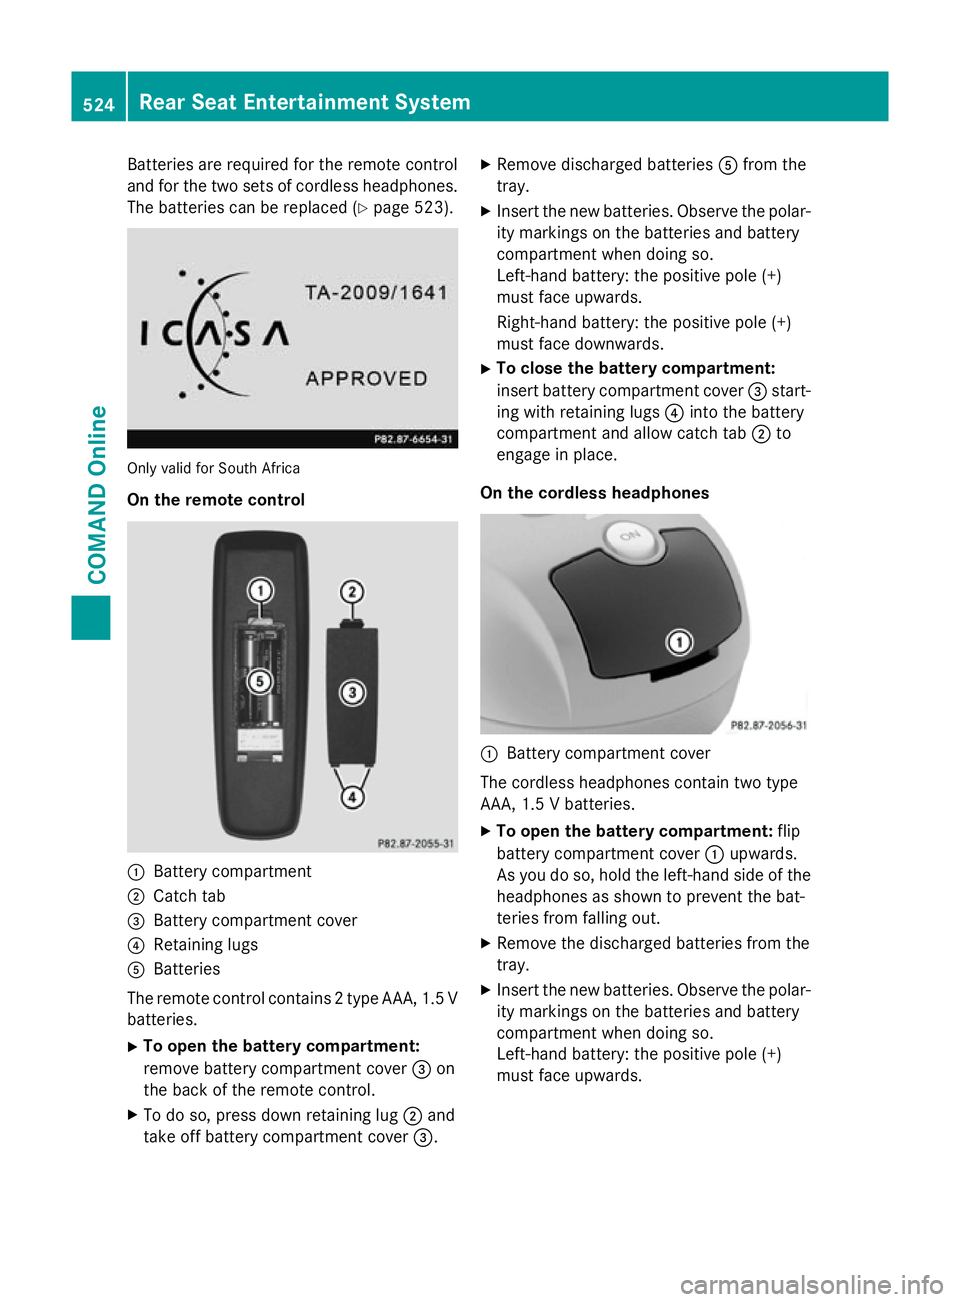
Batteries are required for the remote control
and for the two sets of cordless headphones. The batteries can be replaced (Y page 523).Only valid for South Africa
On the remote control :
Battery compartment
; Catch tab
= Battery compartment cover
? Retaining lugs
A Batteries
The remote control contains 2 type AAA, 1.5 V
batteries.
X To open the battery compartment:
remove battery compartment cover =on
the back of the remote control.
X To do so, press down retaining lug ;and
take off battery compartment cover =.X
Remove discharged batteries Afrom the
tray.
X Insert the new batteries. Observe the polar-
ity markings on the batteries and battery
compartment when doing so.
Left-hand battery: the positive pole (+)
must face upwards.
Right-hand battery: the positive pole (+)
must face downwards.
X To close the battery compartment:
insert battery compartment cover =start-
ing with retaining lugs ?into the battery
compartment and allow catch tab ;to
engage in place.
On the cordless headphones :
Battery compartment cover
The cordless headphones contain two type
AAA, 1.5 V batteries.
X To open the battery compartment: flip
battery compartment cover :upwards.
As you do so, hold the left-hand side of the headphones as shown to prevent the bat-
teries from falling out.
X Remove the discharged batteries from the
tray.
X Insert the new batteries. Observe the polar-
ity markings on the batteries and battery
compartment when doing so.
Left-hand battery: the positive pole (+)
must face upwards. 524
Rear Seat Entertainment SystemCOMAND Online