2012 MERCEDES-BENZ SL ROADSTER boot
[x] Cancel search: bootPage 549 of 637
X
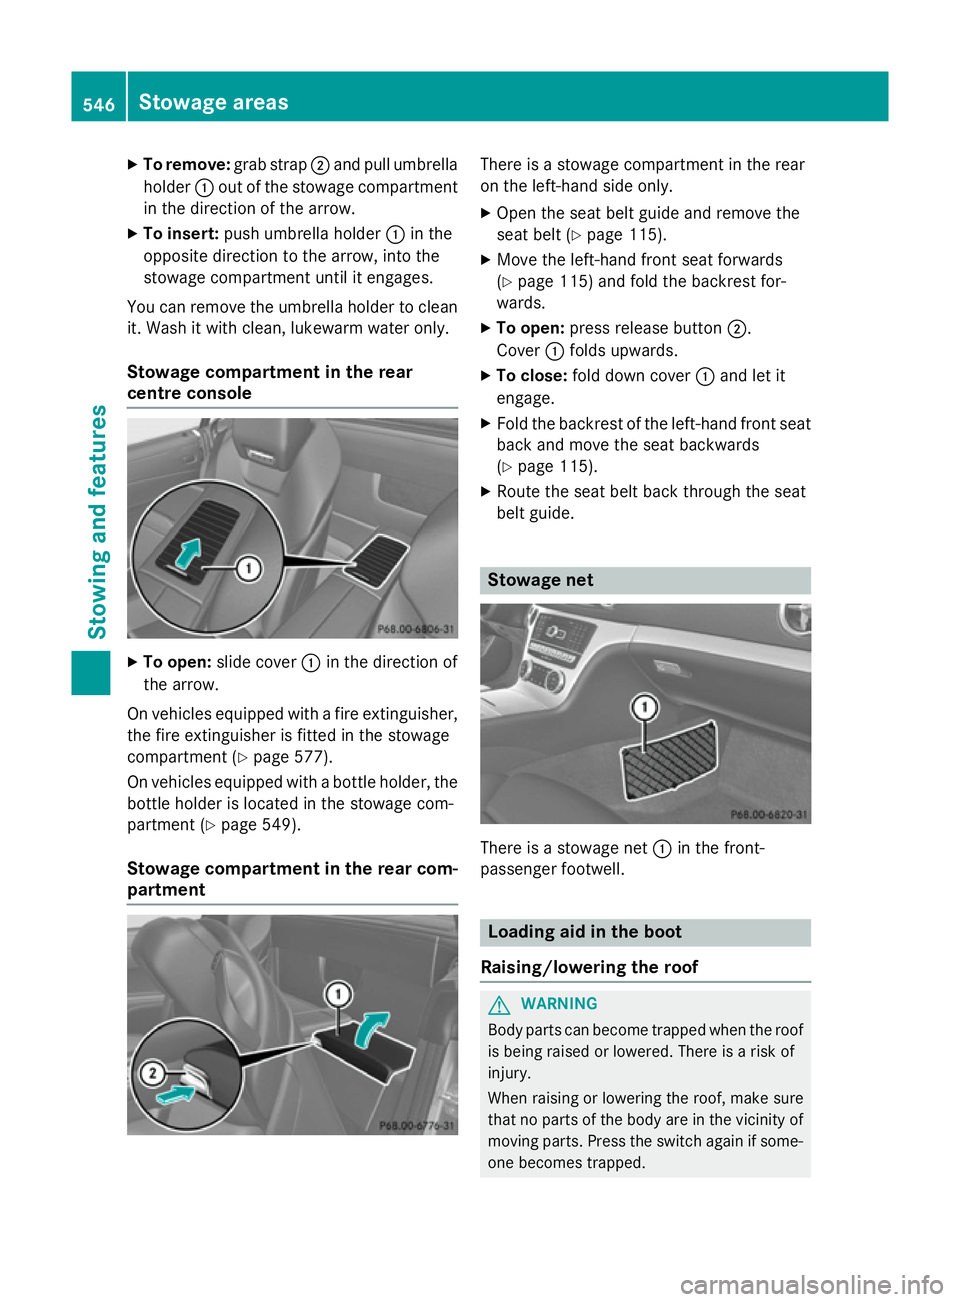
To remove: grab strap;and pull umbrella
holder :out of the stowage compartment
in the direction of the arrow.
X To insert: push umbrella holder :in the
opposite direction to the arrow, into the
stowage compartment until it engages.
You can remove the umbrella holder to clean it. Wash it with clean, lukewarm water only.
Stowage compartment in the rear
centre console X
To open: slide cover :in the direction of
the arrow.
On vehicles equipped with a fire extinguisher,
the fire extinguisher is fitted in the stowage
compartment (Y page 577).
On vehicles equipped with a bottle holder, the
bottle holder is located in the stowage com-
partment (Y page 549).
Stowage compartment in the rear com- partment There is a stowage compartment in the rear
on the left-hand side only.
X Open the seat belt guide and remove the
seat belt (Y page 115).
X Move the left-hand front seat forwards
(Y page 115) and fold the backrest for-
wards.
X To open: press release button ;.
Cover :folds upwards.
X To close: fold down cover :and let it
engage.
X Fold the backrest of the left-hand front seat
back and move the seat backwards
(Y page 115).
X Route the seat belt back through the seat
belt guide. Stowage net
There is a stowage net
:in the front-
passenger footwell. Loading aid in the boot
Raising/lowering the roof G
WARNING
Body parts can become trapped when the roof is being raised or lowered. There is a risk of
injury.
When raising or lowering the roof, make sure
that no parts of the body are in the vicinity of moving parts. Press the switch again if some-
one becomes trapped. 546
Stowage areasSto
wing an d features
Page 550 of 637
!
Only close the boot once the roof is low-
ered completely. Otherwise, you could
damage the roof. To make it easier to load your luggage, you
can raise the stowed roof after you have
opened the boot lid.
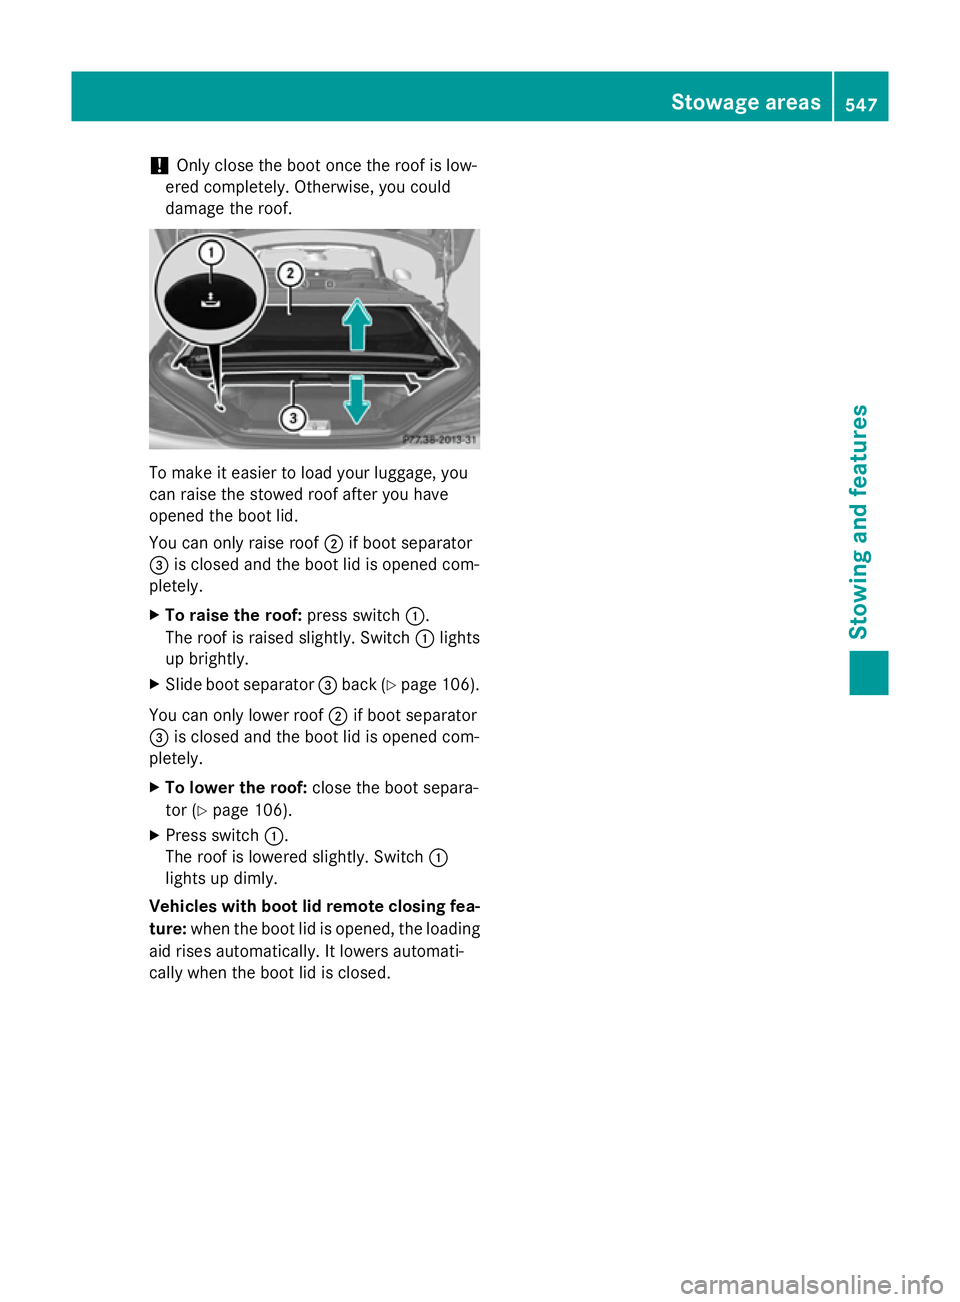
You can only raise roof ;if boot separator
= is closed and the boot lid is opened com-
pletely.
X To raise the roof: press switch:.
The roof is raised slightly. Switch :lights
up brightly.
X Slide boot separator =back (Y page 106).
You can only lower roof ;if boot separator
= is closed and the boot lid is opened com-
pletely.
X To lower the roof: close the boot separa-
tor (Y page 106).
X Press switch :.
The roof is lowered slightly. Switch :
lights up dimly.
Vehicles with boot lid remote closing fea- ture: when the boot lid is opened, the loading
aid rises automatically. It lowers automati-
cally when the boot lid is closed. Stowage areas
547Stowing and features Z
Page 551 of 637
Problems with the loading aid
Problem
Possible causes/consequences and
M
MSolutions It is no longer possible
to lower the stowed
roof in the boot using
the loading aid. You cannot close the boot any more.
X Call a qualified specialist workshop. Stowage well under the boot floor
X
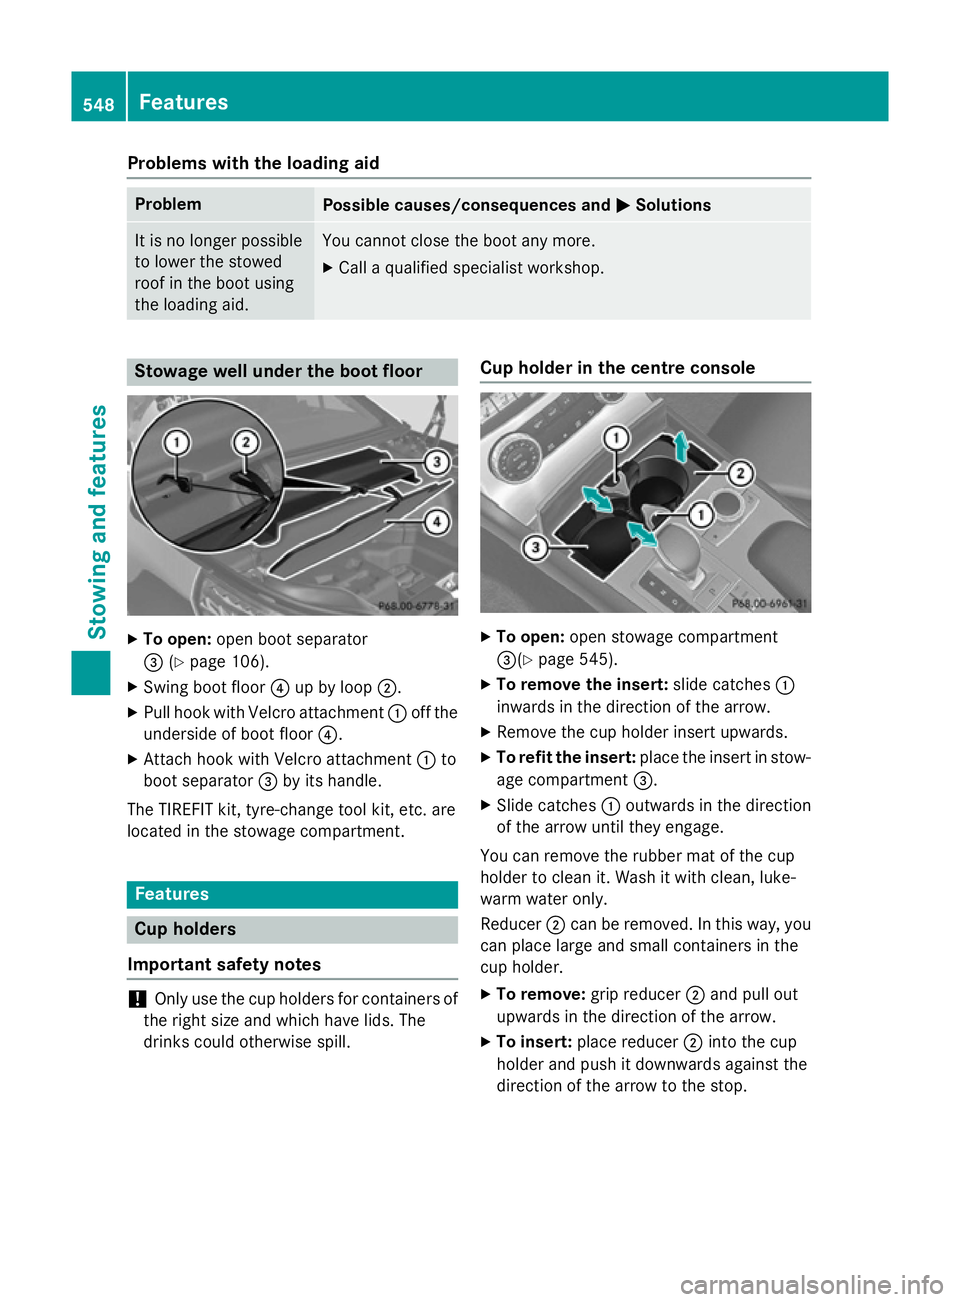
To open: open boot separator
= (Ypage 106).
X Swing boot floor ?up by loop ;.
X Pull hook with Velcro attachment :off the
underside of boot floor ?.
X Attach hook with Velcro attachment :to
boot separator =by its handle.
The TIREFIT kit, tyre-change tool kit, etc. are
located in the stowage compartment. Features
Cup holders
Important safety notes !
Only use the cup holders for containers of
the right size and which have lids. The
drinks could otherwise spill. Cup holder in the centre console
X
To open: open stowage compartment
=(Y page 545).
X To remove the insert: slide catches:
inwards in the direction of the arrow.
X Remove the cup holder insert upwards.
X To refit the insert: place the insert in stow-
age compartment =.
X Slide catches :outwards in the direction
of the arrow until they engage.
You can remove the rubber mat of the cup
holder to clean it. Wash it with clean, luke-
warm water only.
Reducer ;can be removed. In this way, you
can place large and small containers in the
cup holder.
X To remove: grip reducer ;and pull out
upwards in the direction of the arrow.
X To insert: place reducer ;into the cup
holder and push it downwards against the
direction of the arrow to the stop. 548
FeaturesStowing and features
Page 554 of 637
Socket under the armrest
X
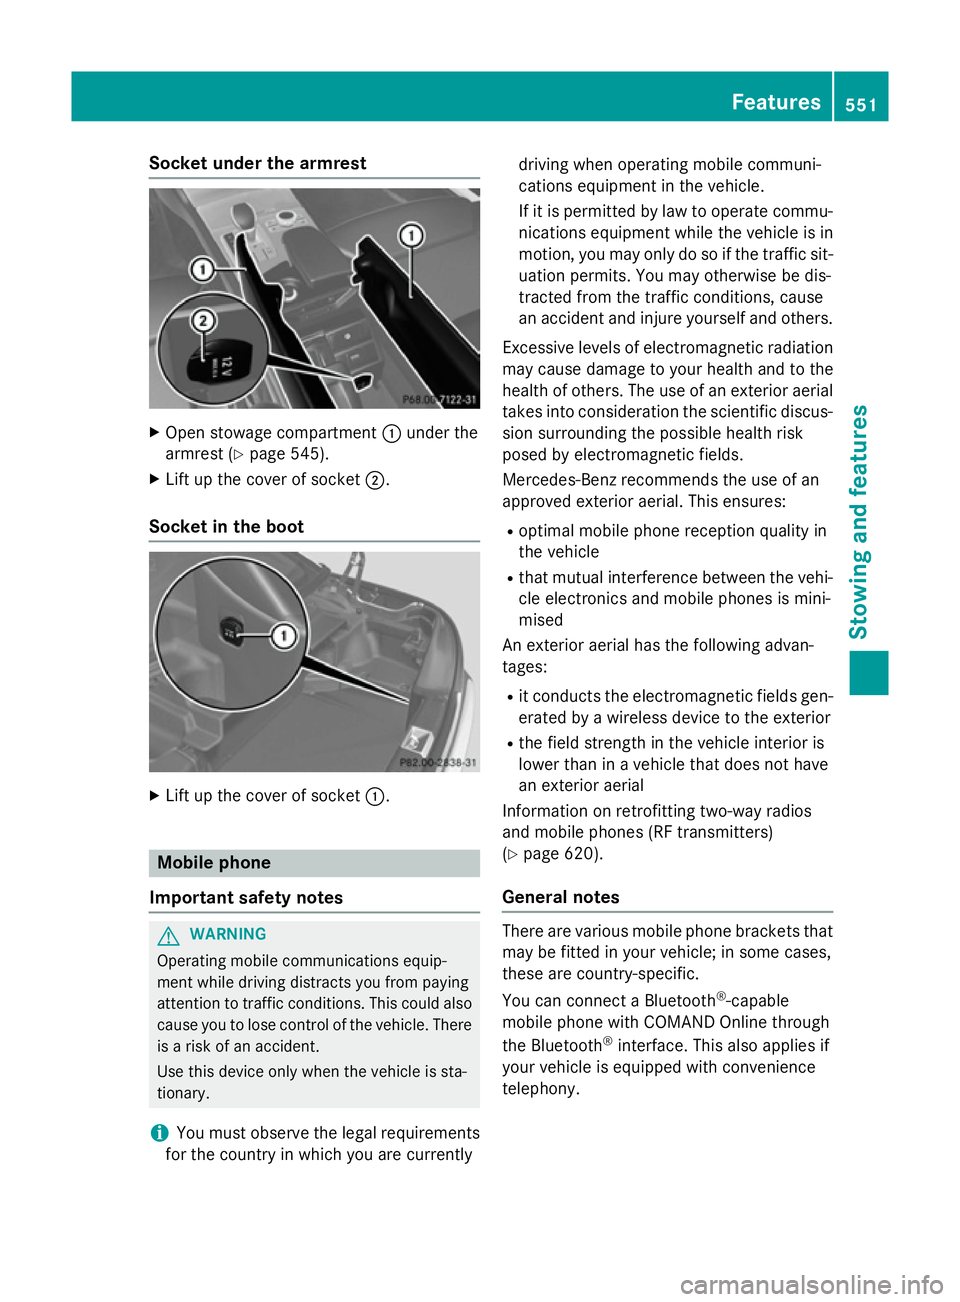
Open stowage compartment :under the
armrest (Y page 545).
X Lift up the cover of socket ;.
Socket in the boot X
Lift up the cover of socket :.Mobile phone
Important safety notes G
WARNING
Operating mobile communications equip-
ment while driving distracts you from paying
attention to traffic conditions. This could also cause you to lose control of the vehicle. There
is a risk of an accident.
Use this device only when the vehicle is sta-
tionary.
i You must observe the legal requirements
for the country in which you are currently driving when operating mobile communi-
cations equipment in the vehicle.
If it is permitted by law to operate commu-
nications equipment while the vehicle is in
motion, you may only do so if the traffic sit-
uation permits. You may otherwise be dis-
tracted from the traffic conditions, cause
an accident and injure yourself and others.
Excessive levels of electromagnetic radiation
may cause damage to your health and to the
health of others. The use of an exterior aerial takes into consideration the scientific discus-
sion surrounding the possible health risk
posed by electromagnetic fields.
Mercedes-Benz recommends the use of an
approved exterior aerial. This ensures:
R optimal mobile phone reception quality in
the vehicle
R that mutual interference between the vehi-
cle electronics and mobile phones is mini-
mised
An exterior aerial has the following advan-
tages:
R it conducts the electromagnetic fields gen-
erated by a wireless device to the exterior
R the field strength in the vehicle interior is
lower than in a vehicle that does not have
an exterior aerial
Information on retrofitting two-way radios
and mobile phones (RF transmitters)
(Y page 620).
General notes There are various mobile phone brackets that
may be fitted in your vehicle; in some cases,
these are country-specific.
You can connect a Bluetooth ®
-capable
mobile phone with COMAND Online through
the Bluetooth ®
interface. This also applies if
your vehicle is equipped with convenience
telephony. Features
551Stowing and features Z
Page 555 of 637
More information on suitable mobile phones,
mobile phone brackets and on connecting
Bluetooth ®
-capable mobile phones with
COMAND Online can be obtained:
R at your Mercedes-Benz Service Centre
R on the Internet at http://www.mercedes-
benz.com/connect
i The functions and services available when
you use the phone depend on your mobile
phone model and service provider.
Using a mobile phone If the mobile phone is inserted in the mobile
phone bracket, the mobile phone will be
charged and connected with the exterior aer-
ial.
X Open the telephone compartment
(Y page 545).
X Place the mobile phone bracket into the
pre-installed fitting; see the separate instal-
lation instructions for the mobile phone fit-
ting.
X Insert the mobile phone into the mobile
phone bracket; see the separate installa-
tion instructions for the mobile phone fit-
ting.
Operating the mobile phone You can operate the telephone using the
6 and~ buttons on the multifunction
steering wheel. You can operate other mobile
phone functions via the on-board computer
(Y page 235).
When you remove the key from the ignition
lock, the mobile phone is disconnected from
the hands-free system. Active calls will first
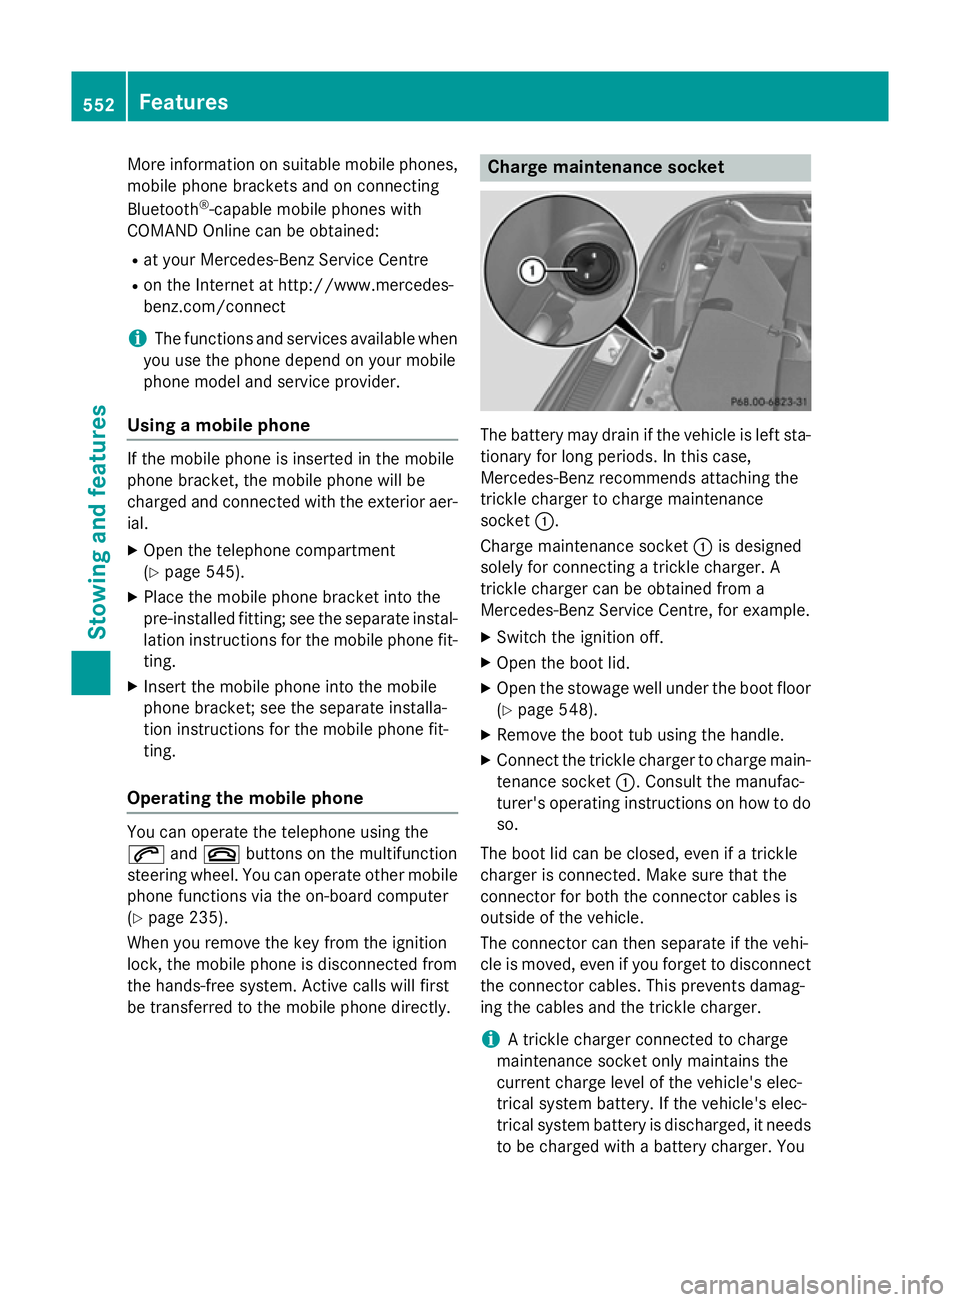
be transferred to the mobile phone directly. Charge maintenance socket
The battery may drain if the vehicle is left sta-
tionary for long periods. In this case,
Mercedes-Benz recommends attaching the
trickle charger to charge maintenance
socket :.
Charge maintenance socket :is designed
solely for connecting a trickle charger. A
trickle charger can be obtained from a
Mercedes-Benz Service Centre, for example.
X Switch the ignition off.
X Open the boot lid.
X Open the stowage well under the boot floor
(Y page 548).
X Remove the boot tub using the handle.
X Connect the trickle charger to charge main-
tenance socket :. Consult the manufac-
turer's operating instructions on how to do
so.
The boot lid can be closed, even if a trickle
charger is connected. Make sure that the
connector for both the connector cables is
outside of the vehicle.
The connector can then separate if the vehi-
cle is moved, even if you forget to disconnect
the connector cables. This prevents damag-
ing the cables and the trickle charger.
i A trickle charger connected to charge
maintenance socket only maintains the
current charge level of the vehicle's elec-
trical system battery. If the vehicle's elec-
trical system battery is discharged, it needs
to be charged with a battery charger. You 552
FeaturesStowing and features
Page 571 of 637
In these or similar operating conditions, have
the air filter, engine oil and oil filter, for exam- ple, changed more frequently. The tyres mustbe checked more frequently if the vehicle is
operated under increased loads. Further
information can be obtained at a qualified
specialist workshop, e.g. a Mercedes-Benz
Service Centre.
Driving abroad An extensive Mercedes-Benz Service network
is also available in other countries. You can
obtain further information from any
Mercedes-Benz Service Centre. Care
Notes on care
H
Environmental note
Dispose of empty packaging and cleaning
cloths in an environmentally responsible man- ner.
! For cleaning your vehicle, do not use any
of the following:
R dry, rough or hard cloths
R abrasive cleaning agents
R solvents
R cleaning agents containing solvents
Do not scrub.
Do not touch the surfaces or protective
films with hard objects, e.g. a ring or ice
scraper. You could otherwise scratch or
damage the surfaces and protective film.
! Do not park up the vehicle for an extended
period straight after cleaning it, particularly after having cleaned the wheels with wheel
cleaner. Wheel cleaners could cause
increased corrosion of the brake discs and
brake pads/linings. For this reason, you
should drive for a few minutes after clean-
ing. Braking heats the brake discs and the
brake pads/linings, thus drying them. The
vehicle can then be parked up. Regular care of your vehicle is a condition for
retaining the quality in the long term.
Use care products and cleaning agents rec-
ommended and approved by Mercedes-Benz. Washing the vehicle and cleaning the
paintwork
Automatic car wash G
WARNING
Braking efficiency is reduced after the vehicle has been washed. There is a risk of an acci-
dent.
After washing the vehicle, brake carefully
while paying attention to the traffic conditions in order to restore full braking efficiency.
! If DISTRONIC PLUS or the HOLD function
is activated, the vehicle brakes automati-
cally in certain situations. To prevent dam-
age to the vehicle, deactivate DISTRONIC
PLUS and the HOLD function in the follow-
ing or other similar situations:
R when towing the vehicle
R in the car wash
! It is preferable to use car washes with
adjustable high-pressure pre-cleaning that
corresponds to the specification for the
Cabriolet programme. In car washes that
use high water pressures, there is a risk
that a small amount of water may leak into
the vehicle.
! Vehicles with HANDS-FREE ACCESS: if a
key with KEYLESS-GO is within the detec-
tion range of the KEYLESS-GO antenna, the
following situations could lead to the unin-
tentional opening of the boot lid:
R using a car wash
R using a high-pressure cleaner
Make sure that the key is at least 2 maway
from the vehicle.
! Make sure that the automatic transmis-
sion is in position Nwhen washing your 568
CareMaintenance and care
Page 572 of 637
vehicle in a tow-through car wash. Other
transmission positions may lead to damage to the vehicle.
! Make sure that:
R the side windows and the roof are com-
pletely closed
R the climate control blower is switched off
R the windscreen wiper switch is at posi-
tion 0
The vehicle could otherwise be damaged.
You can wash the vehicle in an automatic car
wash from the very start.
Wash off excess dirt before cleaning the vehi- cle in an automatic car wash.
After using an automatic car wash, wipe wax
off the windscreen and the wiper blades. This
will prevent smears and reduce wiping noises caused by residue on the windscreen.
Washing by hand In some countries, washing by hand is only
allowed at specially equipped washing bays.
Observe the legal requirements for each indi- vidual country.
X Do not use hot water and do not wash the
vehicle in direct sunlight.
X Use a soft sponge to clean.
X Use a mild cleaning agent, such as a car
shampoo approved by Mercedes-Benz.
X Thoroughly hose down the vehicle with a
gentle jet of water.
X Do not point the water jet directly towards
the air inlet.
X Use plenty of water and rinse out the
sponge frequently.
X Rinse the vehicle with clean water and dry
thoroughly with a chamois.
X Do not let the cleaning agent dry on the
paintwork.
When using the vehicle in winter, remove all
traces of road salt deposits carefully and as
soon as possible. High-pressure cleaning equipment G
WARNING
The water jet of circular-jet nozzles (dirt grind- ers) can cause damage not visible from the
outside to tyres or chassis components. Com-
ponents damaged in this way can unexpect-
edly fail. There is a risk of an accident.
Do not use high-pressure cleaners with circu-
lar-jet nozzles to clean the vehicle. Have dam- aged tyres or chassis components replaced
immediately.
! Always maintain a distance of at least
30 cm between the vehicle and the high-
pressure cleaner nozzle. Information about
the correct distance is available from the
equipment manufacturer.
Move the high-pressure cleaner nozzle
around when cleaning your vehicle.
Do not aim directly at any of the following:
R tyres
R door gaps, roof gaps, joints etc.
R electrical components
R battery
R connectors
R lights
R seals
R trim elements
R ventilation slots
Damaged seals or electrical components
can lead to leaks or failures.
! Vehicles with HANDS-FREE ACCESS: if a
key with KEYLESS-GO is within the detec-
tion range of the KEYLESS-GO antenna, the
following situations could lead to the unin-
tentional opening of the boot lid:
R using a car wash
R using a high-pressure cleaner
Make sure that the key is at least 2 m away
from the vehicle. Care
569Maintenance and care Z
Page 579 of 637
Useful information
i This Owner's Manual describes all mod-
els, series and optional equipment for your
vehicle that were available at the time of
going to press. National variations are pos- sible. Note that your vehicle may not be
equipped with all of the functions descri-
bed. This is also the case for systems and
functions relevant to safety.
i Read the information on qualified special-
ist workshops: (Y page 34). Where will I find...?
Warning triangle
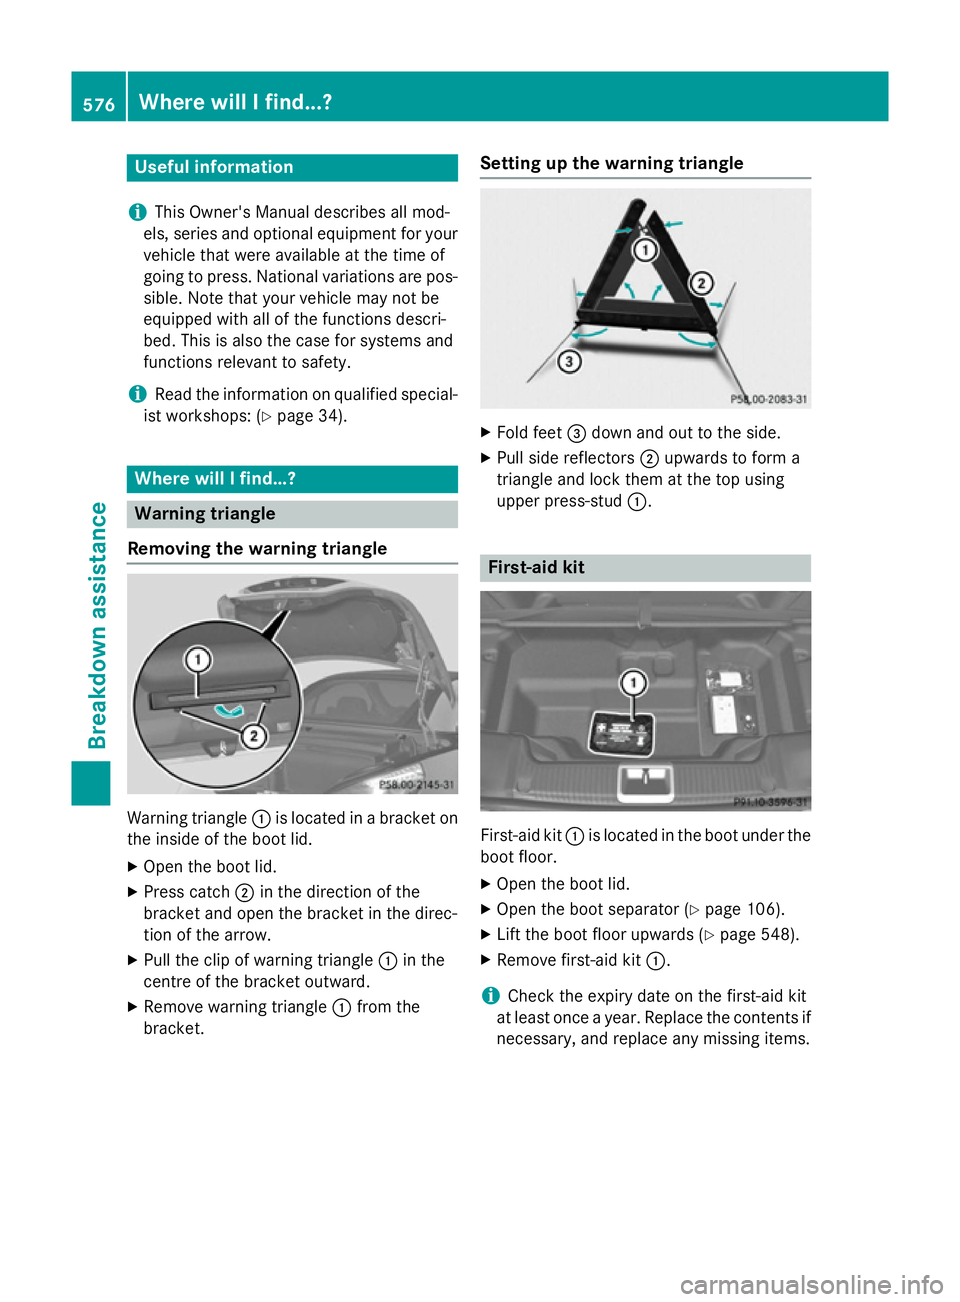
Removing the warning triangle Warning triangle
:is located in a bracket on
the inside of the boot lid.
X Open the boot lid.
X Press catch ;in the direction of the
bracket and open the bracket in the direc-
tion of the arrow.
X Pull the clip of warning triangle :in the
centre of the bracket outward.
X Remove warning triangle :from the
bracket. Setting up the warning triangle X
Fold feet =down and out to the side.
X Pull side reflectors ;upwards to form a
triangle and lock them at the top using
upper press-stud :. First-aid kit
First-aid kit
:is located in the boot under the
boot floor.
X Open the boot lid.
X Open the boot separator (Y page 106).
X Lift the boot floor upwards (Y page 548).
X Remove first-aid kit :.
i Check the expiry date on the first-aid kit
at least once a year. Replace the contents if
necessary, and replace any missing items. 576
Where will I find...?Breakdown assistance