2012 MERCEDES-BENZ SL ROADSTER boot
[x] Cancel search: bootPage 110 of 637
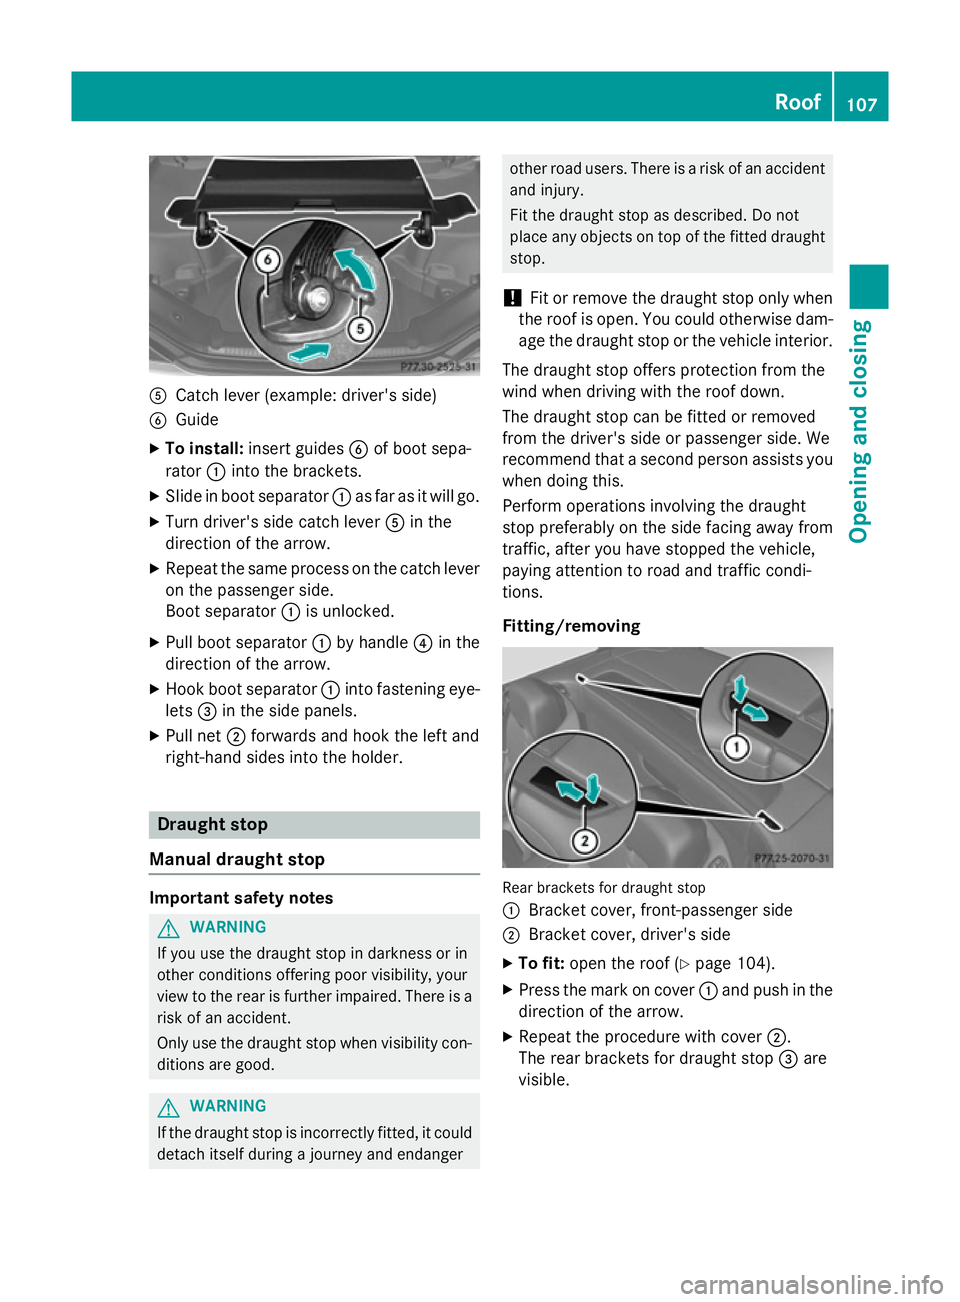
A
Catch lever (example: driver's side)
B Guide
X To install: insert guides Bof boot sepa-
rator :into the brackets.
X Slide in boot separator :as far as it will go.
X Turn driver's side catch lever Ain the
direction of the arrow.
X Repeat the same process on the catch lever
on the passenger side.
Boot separator :is unlocked.
X Pull boot separator :by handle ?in the
direction of the arrow.
X Hook boot separator :into fastening eye-
lets =in the side panels.
X Pull net ;forwards and hook the left and
right-hand sides into the holder. Draught stop
Manual draught stop Important safety notes
G
WARNING
If you use the draught stop in darkness or in
other conditions offering poor visibility, your
view to the rear is further impaired. There is a
risk of an accident.
Only use the draught stop when visibility con- ditions are good. G
WARNING
If the draught stop is incorrectly fitted, it could detach itself during a journey and endanger other road users. There is a risk of an accident
and injury.
Fit the draught stop as described. Do not
place any objects on top of the fitted draught stop.
! Fit or remove the draught stop only when
the roof is open. You could otherwise dam- age the draught stop or the vehicle interior.
The draught stop offers protection from the
wind when driving with the roof down.
The draught stop can be fitted or removed
from the driver's side or passenger side. We
recommend that a second person assists you
when doing this.
Perform operations involving the draught
stop preferably on the side facing away from
traffic, after you have stopped the vehicle,
paying attention to road and traffic condi-
tions.
Fitting/removing Rear brackets for draught stop
:
Bracket cover, front-passenger side
; Bracket cover, driver's side
X To fit: open the roof (Y page 104).
X Press the mark on cover :and push in the
direction of the arrow.
X Repeat the procedure with cover ;.
The rear brackets for draught stop =are
visible. Roof
107Opening and closing Z
Page 113 of 637
Problems with the roof
Problem
Possible causes/consequences and
M
MSolutions The roof will not open or
close. The boot separator is not in place.
X Close the boot separator (Y page 106). The boot lid is open.
X Close the boot lid (Y page 95). The on-board voltage is too low.
X Leave the engine running. The roof has been opened and closed several times in a row. The
roof drive has been automatically deactivated.
You can open and close the roof again after approximately ten
minutes.
X Switch off the ignition and turn it back on.
X Repeat the opening or closing procedure. The automatic roof mechanism is faulty.
X Consult a qualified specialist workshop. 110
RoofOpening and closing
Page 180 of 637
Applying and releasing manually
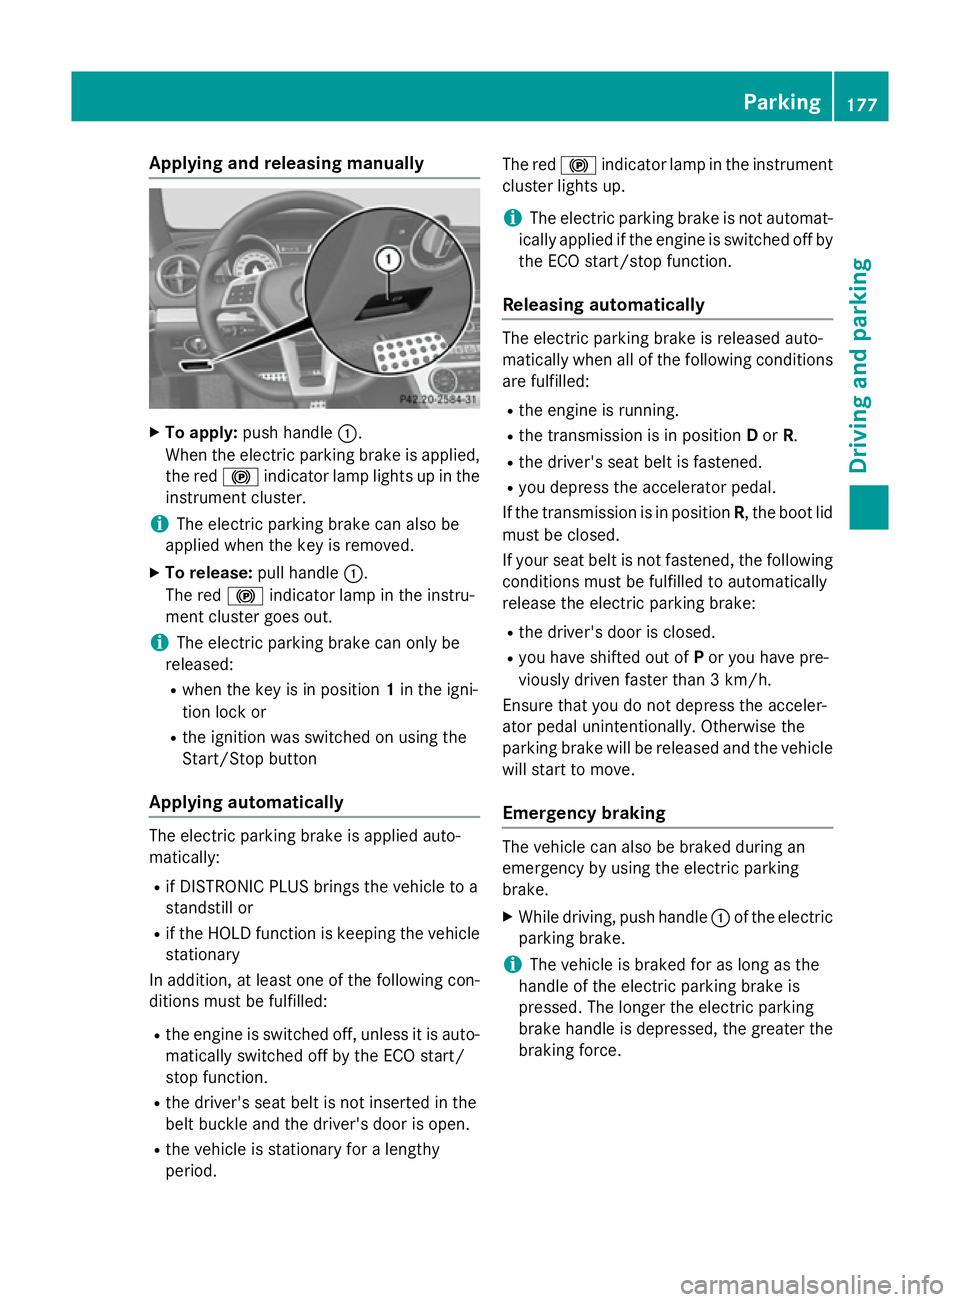
X
To apply: push handle :.
When the electric parking brake is applied, the red !indicator lamp lights up in the
instrument cluster.
i The electric parking brake can also be
applied when the key is removed.
X To release: pull handle:.
The red !indicator lamp in the instru-
ment cluster goes out.
i The electric parking brake can only be
released:
R when the key is in position 1in the igni-
tion lock or
R the ignition was switched on using the
Start/Stop button
Applying automatically The electric parking brake is applied auto-
matically:
R if DISTRONIC PLUS brings the vehicle to a
standstill or
R if the HOLD function is keeping the vehicle
stationary
In addition, at least one of the following con-
ditions must be fulfilled:
R the engine is switched off, unless it is auto-
matically switched off by the ECO start/
stop function.
R the driver's seat belt is not inserted in the
belt buckle and the driver's door is open.
R the vehicle is stationary for a lengthy
period. The red
!indicator lamp in the instrument
cluster lights up.
i The electric parking brake is not automat-
ically applied if the engine is switched off by
the ECO start/stop function.
Releasing automatically The electric parking brake is released auto-
matically when all of the following conditions
are fulfilled:
R the engine is running.
R the transmission is in position Dor R.
R the driver's seat belt is fastened.
R you depress the accelerator pedal.
If the transmission is in position R, the boot lid
must be closed.
If your seat belt is not fastened, the following conditions must be fulfilled to automatically
release the electric parking brake:
R the driver's door is closed.
R you have shifted out of Por you have pre-
viously driven faster than 3 km/h.
Ensure that you do not depress the acceler-
ator pedal unintentionally. Otherwise the
parking brake will be released and the vehicle will start to move.
Emergency braking The vehicle can also be braked during an
emergency by using the electric parking
brake.
X While driving, push handle :of the electric
parking brake.
i The vehicle is braked for as long as the
handle of the electric parking brake is
pressed. The longer the electric parking
brake handle is depressed, the greater the braking force. Parking
177Driving and pa rking Z
Page 214 of 637
X
Stop the movement of the multifunction
steering wheel or steer yourself.
Active Parking Assist will be cancelled at
once. The Park Assist cancelled
Park Assist cancelled mes-
sage appears in the multifunction display.
or X Press the PARKTRONIC button on the
centre console (Y page 206).
PARKTRONIC is switched off and Active
Parking Assist is immediately cancelled.
The Park Assist cancelled Park Assist cancelled message
appears in the multifunction display.
Active Parking Assist is cancelled automati-
cally if:
R parking using Active Parking Assist is no
longer possible
R you are driving faster than 10 km/h
R a wheel spins and ESP ®
intervenes or fails.
The ÷ ESP®
warning lamp lights up in
the instrument cluster.
A warning tone sounds. The parking symbol
goes out and the Park Assist cancelled
Park Assist cancelled
message appears in the multifunction dis-
play.
When Active Parking Assist is cancelled, you
must steer again yourself. Reversing camera
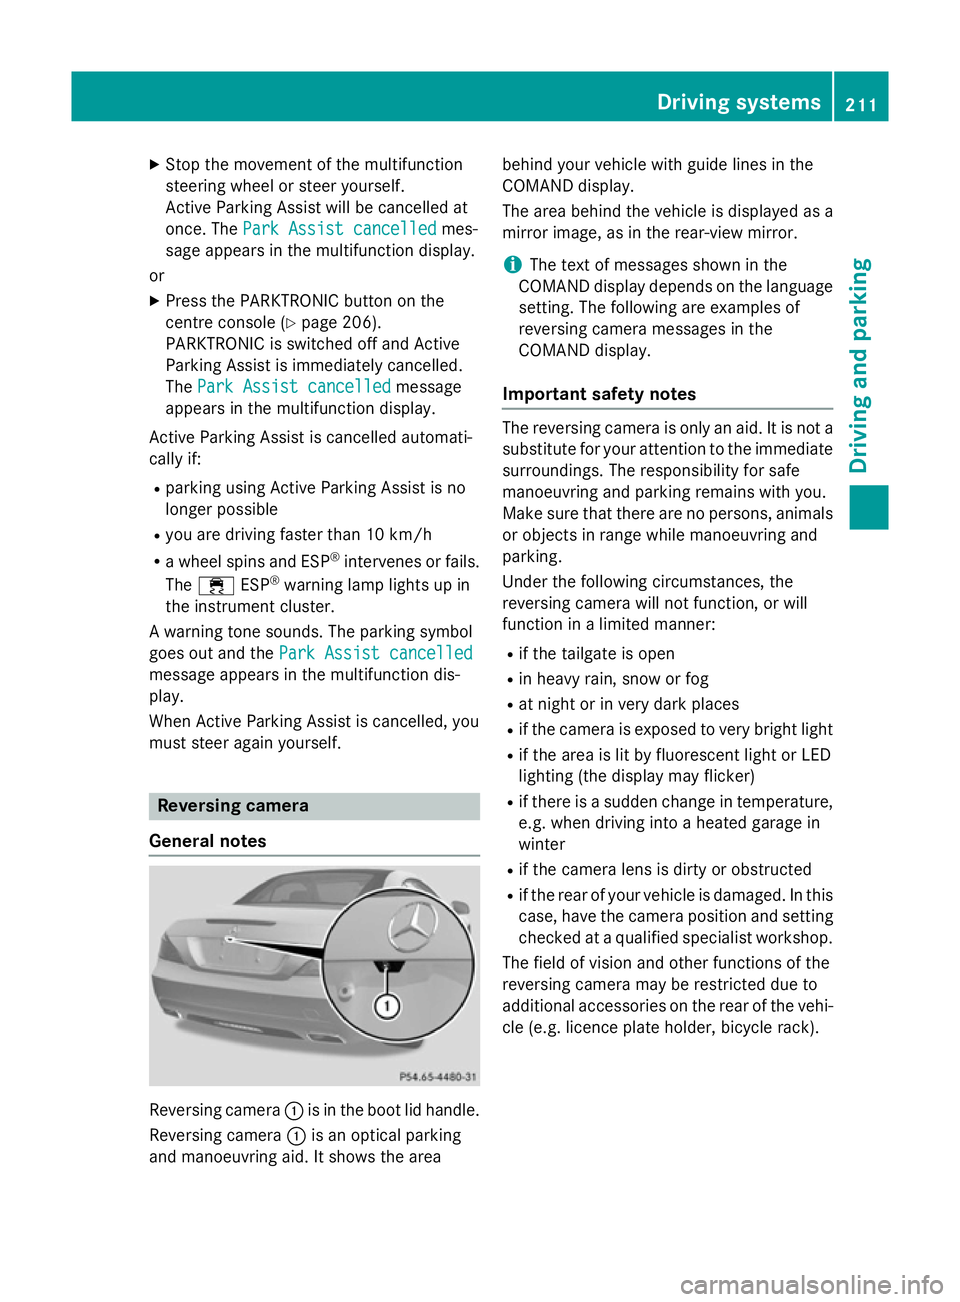
General notes Reversing camera
:is in the boot lid handle.
Reversing camera :is an optical parking
and manoeuvring aid. It shows the area behind your vehicle with guide lines in the
COMAND display.
The area behind the vehicle is displayed as a
mirror image, as in the rear-view mirror.
i The text of messages shown in the
COMAND display depends on the language
setting. The following are examples of
reversing camera messages in the
COMAND display.
Important safety notes The reversing camera is only an aid. It is not a
substitute for your attention to the immediate surroundings. The responsibility for safe
manoeuvring and parking remains with you.
Make sure that there are no persons, animals
or objects in range while manoeuvring and
parking.
Under the following circumstances, the
reversing camera will not function, or will
function in a limited manner:
R if the tailgate is open
R in heavy rain, snow or fog
R at night or in very dark places
R if the camera is exposed to very bright light
R if the area is lit by fluorescent light or LED
lighting (the display may flicker)
R if there is a sudden change in temperature,
e.g. when driving into a heated garage in
winter
R if the camera lens is dirty or obstructed
R if the rear of your vehicle is damaged. In this
case, have the camera position and setting checked at a qualified specialist workshop.
The field of vision and other functions of the
reversing camera may be restricted due to
additional accessories on the rear of the vehi-
cle (e.g. licence plate holder, bicycle rack). Driving systems
211Driving and parking Z
Page 244 of 637
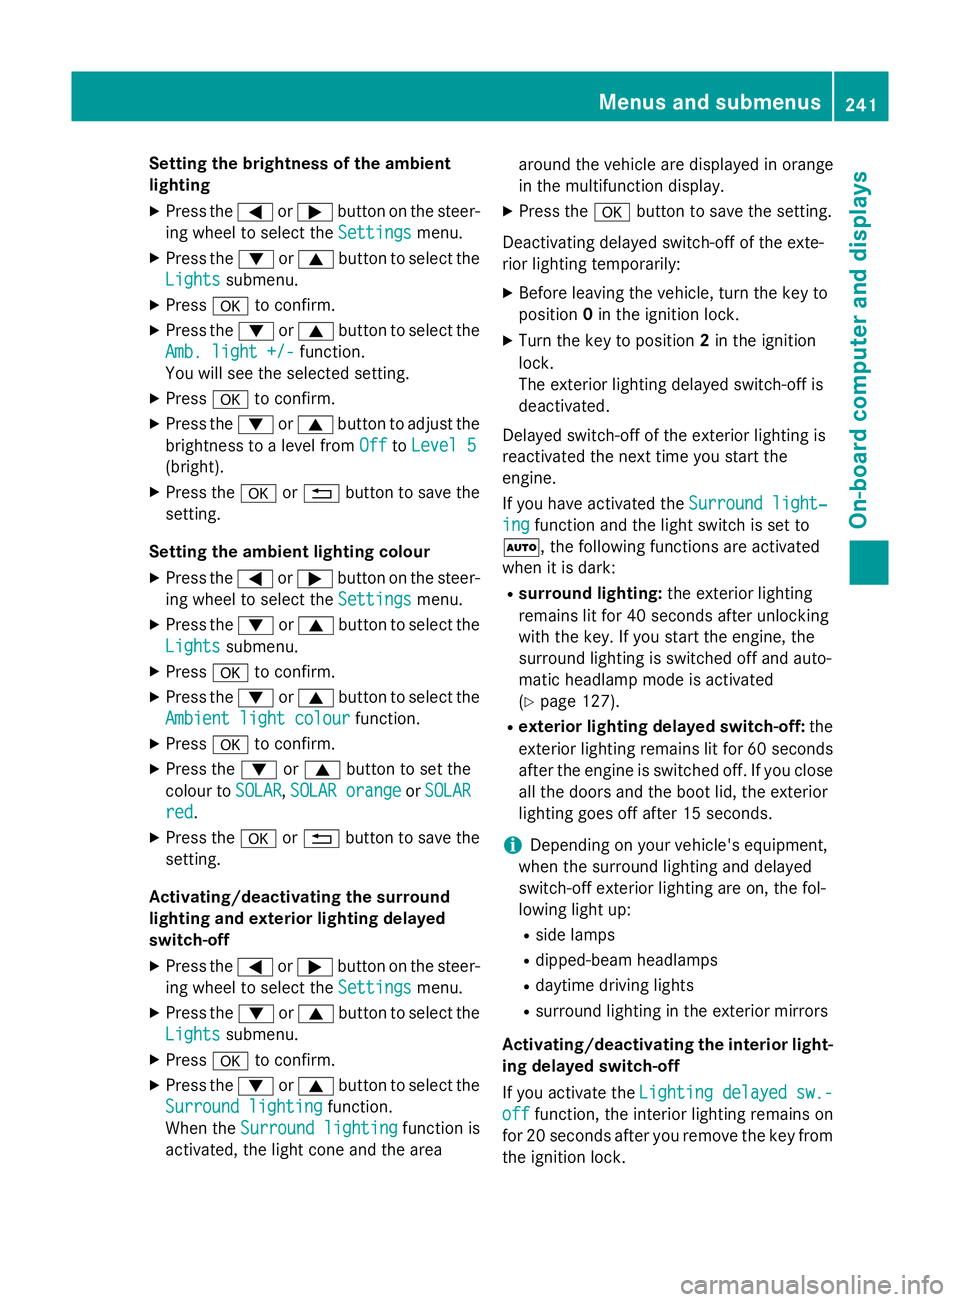
Setting the brightness of the ambient
lighting
X Press the =or; button on the steer-
ing wheel to select the Settings Settingsmenu.
X Press the :or9 button to select the
Lights Lights submenu.
X Press ato confirm.
X Press the :or9 button to select the
Amb. light +/-
Amb. light +/- function.
You will see the selected setting.
X Press ato confirm.
X Press the :or9 button to adjust the
brightness to a level from Off
OfftoLevel 5
Level 5
(bright).
X Press the aor% button to save the
setting.
Setting the ambient lighting colour
X Press the =or; button on the steer-
ing wheel to select the Settings
Settingsmenu.
X Press the :or9 button to select the
Lights
Lights submenu.
X Press ato confirm.
X Press the :or9 button to select the
Ambient light colour
Ambient light colour function.
X Press ato confirm.
X Press the :or9 button to set the
colour to SOLAR
SOLAR,SOLAR orange
SOLAR orange orSOLAR
SOLAR
red
red.
X Press the aor% button to save the
setting.
Activating/deactivating the surround
lighting and exterior lighting delayed
switch-off X Press the =or; button on the steer-
ing wheel to select the Settings
Settings menu.
X Press the :or9 button to select the
Lights Lights submenu.
X Press ato confirm.
X Press the :or9 button to select the
Surround lighting
Surround lighting function.
When the Surround lighting
Surround lighting function is
activated, the light cone and the area around the vehicle are displayed in orange
in the multifunction display.
X Press the abutton to save the setting.
Deactivating delayed switch-off of the exte-
rior lighting temporarily: X Before leaving the vehicle, turn the key to
position 0in the ignition lock.
X Turn the key to position 2in the ignition
lock.
The exterior lighting delayed switch-off is
deactivated.
Delayed switch-off of the exterior lighting is
reactivated the next time you start the
engine.
If you have activated the Surround light‐
Surround light‐
ing ing function and the light switch is set to
Ã, the following functions are activated
when it is dark:
R surround lighting: the exterior lighting
remains lit for 40 seconds after unlocking
with the key. If you start the engine, the
surround lighting is switched off and auto-
matic headlamp mode is activated
(Y page 127).
R exterior lighting delayed switch-off: the
exterior lighting remains lit for 60 seconds
after the engine is switched off. If you close all the doors and the boot lid, the exterior
lighting goes off after 15 seconds.
i Depending on your vehicle's equipment,
when the surround lighting and delayed
switch-off exterior lighting are on, the fol-
lowing light up:
R side lamps
R dipped-beam headlamps
R daytime driving lights
R surround lighting in the exterior mirrors
Activating/deactivating the interior light-
ing delayed switch-off
If you activate the Lighting delayed sw.- Lighting delayed sw.-
off
off function, the interior lighting remains on
for 20 seconds after you remove the key from
the ignition lock. Menus and submenus
241On-board computer and displays Z
Page 273 of 637
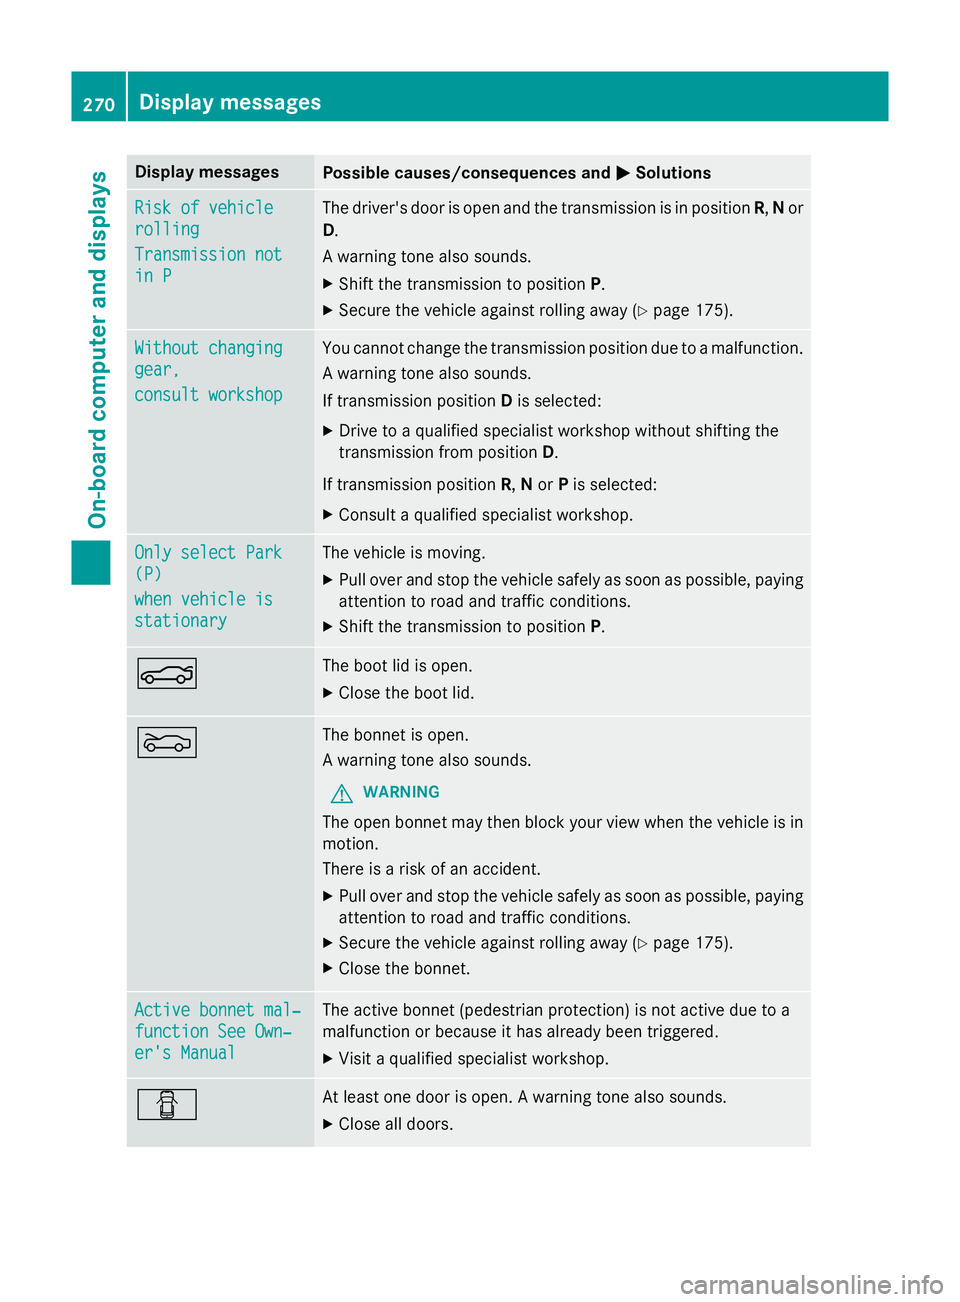
Display messages
Possible causes/consequences and
M
MSolutions Risk of vehicle
Risk of vehicle
rolling rolling
Transmission not Transmission not
in P in P The driver's door is open and the transmission is in position
R,Nor
D.
A warning tone also sounds. X Shift the transmission to position P.
X Secure the vehicle against rolling away (Y page 175).Without changing
Without changing
gear, gear,
consult workshop consult workshop You cannot change the transmission position due to a malfunction.
A warning tone also sounds.
If transmission position Dis selected:
X Drive to a qualified specialist workshop without shifting the
transmission from position D.
If transmission position R,Nor Pis selected:
X Consult a qualified specialist workshop. Only select Park Only select Park
(P) (P)
when vehicle is when vehicle is
stationary stationary The vehicle is moving.
X
Pull over and stop the vehicle safely as soon as possible, paying
attention to road and traffic conditions.
X Shift the transmission to position P.N The boot lid is open.
X Close the boot lid. M The bonnet is open.
A warning tone also sounds.
G WARNING
The open bonnet may then block your view when the vehicle is in
motion.
There is a risk of an accident.
X Pull over and stop the vehicle safely as soon as possible, paying
attention to road and traffic conditions.
X Secure the vehicle against rolling away (Y page 175).
X Close the bonnet. Active bonnet mal‐ Active bonnet mal‐
function See Own‐ function See Own‐
er's Manual er's Manual The active bonnet (pedestrian protection) is not active due to a
malfunction or because it has already been triggered.
X Visit a qualified specialist workshop. C At least one door is open. A warning tone also sounds.
X Close all doors. 270
Display
messagesOn-board computer and displays
Page 274 of 637
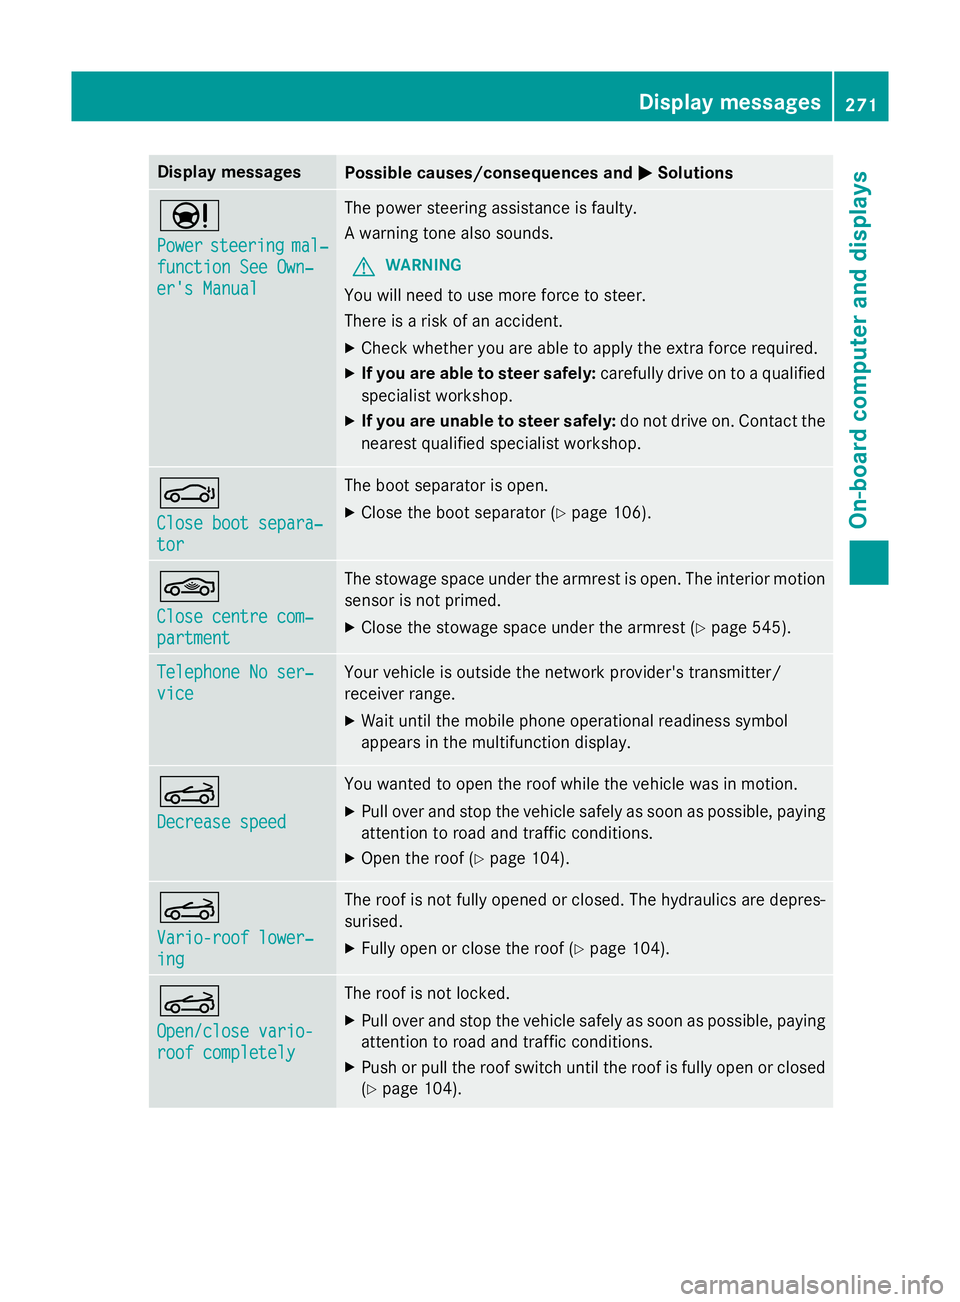
Display messages
Possible causes/consequences and
M
MSolutions Ð
Power Power
steering
steering mal‐
mal‐
function See Own‐
function See Own‐
er's Manual er's Manual The power steering assistance is faulty.
A warning tone also sounds.
G WARNING
You will need to use more force to steer.
There is a risk of an accident. X Check whether you are able to apply the extra force required.
X If you are able to steer safely: carefully drive on to a qualified
specialist workshop.
X If you are unable to steer safely: do not drive on. Contact the
nearest qualified specialist workshop. J
Close boot separa‐ Close boot separa‐
tor tor The boot separator is open.
X Close the boot separator (Y page 106).*
Close centre com‐ Close centre com‐
partment partment The stowage space under the armrest is open. The interior motion
sensor is not primed.
X Close the stowage space under the armrest (Y page 545).Telephone No ser‐
Telephone No ser‐
vice vice Your vehicle is outside the network provider's transmitter/
receiver range.
X Wait until the mobile phone operational readiness symbol
appears in the multifunction display. K
Decrease speed Decrease speed You wanted to open the roof while the vehicle was in motion.
X Pull over and stop the vehicle safely as soon as possible, paying
attention to road and traffic conditions.
X Open the roof (Y page 104). K
Vario-roof lower‐ Vario-roof lower‐
ing ing The roof is not fully opened or closed. The hydraulics are depres-
surised.
X Fully open or close the roof (Y page 104).K
Open/close vario- Open/close vario-
roof completely roof completely The roof is not locked.
X Pull over and stop the vehicle safely as soon as possible, paying
attention to road and traffic conditions.
X Push or pull the roof switch until the roof is fully open or closed
(Y page 104). Display
messages
271On-board computer and displays Z
Page 547 of 637
Useful information
i This Owner's Manual describes all mod-
els, series and optional equipment for your
vehicle that were available at the time of
going to press. National variations are pos- sible. Note that your vehicle may not be
equipped with all of the functions descri-
bed. This is also the case for systems and
functions relevant to safety.
i Read the information on qualified special-
ist workshops: (Y page 34). Stowage areas
Stowage spaces
Important safety notes G
WARNING
If you do not correctly store objects in the
vehicle interior, they can slip or be flung
around, thus striking vehicle occupants.
There is a risk of injury, especially when brak- ing or abruptly changing directions.
R Always store objects so that they cannot be
flung around in these or in similar situa-
tions.
R Always make sure that objects do not pro-
trude from stowage compartments, lug-
gage nets or stowage nets.
R Close lockable stowage compartments
while driving.
R Stow and secure objects that are heavy,
hard, pointy, sharp-edged, fragile or too
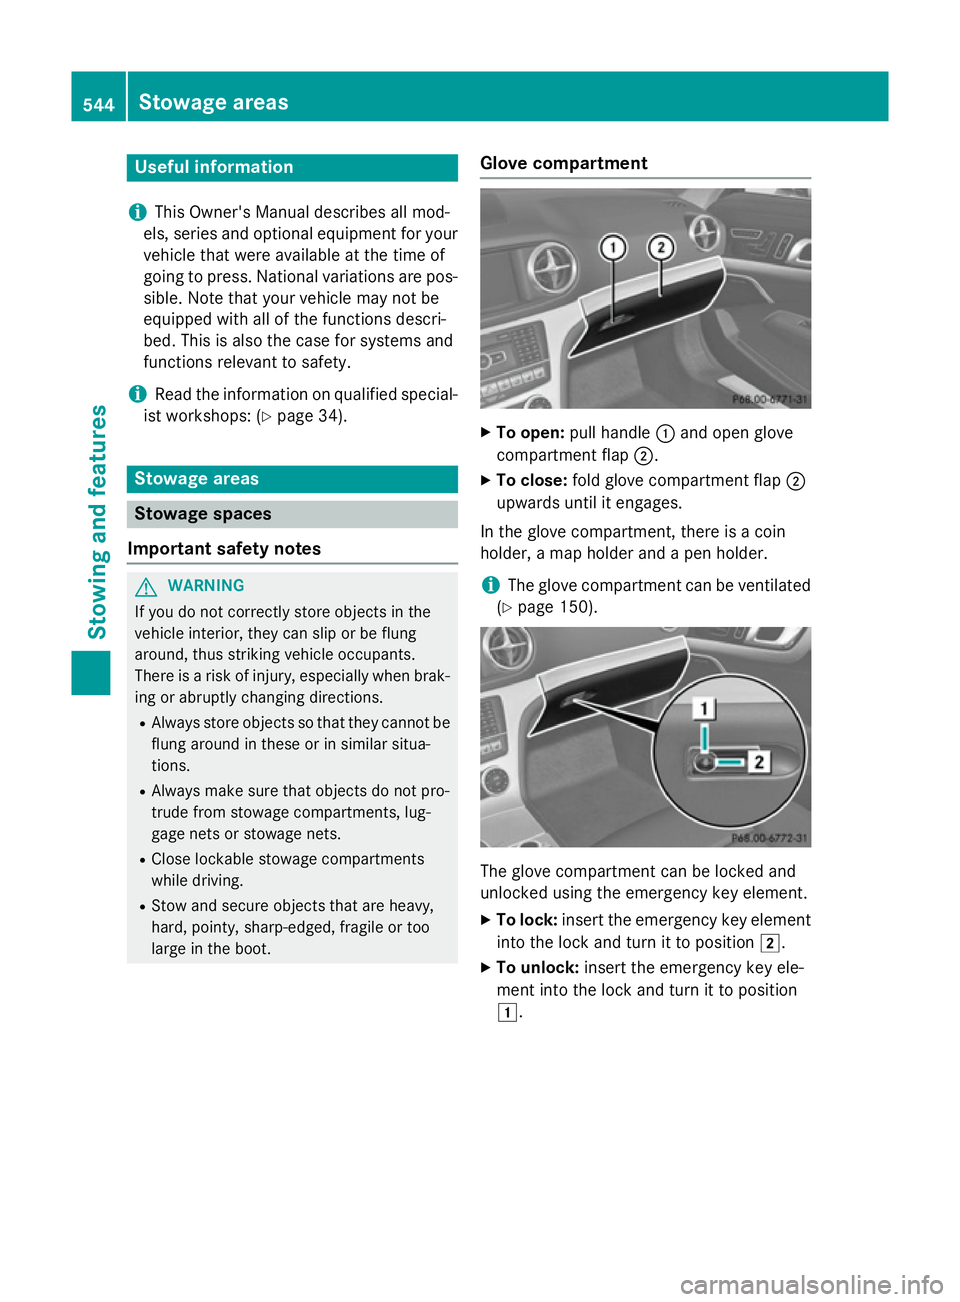
large in the boot. Glove compartment X
To open: pull handle :and open glove
compartment flap ;.
X To close: fold glove compartment flap ;
upwards until it engages.
In the glove compartment, there is a coin
holder, a map holder and a pen holder.
i The glove compartment can be ventilated
(Y page 150). The glove compartment can be locked and
unlocked using the emergency key element.
X To lock: insert the emergency key element
into the lock and turn it to position 2.
X To unlock: insert the emergency key ele-
ment into the lock and turn it to position
1. 544
Stowage areasStowing and features