2012 MERCEDES-BENZ SL ROADSTER boot
[x] Cancel search: bootPage 84 of 637
R
the roof is closed
R the doors are closed
R the boot lid is closed
Only then is the interior motion sensor
primed.
X Lock the vehicle with the key or KEYLESS-
GO.
The interior motion sensor is primed after
approximately 30 second s.
i Only
for the Netherlands and Belgium:
the interior motion sensor is primed even
when the roof is open. However, the roof
should be closed so as to prevent a false
alarm.
Deactivating X
Unlock the vehicle with the key or KEY-
LESS-GO.
The interior motion sensor is automatically
deactivated.
Deactivating X
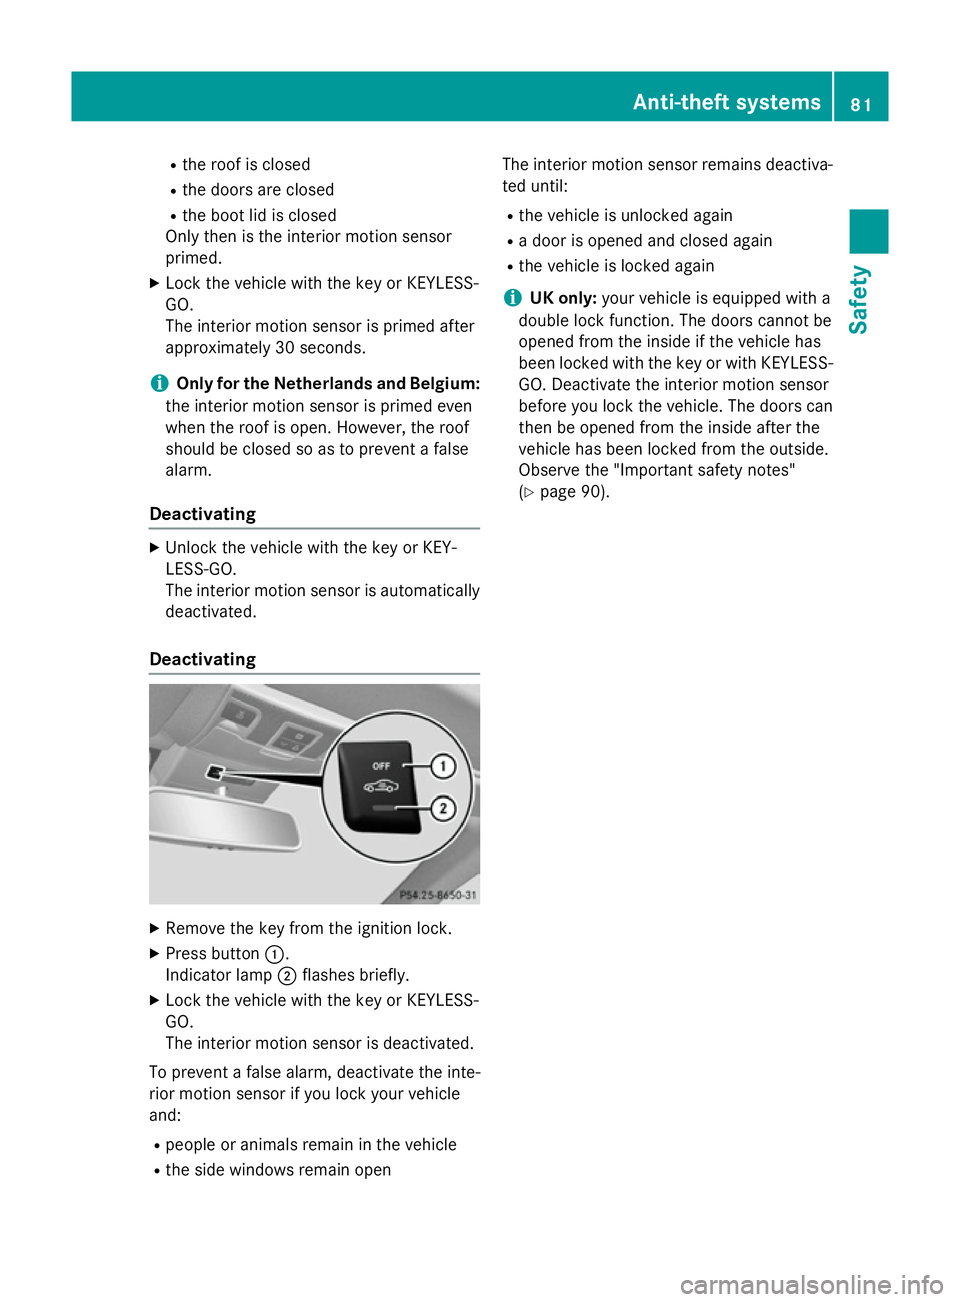
Remove the key from the ignition lock.
X Press button :.
Indicator lamp ;flashes briefly.
X Lock the vehicle with the key or KEYLESS-
GO.
The interior motion sensor is deactivated.
To prevent a false alarm, deactivate the inte-
rior motion sensor if you lock your vehicle
and:
R people or animals remain in the vehicle
R the side windows remain open The interior motion sensor remains deactiva-
ted until:
R the vehicle is unlocked again
R a door is opened and closed again
R the vehicle is locked again
i UK only:
your vehicle is equipped with a
double lock function. The doors cannot be
opened from the inside if the vehicle has
been locked with the key or with KEYLESS- GO. Deactivate the interior motion sensor
before you lock the vehicle. The doors can
then be opened from the inside after the
vehicle has been locked from the outside.
Observe the "Important safety notes"
(Y page 90). Anti-theft systems
81Safety Z
Page 86 of 637
Useful information
..............................84
Key ....................................................... 84
Doors .................................................... 90
Boot ...................................................... 94
Side windows ...................................... 99
Roof .................................................... 103 83Opening and closing
Page 88 of 637
Do not keep the key:
R
with electronic devices, e.g. a mobile
phone or another key
R with metallic objects, e.g. coins or metal
film
R inside metallic objects, e.g. a metal case
This can affect the key's functionality. Key functions
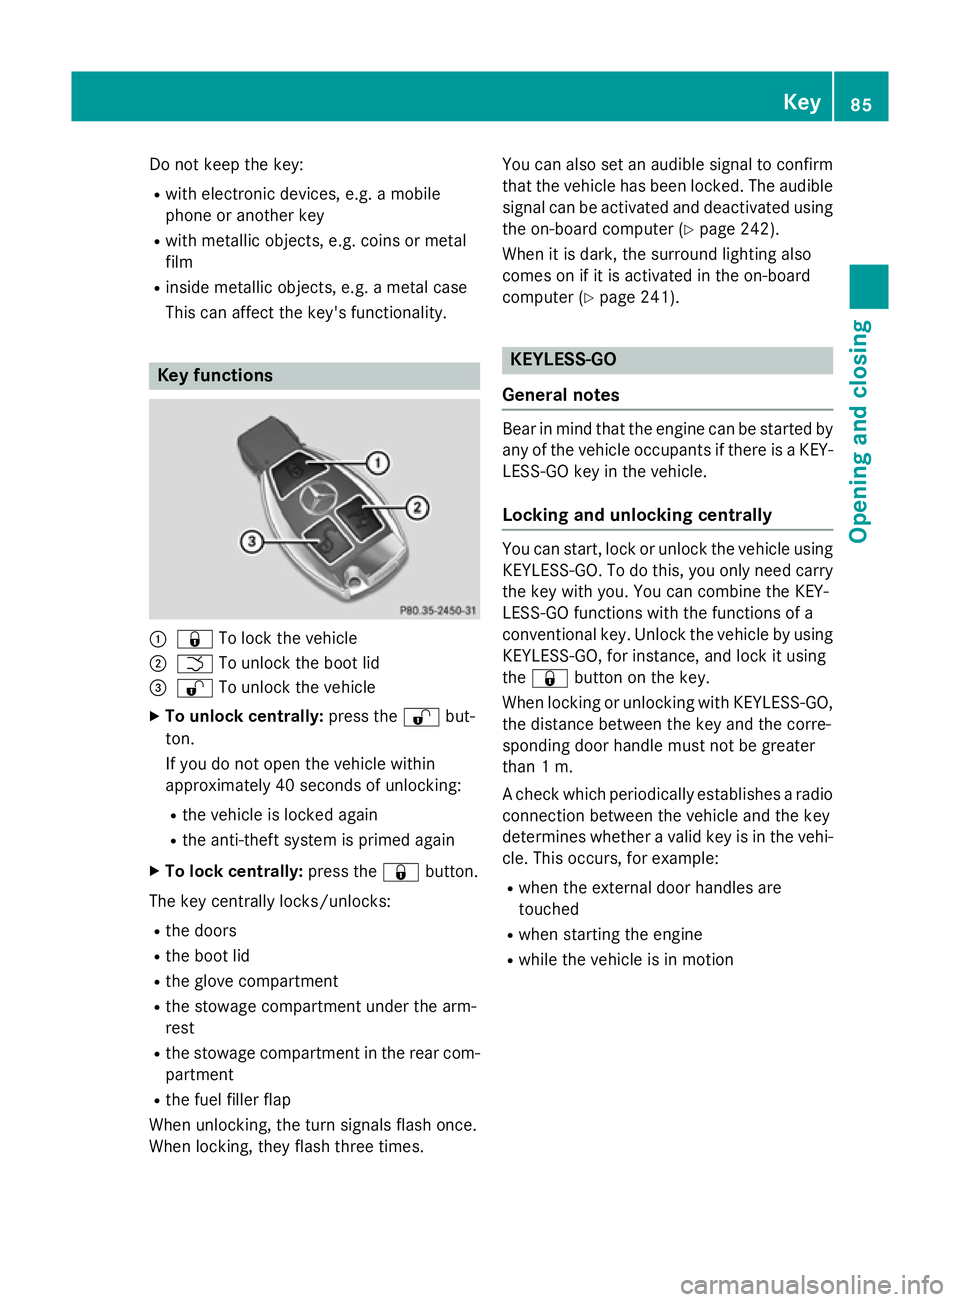
:
& To lock the vehicle
; F To unlock the boot lid
= % To unlock the vehicle
X To unlock centrally: press the%but-
ton.
If you do not open the vehicle within
approximately 40 second s of unlocking:
R the vehicle is locked again
R the anti-theft system is primed again
X To lock centrally: press the&button.
The key centrally locks/unlocks: R the doors
R the boot lid
R the glove compartment
R the stowage compartment under the arm-
rest
R the stowage compartment in the rear com-
partment
R the fuel filler flap
When unlocking, the turn signals flash once.
When locking, they flash three times. You can also set an audible signal to confirm
that the vehicle has been locked. The audiblesignal can be activated and deactivated using
the on-board computer (Y page 242).
When it is dark, the surround lighting also
comes on if it is activated in the on-board
computer (Y page 241). KEYLESS-GO
General notes Bear in mind that the engine can be started by
any of the vehicle occupants if there is a KEY- LESS-GO key in the vehicle.
Locking and unlocking centrally You can start, lock or unlock the vehicle using
KEYLESS-GO. To do this, you only need carry the key with you. You can combine the KEY-
LESS-GO functions with the functions of a
conventional key. Unlock the vehicle by using
KEYLESS-GO, for instance, and lock it using
the & button on the key.
When locking or unlocking with KEYLESS-GO,
the distance between the key and the corre-
sponding door handle must not be greater
than 1 m.
A check which periodically establishes a radio
connection between the vehicle and the key
determines whether a valid key is in the vehi- cle. This occurs, for example:
R when the external door handles are
touched
R when starting the engine
R while the vehicle is in motion Key
85Opening and closing Z
Page 89 of 637
X
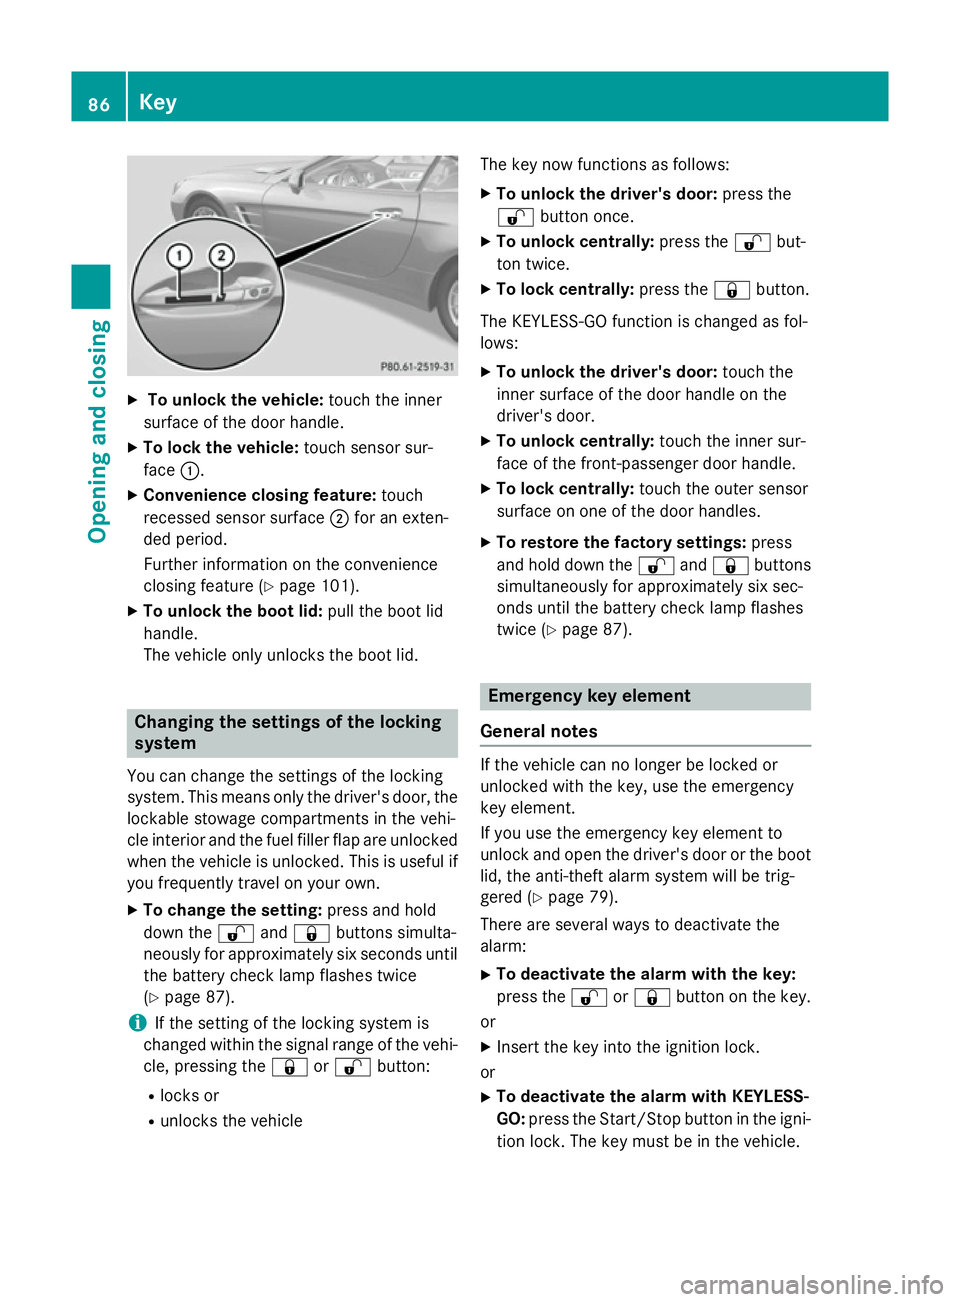
To unlock the vehicle: touch the inner
surface of the door handle.
X To lock the vehicle: touch sensor sur-
face :.
X Convenience closing feature: touch
recessed sensor surface ;for an exten-
ded period.
Further information on the convenience
closing feature (Y page 101).
X To unlock the boot lid: pull the boot lid
handle.
The vehicle only unlocks the boot lid. Changing the settings of the locking
system
You can change the settings of the locking
system. This means only the driver's door, the
lockable stowage compartments in the vehi-
cle interior and the fuel filler flap are unlocked when the vehicle is unlocked. This is useful if
you frequently travel on your own.
X To change the setting: press and hold
down the %and& buttons simulta-
neously for approximately six seconds until the battery check lamp flashes twice
(Y page 87).
i If the setting of the locking system is
changed within the signal range of the vehi- cle, pressing the &or% button:
R locks or
R unlocks the vehicle The key now functions as follows:
X To unlock the driver's door: press the
% button once.
X To unlock centrally: press the%but-
ton twice.
X To lock centrally: press the&button.
The KEYLESS-GO function is changed as fol-
lows:
X To unlock the driver's door: touch the
inner surface of the door handle on the
driver's door.
X To unlock centrally: touch the inner sur-
face of the front-passenger door handle.
X To lock centrally: touch the outer sensor
surface on one of the door handles.
X To restore the factory settings: press
and hold down the %and& buttons
simultaneously for approximately six sec-
onds until the battery check lamp flashes
twice (Y page 87). Emergency key element
General notes If the vehicle can no longer be locked or
unlocked with the key, use the emergency
key element.
If you use the emergency key element to
unlock and open the driver's door or the boot
lid, the anti-theft alarm system will be trig-
gered (Y page 79).
There are several ways to deactivate the
alarm:
X To deactivate the alarm with the key:
press the %or& button on the key.
or
X Insert the key into the ignition lock.
or
X To deactivate the alarm with KEYLESS-
GO: press the Start/Stop button in the igni-
tion lock. The key must be in the vehicle. 86
KeyOpening and closing
Page 90 of 637
or
X Lock or unlock the vehicle using KEYLESS-
GO. The key must be outside the vehicle.
If you unlock the vehicle using the emergency
key element, the fuel filler flap will not auto-
matically be unlocked.
X To unlock the fuel filler flap: insert the
key into the ignition lock.
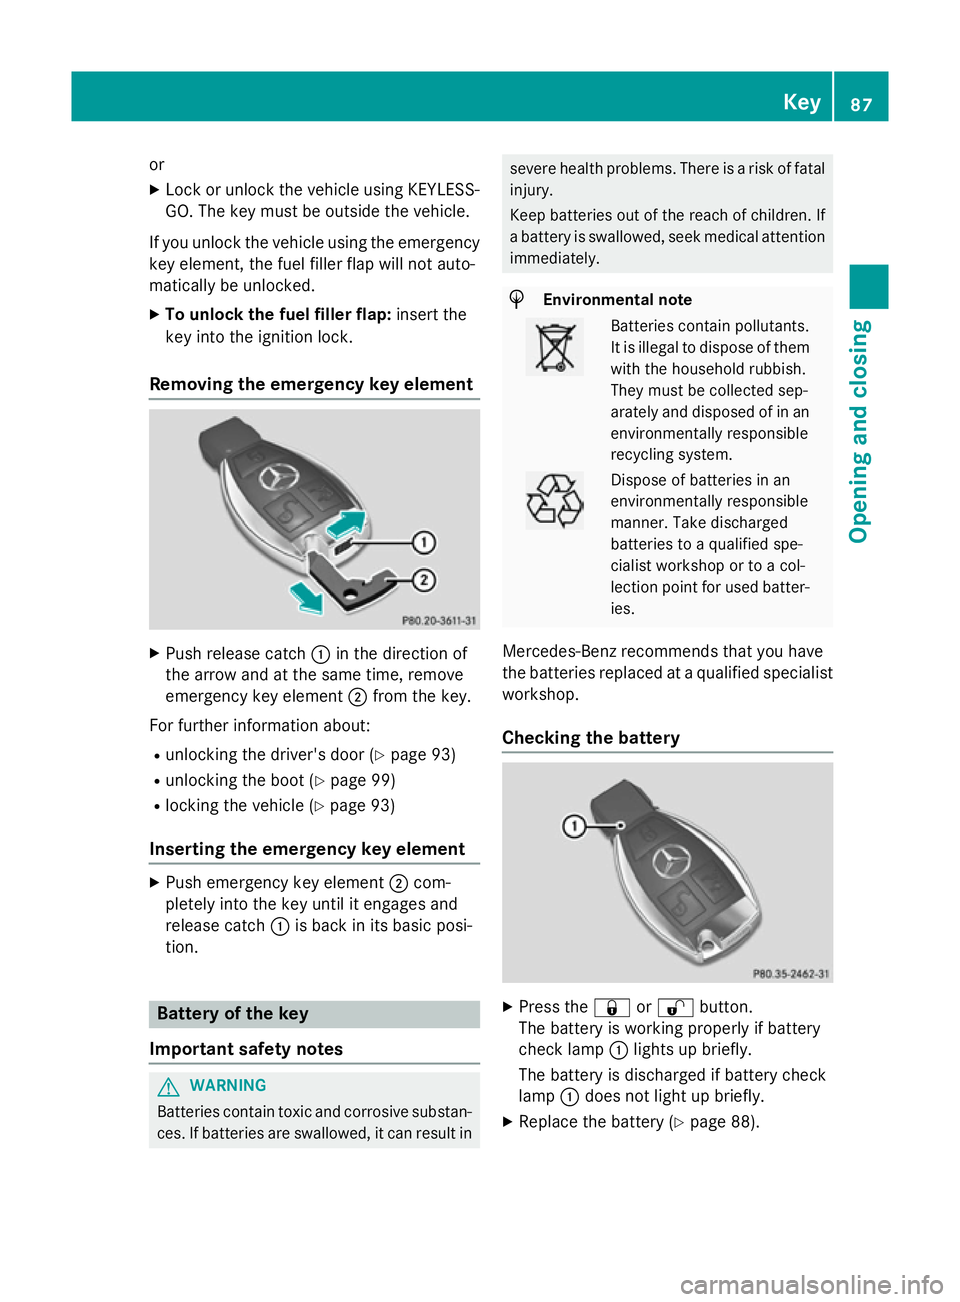
Removing the emergency key element X
Push release catch :in the direction of
the arrow and at the same time, remove
emergency key element ;from the key.
For further information about: R unlocking the driver's door (Y page 93)
R unlocking the boot (Y page 99)
R locking the vehicle (Y page 93)
Inserting the emergency key element X
Push emergency key element ;com-
pletely into the key until it engages and
release catch :is back in its basic posi-
tion. Battery of the key
Important safety notes G
WARNING
Batteries contain toxic and corrosive substan- ces. If batteries are swallowed, it can result in severe health problems. There is a risk of fatal
injury.
Keep batteries out of the reach of children. If
a battery is swallowed, seek medical attention immediately. H
Environmental note Batteries contain pollutants.
It is illegal to dispose of them
with the household rubbish.
They must be collected sep-
arately and disposed of in anenvironmentally responsible
recycling system. Dispose of batteries in an
environmentally responsible
manner. Take discharged
batteries to a qualified spe-
cialist workshop or to a col-
lection point for used batter-
ies.
Mercedes-Benz recommends that you have
the batteries replaced at a qualified specialist workshop.
Checking the battery X
Press the &or% button.
The battery is working properly if battery
check lamp :lights up briefly.
The battery is discharged if battery check
lamp :does not light up briefly.
X Replace the battery (Y page 88). Key
87Opening and closing Z
Page 96 of 637
You could therefore be locked out if:
R the vehicle is being pushed.
R the vehicle is being towed.
R the vehicle is being tested on a dynamom-
eter.
You can also switch the automatic locking
function on and off using the on-board com-
puter (Y page 242). Power closing
Power closing pulls the doors and boot lid into their locks automatically even if they are only
partly closed.
X Power closing feature (doors): push the
door past the first detent position into the
lock.
Power closing will pull the door fully closed.
X To power close the boot lid: lightly push
the boot lid closed.
The power closing function pulls the boot
lid closed. Unlocking the driver's door (emer-
gency key element)
If the vehicle can no longer be unlocked with
the key, use the emergency key element.
If you use the emergency key element to
unlock and open the driver's door, the anti-
theft alarm system will be triggered
(Y page 79).
X Take the emergency key element out of the
key (Y page 86).
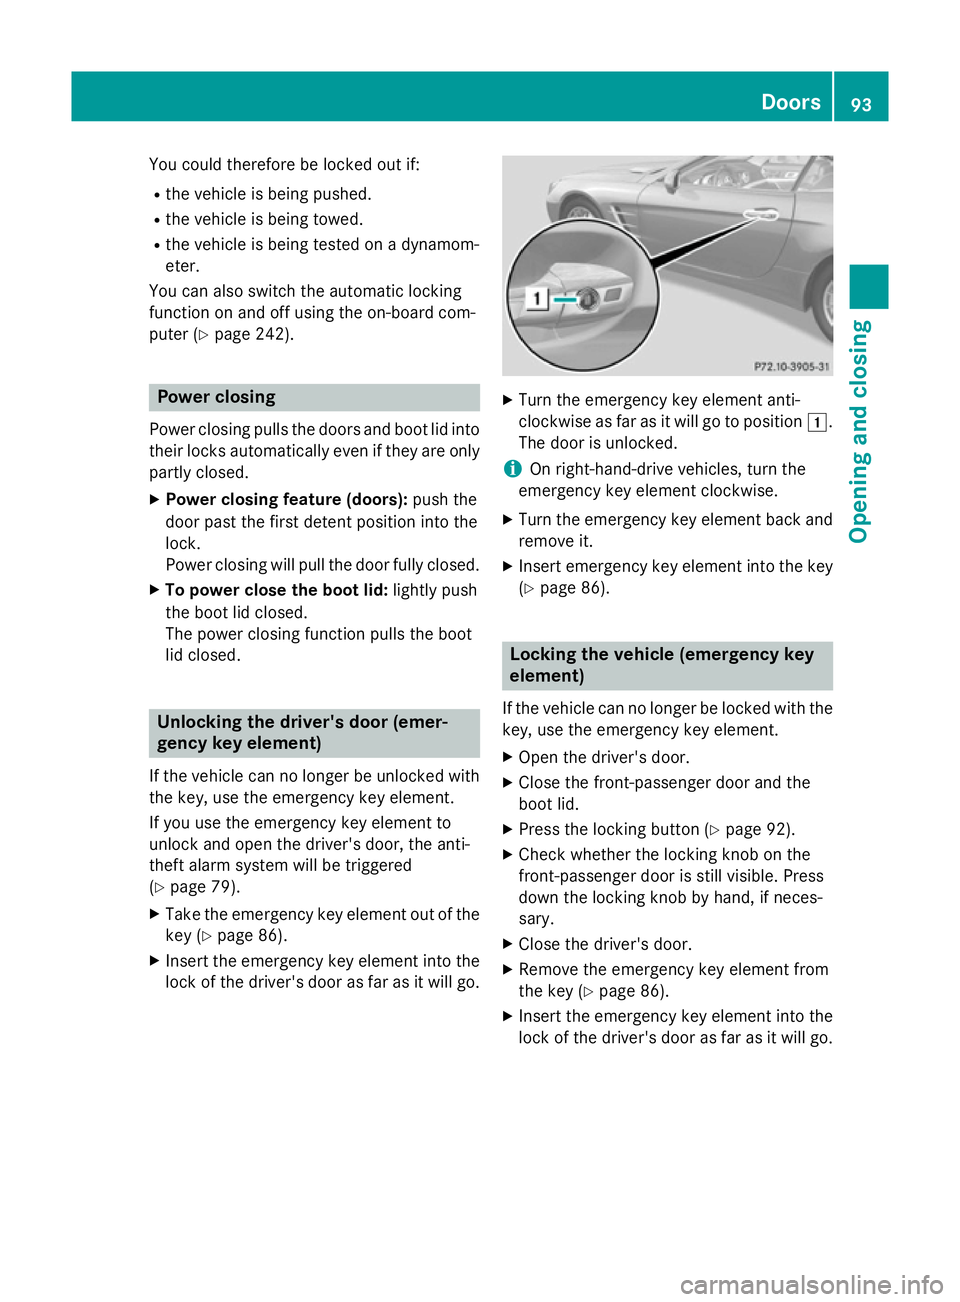
X Insert the emergency key element into the
lock of the driver's door as far as it will go. X
Turn the emergency key element anti-
clockwise as far as it will go to position 1.
The door is unlocked.
i On right-hand-drive vehicles, turn the
emergency key element clockwise.
X Turn the emergency key element back and
remove it.
X Insert emergency key element into the key
(Y page 86). Locking the vehicle (emergency key
element)
If the vehicle can no longer be locked with the key, use the emergency key element.
X Open the driver's door.
X Close the front-passenger door and the
boot lid.
X Press the locking button (Y page 92).
X Check whether the locking knob on the
front-passenger door is still visible. Press
down the locking knob by hand, if neces-
sary.
X Close the driver's door.
X Remove the emergency key element from
the key (Y page 86).
X Insert the emergency key element into the
lock of the driver's door as far as it will go. Doors
93Opening and closing Z
Page 97 of 637
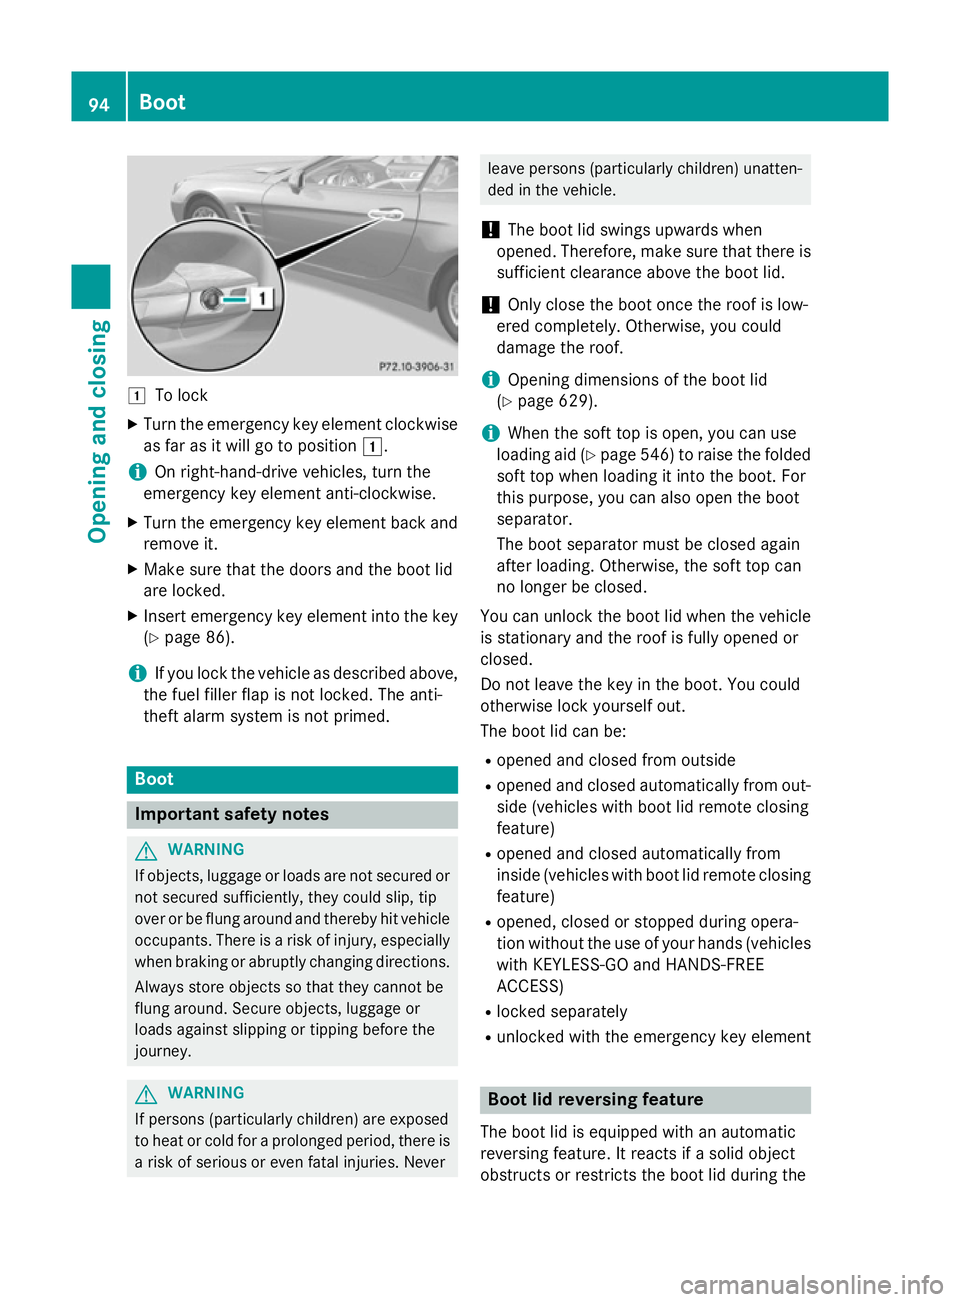
1
To lock
X Turn the emergency key element clockwise
as far as it will go to position 1.
i On right-hand-drive vehicles, turn the
emergency key element anti-clockwise.
X Turn the emergency key element back and
remove it.
X Make sure that the doors and the boot lid
are locked.
X Insert emergency key element into the key
(Y page 86).
i If you lock the vehicle as described above,
the fuel filler flap is not locked. The anti-
theft alarm system is not primed. Boot
Important safety notes
G
WARNING
If objects, luggage or loads are not secured or not secured sufficiently, they could slip, tip
over or be flung around and thereby hit vehicle
occupants. There is a risk of injury, especially when braking or abruptly changing directions.
Always store objects so that they cannot be
flung around. Secure objects, luggage or
loads against slipping or tipping before the
journey. G
WARNING
If persons (particularly children) are exposed
to heat or cold for a prolonged period, there is a risk of serious or even fatal injuries. Never leave persons (particularly children) unatten-
ded in the vehicle.
! The boot lid swings upwards when
opened. Therefore, make sure that there is sufficient clearance above the boot lid.
! Only close the boot once the roof is low-
ered completely. Otherwise, you could
damage the roof.
i Opening dimensions of the boot lid
(Y page 629).
i When the soft top is open, you can use
loading aid (Y page 546) to raise the folded
soft top when loading it into the boot. For
this purpose, you can also open the boot
separator.
The boot separator must be closed again
after loading. Otherwise, the soft top can
no longer be closed.
You can unlock the boot lid when the vehicle
is stationary and the roof is fully opened or
closed.
Do not leave the key in the boot. You could
otherwise lock yourself out.
The boot lid can be:
R opened and closed from outside
R opened and closed automatically from out-
side (vehicles with boot lid remote closing
feature)
R opened and closed automatically from
inside (vehicles with boot lid remote closing
feature)
R opened, closed or stopped during opera-
tion without the use of your hands (vehicles
with KEYLESS-GO and HANDS-FREE
ACCESS)
R locked separately
R unlocked with the emergency key element Boot lid reversing feature
The boot lid is equipped with an automatic
reversing feature. It reacts if a solid object
obstructs or restricts the boot lid during the 94
BootOpening and closing
Page 98 of 637
closing procedure. The boot lid opens again
automatically. The automatic reversing func-
tion is only an aid and is not a substitute for
your attentiveness to the boot lid while it is
closing. G
WARNING
The reversing function does not react:
R to soft, light and thin objects, e.g. small fin-
gers
R over the last 8 mm of the closing path
This means that the reversing feature cannot
prevent someone being trapped in these sit-
uations. There is a risk of injury.
When closing make sure that no parts of the
body are in the closing area.
If someone is trapped:
R press the Fbutton on the key, or
R press the remote operating switch on the
driver's door, or
R press the closing or locking button on the
boot lid, or
R pull the boot lid handle Opening/closing from the outside
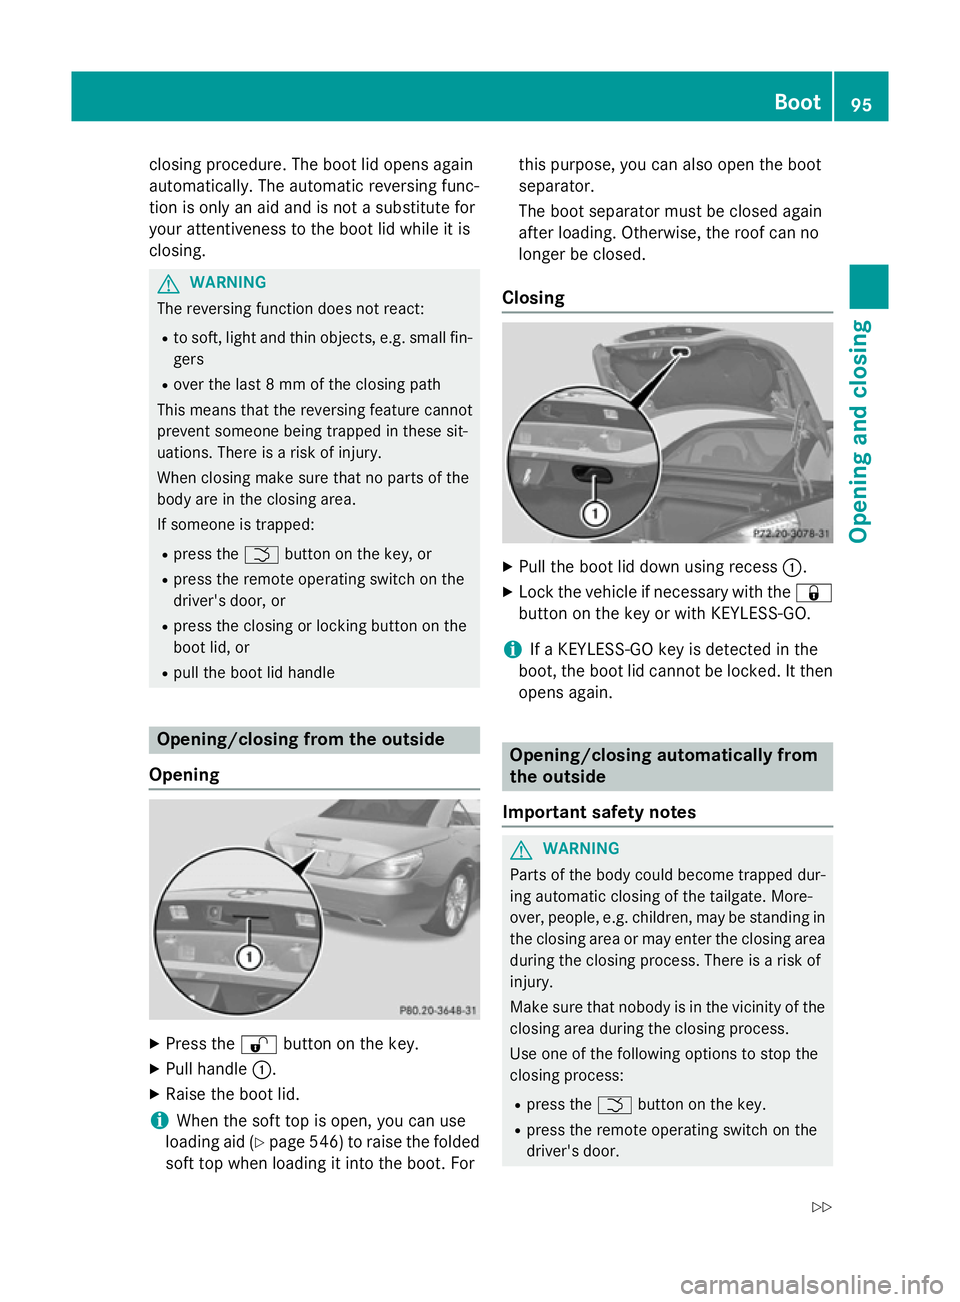
Opening X
Press the %button on the key.
X Pull handle :.
X Raise the boot lid.
i When the soft top is open, you can use
loading aid (Y page 546)to raise the folded
soft top when loading it into the boot. For this purpose, you can also open the boot
separator.
The boot separator must be closed again
after loading. Otherwise, the roof can no
longer be closed.
Closing X
Pull the boot lid down using recess :.
X Lock the vehicle if necessary with the &
button on the key or with KEYLESS-GO.
i If a KEYLESS-GO key is detected in the
boot, the boot lid cannot be locked. It then
opens again. Opening/closing automatically from
the outside
Important safety notes G
WARNING
Parts of the body could become trapped dur-
ing automatic closing of the tailgate. More-
over, people, e.g. children, may be standing in the closing area or may enter the closing area
during the closing process. There is a risk of
injury.
Make sure that nobody is in the vicinity of the closing area during the closing process.
Use one of the following options to stop the
closing process:
R press the Fbutton on the key.
R press the remote operating switch on the
driver's door. Boot
95Opening and closing
Z