2012 MERCEDES-BENZ SL ROADSTER language
[x] Cancel search: languagePage 307 of 637
X
Select c
cand confirm Wwith the COMAND
controller.
The letter c
c is added to S Sin the data field.
X Repeat the process until the name has
been entered in full.
Other input menu functions:
R Deleting a character/entry (Y page 305)
R Switching between upper/lower-case let-
ters (Y page 304)
R Changing the character set (Y page 305)
R Moving the cursor to the next data field
(Y page 305)
X To enter a phone number: select the dig-
its one by one in the corresponding data
field by turning cVdand sliding ZVÆthe
COMAND controller and press Wto con-
firm.
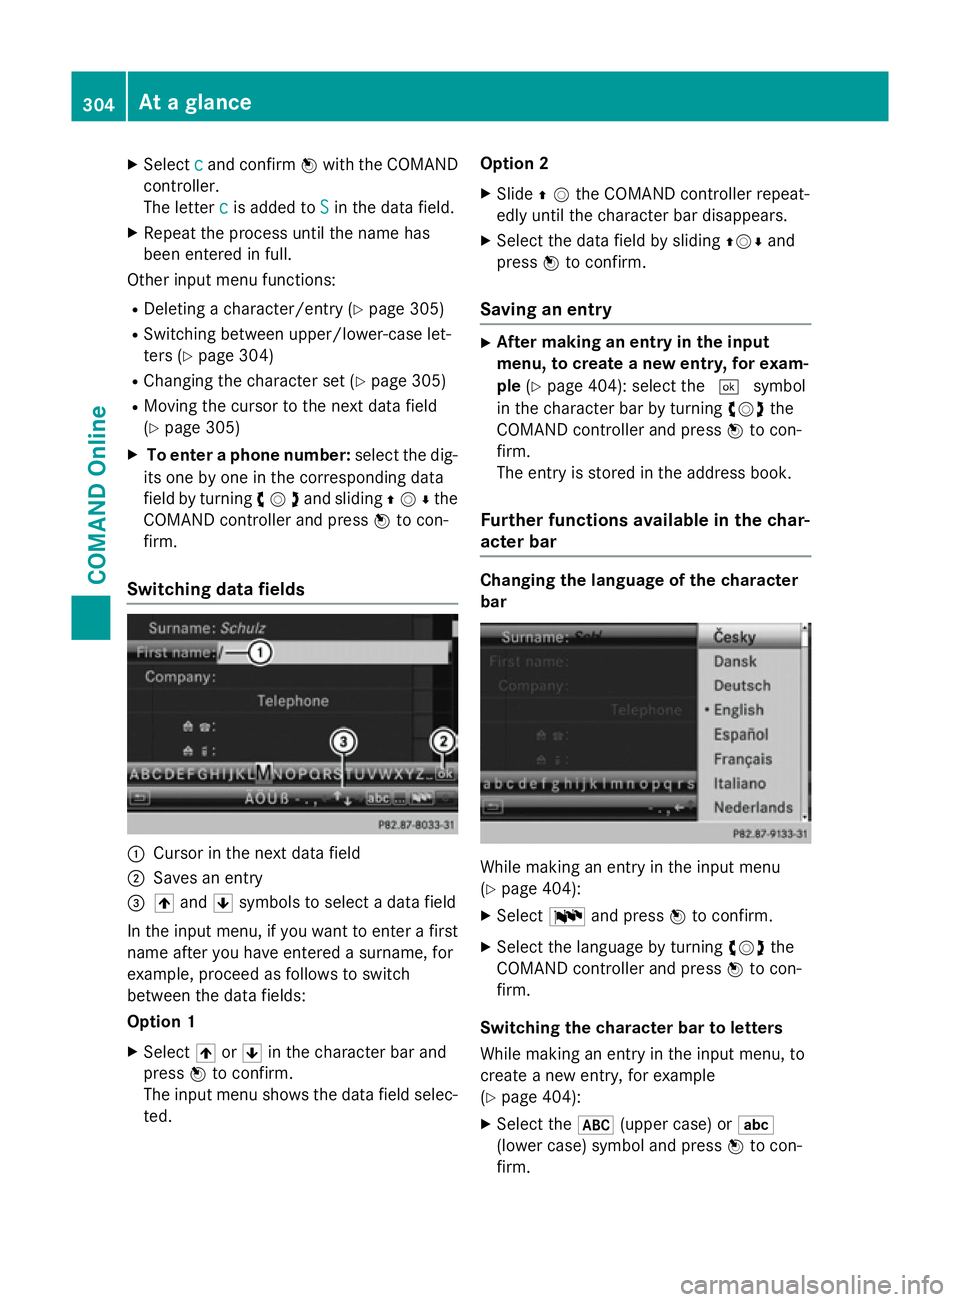
Switching data fields :
Cursor in the next data field
; Saves an entry
= 4 and 5symbols to select a data field
In the input menu, if you want to enter a first name after you have entered a surname, for
example, proceed as follows to switch
between the data fields:
Option 1
X Select 4or5 in the character bar and
press Wto confirm.
The input menu shows the data field selec-
ted. Option 2
X Slide ZVthe COMAND controller repeat-
edly until the character bar disappears.
X Select the data field by sliding ZVÆand
press Wto confirm.
Saving an entry X
After making an entry in the input
menu, to create a new entry, for exam-
ple (Ypage 404): select the ¬symbol
in the character bar by turning cVdthe
COMAND controller and press Wto con-
firm.
The entry is stored in the address book.
Further functions available in the char-
acter bar Changing the language of the character
bar While making an entry in the input menu
(Y
page 404):
X Select Band press Wto confirm.
X Select the language by turning cVdthe
COMAND controller and press Wto con-
firm.
Switching the character bar to letters
While making an entry in the input menu, to
create a new entry, for example
(Y page 404):
X Select the *(upper case) or E
(lower case) symbol and press Wto con-
firm. 304
At a glanceCOMAND Online
Page 316 of 637
improve voice recognition. See the separate
operating instructions. Bluetooth
®
settings
General information about Bluetooth ®Bluetooth
®
technology is a standard for
short-range wireless data transmissions up to
approximately 10 metres. Bluetooth ®
allows,
for example, the exchange of vCards. Bluetooth
®
is a registered trademark of Blue-
tooth Special Interest Group (SIG) Inc.
Activating/deactivating Bluetooth ®X
Press the Wbutton.
The system menu appears.
X Select System
System by turning cVdthe
COMAND controller and press Wto con-
firm.
X Select Activate
Activate Bluetooth
Bluetooth and pressW
to confirm.
This switches Bluetooth ®
on O or off ª. Setting the system language
This function allows you to determine the lan-
guage for the menu displays and the naviga-
tion announcements. The selected language
affects the characters available for entry.
The navigation announcements are not avail-
able in all languages. If a language is not avail- able, the navigation announcements will be in English.
If you change the system language, the lan-
guage for LINGUATRONIC will also be
changed. If the selected language is not sup- ported by LINGUATRONIC, English will be
selected.
X Press the Wbutton.
X Select System System by turning cVdthe
COMAND controller and press Wto con-
firm.
X Select Language
Language and pressWto confirm.
The list of languages appears. The #dot
indicates the current setting.
X Select the language by turning cVdthe
COMAND controller and press Wto con-
firm.
COMAND loads the selected language and
sets it.
i If you are using Arabic map data, the text
information can also be shown in Arabic on
the navigation map. To do this, select Eng‐ Eng‐
lish
lish (Arabic
(Arabic map)
map)as the language from
the list of languages. Navigation announce-
ments are then made in Arabic. Assigning a favourites button
X To assign a favourites button: press the
W button.
X Select System
System by turning cVdthe
COMAND controller and press Wto con-
firm.
X Select Assign as favourite
Assign as favourite and press
W to confirm.
The list of predefined functions appears.
The dot #indicates the currently selected
function.
X Select the function by turning cVdthe
COMAND controller and press Wto con-
firm.
The favourites button is assigned the selec-
ted function.
X Example: to call up a favourite: press the
g favourites button.
This calls up the predefined function. System settings
313COMAND Online Z
Page 359 of 637
Switching announcements and audio
fadeout on/off
X Select Navi
Navi in the main function bar by
sliding ZVand turning cVdthe COMAND
controller and press Wto confirm.
X Select Announcements
Announcements and pressWto
confirm.
A menu appears.
You can activate/deactivate the following
functions:
R Announce street names
Announce street names
Street names are announced during
route guidance.
R Audible info during a phone call Audible info during a phone call
During a phone call, navigation
announcements and traffic reports are
audible in the background.
R Audio fadeout
Audio fadeout
The volume of an active audio or video
source is automatically reduced during a
navigation announcement.
R Reserve fuel level Reserve fuel level
Once you have reached reserve fuel
level, you will see a query asking whether
you wish to start the search for a filling
station (Y page 338).
X Select the function and press Wto confirm.
Switch the function on Oor off ª.
Setting the volume manually
X Adjust the volume using the qcontrol
knob during a navigation announcement.
or
X Select +in the map view with the menu
shown and adjust the volume using the q
control knob.
Announcing street names
If this function is switched on, the name of the
street into which you should turn is
announced.
Announcements are not made in the chosen
language in all countries. They are made when
relevant street names for the selected lan-
guage are available in the database. X
To switch to navigation mode: press the
Ø button.
X To show the menu: pressWthe COMAND
controller.
X Select Navi
Navi in the main function bar by
sliding ZVthe COMAND controller and
press Wto confirm.
X Select Announce
Announce street streetnames
names and press
W to confirm.
The function is switched on Oor off ª,
depending on the previous status.
Street names may be announced in the fol-
lowing languages:
R Danish
R German
R English
R French
R Dutch
R Portuguese
R Swedish
Ending route guidance Cancelling or continuing route guidance
X To switch to navigation mode: press the
Ø button.
X To show the menu: pressWthe COMAND
controller.
X Select Dest.
Dest.in the navigation system
menu bar by turning cVdthe COMAND
controller and press Wto confirm.
X To cancel route guidance: selectCancel
Cancel
route guidance
route guidance and pressWto confirm.
or
X To continue route guidance: selectCon‐
Con‐
tinue route guidance
tinue route guidance and pressWto
confirm.
COMAND Online calculates the route. 356
NavigationCOMAND Online
Page 370 of 637
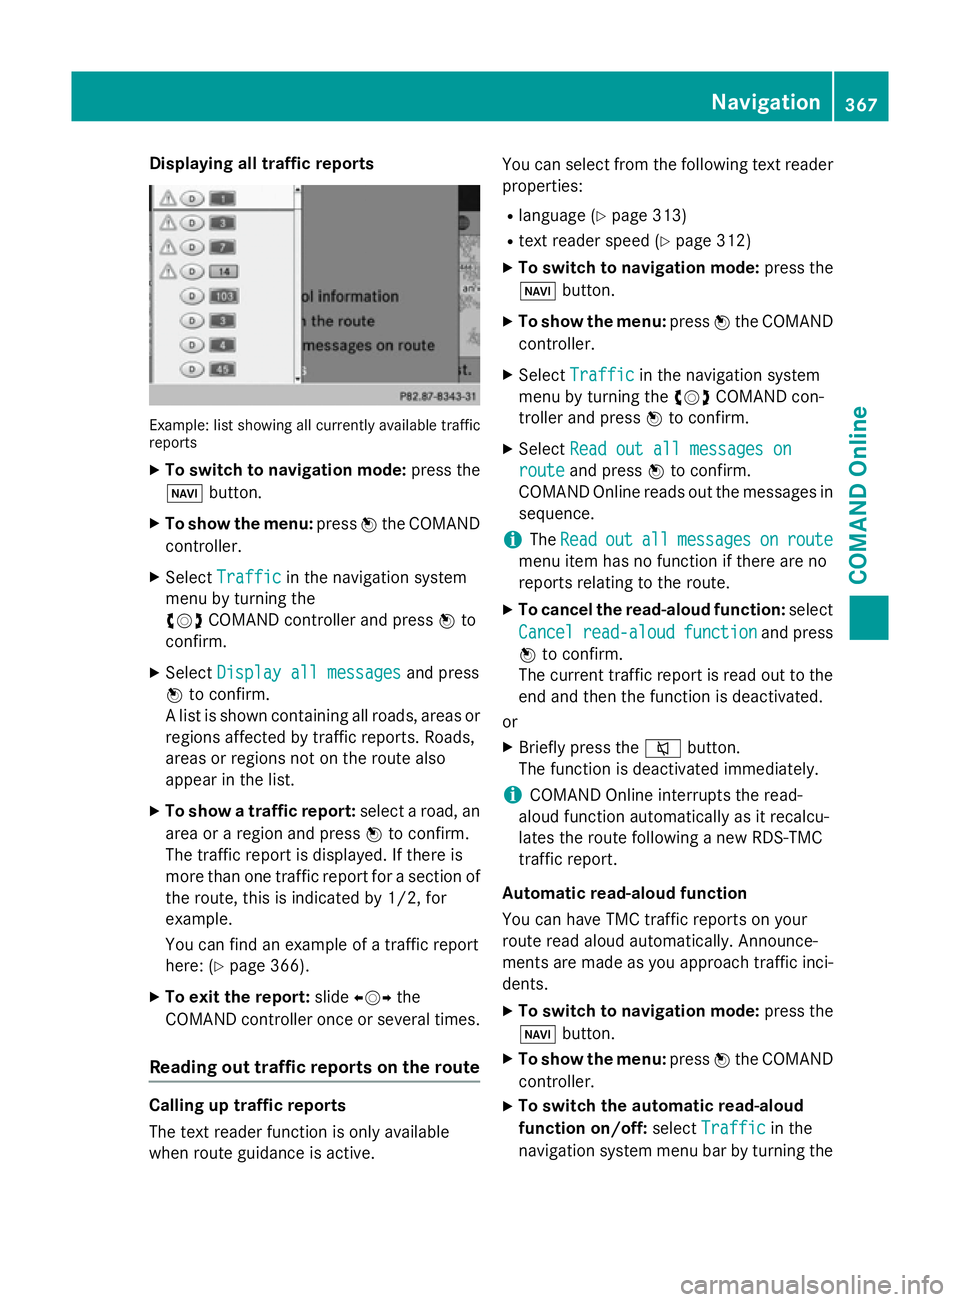
Displaying all traffic reports
Example: list showing all currently available traffic
reports
X To switch to navigation mode: press the
Ø button.
X To show the menu: pressWthe COMAND
controller.
X Select Traffic
Traffic in the navigation system
menu by turning the
cVd COMAND controller and press Wto
confirm.
X Select Display all messages
Display all messages and press
W to confirm.
A list is shown containing all roads, areas or
regions affected by traffic reports. Roads,
areas or regions not on the route also
appear in the list.
X To show a traffic report: select a road, an
area or a region and press Wto confirm.
The traffic report is displayed. If there is
more than one traffic report for a section of
the route, this is indicated by 1/2, for
example.
You can find an example of a traffic report
here: (Y page 366).
X To exit the report: slideXVY the
COMAND controller once or several times.
Reading out traffic reports on the route Calling up traffic reports
The text reader function is only available
when route guidance is active. You can select from the following text reader
properties:
R language (Y page 313)
R text reader speed (Y page 312)
X To switch to navigation mode: press the
Ø button.
X To show the menu: pressWthe COMAND
controller.
X Select Traffic
Traffic in the navigation system
menu by turning the cVdCOMAND con-
troller and press Wto confirm.
X Select Read out all messages on Read out all messages on
route
route and press Wto confirm.
COMAND Online reads out the messages in sequence.
i The
Read
Read out
outall
allmessages
messages on
onroute
route
menu item has no function if there are no
reports relating to the route.
X To cancel the read-aloud function: select
Cancel
Cancel read-aloud read-aloud function
functionand press
W to confirm.
The current traffic report is read out to the
end and then the function is deactivated.
or
X Briefly press the 8button.
The function is deactivated immediately.
i COMAND Online interrupts the read-
aloud function automatically as it recalcu-
lates the route following a new RDS-TMC
traffic report.
Automatic read-aloud function
You can have TMC traffic reports on your
route read aloud automatically. Announce-
ments are made as you approach traffic inci- dents.
X To switch to navigation mode: press the
Ø button.
X To show the menu: pressWthe COMAND
controller.
X To switch the automatic read-aloud
function on/off: selectTraffic
Traffic in the
navigation system menu bar by turning the Navigation
367COMAND Online Z
Page 413 of 637
Reading a text message (SMS)
X Call up the text message (SMS) inbox
(Y page 409)
X Select a text message in the text message
inbox by turning cVdthe COMAND con-
troller and press Wto confirm.
The text message appears.
X To scroll through the display or select
phone numbers in a text message: turn
cVd the COMAND controller.
The display scrolls up or down line by line,
or skips to the next or previous telephone
number and automatically highlights it.
X To return to the list: select the&sym-
bol and press Wto confirm or press the
% back button.
Text message read-aloud function
Settings for the read-aloud function:
R Language (Y page 313)
R Speed (Y page 312)
X Press Wwhile a text message is being dis-
played, select Read
Read aloud aloud and press Wto
confirm.
COMAND Online reads out the text mes-
sage.
X To cancel the read-aloud function: press
the 8 button.
or
X Press W, select Cancel read-aloud
Cancel read-aloud
function
function and pressWto confirm.
Sender or text display
You can switch between displaying the text
message sender or the text message content.
The sender display shows the sender of the
text message. If the sender is stored in the
COMAND phone book, the name is displayed.
The text display shows the first few words of a
text message.
X Select a text message in the text message
inbox by turning cVdthe COMAND con-
troller.
X To switch to the text display: select the
list symbol to the right of the text message by sliding
VYthe COMAND controller and
press Wto confirm.
X Select Display Display text textand press Wto con-
firm.
The view changes.
X To switch to the sender display: select
the list symbol to the right of the text mes-
sage by sliding VYthe COMAND controller
and press Wto confirm.
X Select Display sender
Display sender and pressWto
confirm.
The view changes.
X To return to the telephone basic menu:
press the %button.
Displaying details and phone numbers
COMAND Online can also show a shortened
sender display in full.
X Select a text message in the text message
inbox by turning cVdthe COMAND con-
troller.
X Select the list symbol to the right of the text
message by sliding VYthe COMAND con-
troller and press Wto confirm.
X Select Details Details and press Wto confirm.
The detailed display appears.
X To close the detailed display: slideXVY
the COMAND controller.
X To return to the telephone basic menu:
press the %button.
Managing text messages (SMS) Calling a text message (SMS) sender
X Press Wthe COMAND controller while the
text message is being displayed.
X Select Call sender
Call sender and pressWto con-
firm.
The telephone makes the call to the sender. 410
TelephoneCOMAND Online
Page 423 of 637
The following functions are available in
COMAND Online when the module is used:
R hands-free mode
R data modem mode (Y page 423)
R sending and receiving text messages
(Y page 425)
R access to the phone book of the mobile
phone (if supported by the mobile phone)
(Y page 424)
R loading a mobile phone via the mini USB
connection (Y page 426)
When the module is installed, the vehicle's
exterior aerial is used for reception. This
ensures optimal language quality and Internet connectivity.
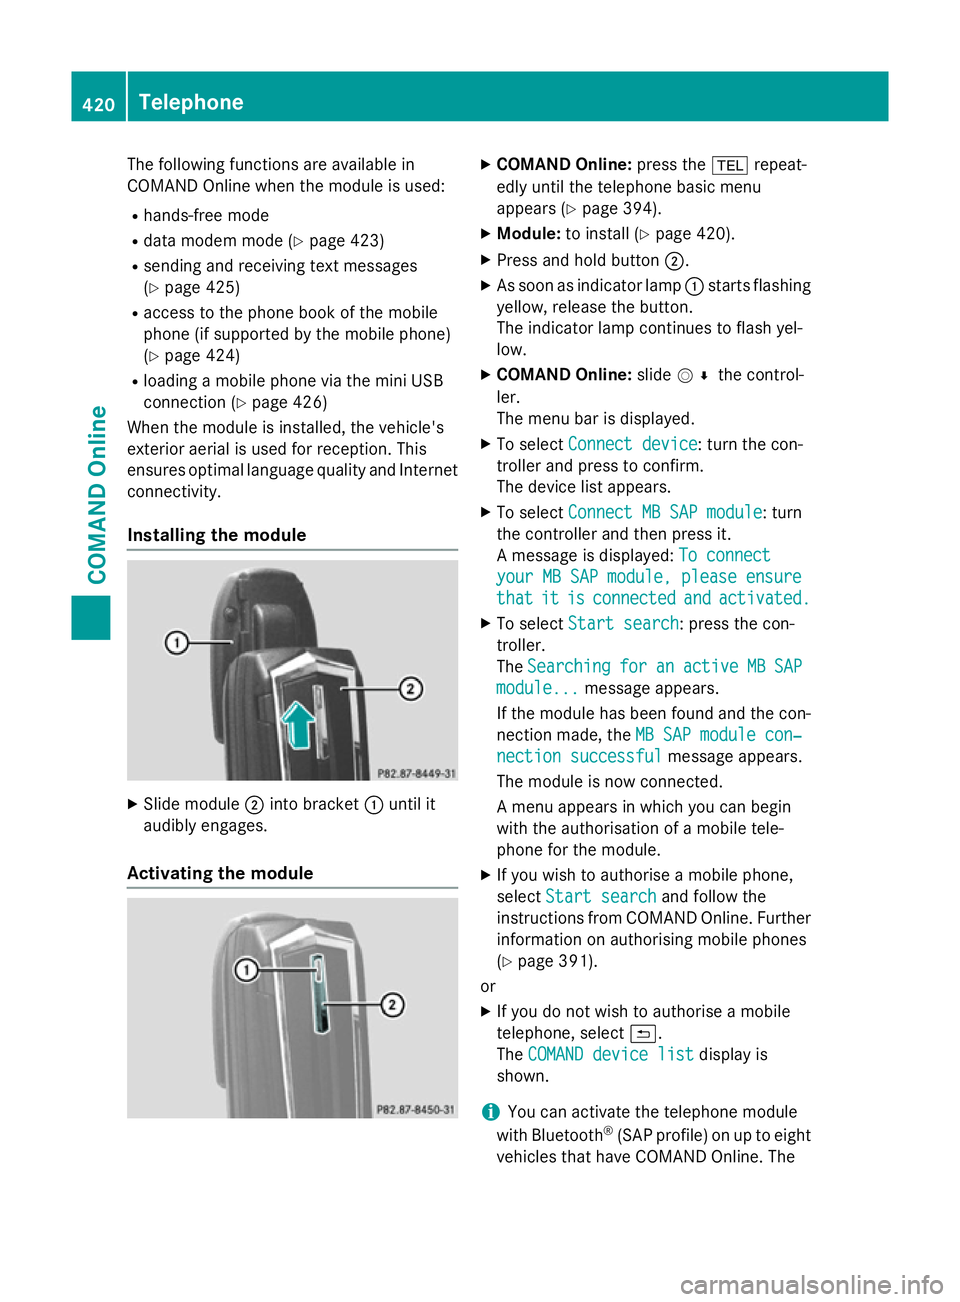
Installing the module X
Slide module ;into bracket :until it
audibly engages.
Activating the module X
COMAND Online: press the%repeat-
edly until the telephone basic menu
appears (Y page 394).
X Module: to install (Y page 420).
X Press and hold button ;.
X As soon as indicator lamp :starts flashing
yellow, release the button.
The indicator lamp continues to flash yel-
low.
X COMAND Online: slideV¬ the control-
ler.
The menu bar is displayed.
X To select Connect device
Connect device: turn the con-
troller and press to confirm.
The device list appears.
X To select Connect MB SAP module Connect MB SAP module: turn
the controller and then press it.
A message is displayed: To connect To connect
your MB SAP module, please ensure
your MB SAP module, please ensure
that that it
itis
isconnected
connected and
andactivated.
activated.
X To select Start search
Start search: press the con-
troller.
The Searching Searching for
foran
anactive
active MB
MBSAP
SAP
module...
module... message appears.
If the module has been found and the con-
nection made, the MB SAP module con‐
MB SAP module con‐
nection successful
nection successful message appears.
The module is now connected.
A menu appears in which you can begin
with the authorisation of a mobile tele-
phone for the module.
X If you wish to authorise a mobile phone,
select Start search Start search and follow the
instructions from COMAND Online. Further
information on authorising mobile phones
(Y page 391).
or
X If you do not wish to authorise a mobile
telephone, select &.
The COMAND device list COMAND device list display is
shown.
i You can activate the telephone module
with Bluetooth ®
(SAP profile) on up to eight
vehicles that have COMAND Online. The 420
TelephoneCOMAND Online
Page 432 of 637
to make arrangements to have the vehicle
towed to a Mercedes-Benz Service Centre.
X To forward the call: press thegkey on
the number keypad.
The voice connection to the Mercedes-
Benz emergency call centre is ended and
the call is automatically forwarded to
Mercedes-Benz Contact Accident Assis-
tance.
After your confirmation, the vehicle data is sent via Mercedes-Benz Contact. An
employee of Mercedes-Benz Contact Acci-
dent Assistance will then make the neces-
sary arrangements with MB Service 24h to have your vehicle towed to a Mercedes-
Benz Service Centre. Mercedes-Benz emergency call sys-
tem
Overview The Mercedes-Benz emergency call system
can help to decisively reduce the time
between an accident and the arrival of emer-
gency services at the site of the accident. It
can also help locate an accident site in places
that are difficult to see.
The emergency call can be made automati-
cally or manually and is transmitted to the
Europe-wide private Mercedes-Benz emer-
gency call number. The vehicle position data
is simultaneously transmitted by text mes-
sage and DTMF to the Mercedes-Benz emer-
gency call centre. The Mercedes-Benz emer-
gency call centre transmits the vehicle posi-
tion data to one of the Europe-wide public
emergency call centres. In almost all coun-
tries, the voice connection can be made in the respective country's language. This allows
measures for rescue, recovery or towing to a
Mercedes-Benz Service Centre to be initiated quickly.
If the Mercedes-Benz emergency call system function is operational, you see the SOS
SOS READY READY
display message in the basic tele-
phone menu (Y page 432).
Information on service availability in Europe
(Y page 429).
i Note that manual emergency calls should
only be used if you or others are in need of rescue, not e.g. in the event of a break-
down.
Operation costs (e.g. for rescue teams)
incurred by a falsely triggered manual
emergency call, must be paid for by the
vehicle owner.
Service availability in Europe The Mercedes-Benz emergency call system is
available for your vehicle for 15 years after
the initial date of production, if:
R it is equipped with COMAND Online
R it was originally produced for the European
market
You can find more information on the regional
availability of the Mercedes-Benz emergency
call system at http://www.mercedes-
benz.com/connect_ecall .
Conditions Equipment requirements
You need:
R a Bluetooth ®
-capable mobile phone which,
if possible, supports the MAP profile (Mes-
sage Access Profile) for sending text mes-
sages, or
R if the vehicle is equipped with permanently
installed/SAP telephony, a SIM card or a
suitable mobile phone
Functional requirements
The vehicle has GPS reception.
Check the following:
R COMAND Online is switched on
R when using the Bluetooth ®
interface, the
mobile phone must be authorised for and
connected with COMAND Online, and log-
ged into a mobile phone network Telephone
429COMAND Online Z
Page 435 of 637
R
a Mercedes-Benz Contact coding
R an indication of whether the call was trig-
gered automatically or manually
R a time stamp
R the language settings on COMAND Online
DTMF sends a reduced data package that
does not contain the vehicle identification
number and time stamp.
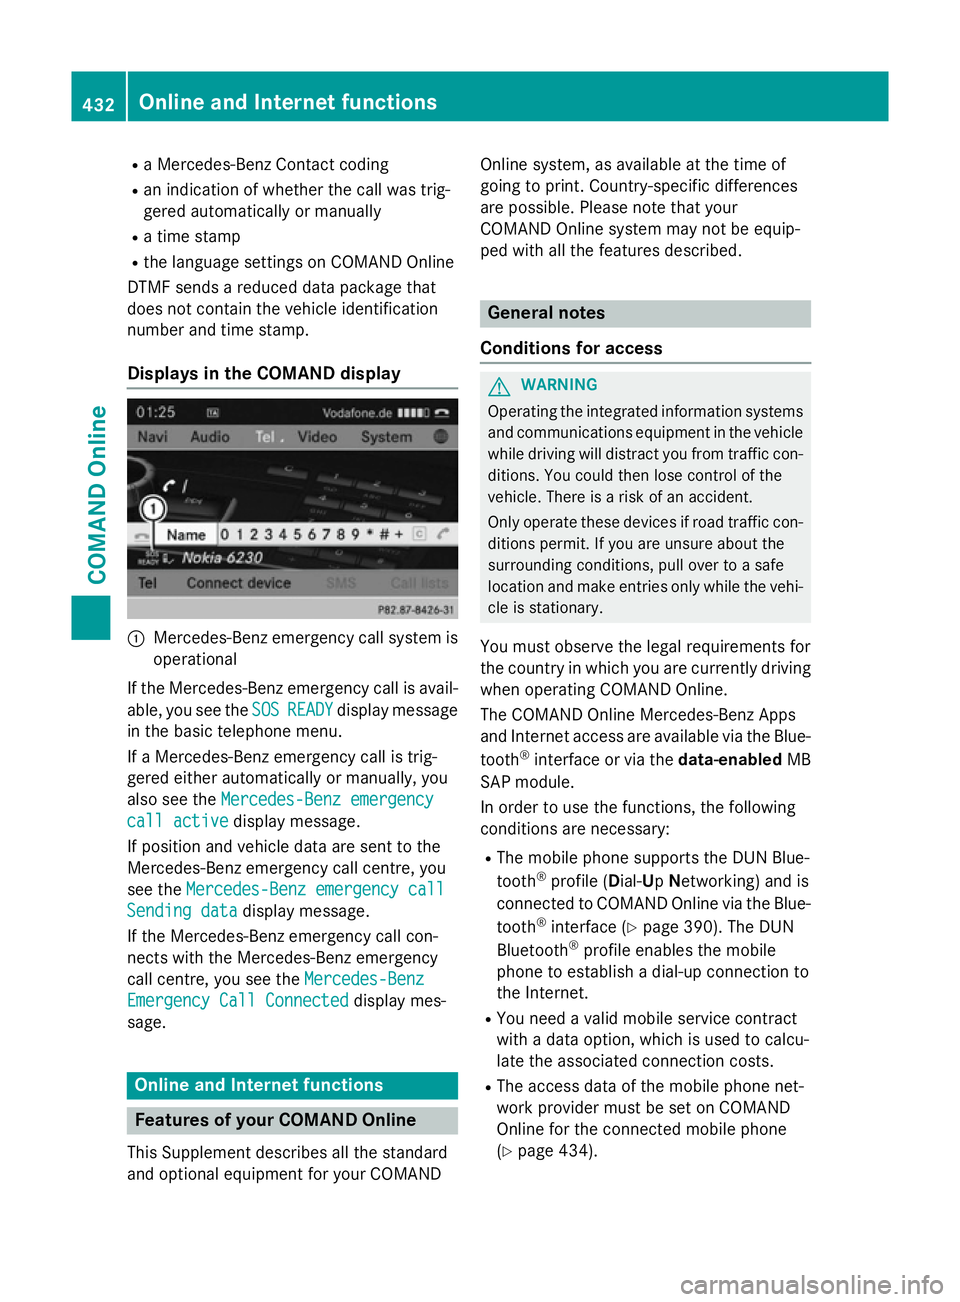
Displays in the COMAND display :
Mercedes-Benz emergency call system is
operational
If the Mercedes-Benz emergency call is avail- able, you see the SOS
SOS READY READY display message
in the basic telephone menu.
If a Mercedes-Benz emergency call is trig-
gered either automatically or manually, you
also see the Mercedes-Benz emergency
Mercedes-Benz emergency
call active call active display message.
If position and vehicle data are sent to the
Mercedes-Benz emergency call centre, you
see the Mercedes-Benz emergency call
Mercedes-Benz emergency call
Sending data
Sending data display message.
If the Mercedes-Benz emergency call con-
nects with the Mercedes-Benz emergency
call centre, you see the Mercedes-Benz
Mercedes-Benz
Emergency Call Connected Emergency Call Connected display mes-
sage. Online and Internet functions
Features of your COMAND Online
This Supplement describes all the standard
and optional equipment for your COMAND Online system, as available at the time of
going to print. Country-specific differences
are possible. Please note that your
COMAND Online system may not be equip-
ped with all the features described. General notes
Conditions for access G
WARNING
Operating the integrated information systems and communications equipment in the vehicle
while driving will distract you from traffic con-
ditions. You could then lose control of the
vehicle. There is a risk of an accident.
Only operate these devices if road traffic con-
ditions permit. If you are unsure about the
surrounding conditions, pull over to a safe
location and make entries only while the vehi-
cle is stationary.
You must observe the legal requirements for
the country in which you are currently driving when operating COMAND Online.
The COMAND Online Mercedes-Benz Apps
and Internet access are available via the Blue-
tooth ®
interface or via the data-enabledMB
SAP module.
In order to use the functions, the following
conditions are necessary:
R The mobile phone supports the DUN Blue-
tooth ®
profile ( Dial-Up Networking) and is
connected to COMAND Online via the Blue-
tooth ®
interface (Y page 390). The DUN
Bluetooth ®
profile enables the mobile
phone to establish a dial-up connection to
the Internet.
R You need a valid mobile service contract
with a data option, which is used to calcu-
late the associated connection costs.
R The access data of the mobile phone net-
work provider must be set on COMAND
Online for the connected mobile phone
(Y page 434). 432
Online and Internet functionsCOMAND Online