2012 MERCEDES-BENZ SL ROADSTER language
[x] Cancel search: languagePage 501 of 637
i
Reading:
if the media content of the con-
nected device is being read, this is indica-
ted on the upper right by a symbol. When
reading has ended, the categories Select
Select
by cover
by cover andKeyword Search Keyword Search are avail-
able.
Depending on the connected device and
the size of the media content, reading may
take several minutes. When the device is
next started or reconnected, the advanced
functions will be quickly available.
However, if you change the media content
on your iPod ®
/iPhone ®
, it has to be read
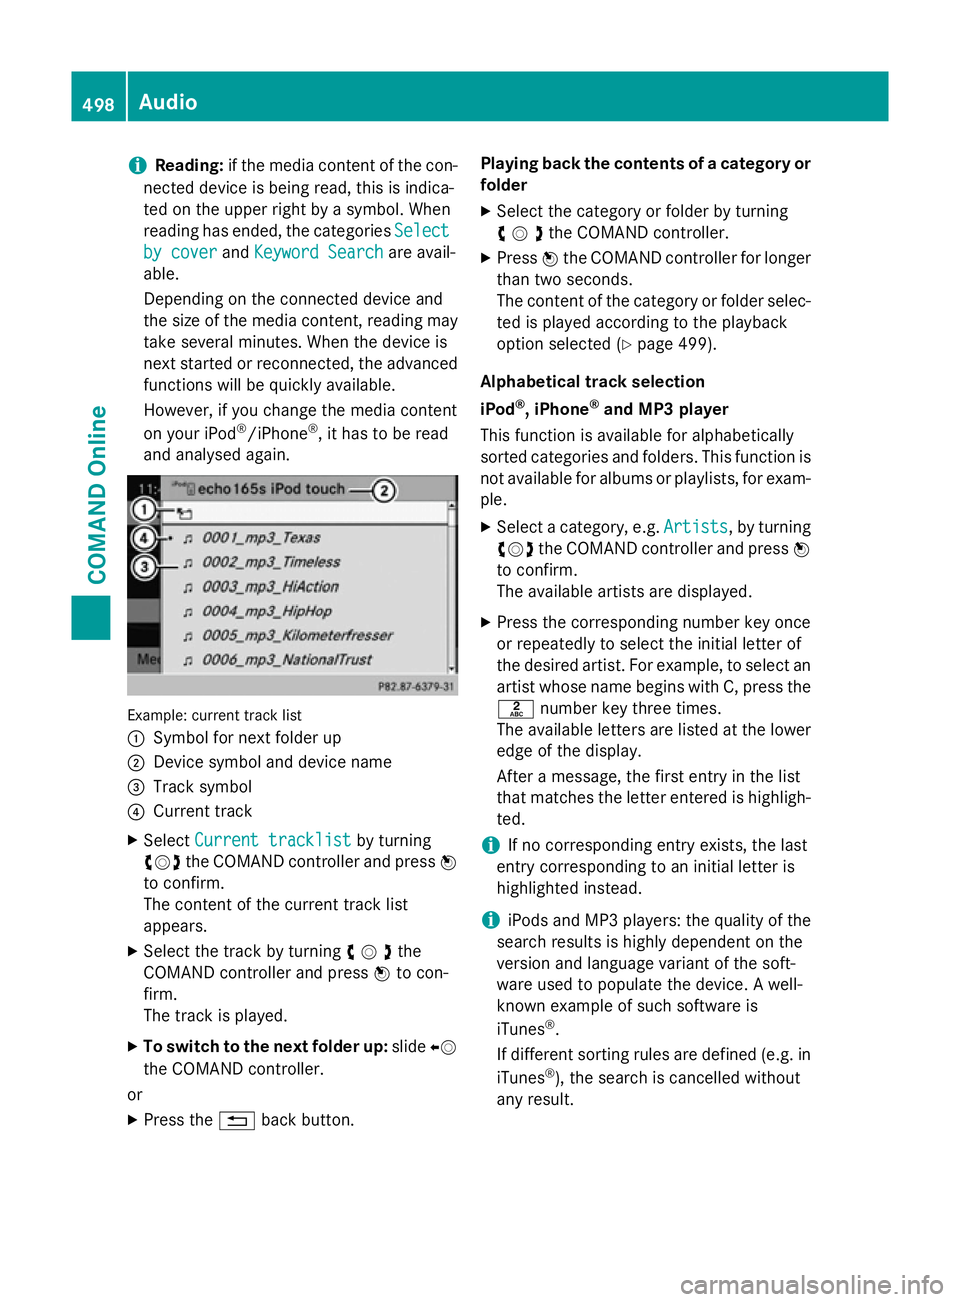
and analysed again. Example: current track list
:
Symbol for next folder up
; Device symbol and device name
= Track symbol
? Current track
X Select Current tracklist Current tracklist by turning
cVd the COMAND controller and press W
to confirm.
The content of the current track list
appears.
X Select the track by turning cVdthe
COMAND controller and press Wto con-
firm.
The track is played.
X To switch to the next folder up: slideXV
the COMAND controller.
or
X Press the %back button. Playing back the contents of a category or
folder
X Select the category or folder by turning
cVdthe COMAND controller.
X Press Wthe COMAND controller for longer
than two seconds.
The content of the category or folder selec-
ted is played according to the playback
option selected (Y page 499).
Alphabetical track selection
iPod ®
, iPhone ®
and MP3 player
This function is available for alphabetically
sorted categories and folders. This function is not available for albums or playlists, for exam-
ple.
X Select a category, e.g. Artists
Artists, by turning
cVd the COMAND controller and press W
to confirm.
The available artists are displayed.
X Press the corresponding number key once
or repeatedly to select the initial letter of
the desired artist. For example, to select an
artist whose name begins with C, press the l number key three times.
The available letters are listed at the lower
edge of the display.
After a message, the first entry in the list
that matches the letter entered is highligh-
ted.
i If no corresponding entry exists, the last
entry corresponding to an initial letter is
highlighted instead.
i iPods and MP3 players: the quality of the
search results is highly dependent on the
version and language variant of the soft-
ware used to populate the device. A well-
known example of such software is
iTunes ®
.
If different sorting rules are defined (e.g. in iTunes ®
), the search is cancelled without
any result. 498
AudioCOMAND Online
Page 512 of 637
X
To return to the TV programme: turn
cVd the COMAND controller.
X Select TV
TVby turning cVdthe COMAND
controller.
or
X Press and hold the %back button on the
left next to the COMAND controller.
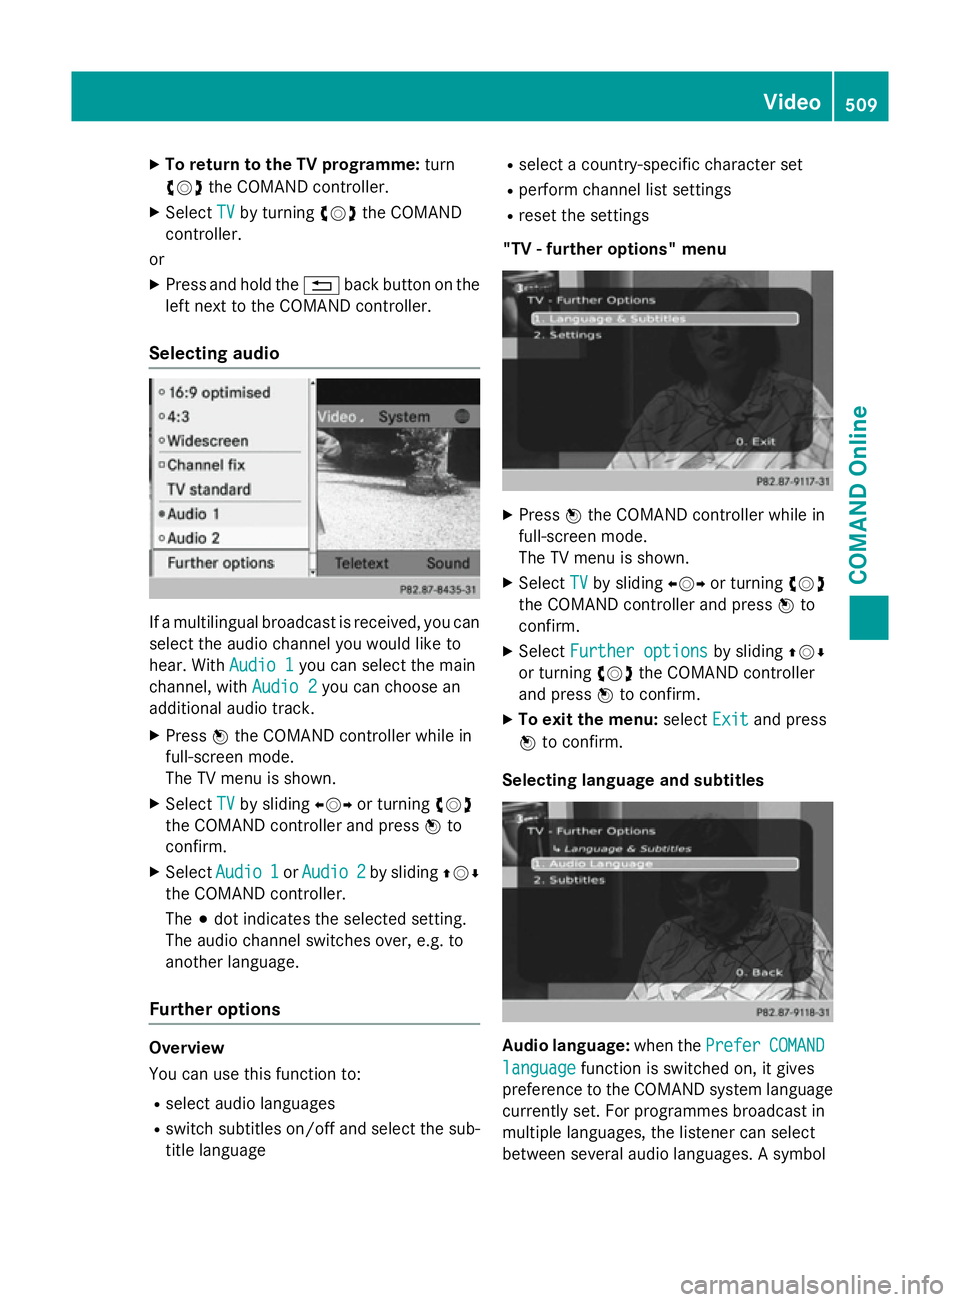
Selecting audio If a multilingual broadcast is received, you can
select the audio channel you would like to
hear. With Audio 1
Audio 1you can select the main
channel, with Audio 2
Audio 2you can choose an
additional audio track.
X Press Wthe COMAND controller while in
full-screen mode.
The TV menu is shown.
X Select TV TVby sliding XVYor turning cVd
the COMAND controller and press Wto
confirm.
X Select Audio 1
Audio 1 orAudio 2
Audio 2 by sliding ZVÆ
the COMAND controller.
The #dot indicates the selected setting.
The audio channel switches over, e.g. to
another language.
Further options Overview
You can use this function to:
R select audio languages
R switch subtitles on/off and select the sub-
title language R
select a country-specific character set
R perform channel list settings
R reset the settings
"TV - further options" menu X
Press Wthe COMAND controller while in
full-screen mode.
The TV menu is shown.
X Select TV TVby sliding XVYor turning cVd
the COMAND controller and press Wto
confirm.
X Select Further options
Further options by slidingZVÆ
or turning cVdthe COMAND controller
and press Wto confirm.
X To exit the menu: selectExit
Exitand press
W to confirm.
Selecting language and subtitles Audio language:
when thePrefer
PreferCOMAND
COMAND
language
language function is switched on, it gives
preference to the COMAND system language currently set. For programmes broadcast in
multiple languages, the listener can select
between several audio languages. A symbol Video
509COMAND Online Z
Page 513 of 637
for programme transmission may appear in
front of the audio language: with audio
explanations (for the visually impaired) in
stereo or for the hearing impaired. If a symbol
does not appear, the programme is either
broadcast in mono or the transmission prop-
erties are unknown.
Subtitles: when this function is activated,
shows subtitles in the selected language for
the programme currently broadcast (if avail-
able).
X In the "Tuner - Further Options" menu, con-
firm Language & Subtitles Language & Subtitles by pressing
W the COMAND controller (Y page 509).
A menu appears.
X To select the language: confirmAudio
Audio
Language
Language by pressing Wthe COMAND
controller.
X Select Prefer COMAND language Prefer COMAND language or one
of the available audio languages.
Switch the setting on Oor off ªor select
an available audio language.
If you select one of the available audio lan-
guages, e.g. English, this setting is used for
the current program only.
X To select subtitles: selectSubtitles Subtitles by
sliding ZVÆor turning cVdthe COMAND
controller and press Wto confirm.
X Select Subtitles
Subtitles and pressWto confirm.
Switch the subtitles on Oor off ª.
X Select Prefer COMAND language
Prefer COMAND language or one
of the available languages for subtitles.
Switch the setting on Oor off ªor select
an available language for subtitles.
If you select one of the available languages
for subtitles, e.g. English, this setting is
used for the current programme.
X To exit the menu: selectBack
Back and press
W to confirm. Settings X
In the "Tuner - Further Options" menu, con-
firm Settings Settings by pressing Wthe
COMAND controller (Y page 509).
A menu appears.
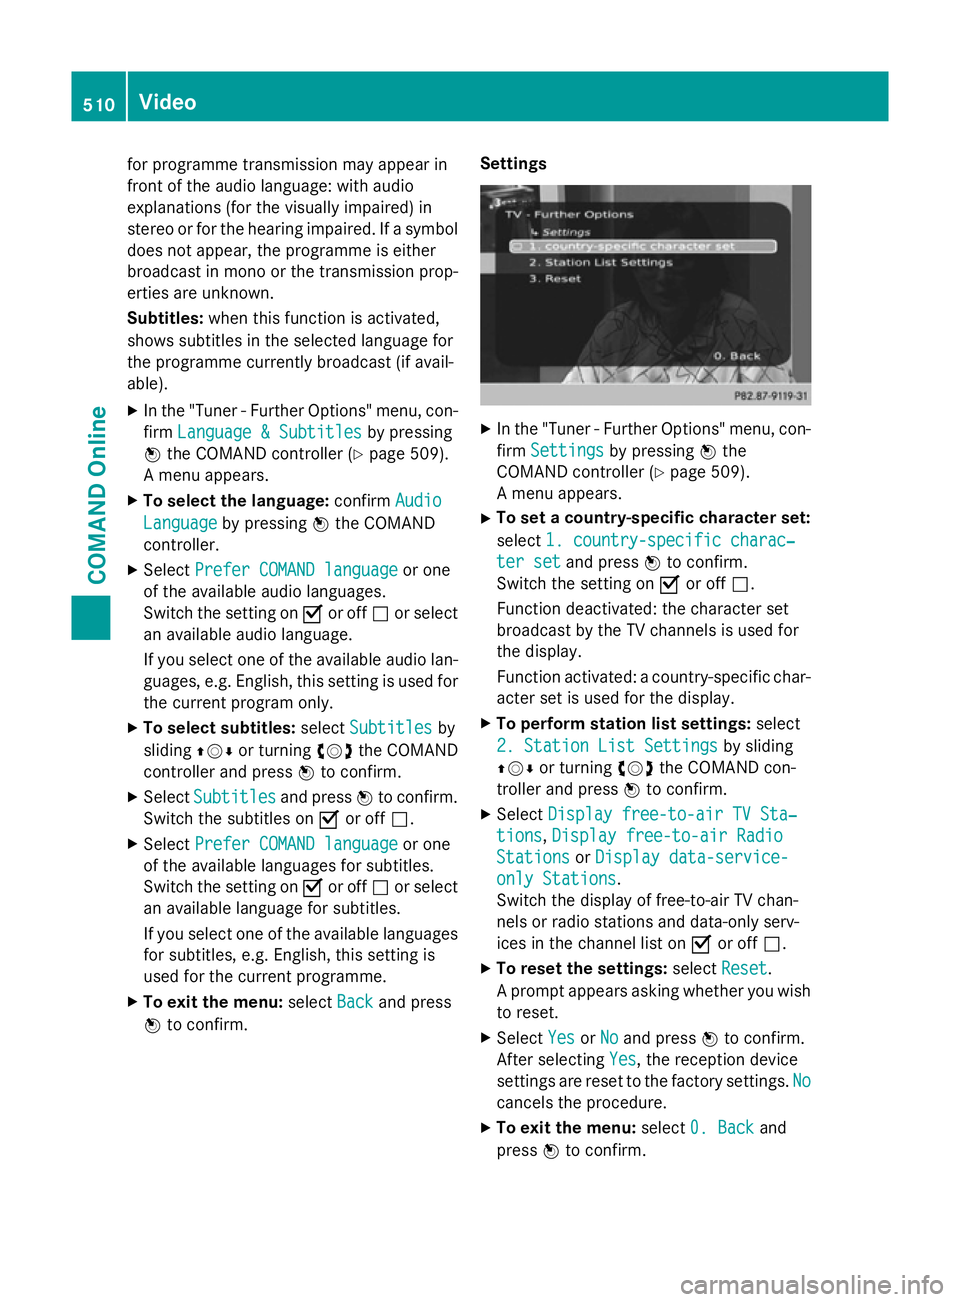
X To set a country-specific character set:
select 1. country-specific charac‐ 1. country-specific charac‐
ter set
ter set and press Wto confirm.
Switch the setting on Oor off ª.
Function deactivated: the character set
broadcast by the TV channels is used for
the display.
Function activated: a country-specific char-
acter set is used for the display.
X To perform station list settings: select
2. Station List Settings 2. Station List Settings by sliding
ZVÆ or turning cVdthe COMAND con-
troller and press Wto confirm.
X Select Display free-to-air TV Sta‐
Display free-to-air TV Sta‐
tions
tions, Display free-to-air Radio
Display free-to-air Radio
Stations
Stations orDisplay data-service-
Display data-service-
only Stations
only Stations.
Switch the display of free-to-air TV chan-
nels or radio stations and data-only serv-
ices in the channel list on Oor off ª.
X To reset the settings: selectReset Reset.
A prompt appears asking whether you wish to reset.
X Select Yes
YesorNo
No and press Wto confirm.
After selecting Yes Yes, the reception device
settings are reset to the factory settings. No No
cancels the procedure.
X To exit the menu: select0. Back
0. Back and
press Wto confirm. 510
VideoCOMAND Online
Page 517 of 637
X
On the multifunction steering wheel:
switch to video DVD mode in
COMAND Online (Y page 512).
X Use the =or; button to select the
Audio Audio menu.
X Press the 9or: button to select a
scene/chapter.
If you press and hold the 9or:
button for an extended period, rapid scroll-
ing begins.
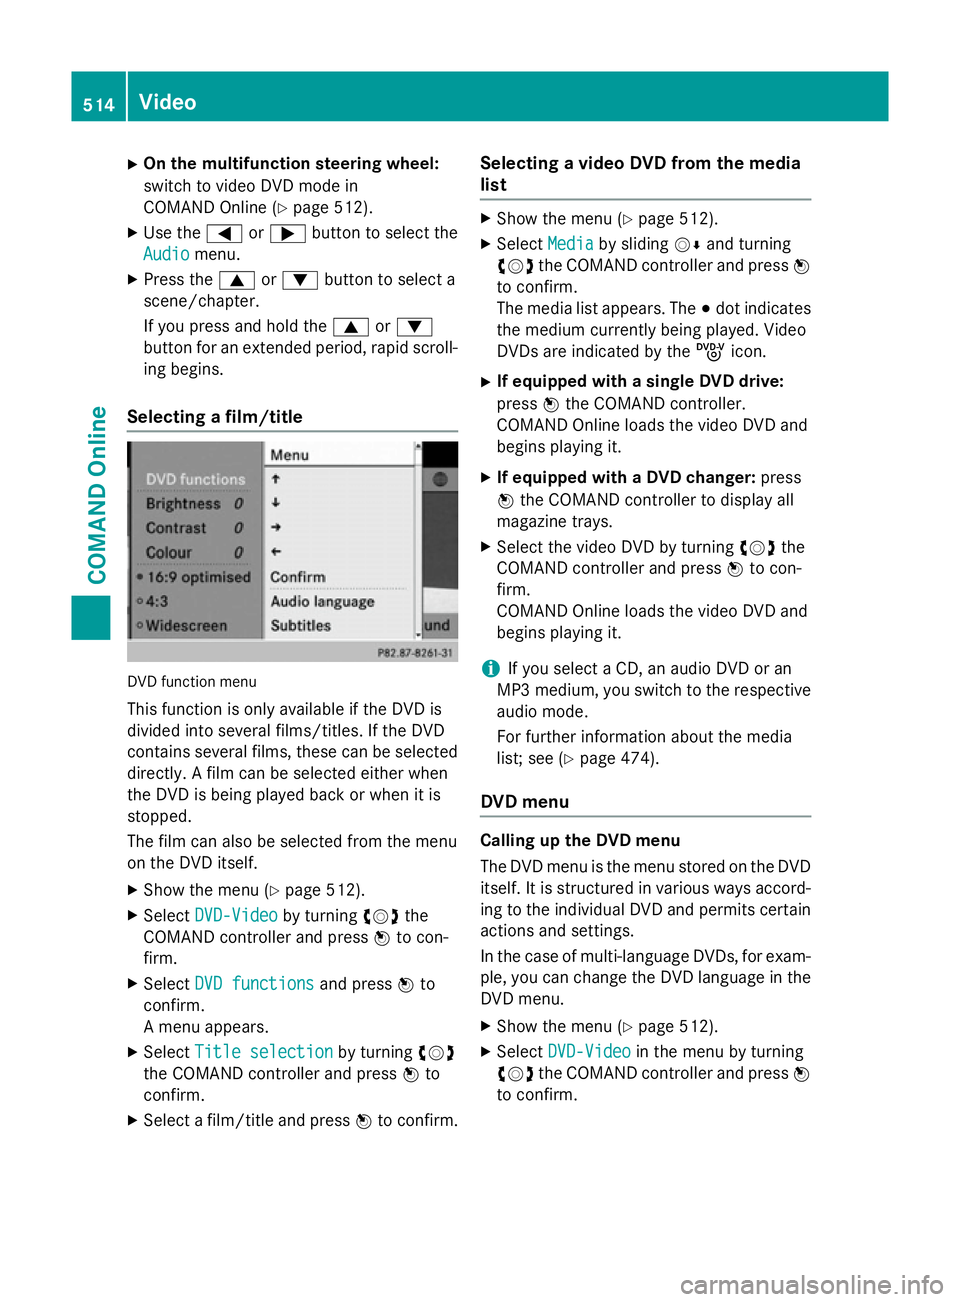
Selecting a film/title DVD function menu
This function is only available if the DVD is
divided into several films/titles. If the DVD
contains several films, these can be selected
directly. A film can be selected either when
the DVD is being played back or when it is
stopped.
The film can also be selected from the menu
on the DVD itself.
X Show the menu (Y page 512).
X Select DVD-Video DVD-Video by turningcVdthe
COMAND controller and press Wto con-
firm.
X Select DVD functions
DVD functions and pressWto
confirm.
A menu appears.
X Select Title selection
Title selection by turningcVd
the COMAND controller and press Wto
confirm.
X Select a film/title and press Wto confirm. Selecting a video DVD from the media
list X
Show the menu (Y page 512).
X Select Media Mediaby sliding VÆand turning
cVd the COMAND controller and press W
to confirm.
The media list appears. The #dot indicates
the medium currently being played. Video
DVDs are indicated by the ýicon.
X If equipped with a single DVD drive:
press Wthe COMAND controller.
COMAND Online loads the video DVD and
begins playing it.
X If equipped with a DVD changer: press
W the COMAND controller to display all
magazine trays.
X Select the video DVD by turning cVdthe
COMAND controller and press Wto con-
firm.
COMAND Online loads the video DVD and
begins playing it.
i If you select a CD, an audio DVD or an
MP3 medium, you switch to the respective
audio mode.
For further information about the media
list; see (Y page 474).
DVD menu Calling up the DVD menu
The DVD menu is the menu stored on the DVD
itself. It is structured in various ways accord-
ing to the individual DVD and permits certain actions and settings.
In the case of multi-language DVDs, for exam-
ple, you can change the DVD language in the DVD menu.
X Show the menu (Y page 512).
X Select DVD-Video DVD-Video in the menu by turning
cVd the COMAND controller and press W
to confirm. 514
VideoCOMAND Online
Page 518 of 637
X
Select DVD functions
DVD functions and pressWto
confirm.
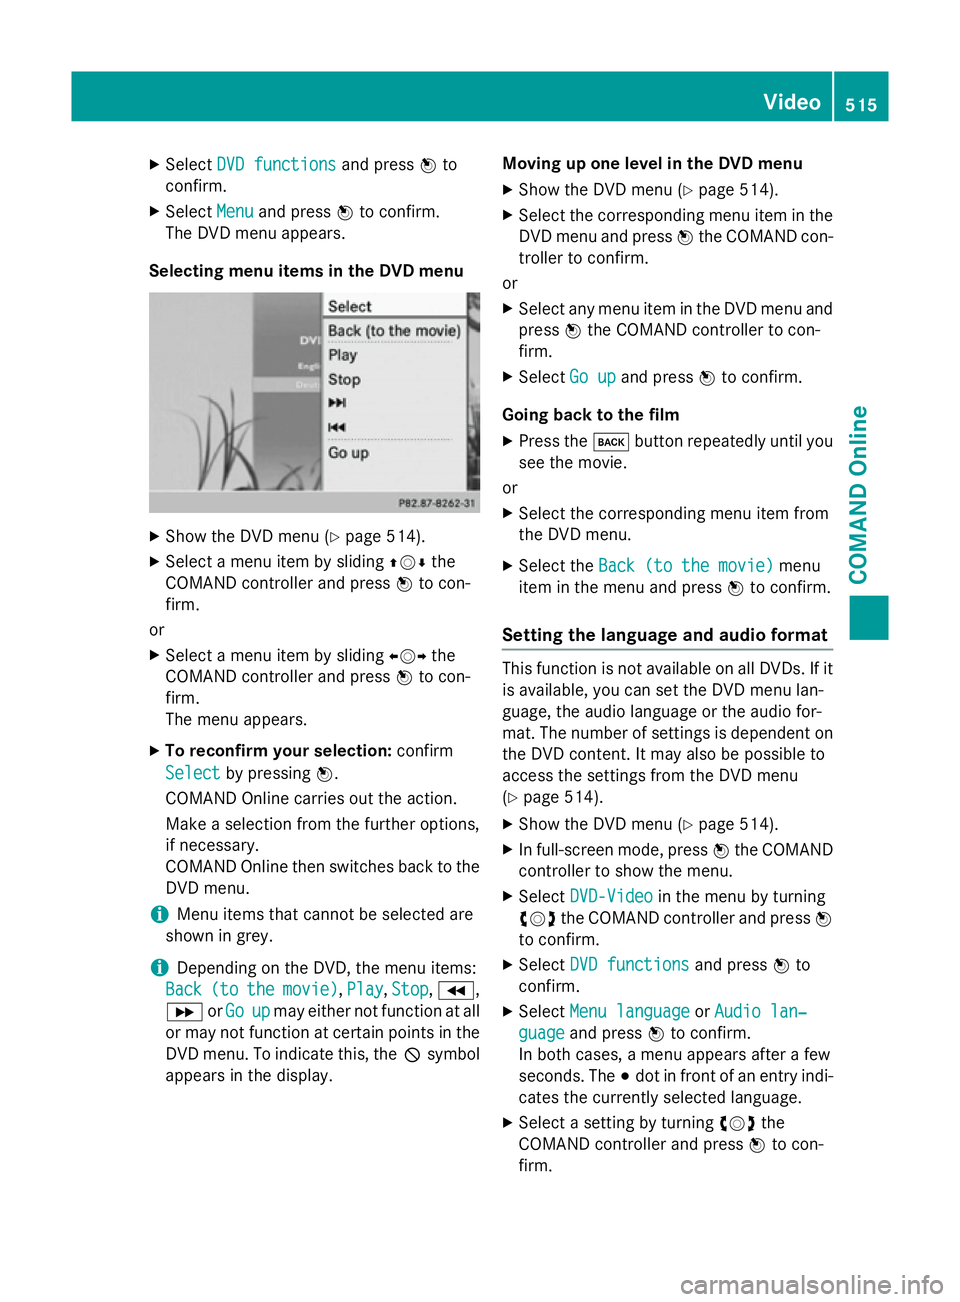
X Select Menu
Menu and press Wto confirm.
The DVD menu appears.
Selecting menu items in the DVD menu X
Show the DVD menu (Y page 514).
X Select a menu item by sliding ZVÆthe
COMAND controller and press Wto con-
firm.
or X Select a menu item by sliding XVYthe
COMAND controller and press Wto con-
firm.
The menu appears.
X To reconfirm your selection: confirm
Select Select by pressing W.
COMAND Online carries out the action.
Make a selection from the further options,
if necessary.
COMAND Online then switches back to the
DVD menu.
i Menu items that cannot be selected are
shown in grey.
i Depending on the DVD, the menu items:
Back
Back (to (tothe
themovie)
movie) ,Play
Play, Stop
Stop,K,
L orGo
Go up
upmay either not function at all
or may not function at certain points in the
DVD menu. To indicate this, the Ksymbol
appears in the display. Moving up one level in the DVD menu
X Show the DVD menu (Y page 514).
X Select the corresponding menu item in the
DVD menu and press Wthe COMAND con-
troller to confirm.
or
X Select any menu item in the DVD menu and
press Wthe COMAND controller to con-
firm.
X Select Go up
Go up and press Wto confirm.
Going back to the film
X Press the kbutton repeatedly until you
see the movie.
or
X Select the corresponding menu item from
the DVD menu.
X Select the Back (to the movie)
Back (to the movie) menu
item in the menu and press Wto confirm.
Setting the language and audio format This function is not available on all DVDs. If it
is available, you can set the DVD menu lan-
guage, the audio language or the audio for-
mat. The number of settings is dependent on
the DVD content. It may also be possible to
access the settings from the DVD menu
(Y page 514).
X Show the DVD menu (Y page 514).
X In full-screen mode, press Wthe COMAND
controller to show the menu.
X Select DVD-Video DVD-Video in the menu by turning
cVd the COMAND controller and press W
to confirm.
X Select DVD functions
DVD functions and pressWto
confirm.
X Select Menu language
Menu language orAudio lan‐
Audio lan‐
guage
guage and press Wto confirm.
In both cases, a menu appears after a few
seconds. The #dot in front of an entry indi-
cates the currently selected language.
X Select a setting by turning cVdthe
COMAND controller and press Wto con-
firm. Video
515COMAND Online Z
Page 519 of 637
Subtitles and camera angle
These functions are not available on all DVDs.
The number of subtitle languages and camera
angles available depends on the content of
the DVD. It may also be possible to access the settings from the DVD menu.
X Show the DVD menu (Y page 514).
X Select DVD-Video DVD-Video in the menu by turning
cVd the COMAND controller and press W
to confirm.
X Select DVD functions
DVD functions and pressWto
confirm.
X Select Subtitles
Subtitles orCamera angle
Camera angle and
press Wto confirm.
In both cases, a menu appears. The #dot in
front of an entry indicates the current set-
ting.
X Select a setting by turning cVdthe
COMAND controller and press Wto con-
firm.
Interactive content DVDs may contain interactive content (e.g. a
video game). In a video game, for example,
you may be able to influence events by select- ing and triggering actions. The type and num- ber of actions depend on the DVD.
X Select an action by sliding ZVÆorXVY the
COMAND controller and press Wto exe-
cute it.
A menu appears and the first entry, Select Select,
is highlighted.
X Press Wthe COMAND controller. Video AUX operation
Connecting external video sources External video sources may have different
volumes, which can mean that system mes-
sages such as traffic announcements and
navigation system announcements are much louder. If necessary, deactivate the system
messages or adjust their volume manually. If your vehicle is equipped with the Media
Interface, you can connect an external video
source.
You require an additional audio/video cable
set to connect an external video source to the
Media Interface.
For more details, please contact a Mercedes- Benz Service Centre or visit http://
www.mercedes-benz.com/connect . Then,
follow the instructions in the "Media Inter-
face" section.
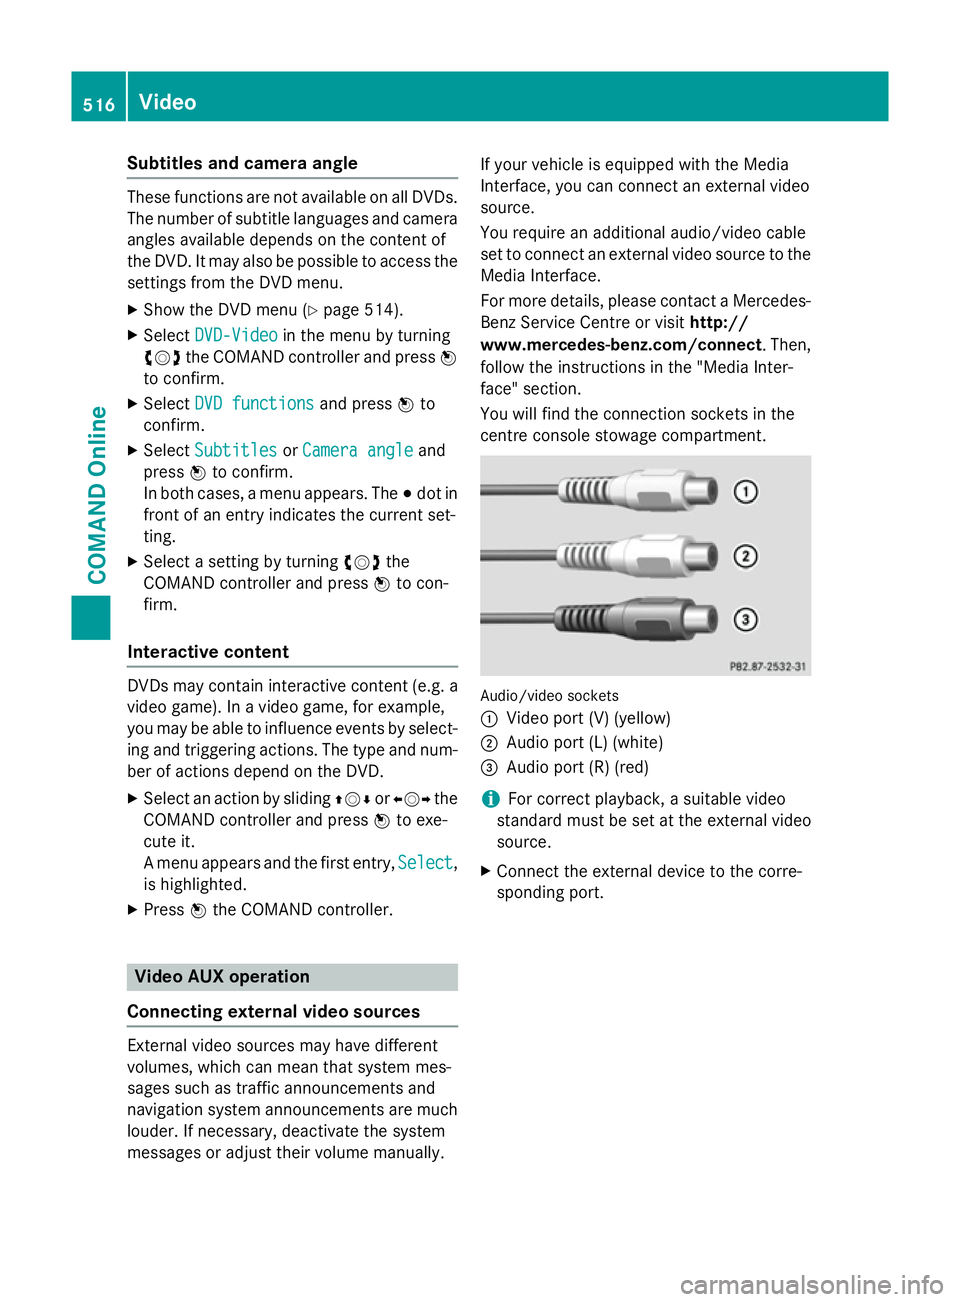
You will find the connection sockets in the
centre console stowage compartment. Audio/video sockets
:
Video port (V) (yellow)
; Audio port (L) (white)
= Audio port (R) (red)
i For correct playback, a suitable video
standard must be set at the external video
source.
X Connect the external device to the corre-
sponding port. 516
VideoCOMAND Online
Page 528 of 637
Right-hand battery: the positive pole (+)
must face downwards.
X To close the battery compartment:
press the battery compartment cover
downwards until it engages into place.
If the batteries have been inserted cor-
rectly, the indicator lamp will light up green
when the headphones are switched on.
i The operating duration of the headphones
with a set of batteries is up to 40 hours. Basic functions
Using headphones You can use the cordless headphones sup-
plied and/or up to two sets of corded head-
phones connected to the corresponding jack
of the rear-compartment screens
(Y page 520).
Information on the cordless headphones
(Y page 522).
Using the main loudspeakers This function is available in conjunction with
COMAND Online.
You can use the vehicle loudspeakers to lis-
ten to a disc inserted in the rear-compartment drive. To do so, at least one of the rear-com-
partment screens must be set to disc mode.
X To set on COMAND Online: press the
$ function button to switch on an audio
mode.
X Select Audio
Audio by sliding ZVthe COMAND
controller and press Wto confirm.
The Audio menu appears.
X Select Rear Rearby turning cVdthe COMAND
controller and press Wto confirm.
i The headphones' volume setting does not
affect the main loudspeakers. Selecting sound settings You can select the sound settings in the audio
CD/DVD/MP3, TV, video DVD and AUX
modes.
X Switch on an operating mode (e.g. audio
CD mode) (Y page 527).
X Select Treble Treble orBass
Bass using
the :=; buttons on the remote
control and press the 9button to confirm.
An adjustment scale appears.
X Select a setting using the 9:but-
tons and press the 9button to confirm.
Multiple users Simultaneous use of the rear-compart-
ment disc drive
The two rear-compartment screens can be
operated almost entirely independently from
one another. However, there can be a conflict
in some menus if the two screens are used
simultaneously.
If the rear-compartment disc drive is being
used for both screens simultaneously, select- ing certain menus or settings on one of the
screens also affects the other screen.
The following functions affect both screens:
R changing playback options
R selecting a track (from a track list or folder)
R using the play, pause and stop functions
R fast forwarding/rewinding or scrolling
R calling up the DVD menu and navigating
within it
R setting the language, subtitles and camera
angle
R calling up interactive DVD content
The following functions affect only one
screen:
R audio and video functions as well as picture
settings
R switching between full screen and the
menu Rea
r Seat Entertainment System
525COMAND Online Z
Page 529 of 637
Switching between operating modes
When you exit an operating mode (e.g. audio
CD mode), the current setting is saved. If youcall up this operating mode again later, there
are two possibilities:
R the operating mode has been changed on
the other screen.
R the operating mode has not been changed.
In the first case, the operating mode appears as it is on the other screen.
In the second case, the setting appears on the
screen as it was when you last exited the
operating mode.
Picture settings Overview
You can select the picture settings in TV,
video DVD and AUX mode (Y
page 541).
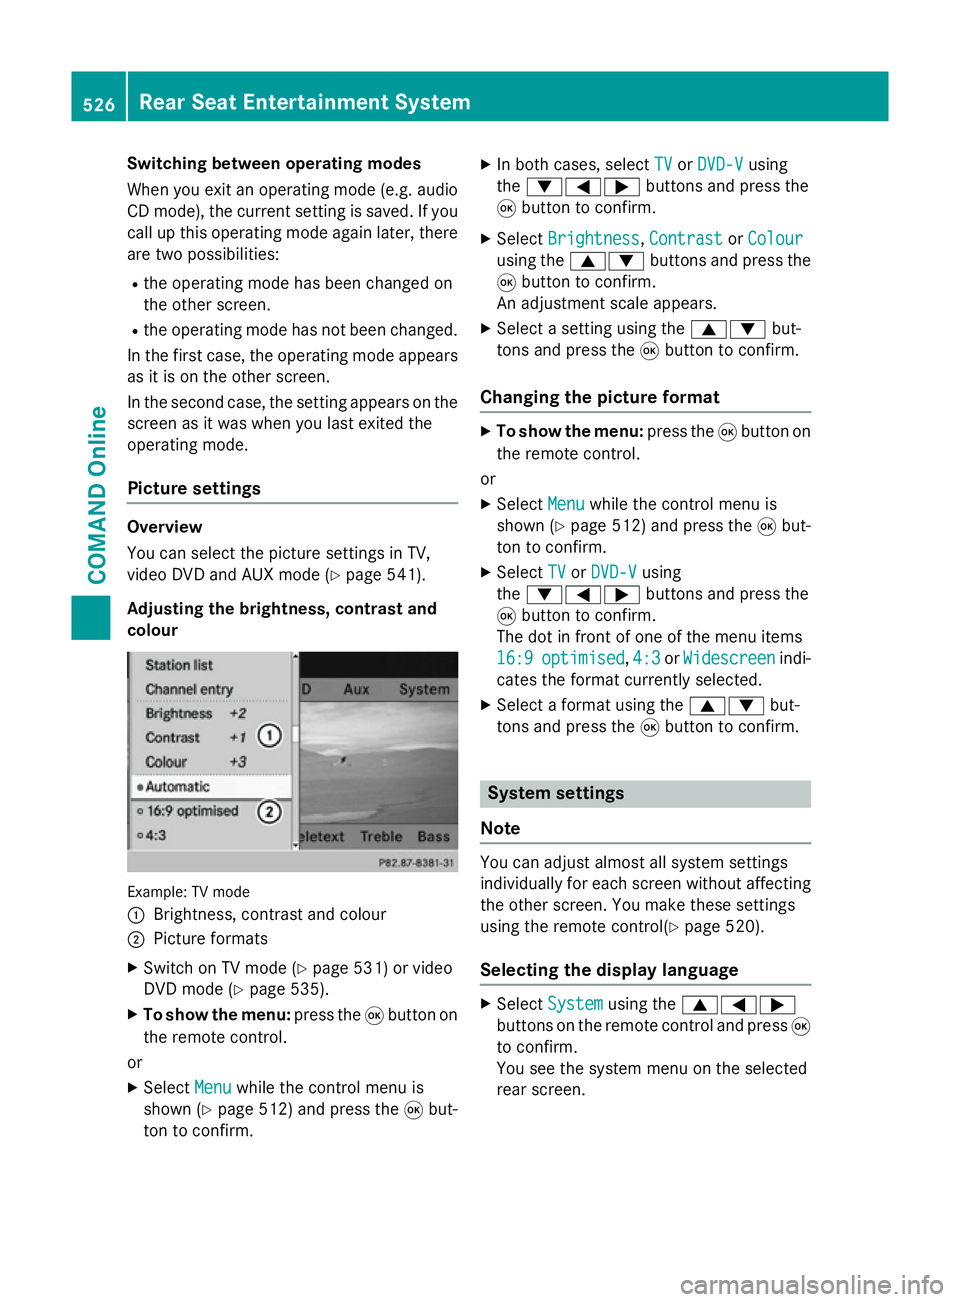
Adjusting the brightness, contrast and
colour Example: TV mode
:
Brightness, contrast and colour
; Picture formats
X Switch on TV mode (Y page 531) or video
DVD mode (Y page 535).
X To show the menu: press the9button on
the remote control.
or
X Select Menu
Menu while the control menu is
shown (Y page 512) and press the 9but-
ton to confirm. X
In both cases, select TV TVorDVD-V DVD-V using
the :=; buttons and press the
9 button to confirm.
X Select Brightness
Brightness, Contrast
ContrastorColour
Colour
using the 9: buttons and press the
9 button to confirm.
An adjustment scale appears.
X Select a setting using the 9:but-
tons and press the 9button to confirm.
Changing the picture format X
To show the menu: press the9button on
the remote control.
or
X Select Menu
Menu while the control menu is
shown (Y page 512) and press the 9but-
ton to confirm.
X Select TV
TV orDVD-V
DVD-V using
the :=; buttons and press the
9 button to confirm.
The dot in front of one of the menu items
16:9 16:9 optimised
optimised, 4:3
4:3orWidescreen
Widescreen indi-
cates the format currently selected.
X Select a format using the 9:but-
tons and press the 9button to confirm. System settings
Note You can adjust almost all system settings
individually for each screen without affecting
the other screen. You make these settings
using the remote control(Y page 520).
Selecting the display language X
Select System System using the 9=;
buttons on the remote control and press 9
to confirm.
You see the system menu on the selected
rear screen. 526
Rear Seat Entertainment SystemCOMAND Online