2012 MERCEDES-BENZ SL ROADSTER spare tire
[x] Cancel search: spare tirePage 17 of 637
Preparing the vehicle ..................... 606
Raising the vehicle .........................6 07
Removing a wheel .......................... 608
Securing the vehicle against roll-
ing away ........................................ 606
Flat tyre
MOExtended tyres ......................... 578
Preparing the vehicle ..................... 578
TIREFIT kit ...................................... 579
see Emergency spare wheel
Floormat ............................................. 558
Foglamps
Extended range .............................. 132
Frequencies
Garage door opene r....................... 555
Mobile phone ................................. 620
Two-way radio ................................ 620
Frequency
Adjusting for radio stations ............ 466
Front-passenger seat
Adjusting from the driver's seat ..... 114
Fuel
Additives ........................................ 625
Consumption information .............. 625
Consumption statistics .................. 231
Displaying consumption ................. 317
Displaying the current consump-
tion ................................................ 232
Displaying the range ...................... 232
Driving tips .................................... 178
E10 ................................................ 624
Fuel gaug e....................................... 40
Grade (petrol) ................................ 624
Important safety notes .................. 623
Notes for AMG vehicles ................. 624
Problem (malfunction) ................... 175
Refuelling ....................................... 173
Tank content/reserve fue l............. 623
Fuel filler flap
Opening ......................................... 174
Fuel level
Calling up the range (on-board
computer) ...................................... 232
Gaug e.............................................. 40
Fuel reserve
see Fuel
Fuel tank
Capacity ........................................ 623 Problem (malfunction) ................... 175
Fuse allocation chart (vehicle tool
kit) ...................................................... 577
Fuses
Allocation chart ............................. 592
Before changing ............................. 592
Dashboard fuse box ....................... 592
Fuse box in the engine compart-
ment .............................................. 593
Fuse box in the rear compartment .. 593
Important safety notes .................. 592 G
Garage door opener Clearing the memory ..................... 555
Frequencies ................................... 555
General notes ................................ 553
Important safety notes .................. 553
Opening/closing the garage doo r..5 55
Programming (button in the rear-
view mirror) ................................... 553
Gear indicator (on-board com-
puter) ................................................. .244
Gearshift program
SETUP (on-board computer) .......... 244
Genuine Mercedes-Benz parts ........... 31
Glass roof (sunblind) ......................... 109
Glove compartment .......................... 544
Google™ local search
Importing a destination/route ....... 443
Popular searches ........................... 444
Search .......................................... .442
Search history ............................... 444
Selecting a search position ............ 442
Using as the destination ................ 443
GPS reception ................................... .323
Gracenote® Media Database ........... 476 H
Handbrake see Parking brake
HANDS-FREE ACCESS .......................... 96
Hands-free microphone, switching
on/off ................................................. 398 14
Index
Page 112 of 637
Sunblind for the glass roof
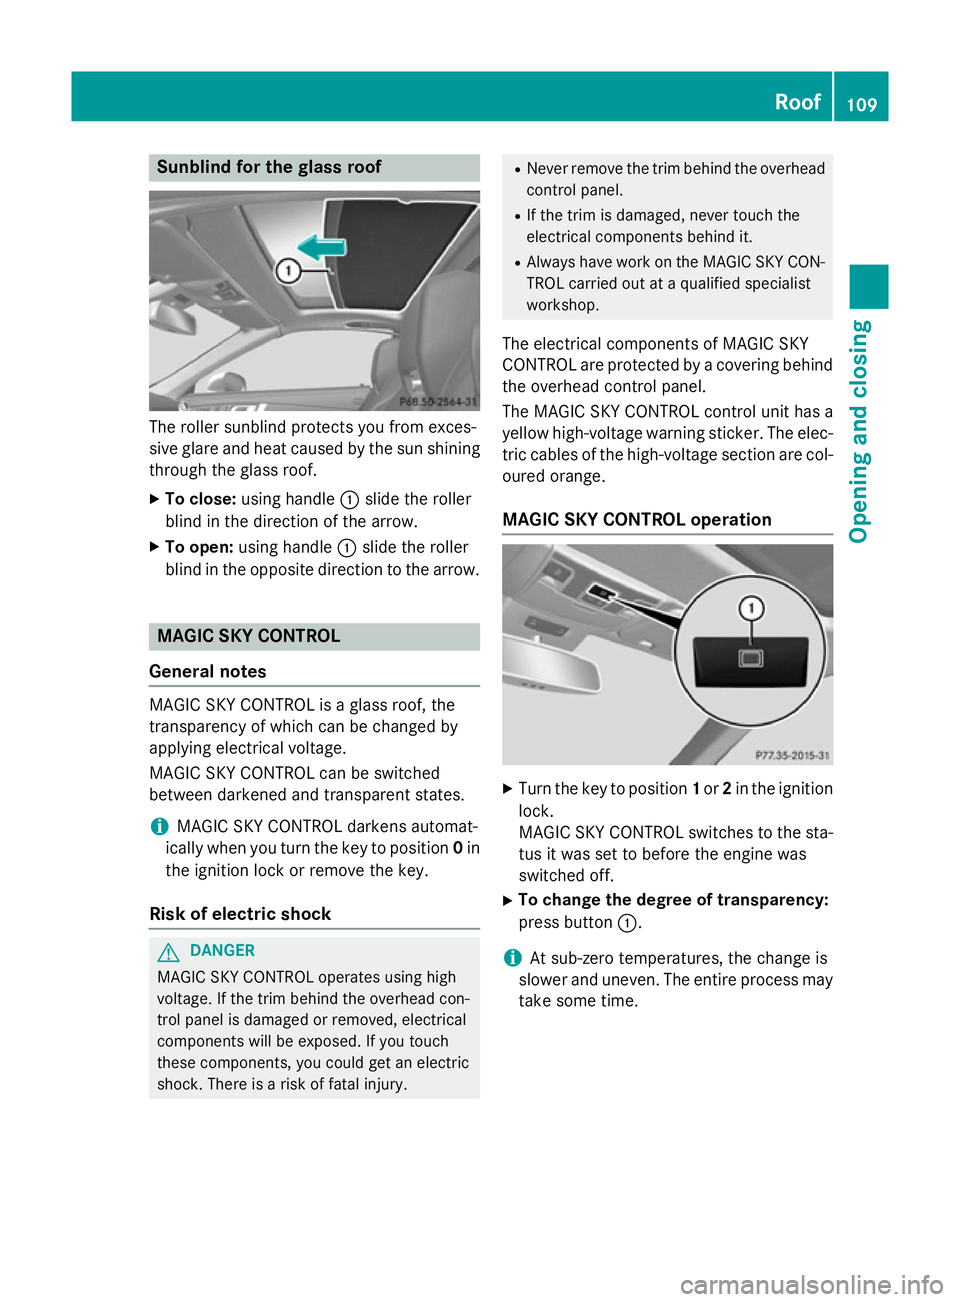
The roller sunblind protects you from exces-
sive glare and heat caused by the sun shining
through the glass roof.
X To close: using handle :slide the roller
blind in the direction of the arrow.
X To open: using handle :slide the roller
blind in the opposite direction to the arrow. MAGIC SKY CONTROL
General notes MAGIC SKY CONTROL is a glass roof, the
transparency of which can be changed by
applying electrical voltage.
MAGIC SKY CONTROL can be switched
between darkened and transparent states.
i MAGIC SKY CONTROL darkens automat-
ically when you turn the key to position 0in
the ignition lock or remove the key.
Risk of electric shock G
DANGER
MAGIC SKY CONTROL operates using high
voltage. If the trim behind the overhead con-
trol panel is damaged or removed, electrical
components will be exposed. If you touch
these components, you could get an electric
shock. There is a risk of fatal injury. R
Never remove the trim behind the overhead
control panel.
R If the trim is damaged, never touch the
electrical components behind it.
R Always have work on the MAGIC SKY CON-
TROL carried out at a qualified specialist
workshop.
The electrical components of MAGIC SKY
CONTROL are protected by a covering behind the overhead control panel.
The MAGIC SKY CONTROL control unit has a
yellow high-voltage warning sticker. The elec-
tric cables of the high-voltage section are col- oured orange.
MAGIC SKY CONTROL operation X
Turn the key to position 1or 2in the ignition
lock.
MAGIC SKY CONTROL switches to the sta-
tus it was set to before the engine was
switched off.
X To change the degree of transparency:
press button :.
i At sub-zero temperatures, the change is
slower and uneven. The entire process may
take some time. Roof
109Opening and closing Z
Page 581 of 637
Tyre-change tool kit
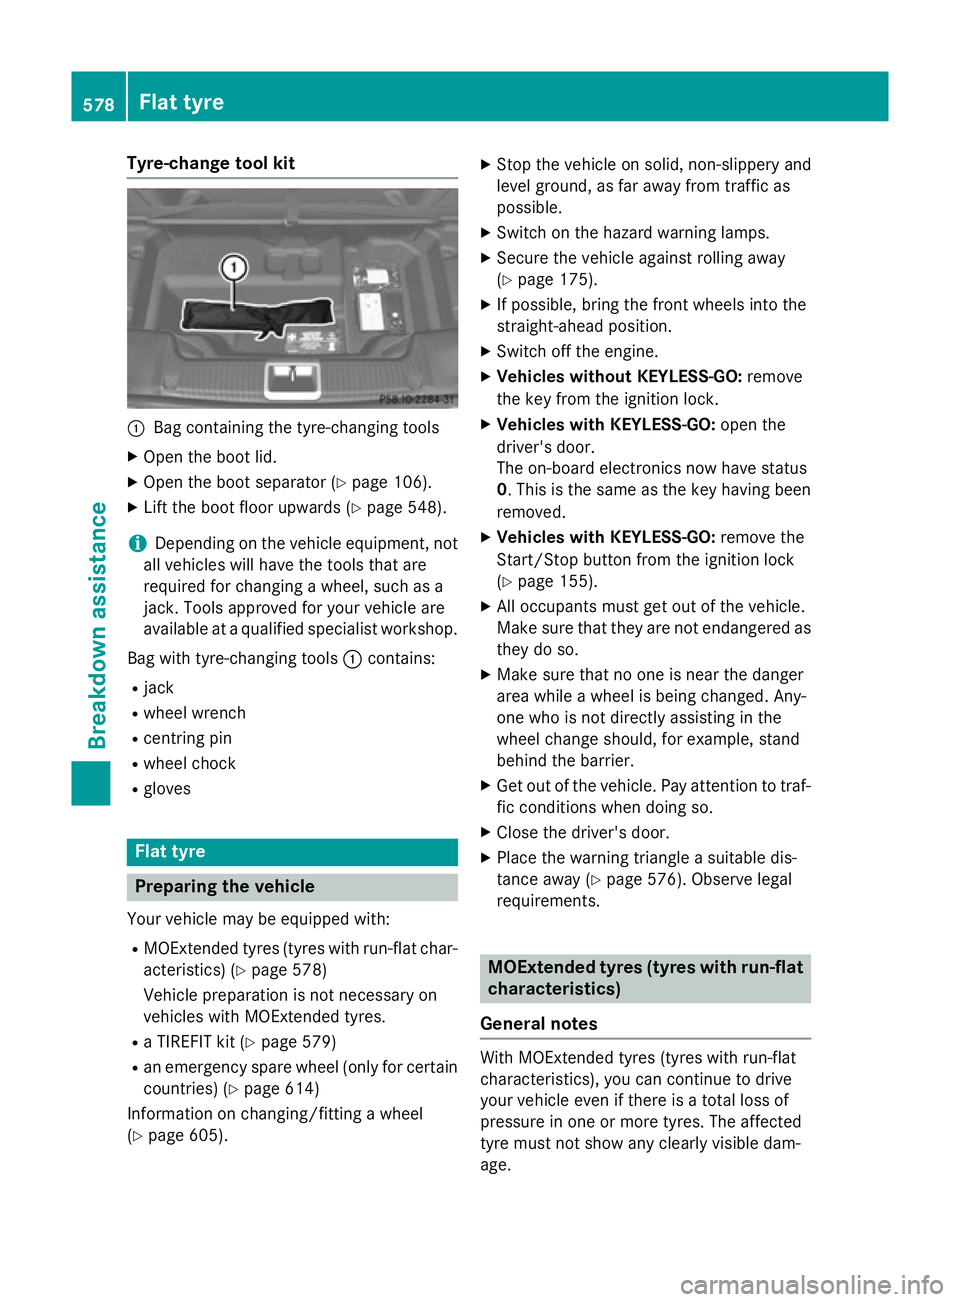
:
Bag containing the tyre-changing tools
X Open the boot lid.
X Open the boot separator (Y page 106).
X Lift the boot floor upwards (Y page 548).
i Depending on the vehicle equipment, not
all vehicles will have the tools that are
required for changing a wheel, such as a
jack. Tools approved for your vehicle are
available at a qualified specialist workshop.
Bag with tyre-changing tools :contains:
R jack
R wheel wrench
R centring pin
R wheel chock
R gloves Flat tyre
Preparing the vehicle
Your vehicle may be equipped with: R MOExtended tyres (tyres with run-flat char-
acteristics) (Y page 578)
Vehicle preparation is not necessary on
vehicles with MOExtended tyres.
R a TIREFIT kit (Y page 579)
R an emergency spare wheel (only for certain
countries) (Y page 614)
Information on changing/fitting a wheel
(Y page 605). X
Stop the vehicle on solid, non-slippery and
level ground, as far away from traffic as
possible.
X Switch on the hazard warning lamps.
X Secure the vehicle against rolling away
(Y page 175).
X If possible, bring the front wheels into the
straight-ahead position.
X Switch off the engine.
X Vehicles without KEYLESS-GO: remove
the key from the ignition lock.
X Vehicles with KEYLESS-GO: open the
driver's door.
The on-board electronics now have status
0. This is the same as the key having been
removed.
X Vehicles with KEYLESS-GO: remove the
Start/Stop button from the ignition lock
(Y page 155).
X All occupants must get out of the vehicle.
Make sure that they are not endangered as
they do so.
X Make sure that no one is near the danger
area while a wheel is being changed. Any-
one who is not directly assisting in the
wheel change should, for example, stand
behind the barrier.
X Get out of the vehicle. Pay attention to traf-
fic conditions when doing so.
X Close the driver's door.
X Place the warning triangle a suitable dis-
tance away (Y page 576). Observe legal
requirements. MOExtended tyres (tyres with run-flat
characteristics)
General notes With MOExtended tyres (tyres with run-flat
characteristics), you can continue to drive
your vehicle even if there is a total loss of
pressure in one or more tyres. The affected
tyre must not show any clearly visible dam-
age. 578
Flat tyreBreakdown assistance
Page 600 of 637
damage. Hidden tyre damage could also be
causing the unusual handling characteristics. If you find no signs of damage, have the tyres
and wheels checked at a qualified specialist
workshop.
When parking your vehicle, make sure that
the tyres do not get deformed by the kerb or
other obstacles. If it is necessary to drive over
kerbs, speed humps or similar elevations, try
to do so slowly and at an obtuse angle. Oth-
erwise, the tyres, particularly the sidewalls,
may be damaged. Regular checking of wheels and tyres
G
WARNING
Damaged tyres can cause tyre inflation pres-
sure loss. As a result, you could lose control of your vehicle. There is a risk of accident.
Check the tyres regularly for signs of damage and replace any damaged tyres immediately.
Regularly check the wheels and tyres of your
vehicle for damage at least once a month, as well as after driving off-road or on rough
roads. Damaged wheels can cause a loss of
tyre pressure. Pay particular attention to
damage such as:
R cuts in the tyres
R punctures
R tears in the tyres
R bulges on tyres
R deformation or severe corrosion on wheels
Regularly check the tyre tread depth and the condition of the tread across the whole width
of the tyre (Y page 597). If necessary, turn
the front wheels to full lock in order to inspect
the inner side of the tyre surface.
All wheels must have a valve cap to protect
the valve against dirt and moisture. Do not fit
anything onto the valve other than the stand-
ard valve cap or other valve caps approved for
your vehicle by Mercedes-Benz. Do not fit any other valve caps or systems, e.g. tyre pres-
sure monitoring systems. Regularly check the pressure of all the tyres,
particularly prior to long trips. Adjust the tyre
pressure as necessary (Y page 600).
Observe the notes on the emergency spare
wheel (Y page 614).
The service life of tyres depends on various
factors, including the following:
R driving style
R tyre pressure
R mileage Important safety notes on the tyre
tread
G
WARNING
Insufficient tyre tread will reduce tyre trac-
tion. The tyre is no longer able to dissipate
water. This means that on wet road surfaces, the risk of aquaplaning increases, in particularwhere speed is not adapted to suit the driving
conditions. There is a risk of accident.
If the tyre pressure is too high or too low, tyres may exhibit different levels of wear at differ-
ent locations on the tyre tread. Thus, you
should regularly check the tread depth and
the condition of the tread across the entire
width of all tyres.
Minimum tyre tread depth for:
R summer tyres: 3 mm
R M+S tyres: 4 mm
For safety reasons, replace the tyres before
the legally prescribed limit for the minimum
tyre tread depth is reached. Selecting, fitting and replacing tyres
G
WARNING
Exceeding the stated tyre load-bearing capa-
city and the approved maximum speed could
lead to tyre damage or the tyre bursting. There is a risk of accident.
Therefore, only use tyre types and sizes
approved for your vehicle model. Observe the Operation
597Wheels and tyres
Z
Page 601 of 637
tyre load rating and speed rating required for
your vehicle.
Pay special attention to country-specific
requirements for tyre approval. These
requirements can stipulate a specific tyre
type for your vehicle. Furthermore, the use of certain tyre types in certain regions and areas
of operation can be highly beneficial. You can find further information regarding tyres at
specialist tyre retailers, at qualified specialist
workshops or at any Mercedes-Benz Service
Centre.
R Only fit tyres and wheels of the same type
and make.
Exception: it is permissible to fit a different
type or make in the event of a flat tyre.
Observe the "MOExtended tyres (tyres with
run-flat characteristics" section
(Y page 578).
R Only fit tyres of the correct size onto the
wheels.
R Run in new tyres at moderate speeds for
the first 100 km. They only reach their full
performance after this distance.
R Do not drive with tyres which have too little
tread depth. This otherwise significantly
reduces the traction on wet roads (aqua-
planing).
R Replace the tyres after six years at the lat-
est, regardless of wear.
Observe the notes on the emergency spare
wheel (Y page 614). MOExtended tyres (tyres with run-flat
characteristics)
With MOExtended tyres (tyres with run-flat
characteristics), you can continue to drive
your vehicle even if there is a total loss of
pressure in one or more tyres.
Only use MOExtended tyres in conjunction
with an activated tyre pressure loss warning
system or tyre pressure monitoring system
and only on tyres specifically inspected by
Mercedes ‑Benz. Notes on driving with MOExtended tyres with
a flat tyre (Y page 578).
i Vehicles with MOExtended tyres are not
equipped with a TIREFIT kit at the factory. It
is therefore recommended that you addi-
tionally equip your vehicle with a TIREFIT kit if you fit tyres that do not feature run-flat
characteristics, e.g. winter tyres. A TIREFIT
kit can be obtained from a qualified spe-
cialist workshop. Winter operation
General notes
Have your vehicle winterproofed at a qualified
specialist workshop at the onset of winter.
Observe the notes in the "Changing a wheel" section (Y page 605). Driving with summer tyres
At temperatures below +7 †, summer tyres
lose elasticity and therefore traction and
braking power. Change the tyres on your vehi- cle to M+S tyres. Using summer tyres at very
cold temperatures could cause tears to form, thereby damaging the tyres permanently.
Mercedes-Benz cannot accept responsibility
for this type of damage. M+S tyres
G
WARNING
M+S tyres with a tyre tread depth of less than 4 mm are not suitable for use in winter as they
do not provide sufficient traction. There is a
risk of accident.
M+S tyres with a tread depth of less than
4 mm must be replaced.
At temperatures below +7 †, use winter tyres or all-season tyres. Both are marked with
M+S. 598
Winter operationWheels and tyres