2012 MERCEDES-BENZ CLS COUPE lock
[x] Cancel search: lockPage 305 of 373
R
Vehicles with akey:
do not remove the key from the ignition
lock. Do not open the driver's door or
front-passenger door when the engine is
switched off. Otherwise, the automatic
transmission selects park position P
automatically and locks the wheels. You
can prevent this by shifting the auto-
matic transmission to Nbeforehand.
R Vehicles with KEYLESS-GO:
do not open the driver's door or front-
passenger door when the engine is
switched off. Otherwise, the automatic
transmission selects park position P
automatically and locks the wheels.
Observe the following to make sure that the
automatic transmission stays in position N:
X Make sure the vehicle is stationary and the
ignition is switched off.
X Turn the key to position 2(Ypage 141) in
the ignition lock.
Use the key instead of the Start/Stop but-
ton on vehicles with KEYLESS-GO.
X Depress and hold the brake pedal.
X Shift the automatic transmission to posi-
tion N.
X Release the brake pedal.
X Release the electric parking brake.
X Switch off the ignition and leave the key in
the ignition lock.
You can wash the vehicle in an automatic car
wash from the very start.
Wash off excess dirt before cleaning the vehi-
cle in an automatic car wash.
After using an automatic car wash, wipe off
wax from the windscreen and the wiper
blades. This will prevent smears and reduce
wiping noises caused by residueont he wind-
screen.
Washing by hand In some countries, washing by hand is only
allowed at specially equipped washing bays. Observe the legal requirements for each indi-
vidual country.
X Do not use hot water and do not wash the
vehicle in direct sunlight.
X Use asoft sponge to clean.
X Use amild cleaning agent, such as acar
shampoo approved by Mercedes-Benz.
X Thoroughly hose down the vehicle with a
gentle jet of water.
X Do not point the water jet directly towards
the air inlet.
X Use plenty of water and rinse out the
sponge frequently.
X Rinse the vehicle with clean water and dry
thoroughly with achamois.
X Do not let the cleaning agent dry on the
paintwork.
When using the vehicle in winter, remove all
traces of road salt deposits carefully and as
soon as possible.
High-pressure cleaninge quipment G
WARNING
Do not use high-pressure cleaners with circu-
lar-jet nozzles (dirt grinders) to clean your
vehicle, in particular the tyres. You could oth-
erwise damage the tyres and cause an acci-
dent.
! Always maintain adistance of at least
30 cm between the vehicle and the high-
pressure cleaner nozzle. Information about
the correct distance is available from the
equipment manufacturer.
Move the high-pressure cleaner nozzle
around when cleaning your vehicle.
Do not aim directly at any of the following:
R tyres
R door gaps, roof gaps, jointse tc.
R electrical components
R battery
R connectors
R lights 302
CareMaintenance and care
Page 307 of 373
Cleaning th
ewindows G
WARNING
Switch off th ewindscree nwipers and remove
the key fro mthe ignition lock before cleaning
the windscreen or the wiper blades. On vehi-
cles with KEYLESS-GO, press the Start/Stop
button repeatedly until all indicator lamps in
the instrument cluster have gone off. The
windscreen wipers could otherwise move and
injure you.
! Do not use dry cloths, abrasive products,
solvents or cleaning agents containing sol-
ventstoc lean the inside of the windows.
Do not touch the insides of the windows
with hard objects, e.g. an ice scraper or
ring. There is otherwise arisk of damaging
the windows.
! Cleant he water drainage channels of the
windscreen and the rear window at regular
intervals. Deposits such as leaves, petals
and pollen may under certain circumstan-
ces prevent water from draining away.T his
can lead to corrosion damage and damage
to electronic components.
X Cleant he inside and outside of the win-
dows with adamp cloth and acleaning
agent that is recommended and approved
by Mercedes-Benz.
Cleaningt he wiper blades G
WARNING
Switch off the windscreen wipers and remove
the key from the ignition lock before cleaning
the windscreen or the wiper blades. On vehi-
cles with KEYLESS-GO, press the Start/Stop
button repeatedly until all indicator lamps in
the instrumentc luster have gone off. The
windscreen wipers could otherwise move and
injure you.
! Do not pull on the wiper blade. Otherwise,
the wiper blade could be damaged.
! Do not clean wiper blades too often and
do not rub them too hard. Otherwise, the graphite coating could be damaged. This
could cause wiper noise.
! Hold the wiper arm securely when folding
back. The windscreen could be damaged if
the wiper arm hits against it suddenly.
X Fold the wiper arms away from the wind-
screen.
X Carefully clean the wiper blades with a
damp cloth.
X Fold the windscreen wipers back again
before switching on the ignition.
Cleaningt he exterior lighting !
Only use cleaning agents or cleaning
cloths that are suitable for plastic lenses.
Unsuitable cleaning agents or cleaning
cloths could scratchord amage the plastic
lenses of the exterior lighting.
X Cleant he plastic lenses of the exterior
lighting using awet sponge and amild
cleaning agent, e.g. Mercedes-Ben zcar
shampoo or cleanin gcloths.
Mirror turn signal !
Only use cleanin gagents or cleaning
cloth sthata re suitable for plastic lenses.
Unsuitable cleanin gagents or cleaning
cloth scould scratch or damag ethe plastic
lenses of th emirror tur nsignals.
X Clean the plastic lenses of the mirror turn
signals in the exterior mirror housing using
aw et sponge and mild cleanin gagent, e.g.
Mercedes-Benz car shampoo or cleaning
cloths.
Cleaning the sensors !
If you clean th esensor swithah igh-pres-
sure cleaner, mak esure that you keep a
distanc eofatl east 30 cm between the
vehicle and th ehigh-pressure cleane rnoz-
zle. Information about the correc tdistance
is available from the equipment manufac-
turer. 304
CareMaintenance and care
Page 313 of 373
Useful information
i This Owner's Manual describes all mod-
els, series and optional equipment for your
vehicle that were available at the time of
going to press. National variation sare pos-
sible. Not ethat your vehicle may not be
equipped with all of the function sdescri-
bed. This is also the case for system sand
function srelevan ttosafety.
i Read the information on qualified special-
ist workshops: (Y page 23). Wher
ewillIfind...? Warning triangle
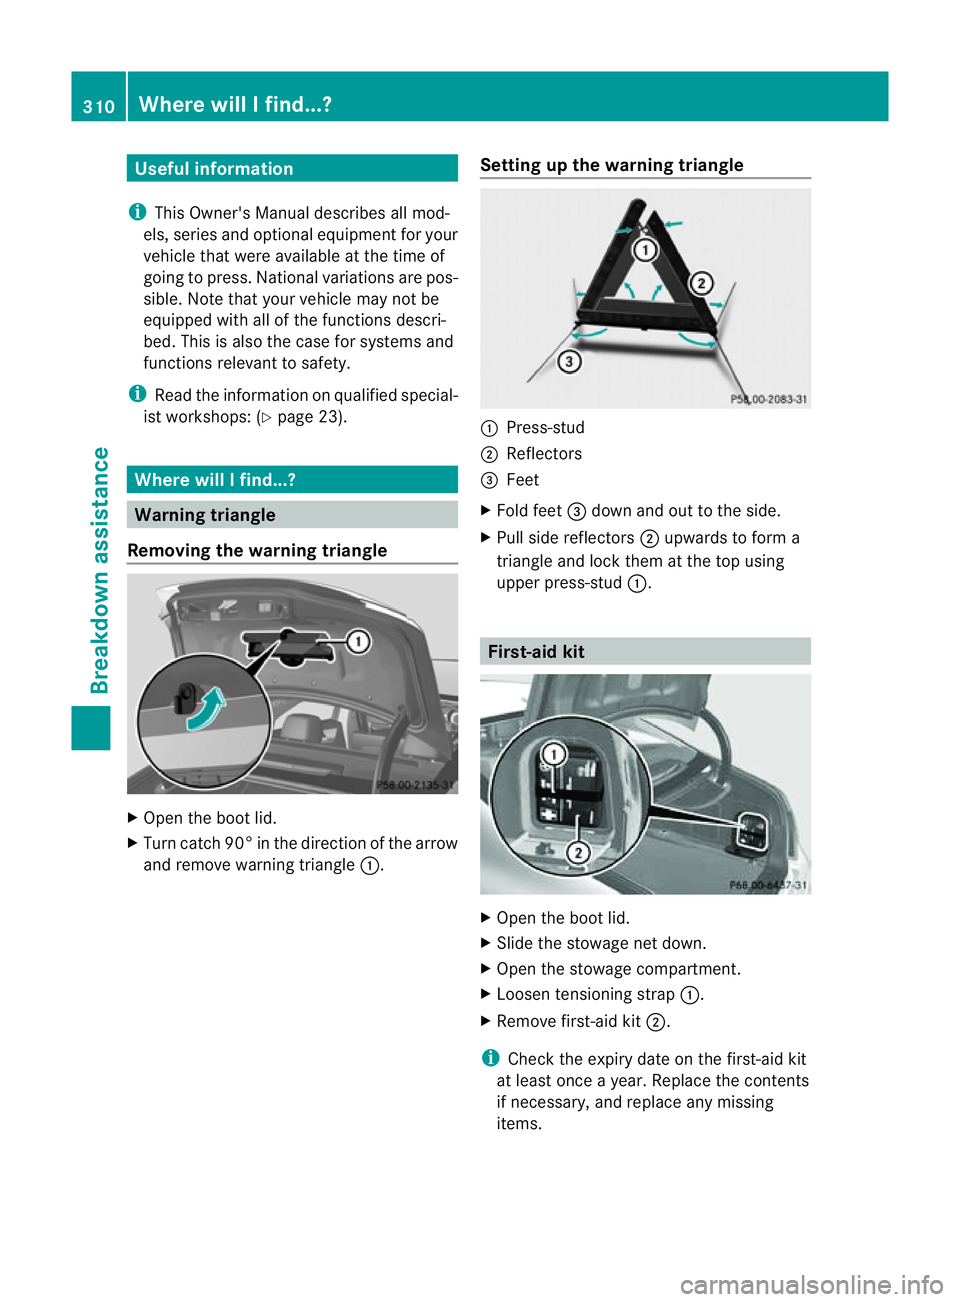
Removing the warning triangle X
Open the boot lid.
X Turn catc h90° in the direction of the arrow
and remove warning triangle :.Settin
gupthe warning triangle :
Press-stud
; Reflectors
= Feet
X Fold feet =dow nand ou ttothe side.
X Pull side reflectors ;upwards to form a
triangle and lock them at the top using
upper press-stud :. First-aid kit
X
Open the boot lid.
X Slide the stowage net down.
X Open the stowage compartment.
X Loosen tensioning strap :.
X Remove first-aid kit ;.
i Check the expiry date on the first-aid kit
at least once ayear. Replace the contents
if necessary, and replace any missing
items. 310
Where will
Ifind...?Breakdown assistance
Page 315 of 373
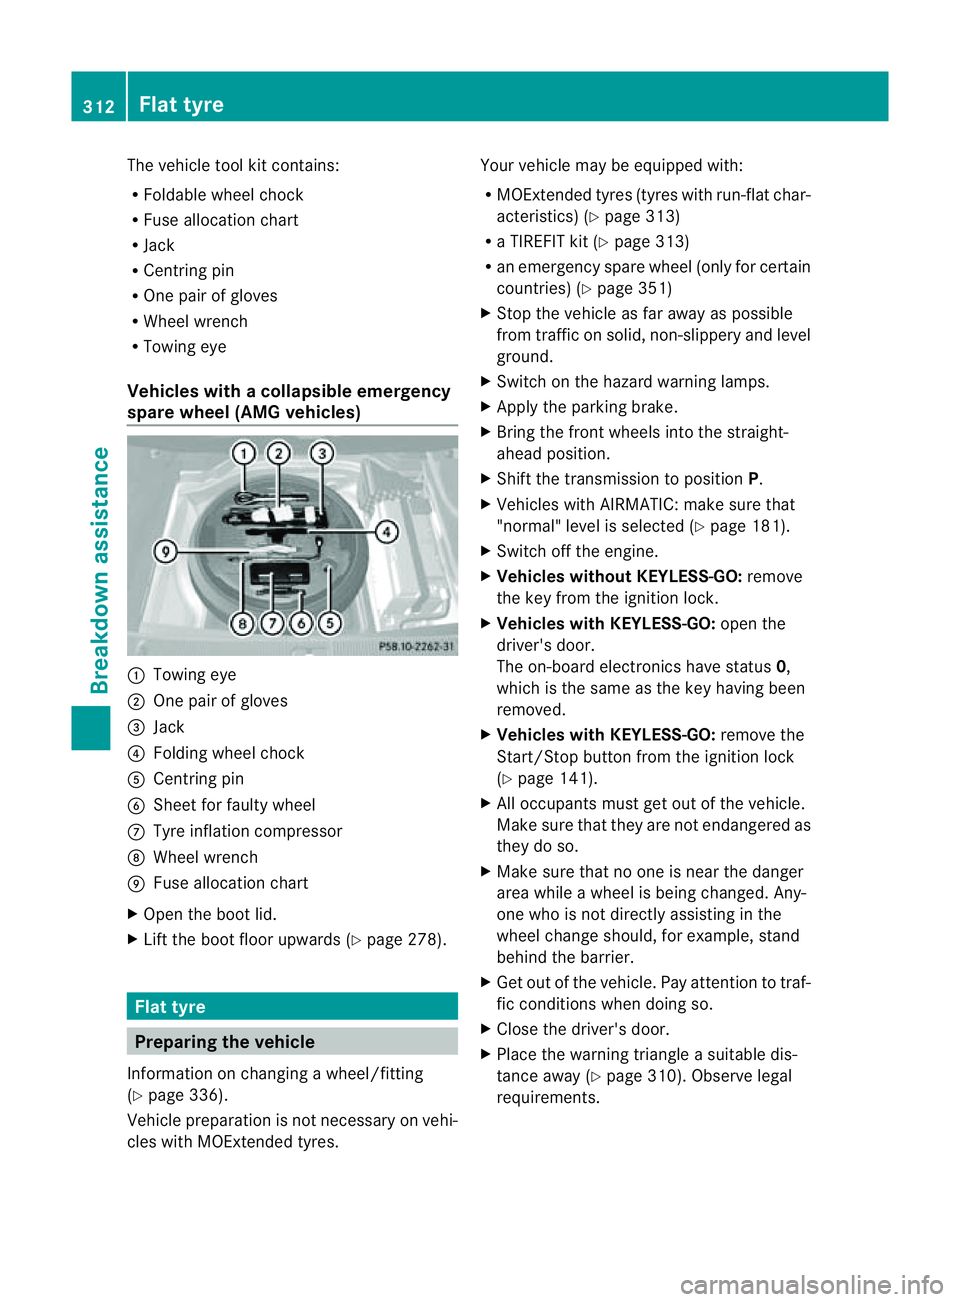
The vehicle tool kit contains:
R
Foldable wheel chock
R Fuse allocation chart
R Jack
R Centrin gpin
R One pair of gloves
R Wheel wrench
R Towing eye
Vehicles with acollapsible emergency
spare wheel (AMG vehicles) :
Towin geye
; Onep air of gloves
= Jack
? Folding wheel chock
A Centrin gpin
B Sheet for fault ywheel
C Tyre inflatio ncompressor
D Wheel wrench
E Fuse allocation chart
X Open the boot lid.
X Lift the boot floor upwards (Y page 278).Flat tyre
Preparing the vehicle
Information on changing awheel/fitting
(Y page 336).
Vehicle preparation is not necessary on vehi-
cles with MOExtended tyres. Your vehicle may be equipped with:
R
MOExtended tyres (tyres with run-flat char-
acteristics) (Y page 313)
R aT IREFIT kit (Y page 313)
R an emergenc yspare wheel (only for certain
countries) (Y page 351)
X Stop the vehicle as far away as possible
from traffic on solid, non-slippery and level
ground.
X Switch on the hazard warning lamps.
X Apply the parking brake.
X Bring the front wheels into the straight-
ahead position.
X Shift the transmission to position P.
X Vehicles with AIRMATIC: make sure that
"normal" level is selected (Y page 181).
X Switch off the engine.
X Vehicles without KEYLESS-GO: remove
the key from the ignition lock.
X Vehicles with KEYLESS-GO: open the
driver's door.
The on-board electronics have status 0,
which is the same as the key having been
removed.
X Vehicles with KEYLESS-GO: remove the
Start/Stop button from the ignition lock
(Y page 141).
X All occupant smust get out of the vehicle.
Make sure that they are not endangered as
they do so.
X Make sure that no one is near the danger
area while awheel is being changed. Any-
one who is not directly assisting in the
wheel change should, for example, stand
behind the barrier.
X Get out of the vehicle. Pay attention to traf-
fic conditions when doing so.
X Close the driver's door.
X Place the warning triangle asuitable dis-
tancea way (Y page 310). Observe legal
requirements. 312
Flat tyreBreakdown assistance
Page 317 of 373
If you come into contact with the tyre sealant,
observe the following:
R Rinse off the tyre sealant from yours kin
immediately with water.
R If the tyre sealant comes into contact with
youre yes, immediately rinse them thor-
oughly wit hclean water.
R If tyr esealant is swallowed ,immediately
rinse your mout hout thoroughl yand drink
plenty of water. Do no tind ucev omiting,
and see kmedical attention immediately.
R Immediately change out of clothing which
has come into contact with tyre sealant.
R If an allergic reaction occurs ,seek medical
attention immediately.
! Do not operate the tyre inflation com-
pressor for longer than eight minutes at a
time without abreak. It may otherwise
overheat.
The tyre inflation compressor can be oper-
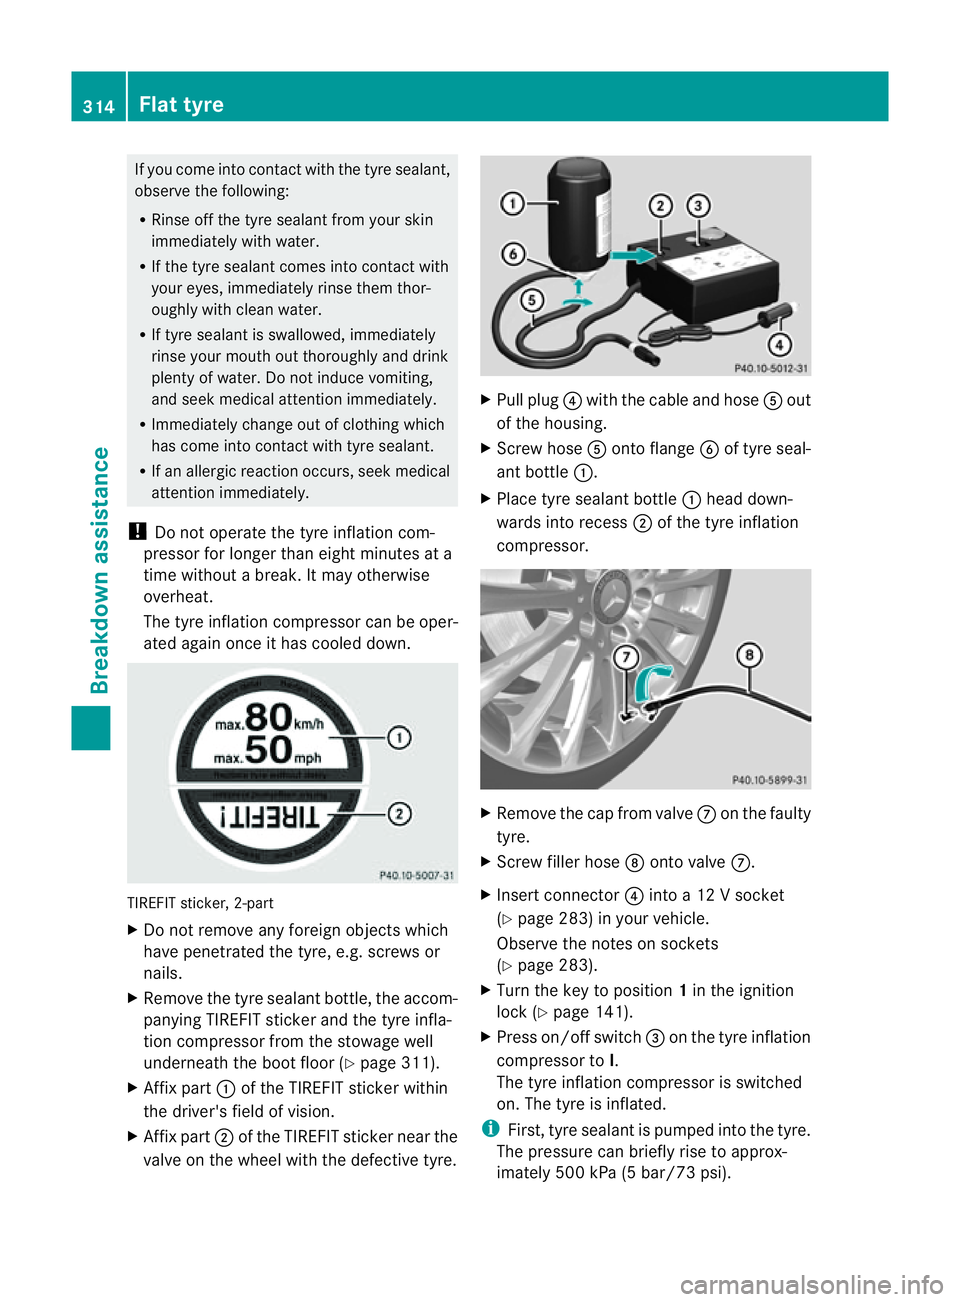
ated again onceith as cooled down.TIREFI
Tsticker, 2-part
X Do not remove any foreign objects which
have penetrated the tyre, e.g. screws or
nails.
X Remove the tyre sealant bottle, the accom-
panying TIREFI Tsticker and the tyre infla-
tion compressor from the stowage well
underneath the boot floor (Y page 311).
X Affix part :of the TIREFI Tsticker within
the driver's field of vision.
X Affix part ;of the TIREFI Tsticke rnearthe
valv eont he whee lwitht he defectiv etyre. X
Pull plug ?with the cable and hose Aout
of the housing.
X Scre whose Aonto flange Bof tyr eseal-
ant bottle :.
X Place tyr esealan tbottle : head down-
wards into recess ;of the tyr einflation
compressor. X
Remov ethe cap fro mvalve Con th efaulty
tyre.
X Screw fille rhose Dontov alveC.
X Insert connector ?into a12V socket
(Y page 283) in your vehicle.
Observe the notes on sockets
(Y page 283).
X Turn the key to position 1in the ignition
lock (Y page 141).
X Press on/offs witch=on th etyrei nflation
compressor to I.
The tyr einflatio ncompressor is switched
on. The tyre is inflated.
i First,t yre sealant is pumped into the tyre.
The pressure can briefly rise to approx-
imately 500 kPa (5 bar/73 psi). 314
Flat tyreBreakdown assistance
Page 319 of 373
icantly impair the vehicle's braking and driv-
ing characteristics. There is
arisk of accident.
Do not continue driving. Contact aqualified
specialist workshop.
X Correc tthe tyre pressure if it is still at least
130 kPa (1.3 bar/19 psi) (see the fuel filler
flap for values).
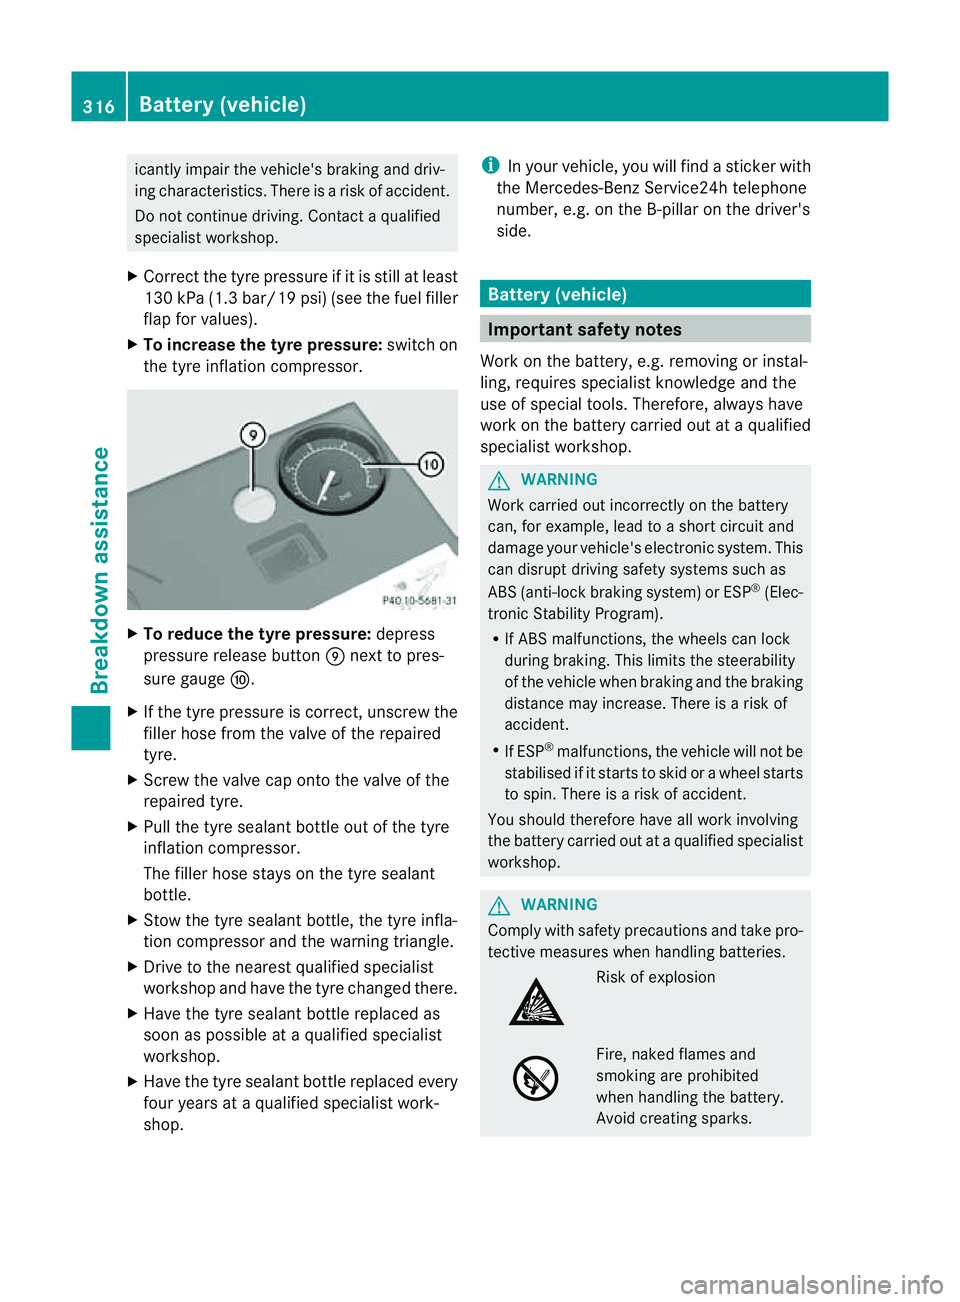
X To increase the tyre pressure: switch on
the tyre inflation compressor. X
To reduce the tyre pressure: depress
pressure release button Enext to pres-
sure gauge F.
X If the tyre pressure is correct,u nscrew the
filler hose from the valve of the repaired
tyre.
X Screw the valve cap onto the valve of the
repaired tyre.
X Pull the tyre sealant bottle out of the tyre
inflation compressor.
The filler hose stays on the tyre sealant
bottle.
X Stow the tyre sealant bottle, the tyre infla-
tion compressor and the warning triangle.
X Drive to the nearest qualified specialist
workshop and have the tyre changed there.
X Have the tyre sealant bottle replaced as
soon as possible at aqualified specialist
workshop.
X Have the tyre sealant bottle replaced every
four years at aqualified specialist work-
shop. i
In your vehicle, you will find asticker with
the Mercedes-Ben zService24h telephone
number, e.g. on the B-pillar on the driver's
side. Battery (vehicle)
Important safet
ynotes
Work on the battery, e.g. removin gorinstal-
ling, requires specialist knowledge and the
use of special tools. Therefore, alway shave
work on the batter ycarried out at aqualified
specialist workshop. G
WARNING
Work carried out incorrectly on the battery
can, for example, lead to ashort circuit and
damage your vehicle's electronic system. This
can disrupt driving safety systems such as
ABS (anti-lock brakin gsystem) or ESP ®
(Elec-
tronic Stabilit yProgram).
R If AB Smalfunctions, th ewheels can lock
during braking. This limits th esteerability
of th evehicl ewhen brakin gand th ebraking
distanc emay increase .There is arisk of
accident.
R If ESP ®
malfunctions, the vehicle will not be
stabilised if it starts to skid or awheel starts
to spin. There is arisk of accident.
You should therefore have all work involving
the battery carried out at aqualified specialist
workshop. G
WARNING
Comply with safety precautions and take pro-
tective measures when handling batteries. Risk of explosion
Fire, naked flames and
smoking are prohibited
when handling the battery.
Avoid creating sparks.316
Battery (vehicle)Breakdown assistance
Page 321 of 373
Otherwise, the vehicle's electronic sys-
tem may be damaged.
R in vehicles with automatic transmission,
the transmission is locked in position P
after disconnecting the battery. The vehi-
cle is secured against rolling away. You
can then no longer move the vehicle.
The battery and the cover of the positive
terminal clamp must be fitted securely dur-
ing operation.
In order for the battery to achieve the maxi-
mum possibles ervice life, it must always be
sufficiently charged.
The vehicle battery, like other batteries, can
discharge over time if you do not use the
vehicle. In such cases, have the battery dis-
connected at aqualified specialist workshop.
You can also charge the battery with a
charger recommended by Mercedes-Benz.
For more information, please contact aquali-
fied specialist workshop.
Have the battery charge checked more fre-
quently if you use the vehicle mainly for short
trips or if you leave it standing idle for a
lengthy period. Consult aqualified specialist
workshop if you wish to leave your vehicle
parked up for along period of time.
i When you park the vehicle, remove the
key if you do not require any electrical con-
sumers. The vehicle will then use very little
energy, thus conserving battery power.
i After an interruption of the power supply,
e.g. the battery was discharged, you have
to:
R set the clock. Information on setting the
clock can be found in the separate oper-
ating instructions.
On vehicles with COMAND Online and a
navigation system, the clock is set auto-
matically.
R reset the function for folding the exterior
mirrors in/out automatically, by folding
the mirrors out once (Y page 106). Charging the battery
G
WARNING
Only charge the battery in awell-ventilated
area. As the battery is being charged, gases
can escape and generate minor explosions.
This could injure you and other persons or
cause damage to the paintwork or acid cor-
rosion on the vehicle.
You can obtain information on battery charg-
ers which allow the battery to be charged
while still installed from aqualified specialist
workshop. G
WARNING
There is arisk of acid burns during the charg-
ing process due to the gases which escape
from the battery. Do not lean over the battery
during the charging process. G
WARNING
Battery acid is caustic. Avoid contact with the
skin, eyes or clothing.
! Only charge the installed battery with a
battery charger which has been tested and
approved by Mercedes-Benz.T hese battery
chargers allow the battery to be charged
while still installed in the vehicle.
! Only use battery chargers with amaxi-
mum charging voltage of 14.8 V.
! Only charge the battery using the jump-
start connection point.
The jump-starting connection point is in the
engine compartment( Ypage 319).
Read the battery charger's operating instruc-
tions before charging the battery.
X Open the bonnet (Y page 296).
X Connect the battery charger to the positive
terminal and earth point in the same order
as when connecting the donor battery in
the jump-starting procedure
(Y page 319). 318
Battery (vehicle)Breakdown assistance
Page 324 of 373
Befor
etowing away ,make sur ethat the steer-
ing can be move dand is not locked.
If yo utow or tow-start another vehicle, its
weigh tmustn ot excee dthe maximum per-
missible gros svehicle weigh tofyour vehicle. G
WARNING
The vehicle is braked when the HOLD function
or DISTRONIC PLUS is activated. Therefore,
deactivate HOLD and DISTRONIC PLUS if the
vehicle is to be towed.
! Only secure the tow rope or towing bar to
the towing eyes. The vehicle may otherwise
be damaged.
! Observe the following points when towing
with atow rope:
R secure the tow rope on the same side on
both vehicles.
R the tow rope must not be longer than is
legally permitted. It should be marked in
the middle, e.g. with awhite cloth
(30 x30c m) so thatothe rroad users are
aware that avehicle is being towed.
R the tow rope may only be attached to the
towing eyes.
R observe the brake lamps of the towing
vehicle while driving. Always maintain a
distance so that the tow rope does not
sag.
R do not use steel cables or chains to tow
your vehicle. The vehicle could be dam-
aged.
! Do not use the towing eye for recovery,
this could damage the vehicle. If in doubt,
recover the vehicle with acrane.
! When towing, pulla wayslowly and
smoothly .Ifthe tractive power is too high,
the vehicles could be damaged.
! To tow vehicles with KEYLESS-GO, use
the key instead of the Start/Stop button.
The automatic transmission may otherwise
switch to position Pwhen you open the driver's or front-passenger door which
could damage the transmission.
! You may tow the vehicle for amaximum
of 50km.At owing speed of 50 km/h must
not be exceeded.
For towing distances over 50 km, the entire
vehicle must be lifted up and transported.
! If you tow or tow-start another vehicle, its
weight must not exceed the maximum per-
missible gross vehicle weight of your vehi-
cle.
Information on your vehicle's gross vehicle
weight rating can be found on the vehicle
identification plate (Y page 359).
Observe the legal requirements for the rele-
vant countries when towing.
It is better to have the vehicle transported
than to have it towed.
If the vehicle has suffered transmission dam-
age, have it transported on atransporter or
trailer.
The automatic transmission must be in posi-
tion Nwhen the vehicle is being towed.
The battery must be connected and charged.
Otherwise, you:
R cannot turn the key in the ignition lock to
position 2
R cannot shift the automatic transmission to
position N
i Deactivate the automatic locking feature
(Y page 84). You could otherwise be locked
out when pushing or towing the vehicle.
Deactivate tow-away protection
(Y page 71) before the vehicle is towed. Fitting/removing the towing eye
Fitting the towing eye G
WARNING
The exhaust tail pipe may be hot. You could
burn yourself if you touch the tail pipe. Be Towing and tow-starting
321Breakdown assistance
Z