2012 MERCEDES-BENZ CLS COUPE auxiliary battery
[x] Cancel search: auxiliary batteryPage 8 of 373
ASSYS
TPLUS
Displaying aservice message ........300
Hiding aservice message ..............300
Notes ............................................. 300
Resetting the service interva ldis-
pla y................................................ 300
Service message ............................ 300
Specia lservice requirements ......... 301
ATA (Anti-Theft Alarm system)
Activating/deactivating ...................71
Function .......................................... .71
Interior motion sensor .....................72
Switching off the alarm ....................71
Tow-awa yprotectio n........................ 71
ATTENTIO NASSIST
Activating/deactivating .................220
Display message ............................ 243
Function/notes ............................. 192
Authorised workshop
see Qualified specialist workshop
AUTO lights
Display message ............................ 239
see Lights
Automatic engine start (ECO start/
stop function) .................................... 146
Automatic engine switch-off (ECO
start/stop function) ..........................145
Automatic headlamp mode ..............111
Automatic transmission Accelerator pedal position .............151
Automatic drive program ...............152
Changing gea r............................... 151
DIRECT SELECT leve r..................... 149
Display message ............................ 254
Drive position (ECO start/stop
function) ........................................ 150
Drive program displa y.................... 149
Driving tips .................................... 151
Emergency running mode ..............156
Engaging drive position .................. 150
Engaging neutra l............................ 150
Engaging revers egear ................... 150
Engaging the par kposition ............ 149
Kickdow n....................................... 151
Manual drive program ....................154
Neutral (ECO start/stop function) .150
Overview ........................................ 148
Problem (fault) ............................... 156Progra
mselector button ................151
Pulling away ................................... 143
Selector leve r................................ 148
Shift range s................................... 153
Starting the engine ........................143
Steering wheel gearshift paddle s... 152
Transmission position displa y........ 149
Transmission position display
(DIREC TSELECT lever) ................... 149
Transmission positions ..................150
Automatic transmission emer-
gency runnin gmode ......................... 156
Auxiliary heating Activating/deactivating .................133
Activating/deactivating (on the
centre console ).............................. 133
Display message ............................ 255
Important safety notes ..................132
Problem (display message) ............136
Remote control .............................. 133
Setting ........................................... 225
Setting the departur etime ............ .135
Auxiliary ventilation
Activating/deactivating .................133
Activating/deactivating (on the
centre console ).............................. 133
Problem (display message) ............136
Remote control .............................. 133 B
Bag hook ............................................ 277
BAS (Brake Assist System) .................63
BAS PLU S(Brake Assist System
PLUS) .................................................... 64
Battery (key) Checking .......................................... 79
Important safety notes ....................79
Replacing ......................................... 79
Battery (vehicle)
Charging ........................................ 318
Display message ............................ 242
Important safety notes ..................316
Jump starting ................................. 319
Belt
see Seat belt
Belt force limiters (activation) ...........41 Index
5
Page 19 of 373

Remote control
Auxiliary heating/ventilation .......... 133
Changing the batterie s(au xiliary
heating) ......................................... 135
Garage door opene r....................... 287
Programming (garage door
opener) .......................................... 287
Replacing the battery (auxiliary
heatin gremote control) .................... 135
Reserve (fue ltank)
see Fuel
Reserve fuel
Display message ............................ 242
Warning lamp ................................. 267
Residual heat (climate control) ........132
Restrain tsystem
see SRS (Supplemental Restraint
System)
Rev counter ........................................ 210
Reverse gear (selector lever) ...........148
Reversing camera Cleaning instructions .....................305
Function/notes ............................. 190
Switching on/off ........................... 191
Reversing lamp
Changing bulbs .............................. 120
Reversing lamp (display message) ..239
Roller sunblind Rea rwindow .................................. 282
Roof carrier ........................................ 278
Roof lining and carpets (cleaning
instructions) ...................................... 307
Roof load (maximum) ........................366 S
Safety Childre ninthe vehicle ..................... 52
Child restraint systems ....................52
Safety system
see Driving safety system
Seat
Seat backres tdisplay message .....255
Seat belt
Adjusting the driver's and front-
passenger sea tbelt ......................... 50
Adjusting the height ......................... 50
Belt force limiter .............................. 51Belt tensioner
.................................. 51
Cleaning ......................................... 307
Display message ............................ 235
Fastening ......................................... 49
Important safety guidelines .............48
Rea rseat belt status indicator .........51
Releasing ......................................... 50
Switching bel tadjustment on/off
(on-board computer) ......................227
Warning lamp ................................. 259
Warning lamp (function) ................... 51
Seats
Adjusting (electrically). ....................98
Adjusting lumba rsuppor t.............. 101
Adjusting the 4-way lumba rsup-
por t................................................ 101
Adjusting the head restraint ............98
Cleaning the cover .........................306
Correct driver's sea tposition ........... 96
Important safety notes ....................97
Seat heating problem ....................102
Seat ventilation problem ................102
Storing settings (memory func-
tion) ............................................... 107
Switching sea theating on/off .......101
Switching the sea tventilation on/
off .................................................. 102
Selector lever
Cleaning ......................................... 306
Sensors (cleaning instructions) .......304
Service see ASSYST PLUS
Service Centre
see Qualified specialist workshop
Service menu (on-board computer) .220
Service products Brake fluid ..................................... 365
Coolant (engine) ............................ 365
Engine oil ....................................... 363
Fuel ................................................ 360
Important safety notes ..................359
Washer fluid .................................. .366
Settings
Factory (on-board computer) .........227
On-board computer .......................221
Settin gthe air distribution ...............129
Settin gthe airflow ............................ 129
SETUP (on-board computer) .............228 16
Index
Page 135 of 373
opened or closed. You or the object
scould be
drawn in or become trapped between the side
window and the door frame as the window
moves. If there is arisk of entrapment, oper-
ate the Wswitchtom ove the side window
in the opposit edirection.
Make sure that nobody can becom etrapped
as the slidin gsunroof/panorama slidin gsun-
roof is opened and closed. If there is arisk of
entrapment, operat ethe 3 switchtom ove
the slidin gsunroof/panorama slidin gsunroof
in the opposit edirection.
X Convenience closing feature: press and
hold the gbutton until the side win-
dows and the sliding sunroof/panorama
sliding sunroof are closed.
The indicator lamp in the gbutton lights
up. Air-recirculation mode is activated.
X Convenience opening feature: press and
hold the gbutton until the side win-
dows and the sliding sunroof/panorama
sliding sunroof are opened. The side win-
dows and the sliding sunroof/panorama
sliding sunroof move back to their original
position.
The indicator lamp in the gbutton goes
out. Air-recirculation mode is deactivated.
i If you open the side windows or the sliding
sunroof/panorama sliding sunroof man-
ually after closing the mwith the conveni-
enc eclosing feature, the ywill remain in this
position when opened using the conveni-
enc eopening feature. Activating/deactivating th
eresidual
heat function
The residual heat function is only available
with THERMOTRONI Cautomatic climate con-
trol.
It is possible to mak euse of the residual heat
of the engine to continue heatin gthe station-
ary vehicle for up to 30 minutes after the
engine has been switched off .The heating time depends on the temperature that has
been set for the vehicle interior.
X
To activate: press theÌbutton.
The indicator lamp in the Ìbutton lights
up.
i The blower will run at alow speed regard-
less of the airflow setting.
i If you activate the residual heat function
at high temperatures, only the ventilation
will be activated. The blower runs at
medium speed.
X To deactivate: press theÌbutton.
The indicator lamp in the Ìbutton goes
out.
i It is possible that the residual heat func-
tion may be activated automatically an hour
after the key has been removed. The vehi-
cle is then ventilated for 30minutes to dry
the air-conditioning system.
Residual heat is deactivated automatically:
R after approximately 30 minutes
R when the ignition is switched on
R if the battery voltage drops Auxiliary heating
Important safety notes G
WARNING
Exhaust fumes are produced when the auxili-
ary heating is in operation. Inhaling these
exhaust fumes can be poisonous. You should
therefore switch off the auxiliary heating in
confined spaces without an extraction sys-
tem, e.g. agarage. G
WARNING
When operating the auxiliary heating parts of
the vehicle can get very hot. Make sure that
the exhaust system does not under any cir-
cumstances come into contact with easily
ignitable material such as dry grass or fuels.
The material could otherwise ignite and set 132
Operating the climate control systemClimatec
ontrol
Page 136 of 373
the vehicl
ealigh t. Choose your parking spot
accordingly.
Operating the auxiliary heating is thu spro-
hibited at filling stations or when your vehicle
is being refuelled .You must therefor eswitch
off the auxiliary heating at filling stations.
! Operating the auxiliary heating/ventila-
tion draws on the vehicle battery. After you
have heated or ventilated the vehicle a
maximum of two times, drive for alonger
distance.
i Switch the auxiliary heating on regularly
once amonthf or about ten minutes.
The auxiliary heating heats the air in the
passenger compartment to the selected tem-
perature. It does not use the heat of the run-
ning engine to do this. The auxiliary heating
is operated directly using the vehicle's fuel.
For this reason, the tank content must be at
least at reserve fuel level to ensure that the
auxiliary heating functions.
The auxiliary heating/ventilation automati-
cally adjusts to changes in temperature and
weather conditions. For this reason, the aux-
iliary heating could switch from ventilation
mode to heating mode or from heating mode
to ventilation mode.
The auxiliary heating switches off automati-
cally after 50 minutes. This time limit can be
altered. To do this, visit aqualified specialist
workshop.
You cannot use the auxiliary ventilation to
cool the vehicle interior to atemperature
lower than the outside temperature.
Before switching on X
Turn the key to position 2in the ignition
lock.
X Set the temperature.
The auxiliary heating/ventilation can be acti-
vated even when climate control is set to
manual. Optimum comfor tcan be attained
when the system is set to automatic mode.
Set the temperature to 22 †. The auxiliary heating/ventilation can be acti-
vated or deactivated using the remote control
or the button on the centre console.
The on-board computer can be used to spec-
ify up to three departure times, one of which
may be preselected (Y page 225).
Switching the auxiliary heating/venti-
lation on/off using the centre console
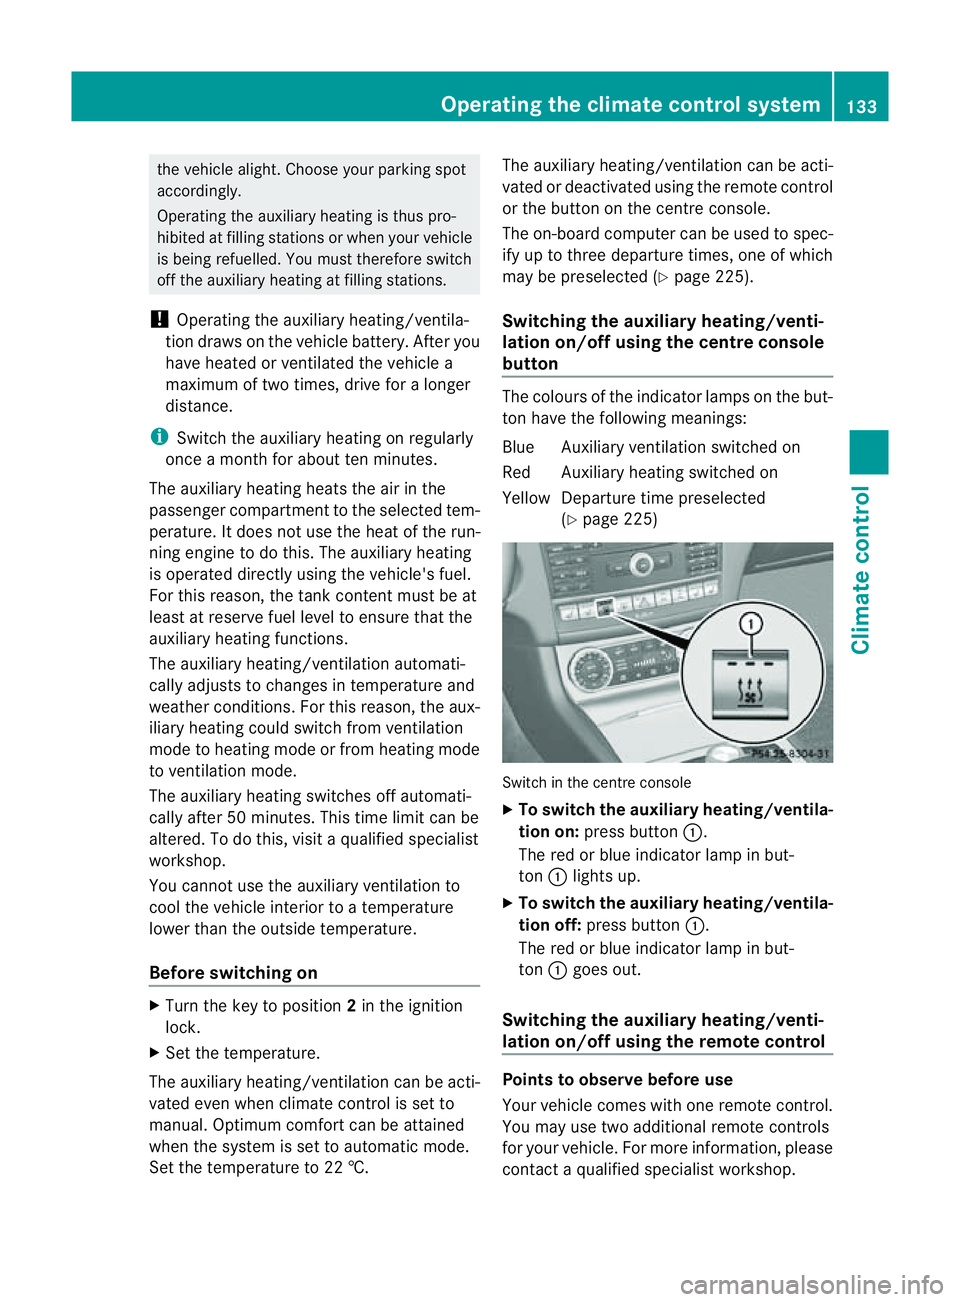
button The colours of the indicator lamps on the but-
ton have the following meanings:
Blue Auxiliary ventilation switched on
Red Auxiliary heating switched on
Yellow Departure time preselected
(Ypage 225) Switch in the centre console
X
To switch the auxiliary heating/ventila-
tion on: press button :.
The red or blue indicator lamp in but-
ton :lights up.
X To switch the auxiliary heating/ventila-
tion off: press button :.
The red or blue indicator lamp in but-
ton :goes out.
Switching the auxiliary heating/venti-
lation on/off using the remotec ontrol Points to observe before use
Your vehicle comes with one remote control.
You may use two additional remote controls
for your vehicle. For more information, please
contact
aqualified specialist workshop. Operating the climate control system
133Climate control Z
Page 137 of 373
The remote control has
amaximum range of
approximately 300 metres. This range is
reduced by:
R sources of radio interference
R solid object sbetween the remote control
and the vehicle
R the remote control being in an unfavoura-
ble position in relation to the vehicle
R transmitting from an enclosed space
i The optimum range can be achieved if you
hold the remote control vertically, pointing
upwards when you press one of the but-
tons.
i Abattery symbol appear sinthedisplay
when th ebattery in th eremot econtro lis
low. Replac ethe remot econtro lbattery
(Y page 135).
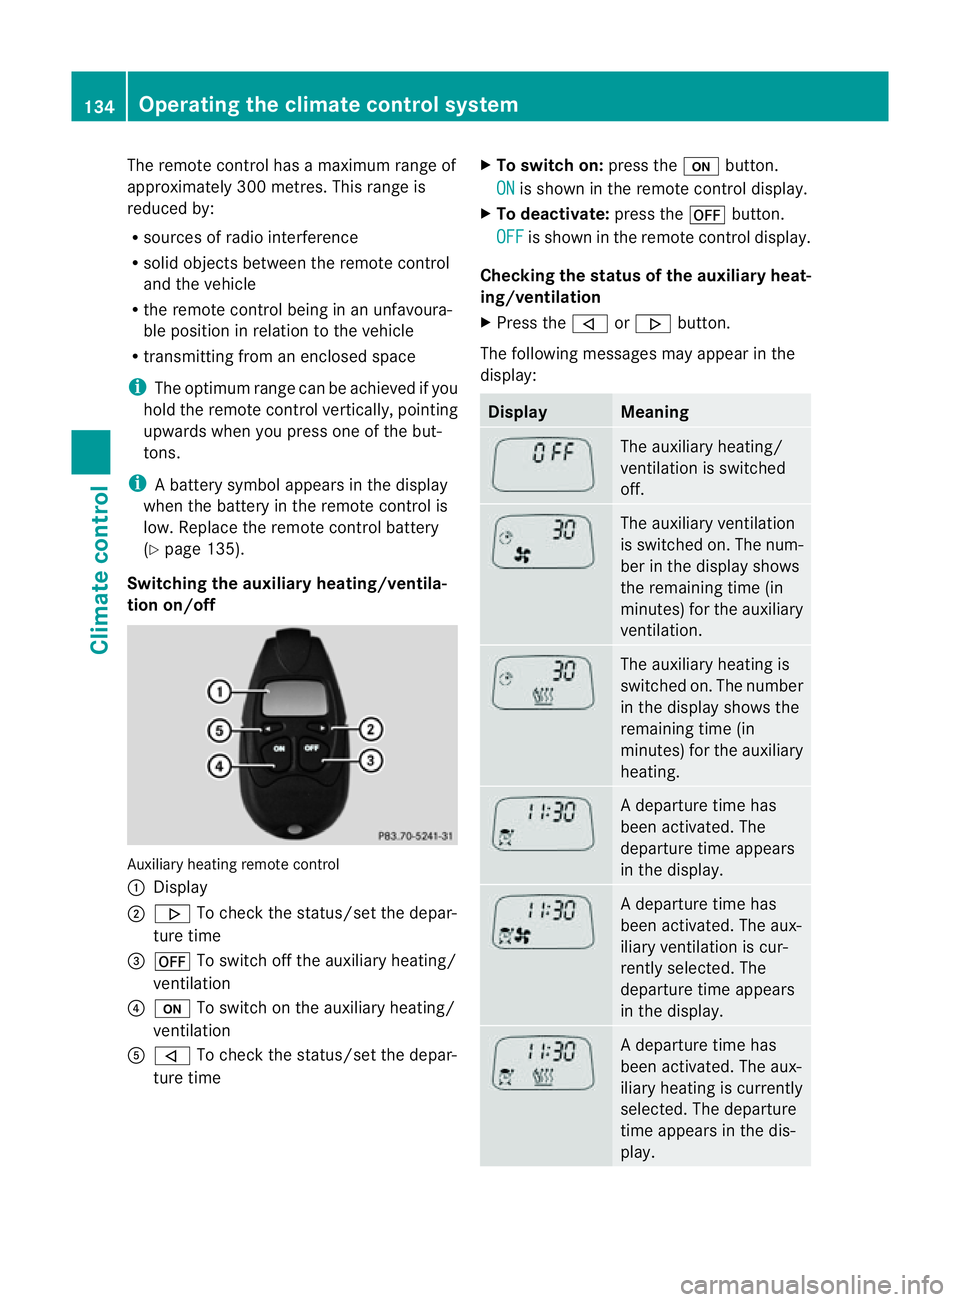
Switching th eauxiliary heating/ventila-
tion on/off Auxiliary heating remot
econtrol
: Display
; . To check th estatus/set th edepar-
tur etime
= ^ To switch off th eauxiliary heating/
ventilation
? u To switch on th eauxiliary heating/
ventilation
A , To check th estatus/set th edepar-
tur etime X
To switch on: pressthe u button.
ON is shown in th
eremot econtro ldisplay.
X To deactivate: pressthe ^ button.
OFF is shown in th
eremot econtro ldisplay.
Checking th estatus of the auxiliary heat-
ing/ventilation
X Press the ,or. button.
The following message smayappear in the
display: Display Meaning
The auxiliary heating/
ventilatio
nisswitched
off. The auxiliary ventilation
is switched on. The num-
ber in the displays
hows
the remaining time (in
minutes) for the auxiliary
ventilation. The auxiliary heating is
switched on. The number
in the displays
hows the
remaining time (in
minutes) for the auxiliary
heating. Ad
eparture time has
been activated. The
departure time appears
in the display. Ad
eparture time has
been activated. The aux-
iliary ventilation is cur-
rently selected. The
departure time appears
in the display. Ad
eparture time has
been activated. The aux-
iliary heating is currently
selected. The departure
time appears in the dis-
play. 134
Operating thec
limatecontrol systemClimatecontrol
Page 138 of 373
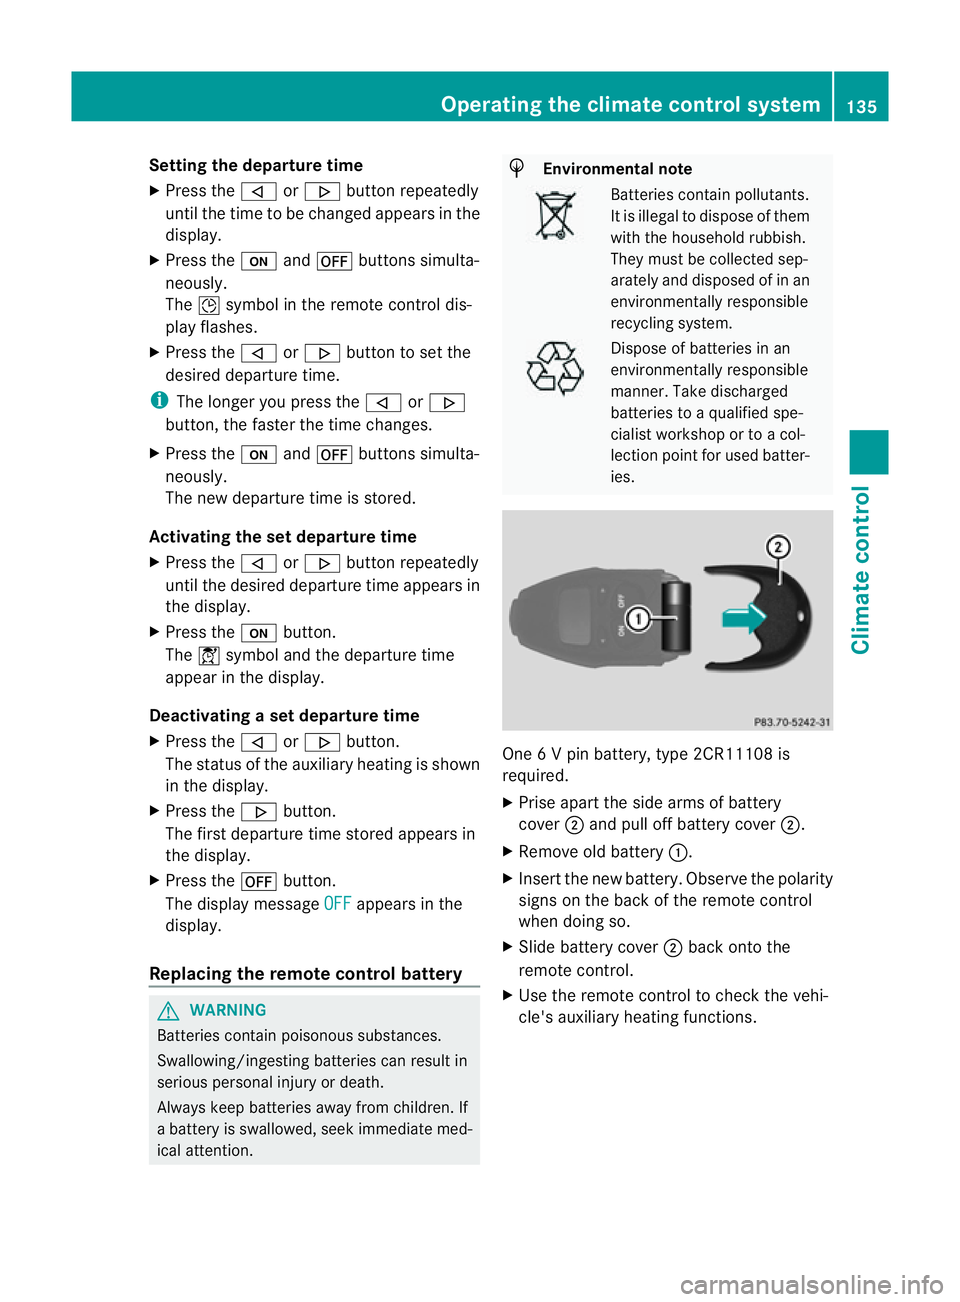
Setting the departuret
ime
X Press the ,or. button repeatedly
until the time to be changed appears in the
display.
X Press the uand^ buttons simulta-
neously.
The Îsymbol in the remote control dis-
play flashes.
X Press the ,or. button to set the
desired departure time.
i The longer you press the ,or.
button, the faster the time changes.
X Press the uand^ buttons simulta-
neously.
The new departure time is stored.
Activating the set departuret ime
X Press the ,or. button repeatedly
until the desired departure time appears in
the display.
X Press the ubutton.
The Ísymbol and the departure time
appearint he display.
Deactivating aset departuret ime
X Press the ,or. button.
The status of the auxiliary heating is shown
in the display.
X Press the .button.
The first departure time stored appears in
the display.
X Press the ^button.
The displaym essageOFF appears in the
display.
Replacing the remote control battery G
WARNING
Batteries contain poisonous substances.
Swallowing/ingesting batteries can result in
serious personal injury or death.
Always keep batteries away from children. If
ab attery is swallowed, seek immediate med-
ical attention. H
Environmental note Batteries contain pollutants.
It is illegaltod
ispose of them
with the household rubbish.
They must be collected sep-
arately and disposed of in an
environmentally responsible
recycling system. Dispose of batteries in an
environmentally responsible
manner. Take discharged
batteries to aqualified spe-
cialist workshop or to acol-
lection point for used batter-
ies. One
6Vp in battery, type 2CR11108 is
required.
X Prise apart the side arms of battery
cover ;and pull off battery cover ;.
X Remove old battery :.
X Insert the new battery. Observe the polarity
signs on the back of the remote control
when doing so.
X Slide battery cover ;back onto the
remote control.
X Use the remote control to check the vehi-
cle's auxiliary heating functions. Operating the climate control system
135Climatecontrol Z
Page 139 of 373
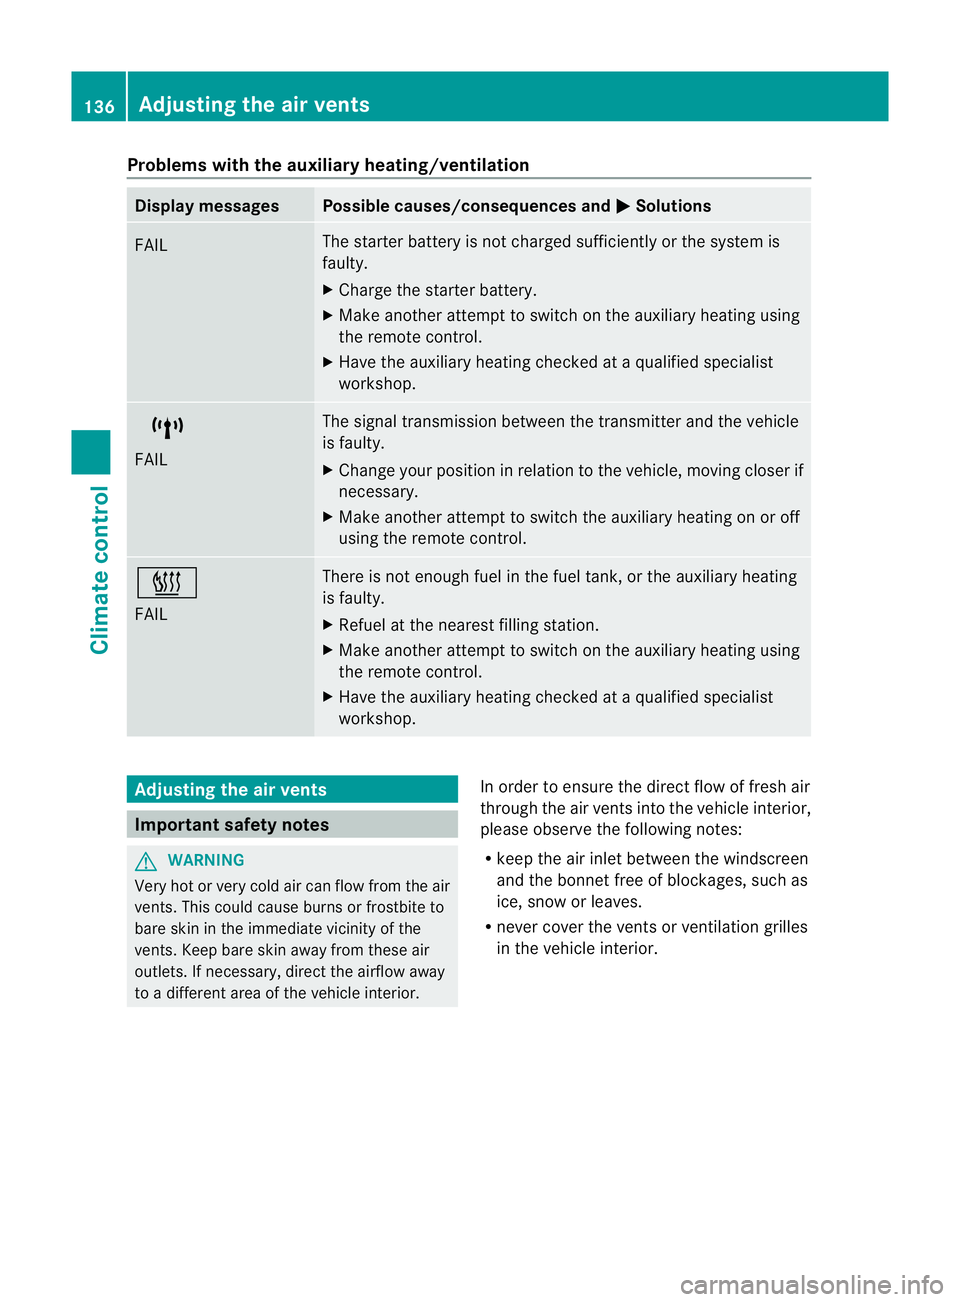
Problems with the auxiliary heating/ventilation
Display messages Possible causes/consequences and
M Solutions
FAIL The starter battery is not charged sufficiently or the system is
faulty.
X
Charge the starter battery.
X Make another attempt to switch on the auxiliary heating using
the remote control.
X Have the auxiliary heating checked at aqualified specialist
workshop. $
FAIL The signal transmission between the transmitter and the vehicle
is faulty.
X
Change your position in relation to the vehicle, moving closer if
necessary.
X Make another attempt to switch the auxiliary heating on or off
using the remote control. ©
FAIL There is not enough fuel in the fuel tank,ort
he auxiliary heating
is faulty.
X Refuel at the nearest filling station.
X Make another attempt to switch on the auxiliary heating using
the remote control.
X Have the auxiliary heating checked at aqualified specialist
workshop. Adjusting the air vents
Important safety notes
G
WARNING
Very hot or very cold air can flow from the air
vents. This could cause burns or frostbit eto
bare skin in the immediate vicinity of the
vents. Keep bare skin away from these air
outlets. If necessary, direct the airflow away
to ad ifferent area of the vehicle interior. In order to ensure the direct flow of fresh air
through the air ventsi
nto the vehicle interior,
please observe the following notes:
R keep the air inlet between the windscreen
and the bonnet free of blockages, such as
ice, snow or leaves.
R never cover the ventsorv entilation grilles
in the vehicle interior. 136
Adjusting the air ventsClimate control
Page 229 of 373
!
Operating the auxiliary heating/ventila-
tion draws on the vehicle battery. After you
have heated or ventilated the vehicle a
maximum of two times, drive for alonger
distance.
This function is only available on vehicles with
auxiliary heating (Y page 132).
In the Heating submenu, you can select a
stored departure time or change adeparture
time.
The auxiliary heating timer function calcu-
lates the switch-on time according to the out-
side temperature so that the vehicle is pre-
heated by the departure time. When the
departure time is reached, the auxiliary heat-
ing continues to heat for afurther five
minutes and then switches off. The auxiliary
heating adopts the THERMATIC or
THERMOTRONIC temperature setting.
You can switch off the auxiliary heating by
using the remote control or the auxiliary heat-
ing button on the centre console.
i Switch the auxiliary heating on regularly
once amonth for aboutt en minutes.
Selecting the departure time or deactivat-
ing aselected departure time
X Press the =or; button on the steer-
ing wheel to select the Settings menu.
X Press the :or9 button to select the
Heating submenu.
X Press ato confirm.
You will see the selected setting.
X Press ato confirm.
X Press the :or9 button to select
one of the three departure times or Timeroff (no timer active).
X Press ato confirm.
If ad eparture time is selected, the yellow
indicator lamp lights up on the auxiliary
heating button. Changing the departure time
X
Press the =or; button on the steer-
ing wheel to select the Settings menu.
X Press the :or9 button to select the
Heating submenu.
X Press ato confirm.
You will see the selected setting.
X Press ato confirm.
X Press the :or9 button to select A ,
B or
Change C .
X Press ato confirm.
You can now change the departure time.
X Press the =or; button to select the
displaytobec hanged: hours, minutes.
X Press the :or9 button to set the
selected display.
X Press the abutton to store the entry.
The yellow indicator lamp on the auxiliary
heating button lights up.
Convenience Activating/deactivating the EASY-
ENTRY/EXIT feature
G
WARNING
The steering wheel moves when the EASY-
ENTRY/EXIT feature is active. There is arisk
of occupants becoming trapped. Before acti-
vating the EASY-ENTRY/EXIT feature, make
sure that nobody can become trapped.
Do not leave children unsupervised in the
vehicle, even if they are secured in achild
restraint system. The children could open the
driver's door and thereby unintentionally acti-
vate the EASY-ENTRY/EXIT feature and
become trapped.
X Press the =or; button on the steer-
ing wheel to select the Settings menu.
X Press the :or9 button to select the
Convenience submenu.
X Press ato confirm. 226
Menus and submenusOn-board computer and displays