2012 MERCEDES-BENZ CLS COUPE tire size
[x] Cancel search: tire sizePage 22 of 373
Type identificatio
nplate
see Vehicl eide ntificatio nplate
Tyr epressure
Calling up (on-board computer )..... 334
Display message ............................ 250
Not reached (TIREFIT) ....................315
Reached (TIREFIT) ..........................315
Recommended ............................... 331
Tyre pressure los swarning
Important safety notes ..................332
Restarting ...................................... 333
Tyre pressure monitor
Checking the tyre pressure elec-
tronically ........................................ 334
Function/notes ............................. 334
Restarting ...................................... 335
Warning lamp ................................. 270
Warning message .......................... 335
Tyres
Changing awheel .......................... 336
Checking ........................................ 329
Directio nofrotation ...................... 336
Display message ............................ 250
Important safety notes ..................328
MOExtended tyres .........................330
Replacing ....................................... 336
Service life ..................................... 329
Storing ........................................... 337
Tyr esize (data) .............................. 341
Tyr etread ...................................... 329
see Flat tyre U
Unladen weight ................................. 366
Unlocking Emergency unlocking .......................84
From insid ethe vehicle (central
unlocking button) ............................. 83 V
Vanity mirror (in sun visor) ..............281
Variable SPEEDTRONIC see SPEEDTRONIC
Vehicle
Correct use ...................................... 24
Data acquisition ............................... 24Display message
............................ 254
Electronics ..................................... 357
Equipment ....................................... 22
Implied warranty .............................. 24
Individua lsettings .......................... 221
Leaving parked up .........................161
Locking (in an emergency) ...............84
Locking (key )................................... 77
Lowering ........................................ 340
Pulling away ................................... 143
Raising ........................................... 338
Registration ..................................... 24
Securing from rolling away ............337
Towing away .................................. 320
Transporting .................................. 323
Unlocking (in an emergency) ...........84
Unlocking (key )................................ 77
Vehicle data ................................... 366
Vehicle data ....................................... 366
Vehicle dimensions ...........................366
Vehicle emergency locking ................84
Vehicle identification number see VIN
Vehicle identification plate ..............359
Vehicle level AIRMATIC ...................................... 181
AMG RIDE CONTROL sports sus-
pension .......................................... 183
Vehicle level (display message) .......243
Vehicle tool kit .................................. 311
Vehicle weights ................................. 366
Video Operating the DVD ......................... 216
VIN ...................................................... 359 W
Warning and indicator lamps ABS ................................................ 261
Brakes ........................................... 260
Distance warning signa l................. 269
ESP ®
.............................................. 263
ESP ®
OFF ....................................... 264
LIM (cruise control) ........................ 165
LIM (DISTRONIC PLUS) ..................172
LIM (variable SPEEDTRONIC )......... 168
Overview .................................. 32, 258
PASSENGER AIRBAG OFF ................54 Index
19
Page 56 of 373
seat, you must move the front-passenger
seat as far back as possible.
R children must never travel sitting on the lap
of another occupant. Due to the forces
which occur in the event of asudden
change of direction, heavy braking or an
accident, it wouldn ot be possible to
restrain the child. The child could be thrown
against parts of the vehicle interior and be
seriously or even fatally injured. G
WARNING
The child restraint system cannot perform its
protective function if it is not correctly fitted
to as uitable vehicle seat. The child cannot be
restrained in the event of an accident, heavy
braking or sudden changes of direction. The
child could be seriously or even fatally injured.
For this reason, when fitting achild restraint
system, observe the manufacturer's installa-
tion instructions and the correct use of the
child restraint system.
Child restraint systems should be fitted to the
rear seats. Children are generally better pro-
tected there.
The entire base of the child restraint system
must always rest on the seat cushion. There-
fore, never place objects, e.g. acushion,
under the child restraint system.
Only use child restraint systems with the orig-
inal cover designed for them. Only replace
damaged covers with genuine Mercedes-Benz
covers.
We recommend the use of child restraint sys-
tems which have been approved for
Mercedes-Benz vehicles. G
WARNING
Do not leave children unsupervised in the
vehicle, even if they are secured in achild
restraint system. They could injure them-
selves on parts of the vehicle. They could also
be seriously or even fatally injured by pro-
longed exposure to extreme heat or cold.
Do not expose the child restraint system to
direct sunlight. Parts of the child restraint sys- tem could heat up and the child could burn
herself/himself on them.
If
ac hild opens adoor, the child or other per-
sons could be injured as aresult. They could
get out and injure themselves or be injured by
ap assing vehicle.
Observe the general notes on the HOLD func-
tion, which can be found under the same key-
word. G
WARNING
Unsecured or incorrectly positioned loads
increase the risk of injury for children and all
other occupants in the event of:
R an accident
R sudden braking
R as udden change of direction
Do not transport heavy or hard objects in the
vehicle interior unless they are secured. You
will find further information under "Loading
guidelines" in the index.
If ac hild is travelling in your vehicle, secure
the child using achild restraint system which
is recommended for Mercedes-Benz vehicles.
The child restraint system must be appropri-
ate to the age, weight and size of the child.
Ideallyt he child restraint system should be
installed on asuitabler ear seat. Make sure
that the child is secured for the trip.
Mercedes-Benz recommends that you use
the listed child restraint systems
(Y page 60). You can obtain further infor-
mation aboutt he correct child restraint sys-
tem from any Mercedes-Ben zService Centre.
i It is advisabletou se Mercedes-Benzcare
product stoclean child restraint systems.
You can obtain informatio nabout this at
any Mercedes-Benz Service Centre. Children in thev
ehicle
53Safety Z
Page 281 of 373
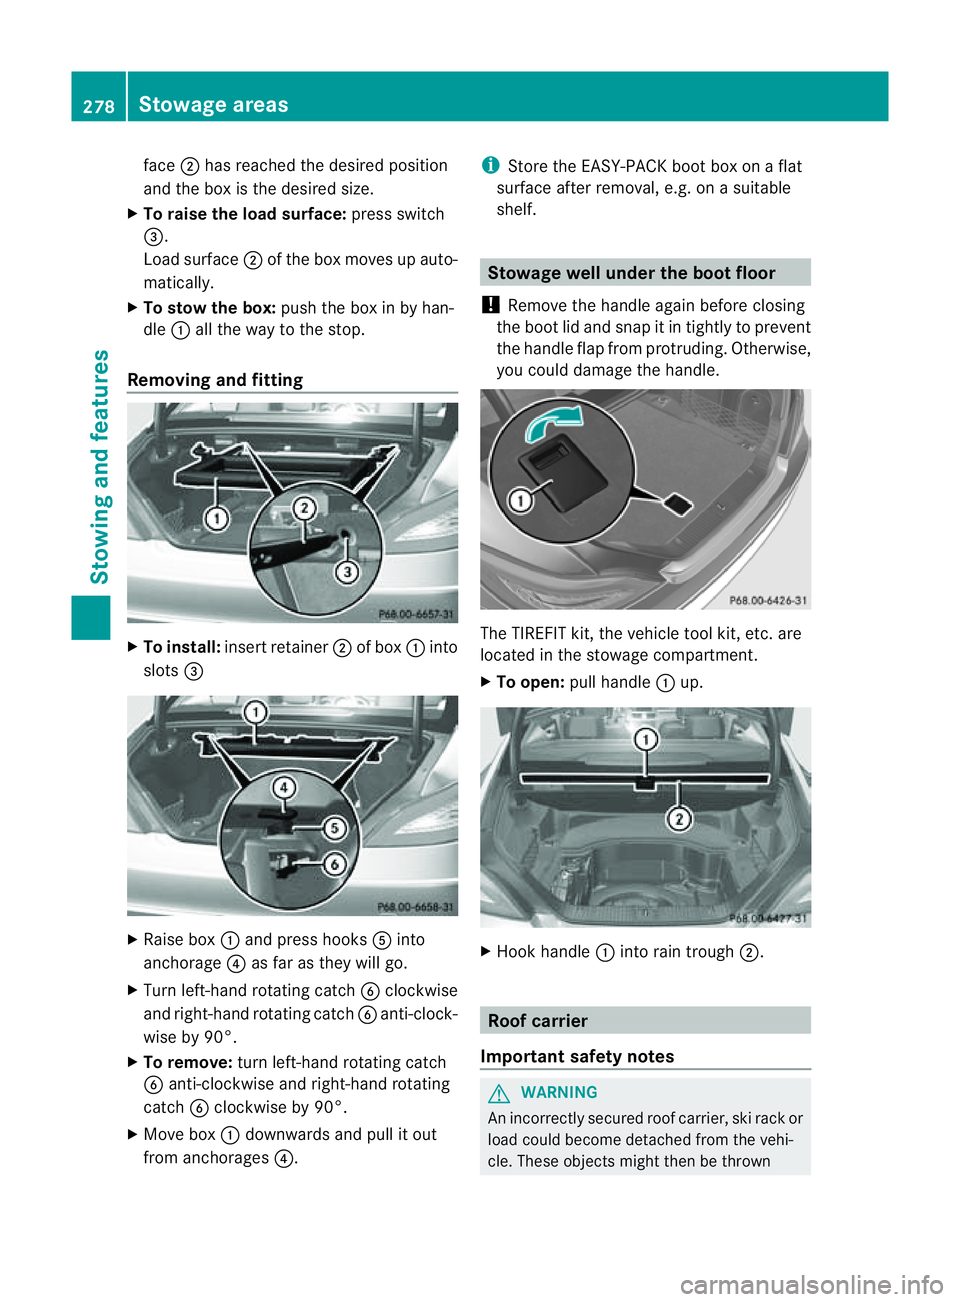
face
;has reache dthe desired position
and the box is the desired size.
X To raise the load surface: press switch
=.
Load surface ;of the box moves up auto-
matically.
X To stow the box: pushthe box in by han-
dle :allt he waytot he stop.
Removing and fitting X
To install: insert retainer ;of box :into
slots = X
Raise box :and press hooks Ainto
anchorage ?as far as they wil lgo.
X Turn left-hand rotating catch Bclockwise
and right-hand rotating catch Banti-clock-
wis eby9 0°.
X To remove: turn left-hand rotating catch
B anti-clockwise and right-hand rotating
catch Bclockwise by 90°.
X Move box :downward sand pul litout
from anchorages ?. i
Store the EASY-PACK boot box on aflat
surface after removal, e.g. on asuitable
shelf. Stowage well under the boo
tfloor
! Remove the handle again befor eclosing
the boot lid and snap it in tightly to prevent
the handle flap fro mprotruding. Otherwise,
you coul ddamage the handle. The TIREFIT kit, the vehicl
etool kit, etc. are
located in the stowage compartment.
X To open: pullhandle :up. X
Hook handle :into rain trough ;. Roof carrier
Important safety notes G
WARNING
An incorrectly secure droof carrier, ski rack or
load could become detached from the vehi-
cle. These object smight then be thrown 278
Stowage areasStowing and features
Page 316 of 373

MOExtended tyres (tyres with run-flat
characteristics) G
WARNING
When driving in emergency mode, the driving
characteristics deteriorate, e.g. when corner-
ing, accelerating quickly and when braking.
There is arisk of accident.
Do not exceed the stated maximu mspeed.
Avoid abrupt steering and driving manoeu-
vres, and driving over obstacles (kerbs ,pot-
holes, off-road). This applies in particular to a
laden vehicle.
Stop driving in emergency mode if:
R you hear banging noises.
R the vehicle start stoshake.
R you see smok eand smell rubber.
R ESP ®
is intervening constantly.
R ther eare tears in the sidewalls of the tyre.
After driving in emergency mode, have the
wheel rims checked at aqualified specialist
workshop with regard to their further use. The
faulty tyre must be replaced.
With MOExtended tyres (tyres with run-flat
characteristics), you can continue to drive
your vehicle even if ther eisatotal loss of
pressure in one or more tyres.
MOExtended tyres may only be used in con-
junction with an activ etyre pressure loss
warning system or with an activ etyre pres-
sure monitor.
The maximum driving distance is approx-
imately 80 km when the vehicle is partially
laden, and approximately 30 km when the
vehicle is fully laden.
In addition to the vehicle load, the driving dis-
tanc epossible depends upon:
R speed
R road condition
R outside temperature
The driving distanc epossible in run-flat mode
may be reduced by extreme driving condi-
tions/manoeuvres, or it can be increased
through amoderat estyle of driving. The maximum permissible distanc
ewhich
can be driven in run-flat mode is counted from
the momen tthe tyre pressure loss warning
appears in the multifunction display.
You must not exceed amaximum speed of
80 km/h.
i When replacing one or all tyres, make
sure that you only use tyres marked
"MOExtended". Make sure that you only
use the size of tyre specified for the vehicle. TIREFIT kit
Using the TIREFIT kit TIREFIT is
atyre sealant.
You can use TIREFIT to seal punctures of up
to 4m m, particularly those in the tyre tread.
You can use TIREFIT at outside temperatures
down to Ò20 †. G
WARNING
In the following situations, the tyre sealant is
unable to provide sufficient breakdown assis-
tance, as it is unable to seal the tyre properly:
R there are cuts or punctures in the tyre
larger than those mentioned above.
R the wheel rim is damaged.
R you have driven at very low tyre pressures
or on aflat tyre.
There is arisk of accident.
Do not drive any further. Contact aqualified
specialist workshop. G
WARNING
The tyre sealant is harmful and causes irrita-
tion. It must not come into contact with your
skin, eyes or clothing or be swallowed. Do not
inhale TIREFIT fumes. Keep tyre sealant away
from children. There is arisk of injury. Flat tyre
313Breakdown assistance
Z
Page 332 of 373
other obstacles. If it is necessary to drive over
kerbs, speed humps or similar elevations, try
to do so slowly and at an obtuse angle. Oth-
erwise, the tyres, particularly the sidewalls,
may be damaged. Regular checking of wheels and tyres
G
WARNING
Damaged tyres can cause tyre inflation pres-
sure loss. As aresult, you could lose control
of your vehicle. There is arisk of accident.
Check the tyres regularly for signs of damage
and replace any damaged tyres immediately.
Regularly check the wheels and tyres of your
vehicle for damage at least once amonth, as
well as after driving off-road or on rough
roads. Damaged wheels can cause aloss of
tyre pressure. Pay particular attention to
damage such as:
R cuts in the tyres
R punctures
R tears in the tyres
R bulges on tyres
R deformation or severe corrosion on wheels
Regularly check the tyre tread depth and the
condition of the tread across the whole width
of the tyre (Y page 329). If necessary, turn
the front wheels to full lock in order to inspect
the inner side of the tyre surface.
All wheels must have avalve cap to protect
the valve against dirt and moisture. Do not fit
anything ontot he valve other than the stand-
ard valve cap or other valve caps approved by
Mercedes-Benz for your vehicle. Do not fit any
other valve caps or systems, e.g. tyre pres-
sure monitoring systems.
Regularly check the pressure of all the tyres,
particularly prior to long trips. Adjust the tyre
pressure as necessary (Y page 331).
Observe the notes on the emergenc yspare
wheel (Y page 351). The service life of tyres depends on various
factors, including the following:
R
driving style
R tyre pressure
R tyre mileage Tyret
read G
WARNING
Insufficient tyre tread will reduce tyre trac-
tion. The tyre is no longer able to dissipate
water. This means that on wet road surfaces,
the risk of aquaplaning increases, in particular
where speed is not adapted to suit the driving
conditions. There is arisk of accident.
If the tyre pressure is too high or too low, tyres
may exhibit different levels of wear at differ-
ent locations on the tyre tread. Thus, you
should regularly check the tread depth and
the condition of the tread across the entire
width of all tyres.
Minimum tyre tread depth for:
R summer tyres: 3mm
R M+S tyres: 4mm
For safety reasons, replace the tyres before
the legally prescribed limit for the minimum
tyre tread depth is reached.. Selecting, fitting and replacing tyres
R Only fit tyres and wheels of the same type
and make.
R Only fit tyres of the correc tsize ontot he
wheels.
R Run in new tyres at moderate speeds for
the first 100 km. They only reach their full
performanc eafter this distance.
R Do not drive with tyres which have too little
tread depth. This otherwise significantly
reduces the traction on wet roads (aqua-
planing).
R Replace the tyres after six years at the lat-
est, regardless of wear. Operation
329Wheels and tyres Z
Page 344 of 373
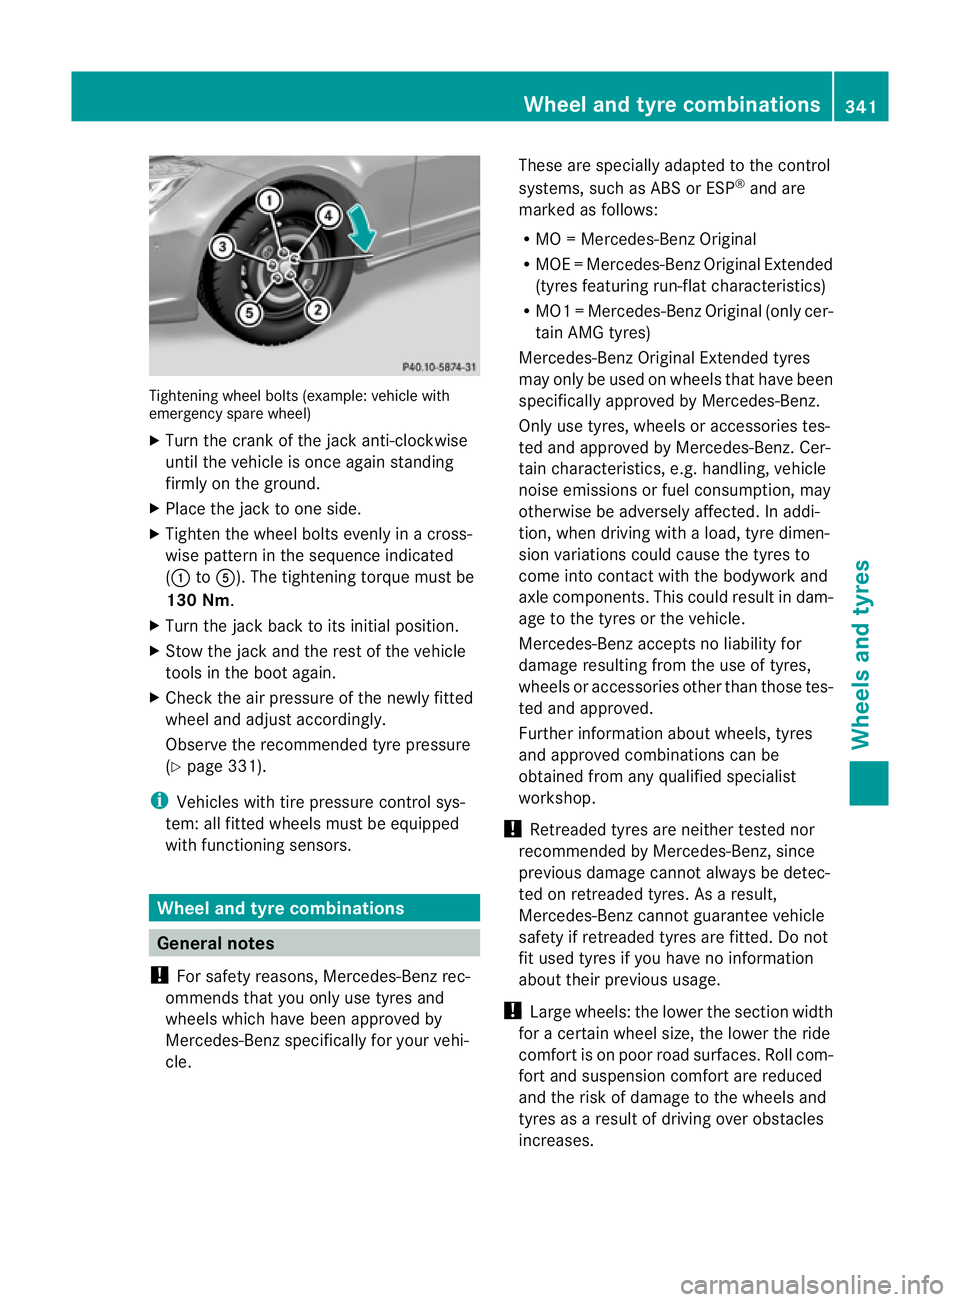
Tightenin
gwheel bolts (example: vehicle with
emergenc yspare wheel)
X Turn the crank of the jack anti-clockwise
until the vehicle is once again standing
firmly on the ground.
X Place the jack to one side.
X Tighten the wheel bolts evenly in across-
wise pattern in the sequence indicated
(: toA). The tightening torque must be
130 Nm.
X Turn the jack back to its initial position.
X Stow the jack and the rest of the vehicle
tools in the boot again.
X Check the air pressure of the newly fitted
wheel and adjust accordingly.
Observe the recommended tyre pressure
(Y page 331).
i Vehicles with tire pressure control sys-
tem: all fitted wheels must be equipped
with functioning sensors. Wheel and tyrec
ombinations General notes
! For safety reasons, Mercedes-Benz rec-
ommends that you only use tyres and
wheels which have been approved by
Mercedes-Benz specifically for your vehi-
cle. These are specially adapted to the control
systems, such as ABS or ESP
®
and are
marked as follows:
R MO =Mercedes-BenzO riginal
R MOE =Mercedes-Benz Original Extended
(tyres featuring run-flat characteristics)
R MO1 =Mercedes-BenzO riginal (only cer-
tain AMG tyres)
Mercedes-Benz Original Extended tyres
may only be usedonw heels that have been
specifically approved by Mercedes-Benz.
Only use tyres, wheels or accessories tes-
ted and approved by Mercedes-Benz. Cer-
tain characteristics, e.g. handling, vehicle
noise emissions or fuel consumption, may
otherwise be adversely affected. In addi-
tion, when driving with aload, tyre dimen-
sion variations could cause the tyres to
come into contact with the bodywork and
axle components.T his could result in dam-
age to the tyres or the vehicle.
Mercedes-Ben zaccepts no liability for
damag eresulting from the us eoftyres,
wheel soraccessorie sothe rthan those tes-
ted and approved.
Further information about wheels, tyres
and approved combinations can be
obtained from any qualified specialist
workshop.
! Retreaded tyres are neither tested nor
recommended by Mercedes-Benz, since
previous damage cannot always be detec-
ted on retreaded tyres. As aresult,
Mercedes-Ben zcannot guarante evehicle
safety if retreade dtyres are fitted. Do not
fit used tyres if you have no information
about their previous usage.
! Large wheels :the lower the section width
for acertain wheel size, the lower the ride
comfort is on poor road surfaces. Roll com-
fort and suspension comfort are reduced
and the risk of damage to the wheels and
tyres as aresult of driving over obstacles
increases. Wheel and tyrec
ombinations
341Wheels and tyres Z
Page 345 of 373
Overview of abbreviations used in the follow-
ing tyre tables:
R BA: both axles
R FA: front axle
R RA: rear axle
You will find atable with recommended tyre
pressures for various operating conditions on
the inside of your vehicle's fuel filler flap. For
further information on tyre pressure, see
(Y page 331). Check tyre pressures regularly
and only when the tyres are cold.
Notes on the vehicle equipment –always fit
the vehicle:
R with tyre softhe same size on agiven axle
(left/right)
R with the same type of tyre satagiven time
(summer tyres, winter tyres, MOExtended
tyres)
Vehicles with MOExtende dtyre sare not
equipped with aTIREFIT kit at the factory. It
is therefore recommende dthat you addition-
ally equip your vehicle with aTIREFIT kit if you
fit tyre sthat do not feature run-flat charac-
teristics, e.g. winter tyres. ATIREFIT kit can
be obtained fro maqualified specialist work-
shop.
i Not all wheel/tyre combinations can be
mounted at the factory in all countries. 342
Wheel and tyrec
ombinationsWheels and tyres