2012 MERCEDES-BENZ CLS COUPE fuel consumption
[x] Cancel search: fuel consumptionPage 13 of 373
Electronic Stability Program
see ESP ®
(Electronic Stabilit yProgram)
Electronic Traction System
see ETS/4ETS (Electronic Trac-
tionS ystem)
Emergency key
Unlocking th edriver's doo r.............. 84
Emergency key element
Function/notes ................................ 78
Locking vehicle ................................ 84
Emergency release
Driver's door .................................... 84
Fuel filler fla p................................. 157
Emergency spare wheel
Important safety notes ..................351
Inflating the collapsibl espare
wheel ............................................. 352
Points to remember .......................351
Removing ....................................... 351
Storage location ............................ 351
Stowing .......................................... 352
Technical data ............................... 354
Emergency unlocking
Vehicle ............................................. 84
Engine
Display message ............................ 240
ECO start/stop function ................144
Engine numbe r............................... 359
Jump-starting ................................. 319
Running irregularl y......................... 147
Starting problems ..........................147
Starting the engine with the key ....143
Starting with KEYLESS GO .............143
Stopping ........................................ 160
Tow-starting (vehicle )..................... 323
Warning lamp (engine diagnos-
tics) ............................................... 266
Engine electronics
Notes ............................................. 357
Problem (fault) ............................... 147
Engine oil
Additives ........................................ 364
Checking the oil leve l..................... 297
Checking the oil leve lusing the
dipstick .......................................... 298
Display message ............................ 242
Filling capacity ............................... 364Notes about oil grades ................... 363
Notes on oil level/consumption
....297
Temperature (on-board computer) .228
Topping up ..................................... 298
Viscosity ........................................ 364
Environmental protection
Returning an end-of-life vehicle .......21
ESP ®
(Electronic Stability Pro-
gram) AMG menu (on-board computer) ...228
Deactivating/activating (AMG
vehicles) .......................................... 66
Deactivating/activating (except
AMG vehicles) ................................ 219
Deactivating/activating (notes;
except AMG vehicles) ......................66
Display message ............................ 232
ETS/4ETS ........................................ 66
Function/notes ................................ 65
Important safety guidelines .............65
Warning lamp ................................. 263
ETS/4ETS (Electronic Traction Sys-
tem) ...................................................... 66
Exhaus ttail pipe (cleaning instruc-
tions) .................................................. 305
Exterior lighting Settings options ............................ .110
see Lights
Exterior mirrors
Adjusting ....................................... 105
Anti-dazzle mode (automatic) ........106
Folding in/ou t(automatically) .......106
Folding in/ou t(electrically) ...........105
Folding in whe nlocking( on-board
computer) ...................................... 227
Out of position (troubleshooting) ...106
Parking position ............................. 106
Resetting ....................................... 106
Storing settings (memory func-
tion) ............................................... 107 F
Faul tmessage
see Display messages
Filler cap
see Fuel filler flap
Fire extinguisher ............................... 31110
Index
Page 14 of 373
First-aid kit
........................................ .310
Fitting awheel
Removing awheel .......................... 339
Fitting wheels
Fitting awheel ............................... 340
Lowering the vehicle ......................340
Raising the vehicle .........................338
Securing the vehicle against roll-
ing away ........................................ 337
Flat tyre
MOExtended tyres .........................313
Preparing the vehicle .....................312
TIREFIT kit ...................................... 313
Floormat ............................................ .292
Foglamps (extende drange) .............. 116
Frequencies Garage door opener .......................289
Mobile phone ................................. 357
Two-way radio ................................ 357
Fuel
Additives ........................................ 361
Consumption information ..............363
Consumption statistics ..................213
Displaying the current consump-
tion ................................................ 213
Displaying the range ......................213
Fuel gauge ............................... 30, 209
Grade (petrol) ................................ 360
Important safety notes ..................360
Notes for AMG vehicles .................361
Problem (malfunction) ...................158
Quality (diesel )............................... 362
Refuelling ...................................... .156
Tank content/reserve fuel .............360
Fue lfiller flap
Emergency release ........................157
Opening/closing ............................ 157
Fue lfilte r(whit edispla ymessage) .243
Fue llevel
Calling up the range (on-board
computer) ...................................... 213
Gauge ...................................... 30, 209
Fue lreserve
see Fuel
Fue ltank
Capacity ........................................ 360
Problem (malfunction) ...................158Fuse allocatio
nchart (vehicle tool
kit) ...................................................... 311
Fuses Allocation chart ............................. 324
Before changing ............................. 324
Fuse box in the boot ......................325
Fuse box in the engine compart-
ment .............................................. 324
Important safety notes ..................324 G
Garage door opener Clearing the memory .....................289
Frequencies ................................... 289
Important safety notes ..................287
Opening/closing the garage door ..288
Programming (button in the rear-
view mirror) ................................... 287
Gear indicator (on-board com-
puter) ................................................. .228
Gearshift program SETUP (on-board computer) ..........228
Genuine Mercedes-Benz parts .........356
Glove compartment ..........................273 H
Handbrake see Parking brake
Hazard warning lamps ......................114
Headbag Display message ............................ 237
Headlamp
Cleaning system (function) ............114
Cleaning system (notes) ................366
Headlamps
Misting up ...................................... 117
Topping up the cleaning system ....299
see Automatic headlamp mode
Head restraints
Adjusting ......................................... 98
Adjusting (electrically). ....................99
Adjusting (manually). .......................98
Adjusting (rear) ................................ 99
Fitting/removing (rear) ....................99
Luxury .............................................. 99 Index
11
Page 24 of 373
Protection of the environment
General notes
H
Environmental note
Daimler's declared policy is one of compre-
hensive environmental protection.
The objectives are for the natural resources
which form the basis of our existence on this
planet to be used sparingly and in amanner
which takes the requirements of both nature
and humanity into account.
You too can help to protect the environment
by operating your vehicle in an environmen-
tally-responsible manner.
Fuel consumption and the rate of engine,
transmission, brake and tyre wear depend on
the following factors:
R operating condition sofyour vehicle
R your personal driving style
You can influence both factors. You should
bear the following in mind:
Operating conditions:
R avoid short trips as these increase fuel con-
sumption.
R make sure that the tyre pressures are
always correct.
R do not carry any unnecessary weight.
R keep an eye on the vehicle's fuel consump-
tion.
R remove roof racks once you no longer need
them.
R ar egularly serviced vehicle will contribute
to environmental protection. You should
therefore adhere to the service intervals.
R always have service work carried out at a
qualified specialist workshop.
Personal driving style:
R do not depress the accelerator pedal when
startingt he engine.
R do not warm up the engine with the vehicle
stationary.
R drive carefully and maintain asafe distance
from the vehicle in front. R
avoid frequent, sudden acceleration.
R change gear in good time and use each gear
only up to Ôof its maximum engine speed.
R switch off the engine in stationary traffic. Returning an end-of-life vehicle
Mercedes-Benz will take back your
Mercedes-Benz to dispose of it in an environ-
mentally responsible manner, in accordance
the European Union (EU) End of Life Vehicles
Directive.
The End of Life Vehicles Directive applies to
vehicles with agross vehicle weight of up to
3.5 t, in accordance with national regulations.
For several years, Mercedes-Benz has been
meeting all the legal requirements for a
design which allowsf or recycling and re-use.
There is anetwork of return points and dis-
assembly plants which can recycle your vehi-
cle in an environmentally-responsible man-
ner. The methods employed in vehicle and
parts recycling are constantly being devel-
oped and improved. This means that your
Mercedes-Benz will also continue to meet
even the increased recycling quotas in the
future in good time. You can obtain further
information from your national Mercedes-
Benz homepage or your national hotline num-
ber. Product information
Mercedes-Benz recommends that you use
genuine Mercedes-Benz parts, conversion
parts and accessories that have been
approved for the type of vehicle.
Mercedes-Benz tests genuine parts and con-
version parts and accessories that have been
specifically approved for your vehicle for their
reliability, safety and suitability. Despite
ongoing market research, Mercedes-Benz is
unable to assess other parts. Therefore,
Mercedes-Benz accepts no responsibility for
the use of such parts in Mercedes-Benz vehi- Introduction
21 Z
Page 155 of 373
E
Economy Comfortable, economical
driving S
Sport Sporty driving style
M
Manual Manua
lgears hifting i
For furthe rinformation on the automatic
drive program, se e(Ypage 152).
i Thea utomatic transmission switches to
automatic drive program Eeach tim ethe
engine is started.
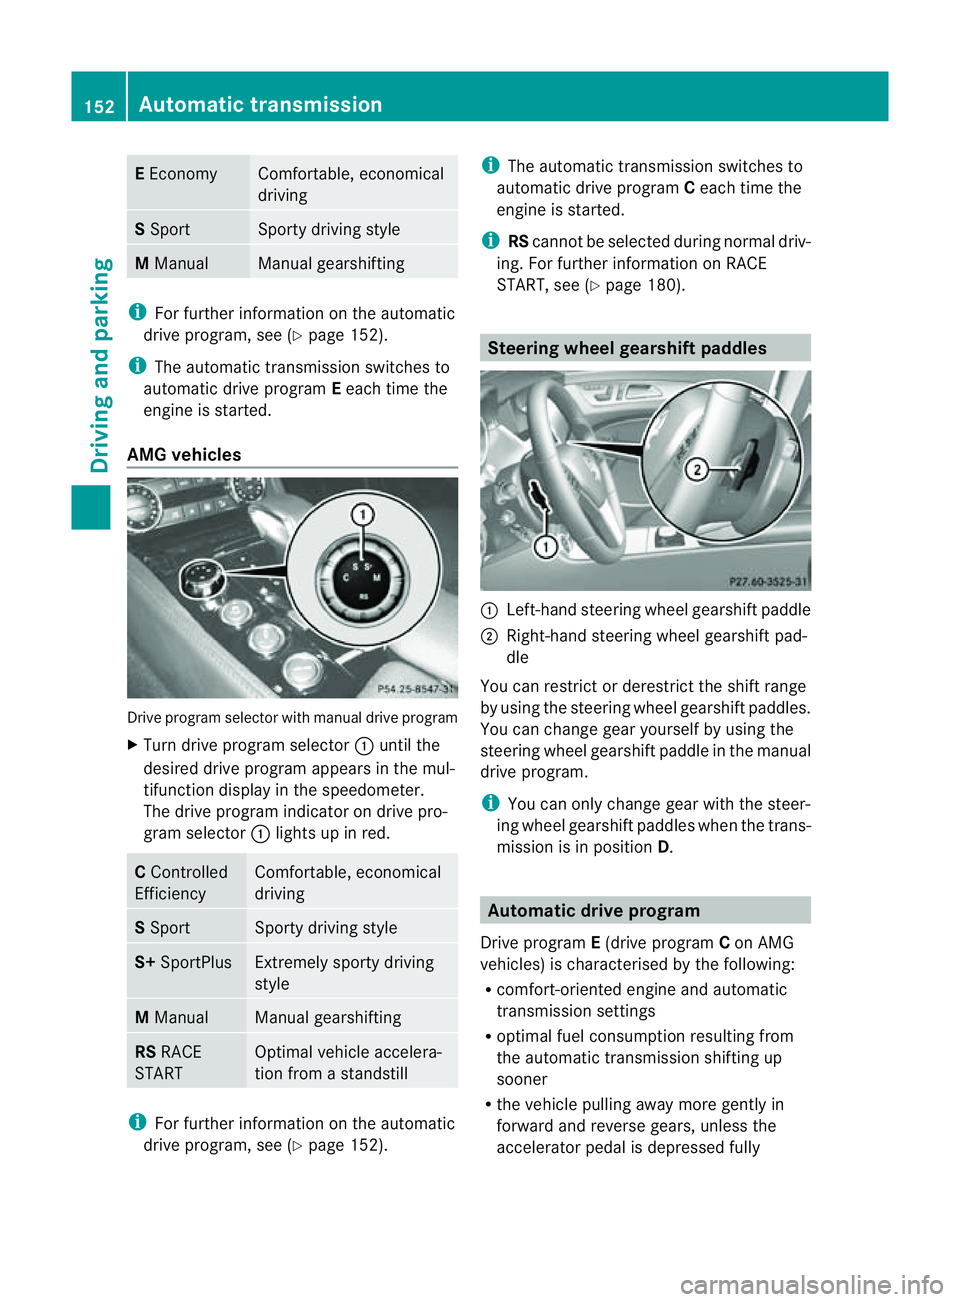
AM Gvehicles Drive program selecto
rwith manual drive program
X Turn drive program selector :until the
desired drive program appears in the mul-
tifunction display in the speedometer.
The drive program indicator on drive pro-
gram selector :light supinr ed. C
Controlled
Efficiency Comfortable, economical
driving
S
Sport Sporty drivin
gstyle S+
SportPlus Extremely sport
ydriving
style M
Manual Manual gearshifting
RS
RACE
START Optimal vehicle accelera-
tion from
astandstill i
For further information on the automatic
drive program, see (Y page 152). i
The automatic transmission switches to
automatic drive program Ceach tim ethe
engin eisstarted.
i RScannot be selected during normal driv-
ing. For further information on RACE
START, see (Y page 180). Steering wheel gearshift paddles
:
Left-han dsteerin gwheel gearshif tpaddle
; Right-hand steering wheel gearshif tpad-
dle
You can restrict or derestric tthe shif trange
by usin gthe steering wheel gearshif tpaddles.
You can chang egear yourself by usin gthe
steering wheel gearshif tpaddle in th emanual
driv eprogram.
i You can only chang egear wit hthe steer-
ing wheel gearshif tpaddles when th etrans-
mission is in position D. Automatic drive program
Drive program E(drive program Con AMG
vehicles) is characterised by th efollowing:
R comfort-oriente denginea nd automatic
transmission settings
R optimal fuel consumption resulting from
th ea utomatic transmission shiftin gup
sooner
R thev ehicle pullin gaway mor egently in
forward and revers egears, unless the
accelerator pedal is depressed fully 152
Automatic transmissionDriving and parking
Page 156 of 373
R
increased sensitivity. This improves driving
stability on slipper yroad surfaces, for
example
R the automatic transmission shifting up
sooner. This result sinthe vehicle being
drive natl ower engine speeds and the
wheels being less likely to spin
Drive program S(or, in the case of AMG vehi-
cles, drive programs Sand S+)isc haracter-
ised by the following:
R sporty engine and automatic transmission
settings
R the vehicle pulling away in first gear
R the automatic transmission shiftin gup
later
R as aresult of the later automatic transmis-
sion shift points, the fuel consumption pos-
sibly being higher. Shift ranges
Introduction i
OnAMG vehicles andvehicles with
steering wheel gearshift paddles,y ou
can restrict or derestric tthe shift range
using the steerin gwheel gearshift paddles.
When the automatic transmission is in posi-
tion D,itisp ossible to restrict or derestrict
the shift range (Y page 153).
The shift range selected is shown in the mul-
tifunction display .The automatic transmis-
sion shifts only as far as the selected gear. Shift range: =
To use the engine's braking effect
5
To use the braking effect of the
engine on downhill gradients and
for driving:
R
on steep mountain roads
R in mountainous terrain
R in arduousc onditions 4
To use the braking effect of the
engine on extremely steep downhill
gradients and on long downhill
stretches
Restricting the shift range
X
Pull the left-hand steering wheel gearshift
paddle.
The automatic transmission shifts down
one gear and restrictst he shift range to the
relevant gear.
i If the engine exceeds the maximum
engine speed when shifting down, the auto-
matic transmission protectsa gainst engine
damage by not shifting down.
i If the maximum engine speed for the shift
range is reached and you continue to accel-
erate, the automatic transmission shifts up,
even if the shift range is restricted. This
prevents the engine from overrevving.
Extending the shift range X
Pull the right-hand steering wheel gearshift
paddle.
The shift range is derestricted. Automatic transmission
153Driving and parking Z
Page 184 of 373
Activating RACE START
X
Depress th ebrak epedal wit hyour left foot
and keep it depressed.
X Turn the drive program selector clockwise
(Y page 151) until the RSlamp lights up.
The RACE START Confirm: Paddle UP Cancel: Paddle DOWN message appears
in the multifunction display.
i If the activation conditions are no longer
fulfilled, RACE START is cancelled. The
RACE START cancelled message
appears in the multifunction display.
X To cancel: pull the left steerin gwheel shift
paddle (Y page 152).
or
X To confirm: pull the right steerin gwheel
shift paddle (Y page 152).
The RACE START available Depress accelerator message appears in the mul-
tifunction display.
i If you do not depress the accelerator
pedal fully within two seconds, RACE
START is cancelled. The RACE START not
possible See Owner's Manual message
appears in the multifunction display.
X Fully depress the accelerator pedal.
The engine speed rises to approximately
3500 rpm.
The RACE START Release brake to start message appears in the multifunc-
tion display.
i If you do not release the brake pedal
within five seconds, RACE START is cancel-
led. The RACE START cancelled mes-
sage appears in the multifunction display.
X Take your foot off the brake, but keep the
accelerator pedal depressed.
The vehicle pulls away at maximum accel-
eration.
The RACE START active message appears
in the multifunction display.
RACE START is deactivated when the vehicle
reaches aspeed of approximately 50 km/h. Drive program
S+is activated. SPORT han-
dling mode remains activated.
RACE START is deactivated immediately if
you release the accelerator pedal during
RACE START or if any of the activation condi-
tions are no longer fulfilled. The RACE START
not possible See Owner's Manual mes-
sage appears in the multifunction display.
i After using it several times in short suc-
cession, RACE START will be unavailable
until acertain distance has been driven. AIRMATIC
Vehicle level Important safety notes
G
WARNING
If you have selected "Comfort tuning", the
vehicle will be lowered if you lock it within
60 seconds of the engine being switched off.
Make sure, therefore, that nobody is in the
vicinit yofthe wheel housing or under the
vehicle when you lock the vehicle. Otherwise,
limbs could become trapped.
! The vehicle is lowered by about 15 mm if:
R you have selected "Comfort tuning"
R you switch off the engine and
R you lock the vehicle within approximately
60 seconds
When parking, position your vehicle so that
it does not make contact with the kerb as
the vehicle is lowered. Your vehicle could
otherwise be damaged.
Your vehicle regulates its height automati-
cally. All-round level control ensures the best
possible suspension and constant ground
clearance, even with aladen vehicle. When
you drive fast, the vehicle is lowered auto-
matically to improve driving safety and to
reduce fuel consumption. Driving systems
181Driving and parking Z
Page 216 of 373
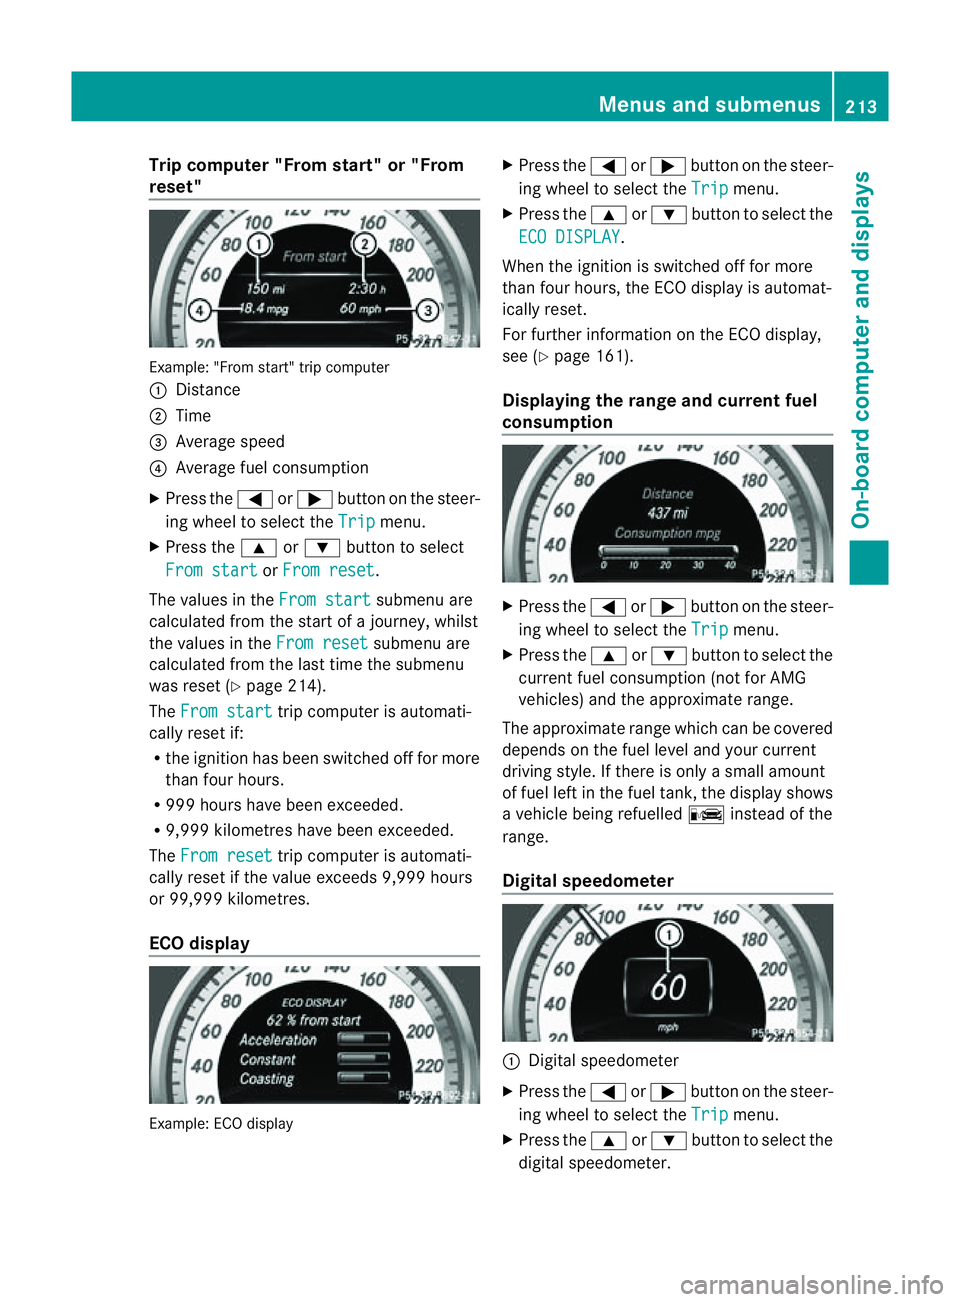
Trip compute
r"From start" or "From
reset" Example: "From start" trip computer
:
Distance
; Time
= Averag espeed
? Averag efuelconsumption
X Press the =or; button on the steer-
ing whee ltoselect the Trip menu.
X Press the 9or: button to select
Fro mstart or
Fro mreset .
The values in the Fromstart submenu are
calculate dfromt he start of ajourney, whilst
the values in the From reset submenu are
calculated from the last time the submenu
was reset (Y page 214).
The From start trip computer is automati-
cally reset if:
R the ignition has been switched off for more
than four hours.
R 999 hours have been exceeded.
R 9,999 kilometres have been exceeded.
The From reset trip computer is automati-
cally reset if the value exceeds 9,999 hours
or 99,999 kilometres.
ECO display Example: ECO display X
Press the =or; button on the steer-
ing wheel to select the Trip menu.
X Press the 9or: button to select the
ECO DISPLAY .
When the ignition is switched off for more
than four hours, the ECO displayisa utomat-
ically reset.
For further information on the ECO display,
see (Y page 161).
Displaying the range and current fuel
consumption X
Press the =or; button on the steer-
ing wheel to select the Trip menu.
X Press the 9or: button to select the
current fuel consumption (not for AMG
vehicles) and the approximate range.
The approximate range which can be covered
depends on the fuel level and your current
driving style. If there is only asmall amount
of fuel left in the fuel tank,t he displayshows
av ehicle being refuelled Cinstead of the
range.
Digital speedometer :
Digital speedometer
X Press the =or; button on the steer-
ing wheel to select the Trip menu.
X Press the 9or: button to select the
digital speedometer. Menus and submenus
213On-board computer and displays Z
Page 344 of 373
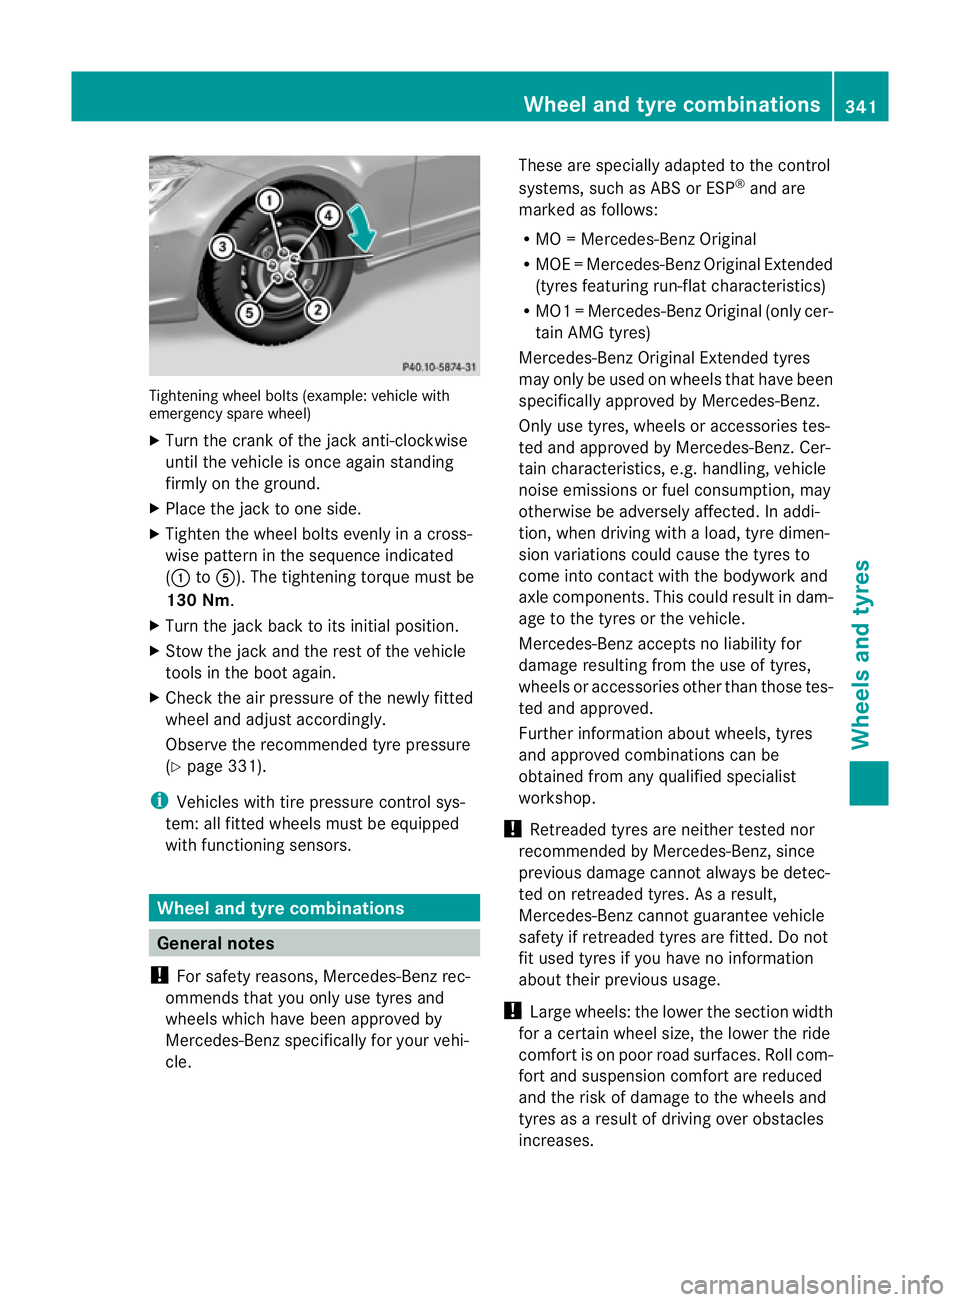
Tightenin
gwheel bolts (example: vehicle with
emergenc yspare wheel)
X Turn the crank of the jack anti-clockwise
until the vehicle is once again standing
firmly on the ground.
X Place the jack to one side.
X Tighten the wheel bolts evenly in across-
wise pattern in the sequence indicated
(: toA). The tightening torque must be
130 Nm.
X Turn the jack back to its initial position.
X Stow the jack and the rest of the vehicle
tools in the boot again.
X Check the air pressure of the newly fitted
wheel and adjust accordingly.
Observe the recommended tyre pressure
(Y page 331).
i Vehicles with tire pressure control sys-
tem: all fitted wheels must be equipped
with functioning sensors. Wheel and tyrec
ombinations General notes
! For safety reasons, Mercedes-Benz rec-
ommends that you only use tyres and
wheels which have been approved by
Mercedes-Benz specifically for your vehi-
cle. These are specially adapted to the control
systems, such as ABS or ESP
®
and are
marked as follows:
R MO =Mercedes-BenzO riginal
R MOE =Mercedes-Benz Original Extended
(tyres featuring run-flat characteristics)
R MO1 =Mercedes-BenzO riginal (only cer-
tain AMG tyres)
Mercedes-Benz Original Extended tyres
may only be usedonw heels that have been
specifically approved by Mercedes-Benz.
Only use tyres, wheels or accessories tes-
ted and approved by Mercedes-Benz. Cer-
tain characteristics, e.g. handling, vehicle
noise emissions or fuel consumption, may
otherwise be adversely affected. In addi-
tion, when driving with aload, tyre dimen-
sion variations could cause the tyres to
come into contact with the bodywork and
axle components.T his could result in dam-
age to the tyres or the vehicle.
Mercedes-Ben zaccepts no liability for
damag eresulting from the us eoftyres,
wheel soraccessorie sothe rthan those tes-
ted and approved.
Further information about wheels, tyres
and approved combinations can be
obtained from any qualified specialist
workshop.
! Retreaded tyres are neither tested nor
recommended by Mercedes-Benz, since
previous damage cannot always be detec-
ted on retreaded tyres. As aresult,
Mercedes-Ben zcannot guarante evehicle
safety if retreade dtyres are fitted. Do not
fit used tyres if you have no information
about their previous usage.
! Large wheels :the lower the section width
for acertain wheel size, the lower the ride
comfort is on poor road surfaces. Roll com-
fort and suspension comfort are reduced
and the risk of damage to the wheels and
tyres as aresult of driving over obstacles
increases. Wheel and tyrec
ombinations
341Wheels and tyres Z