2012 MERCEDES-BENZ CLS COUPE fuse box
[x] Cancel search: fuse boxPage 12 of 373

Driver's door
see Door
Drive system
Active Blind Spot Assis t................. 201
Driving abroad
Service24h .................................... 301
Symmetrical dipped bea m............. 110
Driving on flooded roads ..................164
Driving safety system BAS PLUS (Brake Assist System
PLUS) .............................................. .64
Electroni cBrake-force Distribu-
tio n.................................................. 68
ESP ®
(Electroni cStability Pro-
gram) ............................................... 65
ETS/4ETS (Electroni cTraction
System) ........................................... 66
Important safety guidelines .............62
Driving safety systems
ABS (Anti-lock Braking System) .......63
ADAPTIVE BRAKE ............................. 68
Adaptive brake lamps ......................65
BAS (Brake Assist System) ..............63
Overview .......................................... 62
PRE-SAFE ®
Brake ............................ .68
Driving system
Active Lan eKeepin gAssist. ........... 204
Active Parking Assist .....................187
Driving systems
Active Driving Assistance pack-
age ................................................. 201
AIRMATIC ...................................... 181
AMG RIDE CONTROL sports sus-
pension .......................................... 183
ATTENTION ASSIST ........................192
Blind Spot Assist ............................ 197
Cruise control ................................ 165
Display message ............................ 243
Distronic Plu s................................ 170
HOLD function ............................... 179
Lane Keeping Assist ......................199
Lane package ................................ 197
Nigh tView Assist Plus ...................194
PARKTRONI C................................. 185
RAC ESTART (AMG vehicles) ..........180
Reversing camera ..........................190Speed Limi
tAssist ......................... 193
SPEEDTRONIC ............................... 168
Driving tips
AMG cerami cbrakes ..................... 163
Aquaplaning ................................... 164
Automatic transmission .................151
Brakes ........................................... 162
Downhill gradient ........................... 162
Driving abroad ............................... 110
Driving in winter ............................ .164
Driving on flooded road s................ 164
Driving on wet road s...................... 164
General .......................................... 161
Icy road surfaces ........................... 165
Limited braking efficiency on sal-
ted road s....................................... 163
New brake pads/linings ................163
Running-in tips ............................... 140
Snow chains .................................. 331
Symmetrical dipped bea m............. 110
Wet road surface ........................... 163
DVD audio
Operating (on-board computer) .....216
DVD video
Operating (on-board computer) .....216 E
EASY-ENTRY feature Activating/deactivating .................226
Function/notes ............................. 104
EASY-EXIT feature
Crash-responsive ........................... 104
Function/notes ............................. 104
Switching on/off ........................... 226
EASY-PACKc onvenience box ...........277
EBD (electronic brake force distri-
bution) Display message ............................ 234
Function/notes ................................ 68
ECOd isplay
Function/notes ............................. 161
On-board computer .......................213
ECOs tart/stop function
Deactivating/activating .................145
General information .......................144
Electrical fuses
see Fuses Index
9
Page 14 of 373

First-aid kit
........................................ .310
Fitting awheel
Removing awheel .......................... 339
Fitting wheels
Fitting awheel ............................... 340
Lowering the vehicle ......................340
Raising the vehicle .........................338
Securing the vehicle against roll-
ing away ........................................ 337
Flat tyre
MOExtended tyres .........................313
Preparing the vehicle .....................312
TIREFIT kit ...................................... 313
Floormat ............................................ .292
Foglamps (extende drange) .............. 116
Frequencies Garage door opener .......................289
Mobile phone ................................. 357
Two-way radio ................................ 357
Fuel
Additives ........................................ 361
Consumption information ..............363
Consumption statistics ..................213
Displaying the current consump-
tion ................................................ 213
Displaying the range ......................213
Fuel gauge ............................... 30, 209
Grade (petrol) ................................ 360
Important safety notes ..................360
Notes for AMG vehicles .................361
Problem (malfunction) ...................158
Quality (diesel )............................... 362
Refuelling ...................................... .156
Tank content/reserve fuel .............360
Fue lfiller flap
Emergency release ........................157
Opening/closing ............................ 157
Fue lfilte r(whit edispla ymessage) .243
Fue llevel
Calling up the range (on-board
computer) ...................................... 213
Gauge ...................................... 30, 209
Fue lreserve
see Fuel
Fue ltank
Capacity ........................................ 360
Problem (malfunction) ...................158Fuse allocatio
nchart (vehicle tool
kit) ...................................................... 311
Fuses Allocation chart ............................. 324
Before changing ............................. 324
Fuse box in the boot ......................325
Fuse box in the engine compart-
ment .............................................. 324
Important safety notes ..................324 G
Garage door opener Clearing the memory .....................289
Frequencies ................................... 289
Important safety notes ..................287
Opening/closing the garage door ..288
Programming (button in the rear-
view mirror) ................................... 287
Gear indicator (on-board com-
puter) ................................................. .228
Gearshift program SETUP (on-board computer) ..........228
Genuine Mercedes-Benz parts .........356
Glove compartment ..........................273 H
Handbrake see Parking brake
Hazard warning lamps ......................114
Headbag Display message ............................ 237
Headlamp
Cleaning system (function) ............114
Cleaning system (notes) ................366
Headlamps
Misting up ...................................... 117
Topping up the cleaning system ....299
see Automatic headlamp mode
Head restraints
Adjusting ......................................... 98
Adjusting (electrically). ....................99
Adjusting (manually). .......................98
Adjusting (rear) ................................ 99
Fitting/removing (rear) ....................99
Luxury .............................................. 99 Index
11
Page 327 of 373

You can fin
dinformation on "Jump-starting"
at (Y page 319). Electrical fuses
Important safet
ynotes G
WARNING
Only use fuses that have been approved for
Mercedes-Ben zvehicles and which have the
correct fuse ratin gfor the systems con-
cerned. Do not attempt to repair or bridge
faulty fuses. Using fuses which have not been
approved or attempting to repair or bridge
faulty fuses could cause the fuse to be over-
loaded and result in afire. Have the cause
traced and rectified at aqualified specialist
workshop.
! Only use fuses that have been approved
for Mercedes-Benz vehicles and which
have the correct fuse ratin gfor the system
concerned. Otherwise, componentsors ys-
tems could be damaged.
The fuses in your vehicle serve to close down
faulty circuits. If afuse blows ,all th ecom po-
nent sont hecircuit and their function sstop
operating.
Blown fuse smust be replace dwith fuses of
the same rating, which you can recognise by
the colour and fuse rating. The fuse ratings
are listed in the fuse allocation chart.
If the newly inserted fuse also blows, have the
cause traced and rectified at aqualified spe-
cialist workshop, e.g. aMercedes-Benz
Servic eCentre. Befor
ereplacing afuse
X Secure the vehicle against rollin gaway
(Y page 159).
X Switch off all electrical consumers. X
Turn the key to position 0in the ignition
lock and remove it (Y page 141).
or
X On vehicles with KEYLESS-GO, make sure
the ignition is switched off (Y page 141).
All indicator lamps in the instrumen tcluster
must be off.
The fuses are located in various fuse boxes:
R fuse box in the engine compartmen tonthe
left-hand side of the vehicle, when viewed
in the direction of travel
R fuse box in the boot on the right-hand side
of the vehicle, when viewed in the direction
of travel
the fuse allocation chart is located in the vehi-
cle tool kit in the stowage compartment
under the boot floor (Y page 311). Fuse box in the engine compartment
G
WARNING
Make sure that the windscreen wipers are
turned off and the key is pulledo ut of the igni-
tion lock before you open the cover of the fuse
box. Otherwise, the windscreen wipers and
the wiper rods above the cover could be set
in motion. This could lead to you or others
being injured by the wiper rods.
! Make sure that no moisture can enter the
fuse box when the cover is open.
! When closing the cover, make sure that it
is lying correctly on the fuse box. Moisture
seeping in or dirt could otherwise impair
the operation of the fuses.
X Make sure that the windscreen wipers are
switched off.
X Open the bonnet. 324
Electrical fusesBreakdown assistance
Page 328 of 373

X
Remove any existin gmoisture from the
fus eb ox usin gadry cloth.
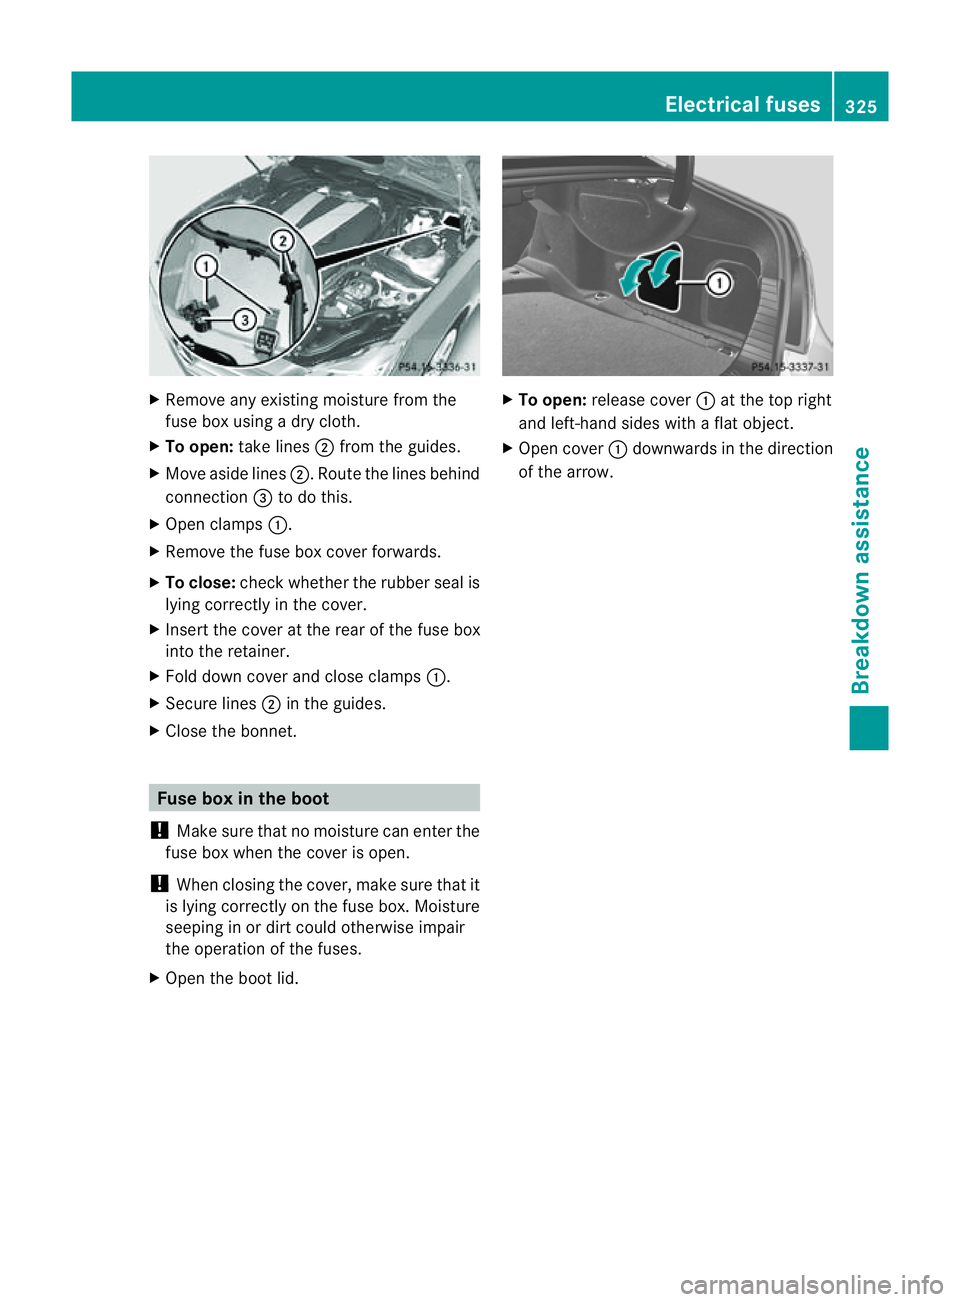
X To open: takelines ;from th eguides.
X Mov easide lines ;.Route the lines behind
connection =to do this.
X Open clamps :.
X Remove the fuse box cover forwards.
X To close: check whether the rubber seal is
lying correctly in the cover.
X Insert the cover at the rear of the fuse box
into the retainer.
X Fold down cover and close clamps :.
X Secure lines ;in the guides.
X Close the bonnet. Fuse box in the boot
! Make sure that no moisture can enter the
fuse box when the cover is open.
! When closing the cover, make sure that it
is lying correctly on the fuse box. Moisture
seeping in or dirt could otherwise impair
the operation of the fuses.
X Open the boot lid. X
To open: release cover :at the top right
and left-hand sides with aflat object.
X Open cover :downwards in the direction
of the arrow. Electrical fuses
325Breakdown assistance Z