2012 MERCEDES-BENZ CLS COUPE oil level
[x] Cancel search: oil levelPage 13 of 373
Electronic Stability Program
see ESP ®
(Electronic Stabilit yProgram)
Electronic Traction System
see ETS/4ETS (Electronic Trac-
tionS ystem)
Emergency key
Unlocking th edriver's doo r.............. 84
Emergency key element
Function/notes ................................ 78
Locking vehicle ................................ 84
Emergency release
Driver's door .................................... 84
Fuel filler fla p................................. 157
Emergency spare wheel
Important safety notes ..................351
Inflating the collapsibl espare
wheel ............................................. 352
Points to remember .......................351
Removing ....................................... 351
Storage location ............................ 351
Stowing .......................................... 352
Technical data ............................... 354
Emergency unlocking
Vehicle ............................................. 84
Engine
Display message ............................ 240
ECO start/stop function ................144
Engine numbe r............................... 359
Jump-starting ................................. 319
Running irregularl y......................... 147
Starting problems ..........................147
Starting the engine with the key ....143
Starting with KEYLESS GO .............143
Stopping ........................................ 160
Tow-starting (vehicle )..................... 323
Warning lamp (engine diagnos-
tics) ............................................... 266
Engine electronics
Notes ............................................. 357
Problem (fault) ............................... 147
Engine oil
Additives ........................................ 364
Checking the oil leve l..................... 297
Checking the oil leve lusing the
dipstick .......................................... 298
Display message ............................ 242
Filling capacity ............................... 364Notes about oil grades ................... 363
Notes on oil level/consumption
....297
Temperature (on-board computer) .228
Topping up ..................................... 298
Viscosity ........................................ 364
Environmental protection
Returning an end-of-life vehicle .......21
ESP ®
(Electronic Stability Pro-
gram) AMG menu (on-board computer) ...228
Deactivating/activating (AMG
vehicles) .......................................... 66
Deactivating/activating (except
AMG vehicles) ................................ 219
Deactivating/activating (notes;
except AMG vehicles) ......................66
Display message ............................ 232
ETS/4ETS ........................................ 66
Function/notes ................................ 65
Important safety guidelines .............65
Warning lamp ................................. 263
ETS/4ETS (Electronic Traction Sys-
tem) ...................................................... 66
Exhaus ttail pipe (cleaning instruc-
tions) .................................................. 305
Exterior lighting Settings options ............................ .110
see Lights
Exterior mirrors
Adjusting ....................................... 105
Anti-dazzle mode (automatic) ........106
Folding in/ou t(automatically) .......106
Folding in/ou t(electrically) ...........105
Folding in whe nlocking( on-board
computer) ...................................... 227
Out of position (troubleshooting) ...106
Parking position ............................. 106
Resetting ....................................... 106
Storing settings (memory func-
tion) ............................................... 107 F
Faul tmessage
see Display messages
Filler cap
see Fuel filler flap
Fire extinguisher ............................... 31110
Index
Page 245 of 373
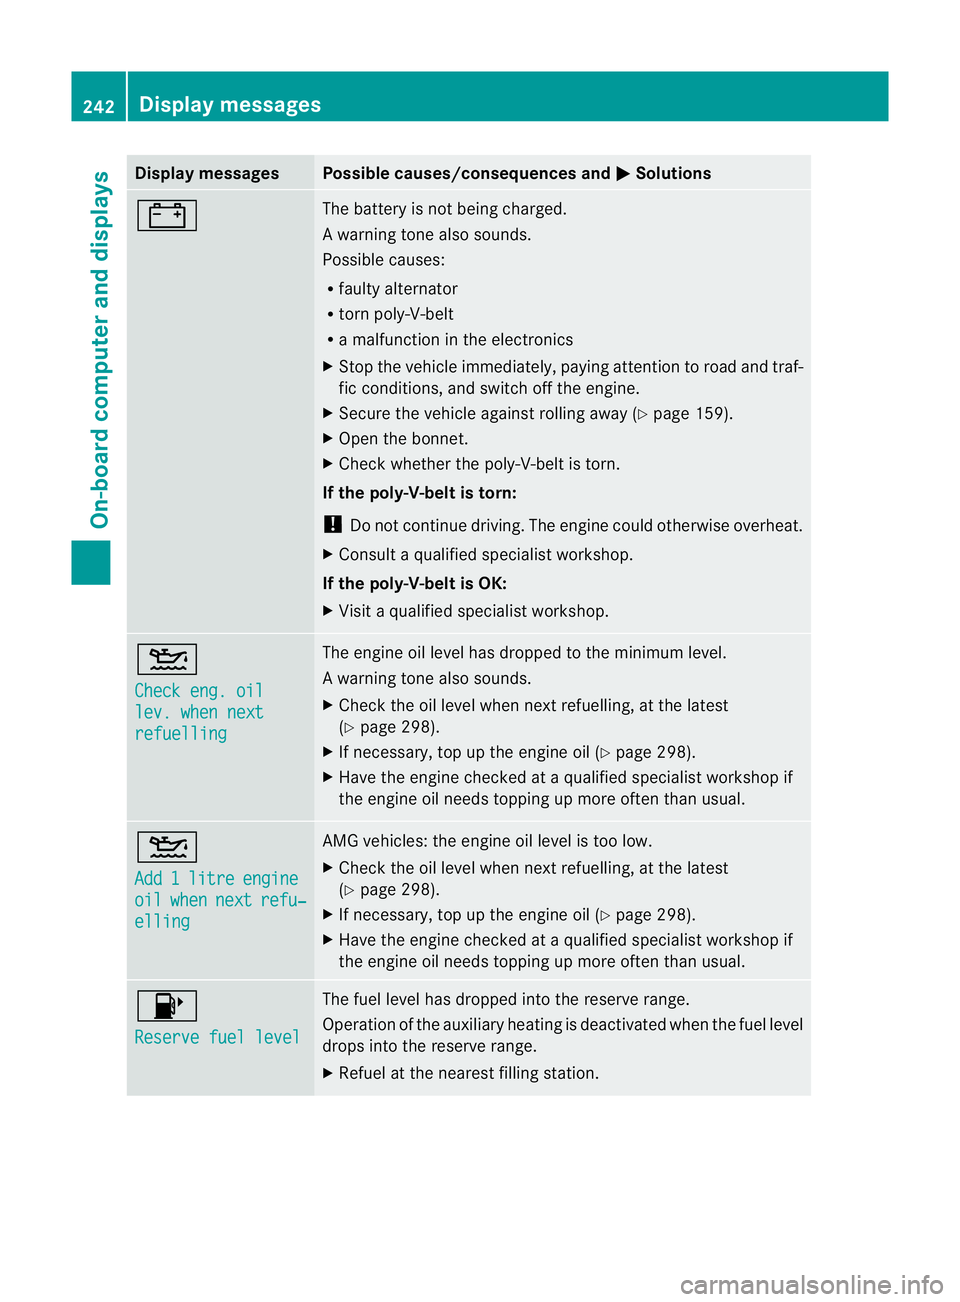
Display messages Possible causes/consequences and
M Solutions
# The battery is no
tbeing charged.
Aw arning tone also sounds.
Possible causes:
R fault yalternator
R torn poly-V-belt
R am alfunctio nintheelectronics
X Stop th evehicle immediately, payin gattentio ntoroad and traf-
fic conditions, and switch off the engine.
X Secure the vehicle against rolling away (Y page 159).
X Open the bonnet.
X Check whether the poly-V-belt is torn.
If the poly-V-belt is torn:
! Do not continue driving. The engine could otherwise overheat.
X Consult aqualified specialist workshop.
If the poly-V-belt is OK:
X Visit aqualified specialist workshop. 4
Check eng. oil
lev. when next
refuelling The engine oil level has dropped to the minimum level.
Aw
arning tone also sounds.
X Chec kthe oil level when next refuelling, at the latest
(Y page 298).
X If necessary, top up the engine oil (Y page 298).
X Have the engine checked at aqualified specialist workshop if
the engine oil needs topping up more often than usual. 4
Add
1 litre engine
oil when next refu‐
elling AMG vehicles: the engine oil level is too low.
X
Check the oil level when next refuelling, at the latest
(Y page 298).
X If necessary, top up the engine oil (Y page 298).
X Have the engine checked at aqualified specialist workshop if
the engine oil needs topping up more often than usual. 8
Reserve fuel level The fuel level has dropped into the reserve range.
Operation of the auxiliary heating is deactivated when the fuel level
drops into the reserve range.
X
Refuel at the nearest filling station. 242
Display messagesOn-board computer and displays
Page 300 of 373
X
Make sure that the windscreen wipers are
switched off.
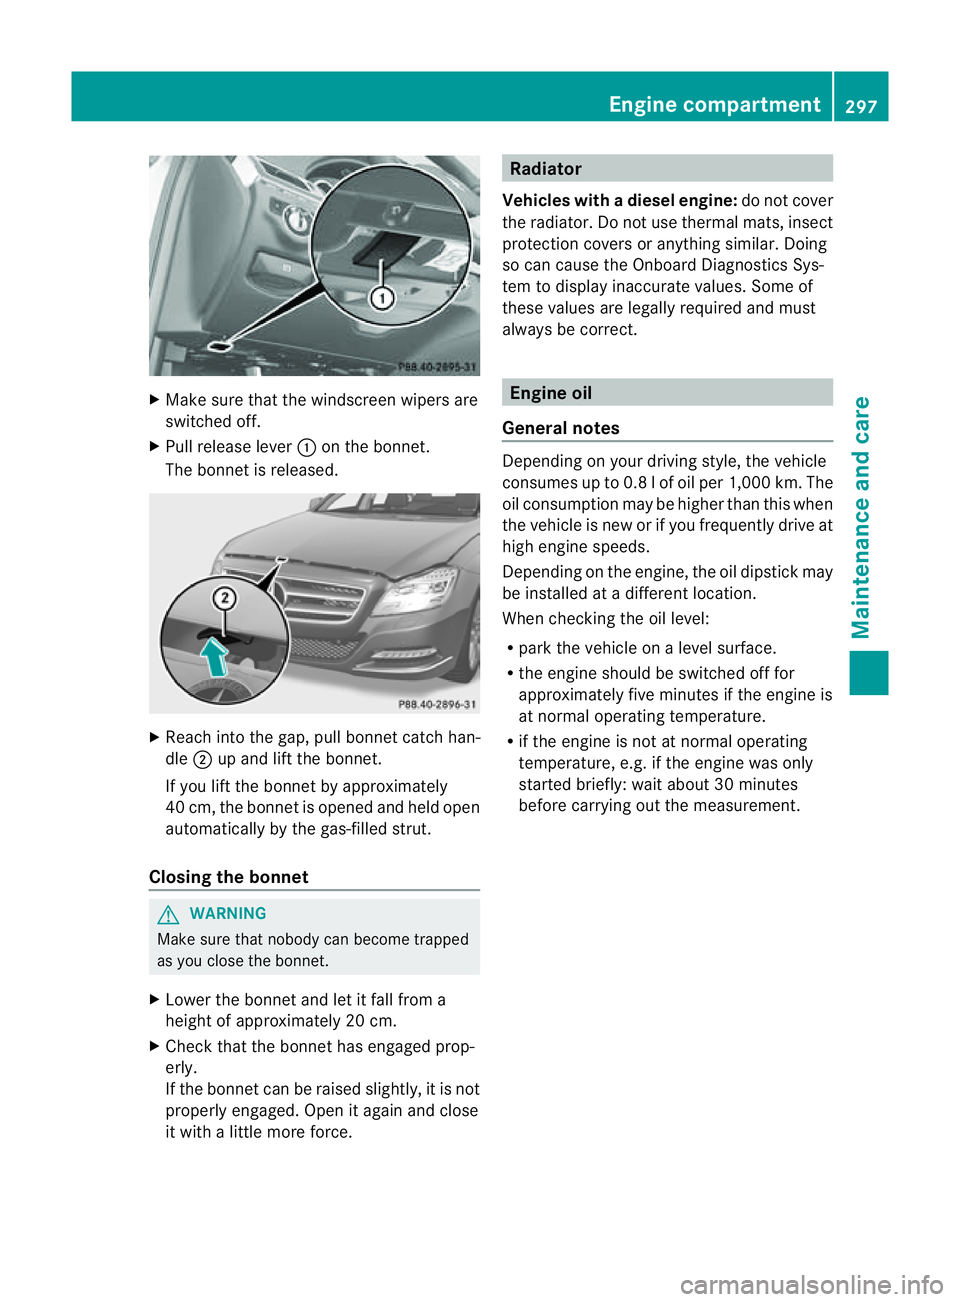
X Pull release lever :on the bonnet.
The bonnet is released. X
Reach into the gap, pull bonnet catch han-
dle ;up and lift the bonnet.
If you lift the bonnet by approximately
40 cm, the bonnet is opened and held open
automatically by the gas-filled strut.
Closing the bonnet G
WARNING
Make sure that nobody can become trapped
as you close the bonnet.
X Lower the bonnet and let it fall from a
height of approximately 20 cm.
X Check that the bonnet has engaged prop-
erly.
If the bonnet can be raised slightly, it is not
properly engaged. Open it again and close
it with alittle more force. Radiator
Vehicles with adiesel engine: do not cover
the radiator .Donot use thermal mats, insect
protection covers or anything similar. Doing
so can cause the Onboard Diagnostics Sys-
tem to display inaccurate values. Some of
these values are legally required and must
always be correct. Engine oil
General notes Dependin
gonyour driving style, the vehicle
consumes up to 0.8 lofoil per 1,000 km. The
oil consumption may be higher than this when
the vehicle is new or if you frequently drive at
high engine speeds.
Dependin gonthe engine, the oil dipstick may
be installed at adifferent location.
When checking the oil level:
R park the vehicle on alevel surface.
R the engine should be switched off for
approximately five minutes if the engine is
at normal operating temperature.
R if the engine is not at normal operating
temperature, e.g. if the engine was only
started briefly: wait about 30 minutes
before carrying out the measurement. Engine compartment
297Maintenance and care Z
Page 301 of 373
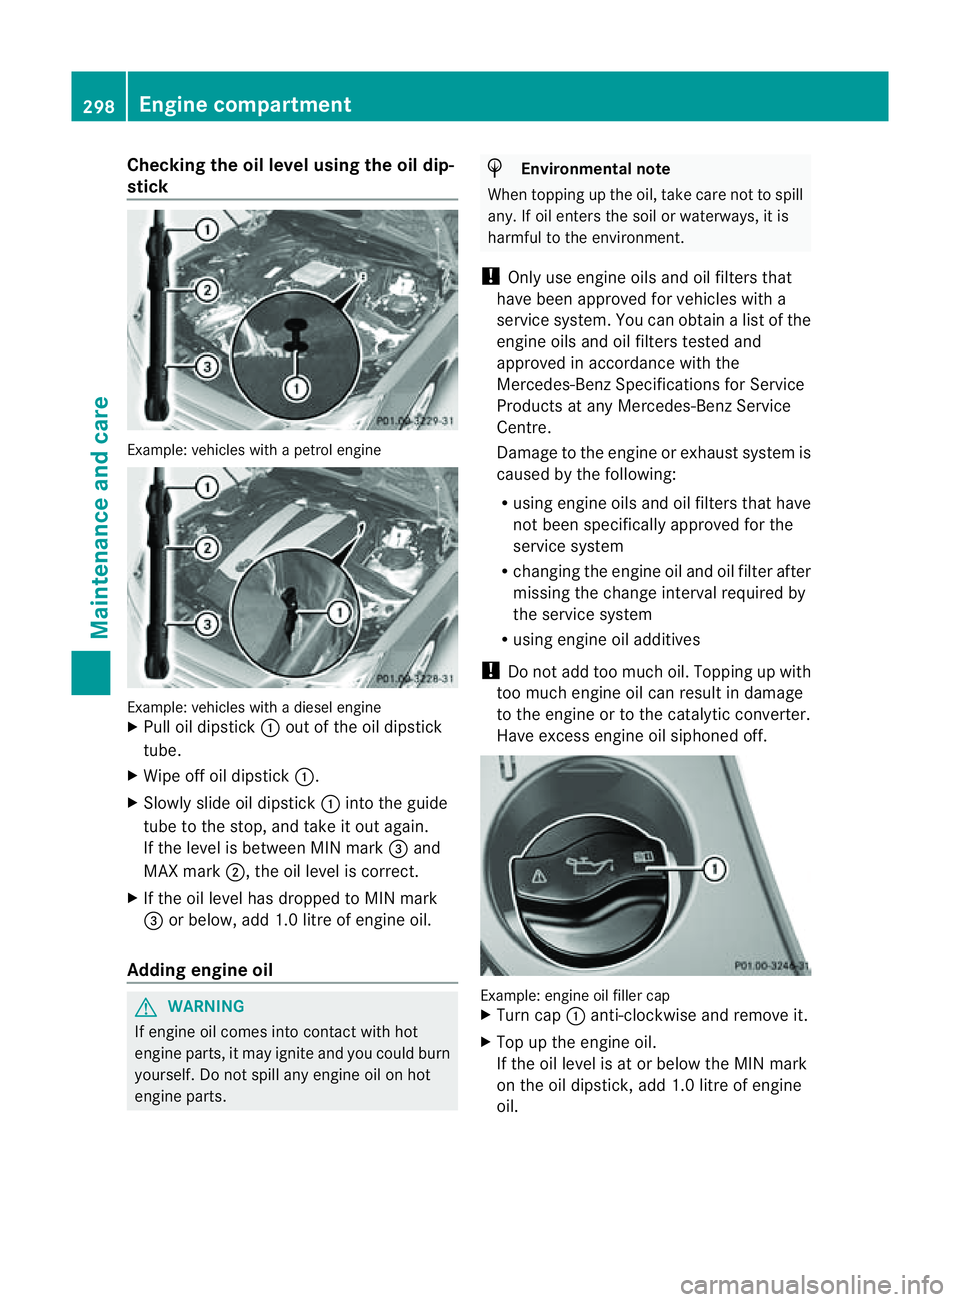
Checking th
eoil level usin gthe oil dip-
stick Example
:vehicles with apetrol engine Example: vehicles with
adiesel engine
X Pull oil dipstick :out of the oil dipstick
tube.
X Wipe off oil dipstick :.
X Slowly slide oil dipstick :into the guide
tube to the stop, and take it out again.
If the level is between MIN mark =and
MAX mark ;,the oil level is correct.
X If the oil level has dropped to MIN mark
= or below, add 1.0 litre of engine oil.
Adding engine oil G
WARNING
If engine oil comes into contact with hot
engine parts, it may ignite and you could burn
yourself. Do not spill any engine oil on hot
engine parts. H
Environmental note
When topping up the oil, take care not to spill
any. If oil enters the soil or waterways, it is
harmful to the environment.
! Only use engine oils and oil filters that
have been approved for vehicles with a
service system. You can obtain alist of the
engine oils and oil filters tested and
approved in accordance with the
Mercedes-Benz Specification sfor Service
Product satany Mercedes-Benz Service
Centre.
Damage to the engine or exhaust system is
caused by the following:
R using engine oils and oil filters that have
not been specifically approved for the
service system
R changin gthe engine oil and oil filter after
missing the change interval required by
the service system
R using engine oil additives
! Do not add too much oil. Topping up with
too much engine oil can result in damage
to the engine or to the catalytic converter.
Have exces sengine oil siphoned off. Example: engine oil filler cap
X
Turn cap :anti-clockwise and remove it.
X Top up the engine oil.
If the oil level is at or below the MIN mark
on the oil dipstick ,add 1.0 litre of engine
oil. 298
Engine compartmentMaintenance and care
Page 302 of 373
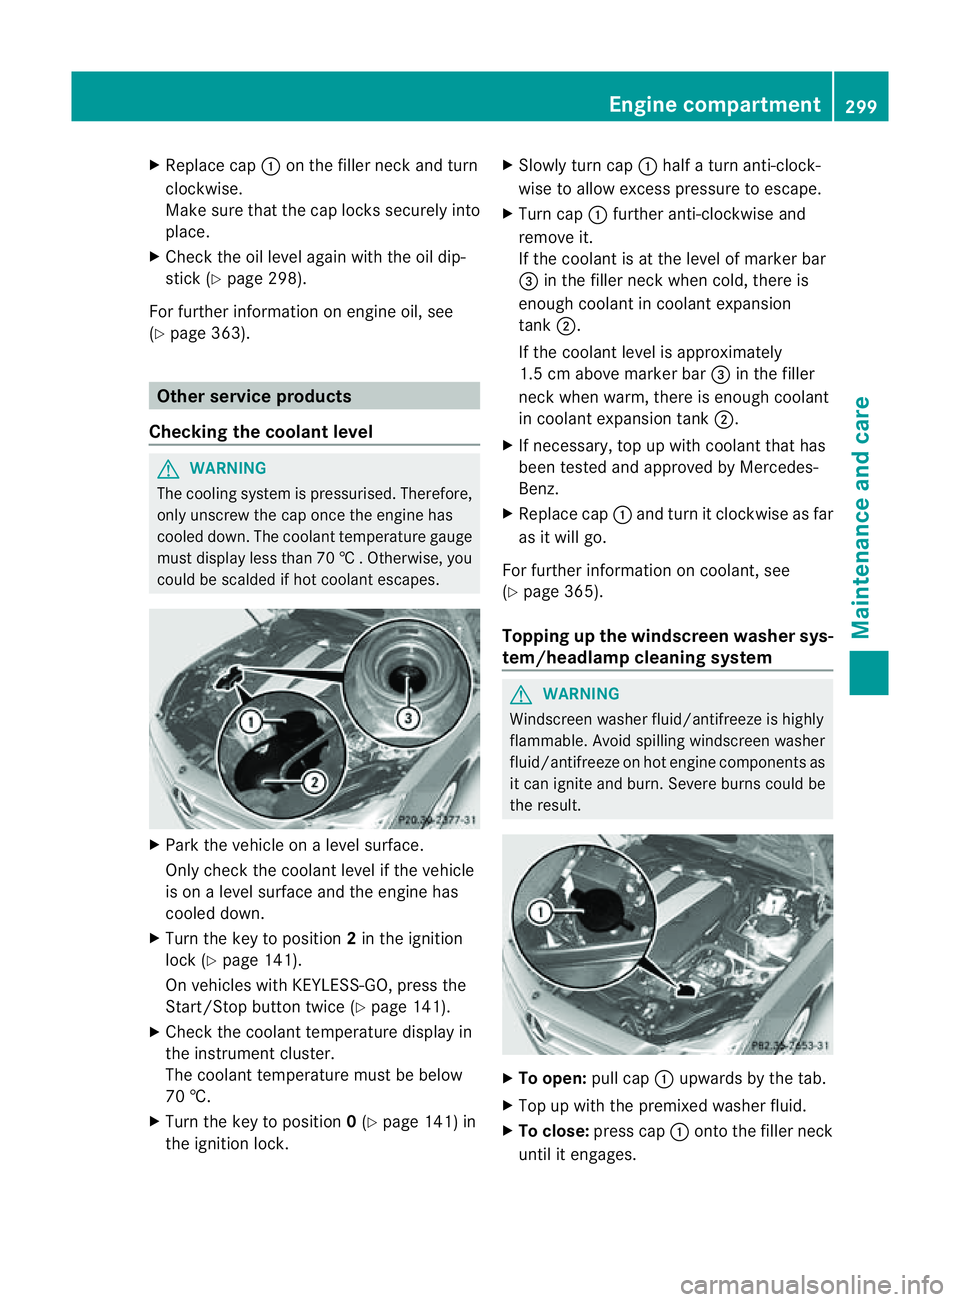
X
Replac ecap : on th efiller neck and turn
clockwise.
Mak esuret hatthe cap locks securel yinto
place.
X Chec kthe oil level again with the oil dip-
stick (Y page 298).
For further information on engine oil, see
(Y page 363). Other service products
Checking the coolant level G
WARNING
The cooling system is pressurised. Therefore,
only unscrew the cap once the engine has
cooled down. The coolant temperature gauge
must display less than 70 †.Otherwise, you
could be scalded if hot coolant escapes. X
Park the vehicl eonalevel surface.
Onl ycheck the coolant level if the vehicle
is on alevel surface and the engine has
coole ddown.
X Turn the key to position 2in the ignition
lock (Y page 141).
On vehicles with KEYLESS-GO, press the
Start/Stop button twice (Y page 141).
X Check the coolant temperatur edisplay in
the instrument cluster.
Th ec oolant temperatur emustbeb elow
70 †.
X Turn the key to position 0(Y page 141) in
the ignition lock. X
Slowl yturnc ap : half aturna nti-clock-
wise to allow exces spressure to escape.
X Turn cap :further anti-clockwis eand
remove it.
If th ecoolan tisatt heleve lofm arkerbar
= in th efille rneck when cold, ther eis
enough coolant in coolant expansion
tank ;.
If the coolant level is approximately
1.5 cm above marker bar =in the filler
neckw hen warm, there is enough coolant
in coolant expansion tank ;.
X If necessary, top up with coolant that has
been tested and approved by Mercedes-
Benz.
X Replace cap :and turn it clockwise as far
as it will go.
For further information on coolant, see
(Y page 365).
Topping up the windscreen washer sys-
tem/headlam pcleaning system G
WARNING
Windscreen washer fluid/antifreez eishighly
flammable. Avoid spilling windscreen washer
fluid/antifreez eonhot engin ecomponent sas
it can ignit eand burn. Severe burns could be
the result. X
To open: pull cap:upwards by the tab.
X Top up with the premixed washer fluid.
X To close: press cap :ontothe filler neck
until it engages. Engine compartment
299Maintenance and care Z
Page 303 of 373
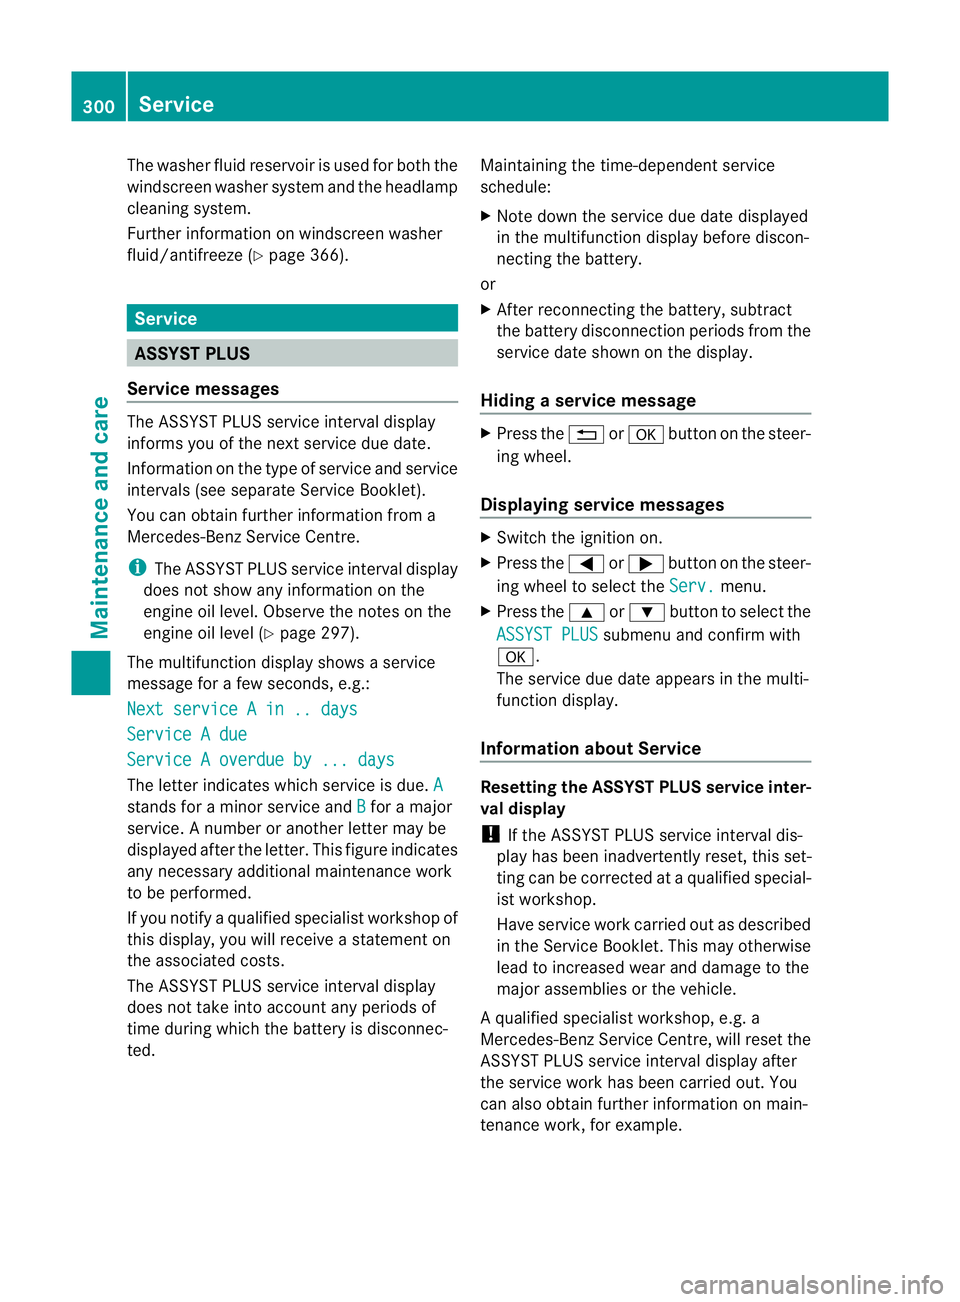
The washer fluid reservoir is used for both the
windscreen washer system and the headlamp
cleaning system.
Further information on windscreen washer
fluid/antifreeze (Y page 366).Service
ASSYST PLUS
Service messages The ASSYST PLUS service interval display
inform syou of the next service due date.
Information on the type of service and service
intervals (see separate Servic eBooklet).
You can obtain further information from a
Mercedes-Benz Servic eCentre.
i The ASSYST PLUS service interval display
does not show any information on the
engine oil level. Observe the notes on the
engine oil level (Y page 297).
The multifunction display shows aservice
message for afew seconds, e.g.:
Next service Ain..days Service
Adue Service
Aoverdue by ... days The letter indicates which service is due.
Astands for
aminor service and B for
am ajor
service. Anumber or another letter may be
displayed after the letter .This figure indicates
any necessary additional maintenancew ork
to be performed.
If you notify aqualified specialist workshop of
this display, you will receive astatementon
the associated costs.
Th eA SSYS TPLUSs ervice interval display
does not take intoa ccountany periods of
time during which the battery is disconnec-
ted. Maintaining the time-dependent service
schedule:
X Note down the servic eduedate displayed
in the multifunctio ndisplay befor ediscon-
nectin gthe battery.
or
X After reconnecting the battery, subtract
the battery disconnection periods fro mthe
service date shown on the display.
Hiding aservice message X
Pres sthe % ora button on th esteer-
ing wheel.
Displaying service messages X
Switch th eignitio non.
X Press the =or; button on the steer-
ing whee ltoselect the Serv. menu.
X Press the 9or: button to select the
ASSYST PLUS submenu and confirm with
a.
The servic eduedate appear sinthe multi-
functio ndisplay.
Information about Service Resetting th
eASSYST PLUS service inter-
val display
! If the ASSYS TPLUS service interval dis-
play has been inadvertently reset ,this set-
tin gc an be corrected at aqualified special-
ist workshop.
Have service work carried out as described
in the Servic eBooklet. This may otherwise
lead to increased wear and damage to the
major assemblies or the vehicle.
Aq ualified specialist workshop, e.g. a
Mercedes-Ben zService Centre, will reset the
ASSYST PLUS servic einterval display after
the servic ework has been carried out. You
can also obtain further information on main-
tenance work, for example. 300
ServiceMaintenance and care