2012 MERCEDES-BENZ CLS COUPE fuse chart
[x] Cancel search: fuse chartPage 14 of 373

First-aid kit
........................................ .310
Fitting awheel
Removing awheel .......................... 339
Fitting wheels
Fitting awheel ............................... 340
Lowering the vehicle ......................340
Raising the vehicle .........................338
Securing the vehicle against roll-
ing away ........................................ 337
Flat tyre
MOExtended tyres .........................313
Preparing the vehicle .....................312
TIREFIT kit ...................................... 313
Floormat ............................................ .292
Foglamps (extende drange) .............. 116
Frequencies Garage door opener .......................289
Mobile phone ................................. 357
Two-way radio ................................ 357
Fuel
Additives ........................................ 361
Consumption information ..............363
Consumption statistics ..................213
Displaying the current consump-
tion ................................................ 213
Displaying the range ......................213
Fuel gauge ............................... 30, 209
Grade (petrol) ................................ 360
Important safety notes ..................360
Notes for AMG vehicles .................361
Problem (malfunction) ...................158
Quality (diesel )............................... 362
Refuelling ...................................... .156
Tank content/reserve fuel .............360
Fue lfiller flap
Emergency release ........................157
Opening/closing ............................ 157
Fue lfilte r(whit edispla ymessage) .243
Fue llevel
Calling up the range (on-board
computer) ...................................... 213
Gauge ...................................... 30, 209
Fue lreserve
see Fuel
Fue ltank
Capacity ........................................ 360
Problem (malfunction) ...................158Fuse allocatio
nchart (vehicle tool
kit) ...................................................... 311
Fuses Allocation chart ............................. 324
Before changing ............................. 324
Fuse box in the boot ......................325
Fuse box in the engine compart-
ment .............................................. 324
Important safety notes ..................324 G
Garage door opener Clearing the memory .....................289
Frequencies ................................... 289
Important safety notes ..................287
Opening/closing the garage door ..288
Programming (button in the rear-
view mirror) ................................... 287
Gear indicator (on-board com-
puter) ................................................. .228
Gearshift program SETUP (on-board computer) ..........228
Genuine Mercedes-Benz parts .........356
Glove compartment ..........................273 H
Handbrake see Parking brake
Hazard warning lamps ......................114
Headbag Display message ............................ 237
Headlamp
Cleaning system (function) ............114
Cleaning system (notes) ................366
Headlamps
Misting up ...................................... 117
Topping up the cleaning system ....299
see Automatic headlamp mode
Head restraints
Adjusting ......................................... 98
Adjusting (electrically). ....................99
Adjusting (manually). .......................98
Adjusting (rear) ................................ 99
Fitting/removing (rear) ....................99
Luxury .............................................. 99 Index
11
Page 314 of 373

Fir
ee xtinguisher
! Kee pthe stowage compartmen tclosed
while the vehicle is in motion. It may oth-
erwise be damaged.
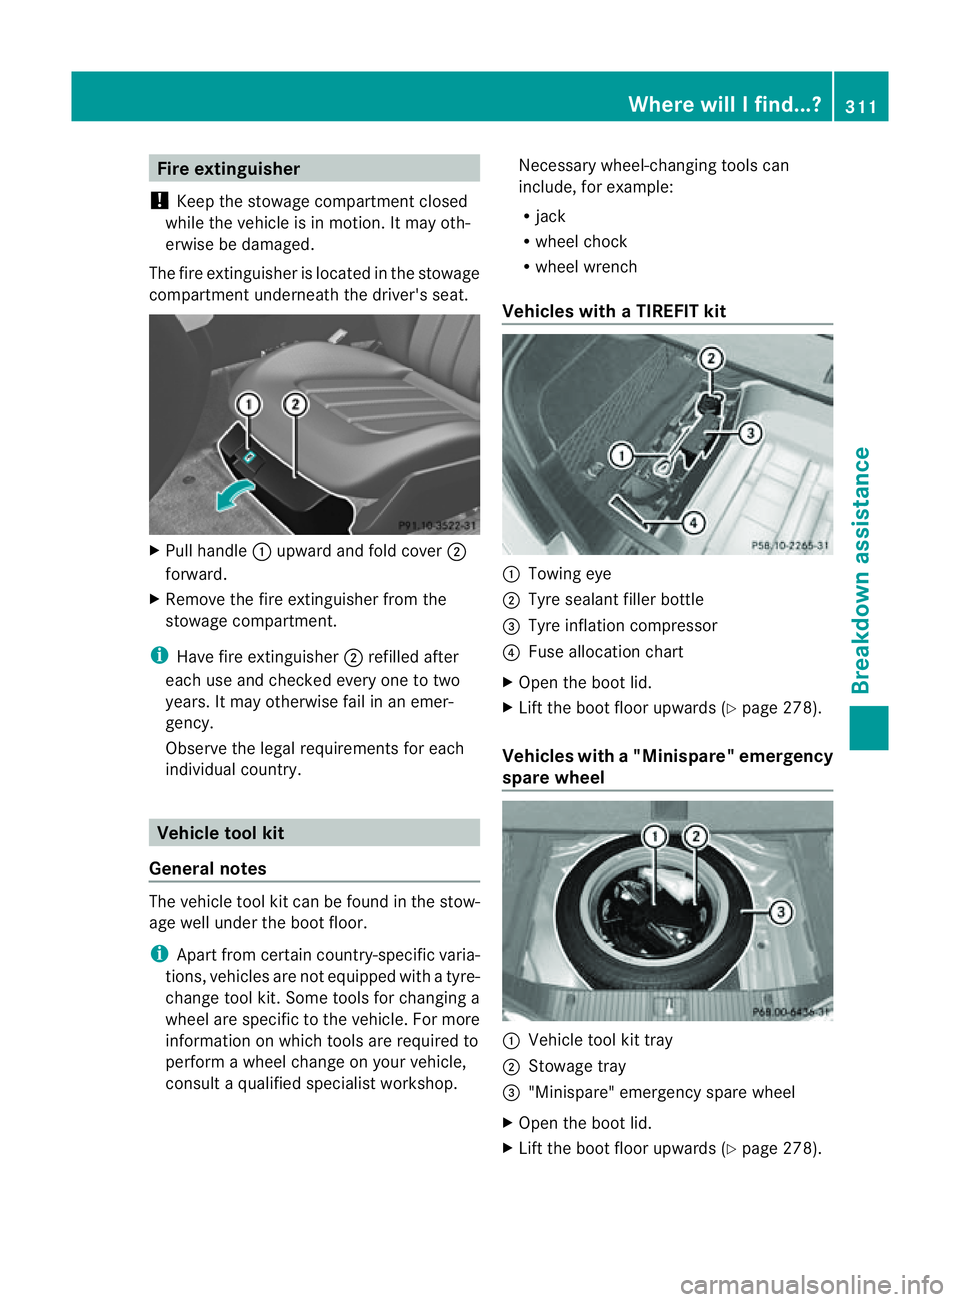
The fire extinguisher is located in the stowage
compartmen tunderneat hthe driver's seat. X
Pull handle :upward and fold cover ;
forward.
X Remove the fire extinguisher fro mthe
stowage compartment.
i Have fire extinguisher ;refilled after
each use and checked every one to two
years. It may otherwise fail in an emer-
gency.
Observe the legal requirements for each
individualc ountry. Vehicle tool kit
General notes The vehicle tool kit can be found in the stow-
age well under the boot floor.
i Apart from certain country-specific varia-
tions, vehicles are not equipped with atyre-
change tool kit. Some tools for changing a
wheel are specific to the vehicle. For more
information on which tools are required to
perform awheel change on your vehicle,
consult aqualified specialist workshop. Necessary wheel-changing tools can
include, for example:
R
jack
R wheel chock
R wheel wrench
Vehicles with aTIREFIT kit :
Towin geye
; Tyre sealan tfiller bottle
= Tyre inflation compressor
? Fuse allocation chart
X Open the boot lid.
X Lift the boot floor upwards ( Ypage 278).
Vehicles with a"Minispare" emergency
spare wheel :
Vehicle tool kit tray
; Stowag etray
= "Minispare" emergency spare wheel
X Open the boot lid.
X Lift the boot floor upwards (Y page278). Where will
Ifind...?
311Breakdown assistance
Page 315 of 373

The vehicle tool kit contains:
R
Foldable wheel chock
R Fuse allocation chart
R Jack
R Centrin gpin
R One pair of gloves
R Wheel wrench
R Towing eye
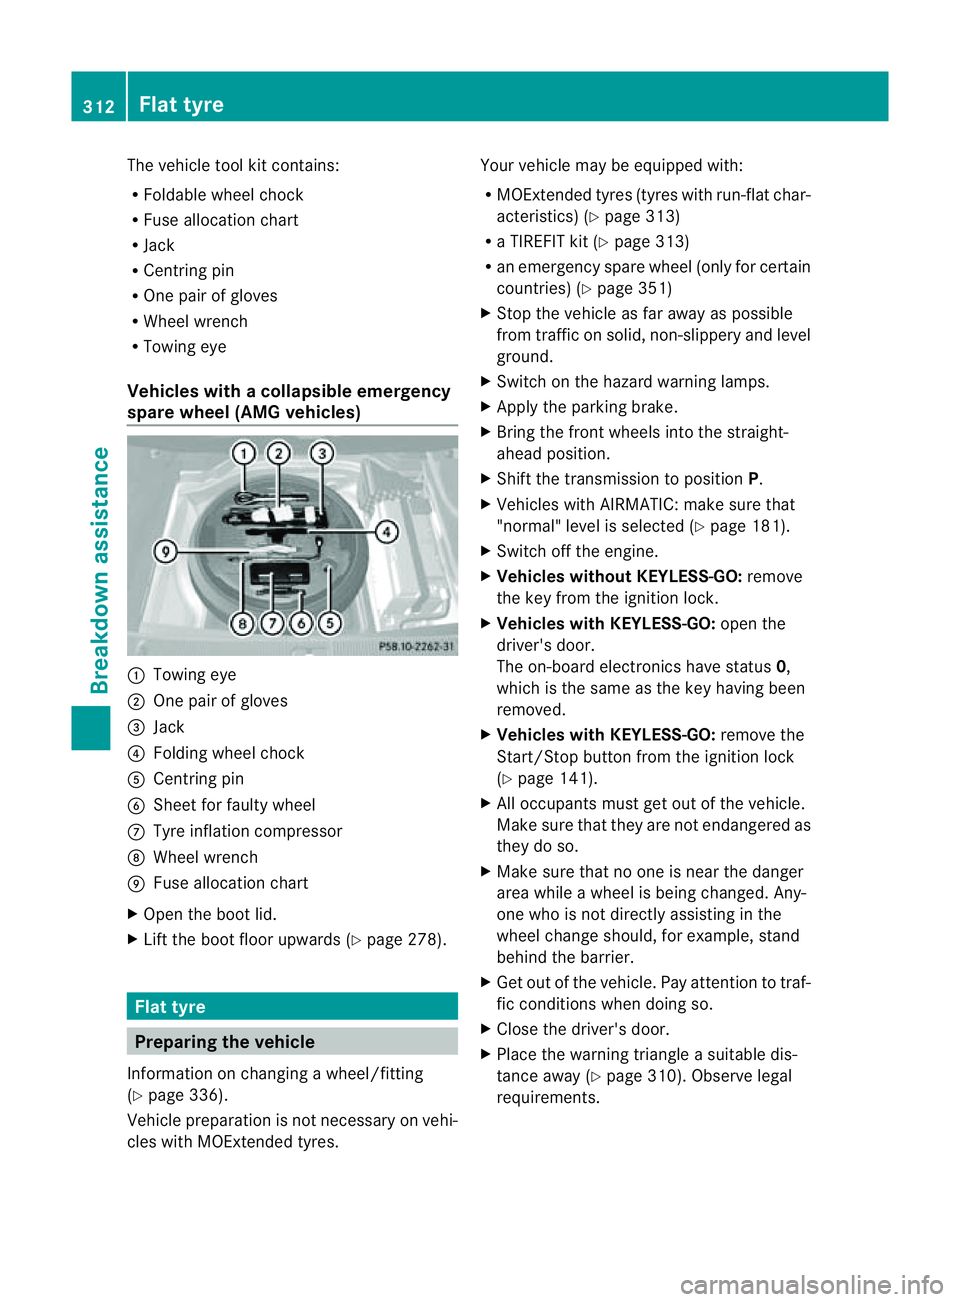
Vehicles with acollapsible emergency
spare wheel (AMG vehicles) :
Towin geye
; Onep air of gloves
= Jack
? Folding wheel chock
A Centrin gpin
B Sheet for fault ywheel
C Tyre inflatio ncompressor
D Wheel wrench
E Fuse allocation chart
X Open the boot lid.
X Lift the boot floor upwards (Y page 278).Flat tyre
Preparing the vehicle
Information on changing awheel/fitting
(Y page 336).
Vehicle preparation is not necessary on vehi-
cles with MOExtended tyres. Your vehicle may be equipped with:
R
MOExtended tyres (tyres with run-flat char-
acteristics) (Y page 313)
R aT IREFIT kit (Y page 313)
R an emergenc yspare wheel (only for certain
countries) (Y page 351)
X Stop the vehicle as far away as possible
from traffic on solid, non-slippery and level
ground.
X Switch on the hazard warning lamps.
X Apply the parking brake.
X Bring the front wheels into the straight-
ahead position.
X Shift the transmission to position P.
X Vehicles with AIRMATIC: make sure that
"normal" level is selected (Y page 181).
X Switch off the engine.
X Vehicles without KEYLESS-GO: remove
the key from the ignition lock.
X Vehicles with KEYLESS-GO: open the
driver's door.
The on-board electronics have status 0,
which is the same as the key having been
removed.
X Vehicles with KEYLESS-GO: remove the
Start/Stop button from the ignition lock
(Y page 141).
X All occupant smust get out of the vehicle.
Make sure that they are not endangered as
they do so.
X Make sure that no one is near the danger
area while awheel is being changed. Any-
one who is not directly assisting in the
wheel change should, for example, stand
behind the barrier.
X Get out of the vehicle. Pay attention to traf-
fic conditions when doing so.
X Close the driver's door.
X Place the warning triangle asuitable dis-
tancea way (Y page 310). Observe legal
requirements. 312
Flat tyreBreakdown assistance
Page 327 of 373

You can fin
dinformation on "Jump-starting"
at (Y page 319). Electrical fuses
Important safet
ynotes G
WARNING
Only use fuses that have been approved for
Mercedes-Ben zvehicles and which have the
correct fuse ratin gfor the systems con-
cerned. Do not attempt to repair or bridge
faulty fuses. Using fuses which have not been
approved or attempting to repair or bridge
faulty fuses could cause the fuse to be over-
loaded and result in afire. Have the cause
traced and rectified at aqualified specialist
workshop.
! Only use fuses that have been approved
for Mercedes-Benz vehicles and which
have the correct fuse ratin gfor the system
concerned. Otherwise, componentsors ys-
tems could be damaged.
The fuses in your vehicle serve to close down
faulty circuits. If afuse blows ,all th ecom po-
nent sont hecircuit and their function sstop
operating.
Blown fuse smust be replace dwith fuses of
the same rating, which you can recognise by
the colour and fuse rating. The fuse ratings
are listed in the fuse allocation chart.
If the newly inserted fuse also blows, have the
cause traced and rectified at aqualified spe-
cialist workshop, e.g. aMercedes-Benz
Servic eCentre. Befor
ereplacing afuse
X Secure the vehicle against rollin gaway
(Y page 159).
X Switch off all electrical consumers. X
Turn the key to position 0in the ignition
lock and remove it (Y page 141).
or
X On vehicles with KEYLESS-GO, make sure
the ignition is switched off (Y page 141).
All indicator lamps in the instrumen tcluster
must be off.
The fuses are located in various fuse boxes:
R fuse box in the engine compartmen tonthe
left-hand side of the vehicle, when viewed
in the direction of travel
R fuse box in the boot on the right-hand side
of the vehicle, when viewed in the direction
of travel
the fuse allocation chart is located in the vehi-
cle tool kit in the stowage compartment
under the boot floor (Y page 311). Fuse box in the engine compartment
G
WARNING
Make sure that the windscreen wipers are
turned off and the key is pulledo ut of the igni-
tion lock before you open the cover of the fuse
box. Otherwise, the windscreen wipers and
the wiper rods above the cover could be set
in motion. This could lead to you or others
being injured by the wiper rods.
! Make sure that no moisture can enter the
fuse box when the cover is open.
! When closing the cover, make sure that it
is lying correctly on the fuse box. Moisture
seeping in or dirt could otherwise impair
the operation of the fuses.
X Make sure that the windscreen wipers are
switched off.
X Open the bonnet. 324
Electrical fusesBreakdown assistance