2012 MERCEDES-BENZ CLS COUPE flat tire
[x] Cancel search: flat tirePage 14 of 373
First-aid kit
........................................ .310
Fitting awheel
Removing awheel .......................... 339
Fitting wheels
Fitting awheel ............................... 340
Lowering the vehicle ......................340
Raising the vehicle .........................338
Securing the vehicle against roll-
ing away ........................................ 337
Flat tyre
MOExtended tyres .........................313
Preparing the vehicle .....................312
TIREFIT kit ...................................... 313
Floormat ............................................ .292
Foglamps (extende drange) .............. 116
Frequencies Garage door opener .......................289
Mobile phone ................................. 357
Two-way radio ................................ 357
Fuel
Additives ........................................ 361
Consumption information ..............363
Consumption statistics ..................213
Displaying the current consump-
tion ................................................ 213
Displaying the range ......................213
Fuel gauge ............................... 30, 209
Grade (petrol) ................................ 360
Important safety notes ..................360
Notes for AMG vehicles .................361
Problem (malfunction) ...................158
Quality (diesel )............................... 362
Refuelling ...................................... .156
Tank content/reserve fuel .............360
Fue lfiller flap
Emergency release ........................157
Opening/closing ............................ 157
Fue lfilte r(whit edispla ymessage) .243
Fue llevel
Calling up the range (on-board
computer) ...................................... 213
Gauge ...................................... 30, 209
Fue lreserve
see Fuel
Fue ltank
Capacity ........................................ 360
Problem (malfunction) ...................158Fuse allocatio
nchart (vehicle tool
kit) ...................................................... 311
Fuses Allocation chart ............................. 324
Before changing ............................. 324
Fuse box in the boot ......................325
Fuse box in the engine compart-
ment .............................................. 324
Important safety notes ..................324 G
Garage door opener Clearing the memory .....................289
Frequencies ................................... 289
Important safety notes ..................287
Opening/closing the garage door ..288
Programming (button in the rear-
view mirror) ................................... 287
Gear indicator (on-board com-
puter) ................................................. .228
Gearshift program SETUP (on-board computer) ..........228
Genuine Mercedes-Benz parts .........356
Glove compartment ..........................273 H
Handbrake see Parking brake
Hazard warning lamps ......................114
Headbag Display message ............................ 237
Headlamp
Cleaning system (function) ............114
Cleaning system (notes) ................366
Headlamps
Misting up ...................................... 117
Topping up the cleaning system ....299
see Automatic headlamp mode
Head restraints
Adjusting ......................................... 98
Adjusting (electrically). ....................99
Adjusting (manually). .......................98
Adjusting (rear) ................................ 99
Fitting/removing (rear) ....................99
Luxury .............................................. 99 Index
11
Page 22 of 373
Type identificatio
nplate
see Vehicl eide ntificatio nplate
Tyr epressure
Calling up (on-board computer )..... 334
Display message ............................ 250
Not reached (TIREFIT) ....................315
Reached (TIREFIT) ..........................315
Recommended ............................... 331
Tyre pressure los swarning
Important safety notes ..................332
Restarting ...................................... 333
Tyre pressure monitor
Checking the tyre pressure elec-
tronically ........................................ 334
Function/notes ............................. 334
Restarting ...................................... 335
Warning lamp ................................. 270
Warning message .......................... 335
Tyres
Changing awheel .......................... 336
Checking ........................................ 329
Directio nofrotation ...................... 336
Display message ............................ 250
Important safety notes ..................328
MOExtended tyres .........................330
Replacing ....................................... 336
Service life ..................................... 329
Storing ........................................... 337
Tyr esize (data) .............................. 341
Tyr etread ...................................... 329
see Flat tyre U
Unladen weight ................................. 366
Unlocking Emergency unlocking .......................84
From insid ethe vehicle (central
unlocking button) ............................. 83 V
Vanity mirror (in sun visor) ..............281
Variable SPEEDTRONIC see SPEEDTRONIC
Vehicle
Correct use ...................................... 24
Data acquisition ............................... 24Display message
............................ 254
Electronics ..................................... 357
Equipment ....................................... 22
Implied warranty .............................. 24
Individua lsettings .......................... 221
Leaving parked up .........................161
Locking (in an emergency) ...............84
Locking (key )................................... 77
Lowering ........................................ 340
Pulling away ................................... 143
Raising ........................................... 338
Registration ..................................... 24
Securing from rolling away ............337
Towing away .................................. 320
Transporting .................................. 323
Unlocking (in an emergency) ...........84
Unlocking (key )................................ 77
Vehicle data ................................... 366
Vehicle data ....................................... 366
Vehicle dimensions ...........................366
Vehicle emergency locking ................84
Vehicle identification number see VIN
Vehicle identification plate ..............359
Vehicle level AIRMATIC ...................................... 181
AMG RIDE CONTROL sports sus-
pension .......................................... 183
Vehicle level (display message) .......243
Vehicle tool kit .................................. 311
Vehicle weights ................................. 366
Video Operating the DVD ......................... 216
VIN ...................................................... 359 W
Warning and indicator lamps ABS ................................................ 261
Brakes ........................................... 260
Distance warning signa l................. 269
ESP ®
.............................................. 263
ESP ®
OFF ....................................... 264
LIM (cruise control) ........................ 165
LIM (DISTRONIC PLUS) ..................172
LIM (variable SPEEDTRONIC )......... 168
Overview .................................. 32, 258
PASSENGER AIRBAG OFF ................54 Index
19
Page 281 of 373
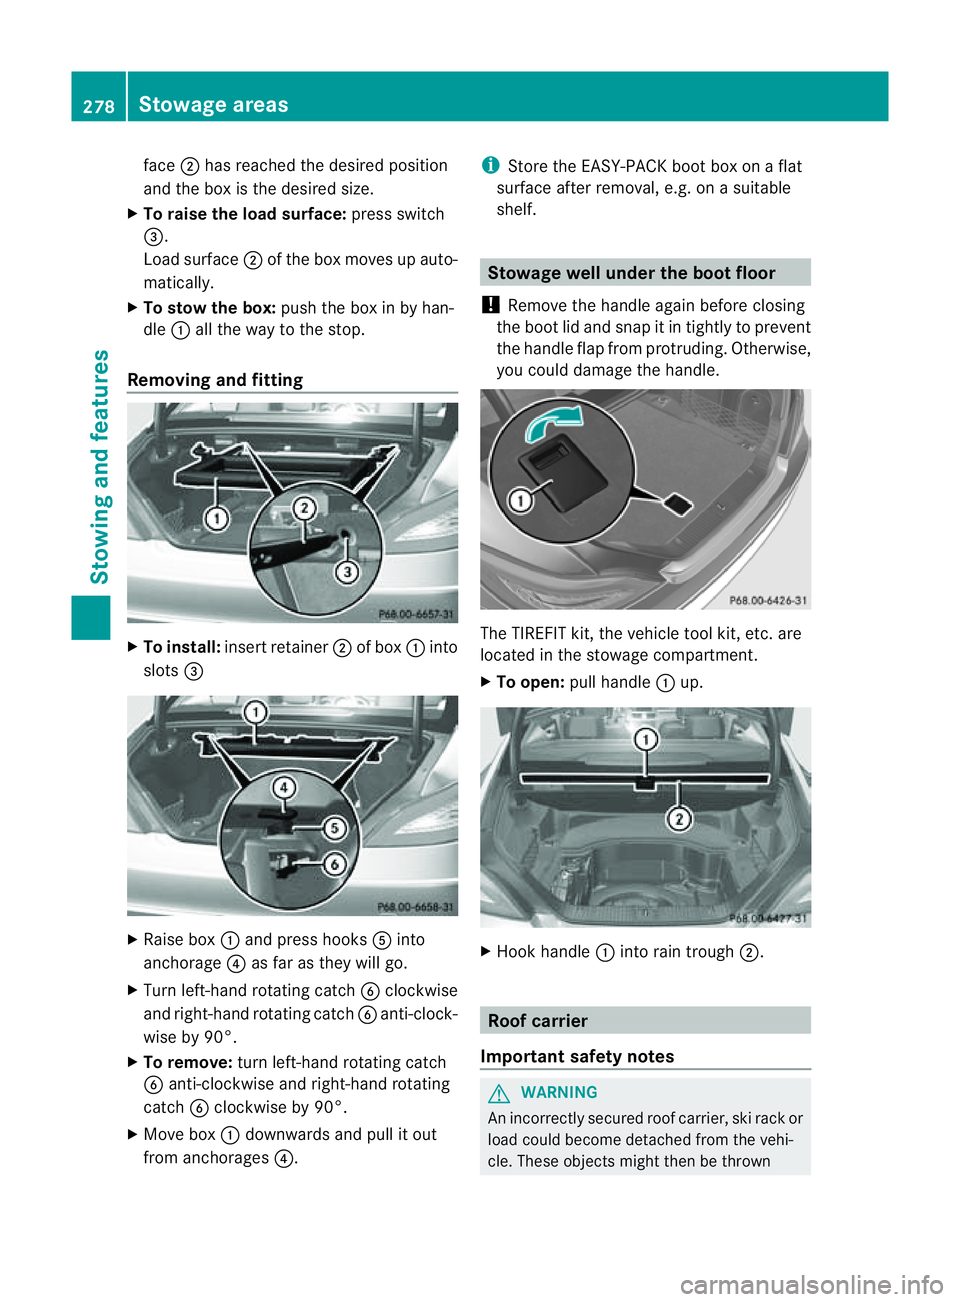
face
;has reache dthe desired position
and the box is the desired size.
X To raise the load surface: press switch
=.
Load surface ;of the box moves up auto-
matically.
X To stow the box: pushthe box in by han-
dle :allt he waytot he stop.
Removing and fitting X
To install: insert retainer ;of box :into
slots = X
Raise box :and press hooks Ainto
anchorage ?as far as they wil lgo.
X Turn left-hand rotating catch Bclockwise
and right-hand rotating catch Banti-clock-
wis eby9 0°.
X To remove: turn left-hand rotating catch
B anti-clockwise and right-hand rotating
catch Bclockwise by 90°.
X Move box :downward sand pul litout
from anchorages ?. i
Store the EASY-PACK boot box on aflat
surface after removal, e.g. on asuitable
shelf. Stowage well under the boo
tfloor
! Remove the handle again befor eclosing
the boot lid and snap it in tightly to prevent
the handle flap fro mprotruding. Otherwise,
you coul ddamage the handle. The TIREFIT kit, the vehicl
etool kit, etc. are
located in the stowage compartment.
X To open: pullhandle :up. X
Hook handle :into rain trough ;. Roof carrier
Important safety notes G
WARNING
An incorrectly secure droof carrier, ski rack or
load could become detached from the vehi-
cle. These object smight then be thrown 278
Stowage areasStowing and features
Page 314 of 373
Fir
ee xtinguisher
! Kee pthe stowage compartmen tclosed
while the vehicle is in motion. It may oth-
erwise be damaged.
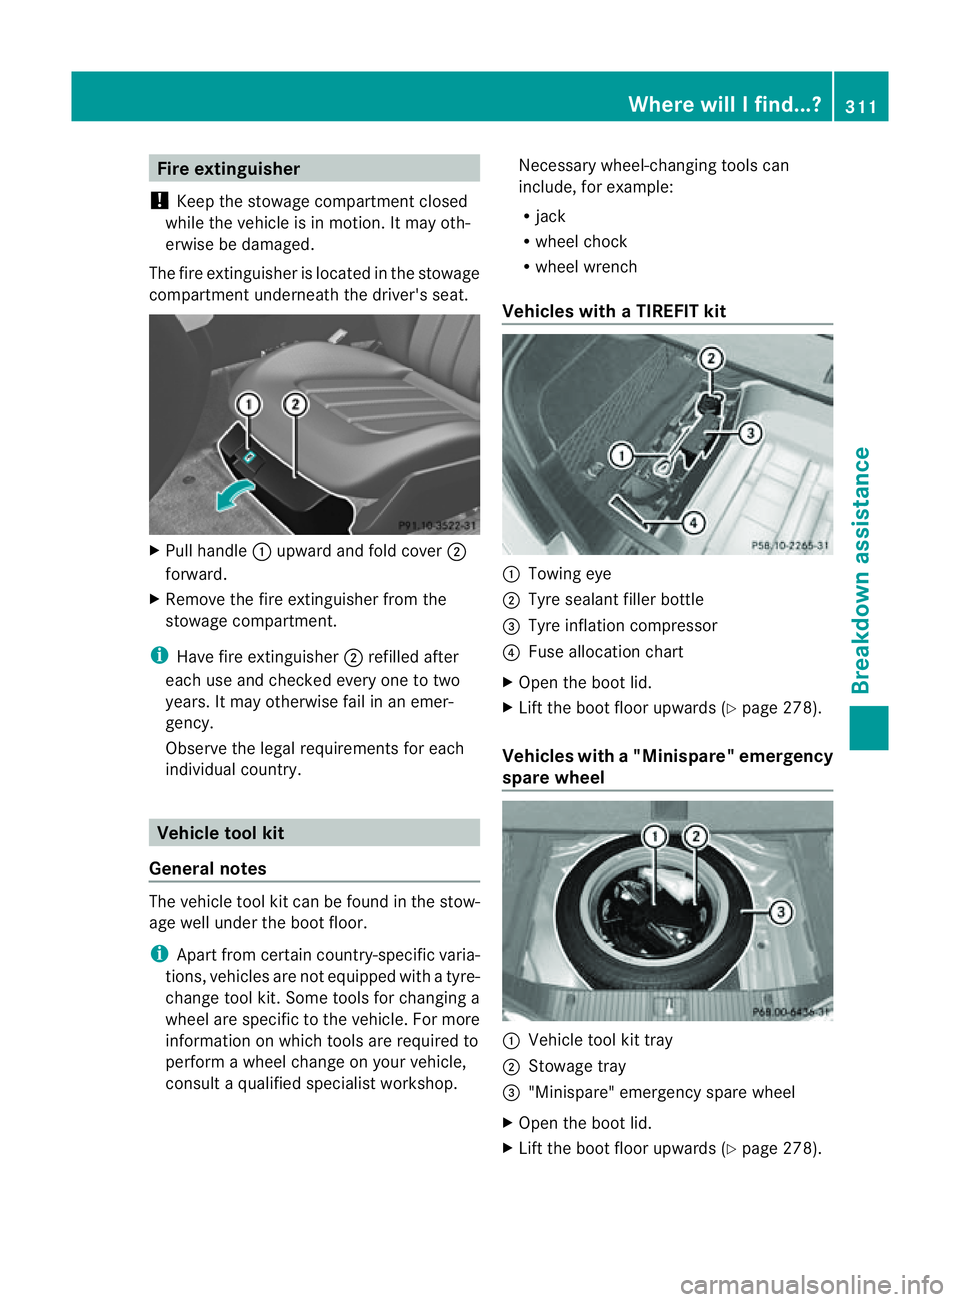
The fire extinguisher is located in the stowage
compartmen tunderneat hthe driver's seat. X
Pull handle :upward and fold cover ;
forward.
X Remove the fire extinguisher fro mthe
stowage compartment.
i Have fire extinguisher ;refilled after
each use and checked every one to two
years. It may otherwise fail in an emer-
gency.
Observe the legal requirements for each
individualc ountry. Vehicle tool kit
General notes The vehicle tool kit can be found in the stow-
age well under the boot floor.
i Apart from certain country-specific varia-
tions, vehicles are not equipped with atyre-
change tool kit. Some tools for changing a
wheel are specific to the vehicle. For more
information on which tools are required to
perform awheel change on your vehicle,
consult aqualified specialist workshop. Necessary wheel-changing tools can
include, for example:
R
jack
R wheel chock
R wheel wrench
Vehicles with aTIREFIT kit :
Towin geye
; Tyre sealan tfiller bottle
= Tyre inflation compressor
? Fuse allocation chart
X Open the boot lid.
X Lift the boot floor upwards ( Ypage 278).
Vehicles with a"Minispare" emergency
spare wheel :
Vehicle tool kit tray
; Stowag etray
= "Minispare" emergency spare wheel
X Open the boot lid.
X Lift the boot floor upwards (Y page278). Where will
Ifind...?
311Breakdown assistance
Page 316 of 373

MOExtended tyres (tyres with run-flat
characteristics) G
WARNING
When driving in emergency mode, the driving
characteristics deteriorate, e.g. when corner-
ing, accelerating quickly and when braking.
There is arisk of accident.
Do not exceed the stated maximu mspeed.
Avoid abrupt steering and driving manoeu-
vres, and driving over obstacles (kerbs ,pot-
holes, off-road). This applies in particular to a
laden vehicle.
Stop driving in emergency mode if:
R you hear banging noises.
R the vehicle start stoshake.
R you see smok eand smell rubber.
R ESP ®
is intervening constantly.
R ther eare tears in the sidewalls of the tyre.
After driving in emergency mode, have the
wheel rims checked at aqualified specialist
workshop with regard to their further use. The
faulty tyre must be replaced.
With MOExtended tyres (tyres with run-flat
characteristics), you can continue to drive
your vehicle even if ther eisatotal loss of
pressure in one or more tyres.
MOExtended tyres may only be used in con-
junction with an activ etyre pressure loss
warning system or with an activ etyre pres-
sure monitor.
The maximum driving distance is approx-
imately 80 km when the vehicle is partially
laden, and approximately 30 km when the
vehicle is fully laden.
In addition to the vehicle load, the driving dis-
tanc epossible depends upon:
R speed
R road condition
R outside temperature
The driving distanc epossible in run-flat mode
may be reduced by extreme driving condi-
tions/manoeuvres, or it can be increased
through amoderat estyle of driving. The maximum permissible distanc
ewhich
can be driven in run-flat mode is counted from
the momen tthe tyre pressure loss warning
appears in the multifunction display.
You must not exceed amaximum speed of
80 km/h.
i When replacing one or all tyres, make
sure that you only use tyres marked
"MOExtended". Make sure that you only
use the size of tyre specified for the vehicle. TIREFIT kit
Using the TIREFIT kit TIREFIT is
atyre sealant.
You can use TIREFIT to seal punctures of up
to 4m m, particularly those in the tyre tread.
You can use TIREFIT at outside temperatures
down to Ò20 †. G
WARNING
In the following situations, the tyre sealant is
unable to provide sufficient breakdown assis-
tance, as it is unable to seal the tyre properly:
R there are cuts or punctures in the tyre
larger than those mentioned above.
R the wheel rim is damaged.
R you have driven at very low tyre pressures
or on aflat tyre.
There is arisk of accident.
Do not drive any further. Contact aqualified
specialist workshop. G
WARNING
The tyre sealant is harmful and causes irrita-
tion. It must not come into contact with your
skin, eyes or clothing or be swallowed. Do not
inhale TIREFIT fumes. Keep tyre sealant away
from children. There is arisk of injury. Flat tyre
313Breakdown assistance
Z
Page 317 of 373
If you come into contact with the tyre sealant,
observe the following:
R Rinse off the tyre sealant from yours kin
immediately with water.
R If the tyre sealant comes into contact with
youre yes, immediately rinse them thor-
oughly wit hclean water.
R If tyr esealant is swallowed ,immediately
rinse your mout hout thoroughl yand drink
plenty of water. Do no tind ucev omiting,
and see kmedical attention immediately.
R Immediately change out of clothing which
has come into contact with tyre sealant.
R If an allergic reaction occurs ,seek medical
attention immediately.
! Do not operate the tyre inflation com-
pressor for longer than eight minutes at a
time without abreak. It may otherwise
overheat.
The tyre inflation compressor can be oper-
ated again onceith as cooled down.TIREFI
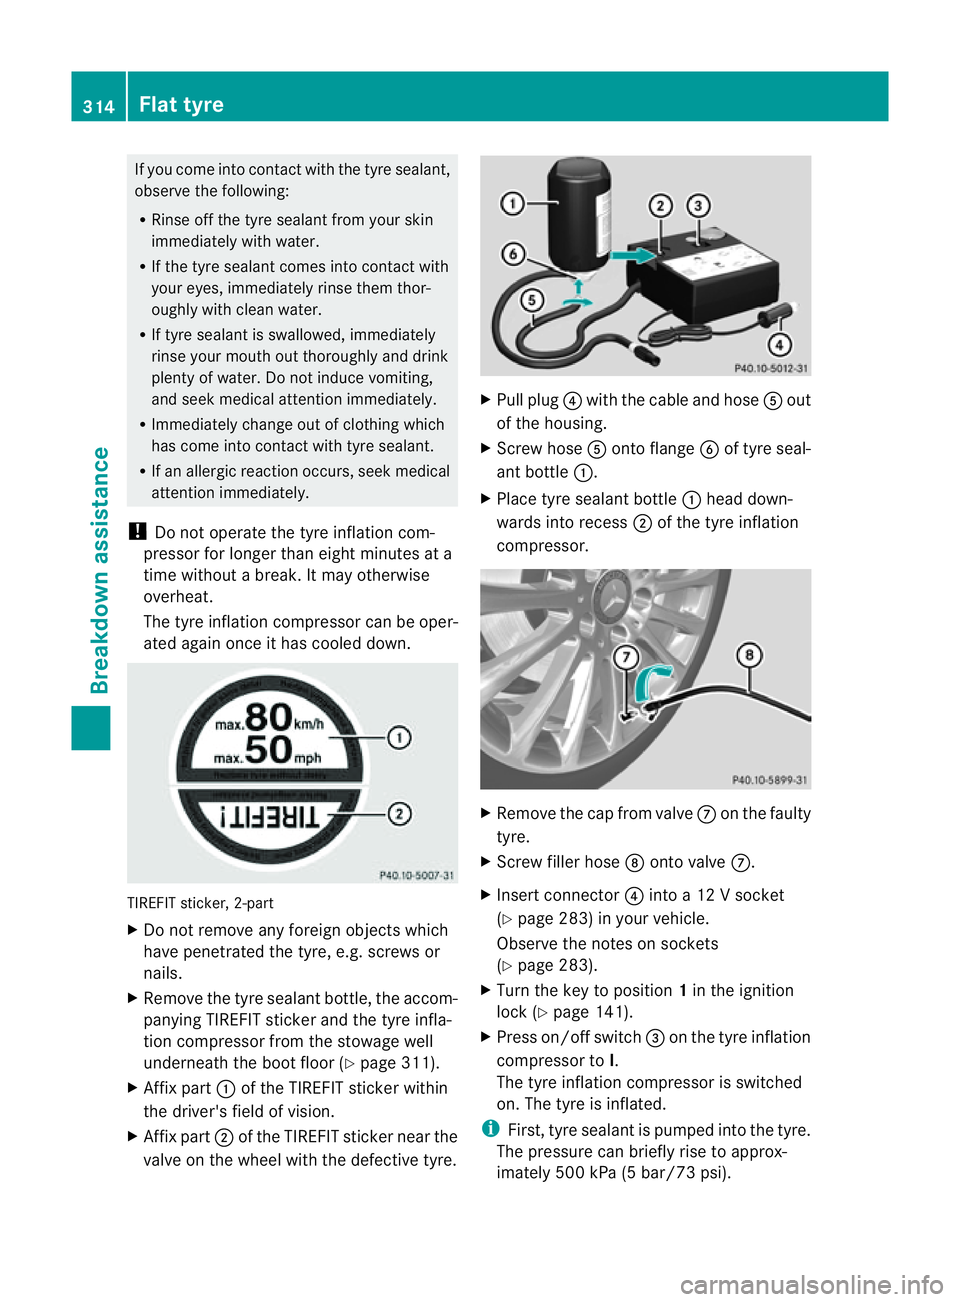
Tsticker, 2-part
X Do not remove any foreign objects which
have penetrated the tyre, e.g. screws or
nails.
X Remove the tyre sealant bottle, the accom-
panying TIREFI Tsticker and the tyre infla-
tion compressor from the stowage well
underneath the boot floor (Y page 311).
X Affix part :of the TIREFI Tsticker within
the driver's field of vision.
X Affix part ;of the TIREFI Tsticke rnearthe
valv eont he whee lwitht he defectiv etyre. X
Pull plug ?with the cable and hose Aout
of the housing.
X Scre whose Aonto flange Bof tyr eseal-
ant bottle :.
X Place tyr esealan tbottle : head down-
wards into recess ;of the tyr einflation
compressor. X
Remov ethe cap fro mvalve Con th efaulty
tyre.
X Screw fille rhose Dontov alveC.
X Insert connector ?into a12V socket
(Y page 283) in your vehicle.
Observe the notes on sockets
(Y page 283).
X Turn the key to position 1in the ignition
lock (Y page 141).
X Press on/offs witch=on th etyrei nflation
compressor to I.
The tyr einflatio ncompressor is switched
on. The tyre is inflated.
i First,t yre sealant is pumped into the tyre.
The pressure can briefly rise to approx-
imately 500 kPa (5 bar/73 psi). 314
Flat tyreBreakdown assistance
Page 318 of 373

Do not switch off th
etyrei nflation com-
pressor during this phase.
X Let th etyrei nflation compressor run for
fiv em inutes. The tyr eshould then have
attained apressur eofatl east180 kPa
(1.8 bar/26 psi).
If at yre pressure of 180 kPa (1.8 bar/
26 psi )has bee nattained after five minutes:
(Y page 315).
If at yrep ressure of 180 kPa (1. 8bar/
26 psi) ha snot been attaine dafter five
minutes: (Y page 315).
i If the tyr esealan tlea ks out, allo wittodry.
It can the nberemove dlikeal ayer of film.
If yo ugettyr es ealant on your clothing,
hav eitc leane dass oonasp ossible with
perchloroethylene.
Tyre pressure not reached If
ap ressure of 180 kPa (1.8 ba r/26 psi )has
not bee nachieved afte rfive minutes:
X Switch off the tyre inflation compressor.
X Unscrew the filler hose fro mthe valve of
the faulty tyre.
X Very slowly drive forwards or reverse
approximately 10 m.
X Pump up the tyre again.
After amaximum of five minutes the tyre
pressure must be at least 180 kPa (1.8 bar/
26 psi). G
WARNING
If the required tyre pressure is not reached
after the specified time, the tyre is too badly
damaged. The tyre sealant cannot repair the
tyre in this instance. Damaged tyres and atyre
pressure that is too low can significantly
impair the vehicle's braking and driving char-
acteristics .There is arisk of accident.
Do not continue driving. Contact aqualified
specialist workshop. Tyrep
ressur ereached G
WARNING
At yre temporarily sealed wit htyres ealant
impairs th edrivin gcharacteristics and is not
suitable for higher speeds .There is arisk of
accident.
You should therefore adapt your driving style
accordingly and drive carefully. Do not exceed
the specified maximum speed with atyre that
has been repaired using tyre sealant.
! After use, excess tyre sealant may run out
of the filler hose. This could cause stains.
Therefore, place the filler hose in the plastic
bag which contained the TIREFIT kit. H
Environmental note
Have the used tyre sealant bottle disposed of
professionally, e.g. at aqualifie dspecialist
workshop.
If at yrep ressur eof180 kP a(1.8 bar/26 psi)
has been attained after five minutes:
X Switc hoff the tyre inflation compressor.
X Unscrew the filler hose from the valve of
the faulty tyre.
X Stow the tyre sealant bottle, the tyre infla-
tion compressor and the warning triangle.
X Pull away immediately.
The maximum speed for atyre sealed with
tyre sealant is 80 km/h. The upper part of
the TIREFI Tsticker must be affixed to the
instrument cluster in the driver's field of
vision.
X Stop after driving for approximately ten
minutes and check the tyre pressure with
the tyre inflation compressor.
The tyre pressure must now be at least
130 kPa (1.3 bar/19 psi). G
WARNING
If the required tyre pressure is not reached
after driving for ashort period, the tyre is too
badly damaged. The tyre sealant cannot
repair the tyre in this instance. Damaged tyres
and atyre pressure that is too low can signif- Flat tyre
315Breakdown assistance
Z
Page 332 of 373
other obstacles. If it is necessary to drive over
kerbs, speed humps or similar elevations, try
to do so slowly and at an obtuse angle. Oth-
erwise, the tyres, particularly the sidewalls,
may be damaged. Regular checking of wheels and tyres
G
WARNING
Damaged tyres can cause tyre inflation pres-
sure loss. As aresult, you could lose control
of your vehicle. There is arisk of accident.
Check the tyres regularly for signs of damage
and replace any damaged tyres immediately.
Regularly check the wheels and tyres of your
vehicle for damage at least once amonth, as
well as after driving off-road or on rough
roads. Damaged wheels can cause aloss of
tyre pressure. Pay particular attention to
damage such as:
R cuts in the tyres
R punctures
R tears in the tyres
R bulges on tyres
R deformation or severe corrosion on wheels
Regularly check the tyre tread depth and the
condition of the tread across the whole width
of the tyre (Y page 329). If necessary, turn
the front wheels to full lock in order to inspect
the inner side of the tyre surface.
All wheels must have avalve cap to protect
the valve against dirt and moisture. Do not fit
anything ontot he valve other than the stand-
ard valve cap or other valve caps approved by
Mercedes-Benz for your vehicle. Do not fit any
other valve caps or systems, e.g. tyre pres-
sure monitoring systems.
Regularly check the pressure of all the tyres,
particularly prior to long trips. Adjust the tyre
pressure as necessary (Y page 331).
Observe the notes on the emergenc yspare
wheel (Y page 351). The service life of tyres depends on various
factors, including the following:
R
driving style
R tyre pressure
R tyre mileage Tyret
read G
WARNING
Insufficient tyre tread will reduce tyre trac-
tion. The tyre is no longer able to dissipate
water. This means that on wet road surfaces,
the risk of aquaplaning increases, in particular
where speed is not adapted to suit the driving
conditions. There is arisk of accident.
If the tyre pressure is too high or too low, tyres
may exhibit different levels of wear at differ-
ent locations on the tyre tread. Thus, you
should regularly check the tread depth and
the condition of the tread across the entire
width of all tyres.
Minimum tyre tread depth for:
R summer tyres: 3mm
R M+S tyres: 4mm
For safety reasons, replace the tyres before
the legally prescribed limit for the minimum
tyre tread depth is reached.. Selecting, fitting and replacing tyres
R Only fit tyres and wheels of the same type
and make.
R Only fit tyres of the correc tsize ontot he
wheels.
R Run in new tyres at moderate speeds for
the first 100 km. They only reach their full
performanc eafter this distance.
R Do not drive with tyres which have too little
tread depth. This otherwise significantly
reduces the traction on wet roads (aqua-
planing).
R Replace the tyres after six years at the lat-
est, regardless of wear. Operation
329Wheels and tyres Z