2012 MERCEDES-BENZ CLS COUPE fuel pressure
[x] Cancel search: fuel pressurePage 15 of 373

Heating
see Climate control
High-pressure cleaners ....................302
Hill start assist .................................. 144
HOLD function Display message ............................ 245
Function/notes ............................. 179I
Ignitio nlock
see Key positions
Immobiliser .......................................... 70
In-car hotspot see Separate operating instructions
Indicator and warning lamps
Coolant .......................................... 267
DISTRONI CPLUS ........................... 269
Engine diagnostics .........................266
Fuel tank ........................................ 267
SPORT handling mode ...................264
Indicator lamps
Display message ............................ 238
see Warning and indicator lamps
Insectp rotection on the radiator ....297
Inspection see ASSYST PLUS
Instrument cluster
Overview .................................. 30, 209
Settings ......................................... 221
Warning and indicator
lamps ...................................... .32, 258
Instrument cluster lighting ..............222
Intelligen tLight System
Activating/deactivatin g................. 222
Display message ............................ 239
Overview ........................................ 115
Setting the dipped-bea mhead-
lamps for driving on the right/left .223
Interior lighting ................................. 118
Automatic control system ..............118
Delayeds witch-off (on-board
computer) ...................................... 224
Emergency lighting ........................119
Manual control ............................... 119
Overview ........................................ 118
Reading lamp ................................. 118Setting brightness for display/
switches (on-board computer)
.......222
Setting the ambient lighting
brightness (on-board computer) ....223
Setting the ambient lighting col-
our (on-board computer) ................ 223
Interior motio nsensor ........................ 72
ISOFIXc hild seat securing system ....56 J
Jack Storage location ............................ 311
Using ............................................. 338
Jump start (engine)
see Jump starting (engine)
Jump starting (engine) ......................319 K
Key Changing the battery .......................79
Checking the battery .......................79
Convenience closing feature ............89
Convenience opening feature ..........89
Display message ............................ 256
Door central locking/unlocking .......77
Emergency key element ................... 78
Important safety notes ....................76
Loss ................................................. 81
Modifying the programming .............78
Positions (ignition lock) .................141
Problem (malfunction) .....................81
Starting the engine ........................143
KEYLESS-GO
Convenience closing ........................89
Display message ............................ 257
Locking ............................................ 77
Start/Stop button .......................... 141
Starting the engine ........................143
Unlocking ......................................... 77
Keyp ositions
Key ................................................ 141
KEYLESS GO .................................. 141
Kickdown
Driving tips .................................... 151
Manual drive program ....................154
Kneebag ............................................... 4412
Index
Page 24 of 373
Protection of the environment
General notes
H
Environmental note
Daimler's declared policy is one of compre-
hensive environmental protection.
The objectives are for the natural resources
which form the basis of our existence on this
planet to be used sparingly and in amanner
which takes the requirements of both nature
and humanity into account.
You too can help to protect the environment
by operating your vehicle in an environmen-
tally-responsible manner.
Fuel consumption and the rate of engine,
transmission, brake and tyre wear depend on
the following factors:
R operating condition sofyour vehicle
R your personal driving style
You can influence both factors. You should
bear the following in mind:
Operating conditions:
R avoid short trips as these increase fuel con-
sumption.
R make sure that the tyre pressures are
always correct.
R do not carry any unnecessary weight.
R keep an eye on the vehicle's fuel consump-
tion.
R remove roof racks once you no longer need
them.
R ar egularly serviced vehicle will contribute
to environmental protection. You should
therefore adhere to the service intervals.
R always have service work carried out at a
qualified specialist workshop.
Personal driving style:
R do not depress the accelerator pedal when
startingt he engine.
R do not warm up the engine with the vehicle
stationary.
R drive carefully and maintain asafe distance
from the vehicle in front. R
avoid frequent, sudden acceleration.
R change gear in good time and use each gear
only up to Ôof its maximum engine speed.
R switch off the engine in stationary traffic. Returning an end-of-life vehicle
Mercedes-Benz will take back your
Mercedes-Benz to dispose of it in an environ-
mentally responsible manner, in accordance
the European Union (EU) End of Life Vehicles
Directive.
The End of Life Vehicles Directive applies to
vehicles with agross vehicle weight of up to
3.5 t, in accordance with national regulations.
For several years, Mercedes-Benz has been
meeting all the legal requirements for a
design which allowsf or recycling and re-use.
There is anetwork of return points and dis-
assembly plants which can recycle your vehi-
cle in an environmentally-responsible man-
ner. The methods employed in vehicle and
parts recycling are constantly being devel-
oped and improved. This means that your
Mercedes-Benz will also continue to meet
even the increased recycling quotas in the
future in good time. You can obtain further
information from your national Mercedes-
Benz homepage or your national hotline num-
ber. Product information
Mercedes-Benz recommends that you use
genuine Mercedes-Benz parts, conversion
parts and accessories that have been
approved for the type of vehicle.
Mercedes-Benz tests genuine parts and con-
version parts and accessories that have been
specifically approved for your vehicle for their
reliability, safety and suitability. Despite
ongoing market research, Mercedes-Benz is
unable to assess other parts. Therefore,
Mercedes-Benz accepts no responsibility for
the use of such parts in Mercedes-Benz vehi- Introduction
21 Z
Page 35 of 373

Warning and indicator lamps
Function Page
:
÷
ESP® 263
M
SPORT handling
mode in AMG vehicles 264
;
·
Distance warning 269
=
å
ESP®
OFF 263
?
#!
Turn signals 113
A
J
Brakes (red) 260
B
J
Only for certain vehi-
cles: brakes (yellow) 260
C
!
ABS 261
D
6
SRS 266
E
;
Engine diagnostics 266
F
h
Tyre pressure monitor 270 Function Page
G
ü
Seat belt 259
H
%
Diesel engine: pre-
glow 143
÷
ESP®
in AMG vehicles 264
I
?
Coolant 267
J
K
Main-beam headlamp 113
K
L
Dipped-bea mhead-
lamps 111
L
T
Side lamps 112
M
R
Rear foglamp 112
N
N
This lamp has no func-
tion O
8
Reserve fuel 26732
Instrument clusterAt
ag lance
Page 157 of 373
Clearing th
eshiftrange restriction X
Pul lthe right-hand steering wheel gearshift
paddle until the numbe rfor the gear disap-
pears from the multifunction display.
or
X Shift the transmission to position D.
The automatic transmission shifts from the
current shift range directly to D.
Selecting the ideal shift range X
Pull the left-hand steerin gwheel gearshift
paddle and hold it in position.
The automatic transmission shifts to the
gear which allowso ptimum acceleration
and deceleration. To do this, the automatic
transmission shifts down one or more
gears. Manual drive program
Activating the manuald rive programX
Press the program selector button
(Y page 151) repeatedly until Mappears in
the multifunction display.
X AMG vehicles: turn the drive program
selector (Y page 152) until Mappears in the
multifunction display.
The indicator Mon the drive program selec-
tor lights up in red.
AMG vehiclesa nd vehicleswithaDIRECT
SELECT lever: you can select manual drive
program Musin gthe program selector or the
driv eprogram selector button. In manual
driv eprogram M,you can chang egear using
th es teering wheel gearshif tpaddles if the
transmission is in position D.
Upshifting !
In manual gearshif tprogram M,the auto-
matic transmission does not shift up auto-
matically even when the engine limiting
spee dfor the current gearisr eached.
When the engine limiting speed is reached, the fuel supplyisc
ut to prevent the engine
from overrevving. You must make sure that
the engine speed does not reach the red
area of the rev counter. Otherwise, there is
ar isk of engine damage.
X Pull the right-hand steering wheel gearshift
paddle.
The automatic transmission shifts up to the
next gear.
AMG vehicles
X If the colour in the multifunction displayin
the speedometer changes to red and the
UP displaym
essage is shown, shift up a
gear.
Downshifting X
Pull the left-hand steering wheel gearshift
paddle.
The automatic transmission shifts down to
the next gear.
i If you slow down or stop without shifting
down, the automatic transmission auto-
matically shifts down.
i For maximum acceleration, pull the left-
hand steering wheel gearshift paddleu ntil
the transmission selects the optimum gear
for the current speed.
Kickdown You can also use kickdown for maximum
acceleration in manual drive program
M.
X Depress the accelerator pedal beyond the
pressure point.
The transmission shifts to alower gear
depending on the engine speed.
X Shift back up once the desired speed is
reached.
i AMG vehicles: it is not possible to use
kickdown in manual drive program M.154
Automatic transmissionDriving and parking
Page 160 of 373
Refuelling
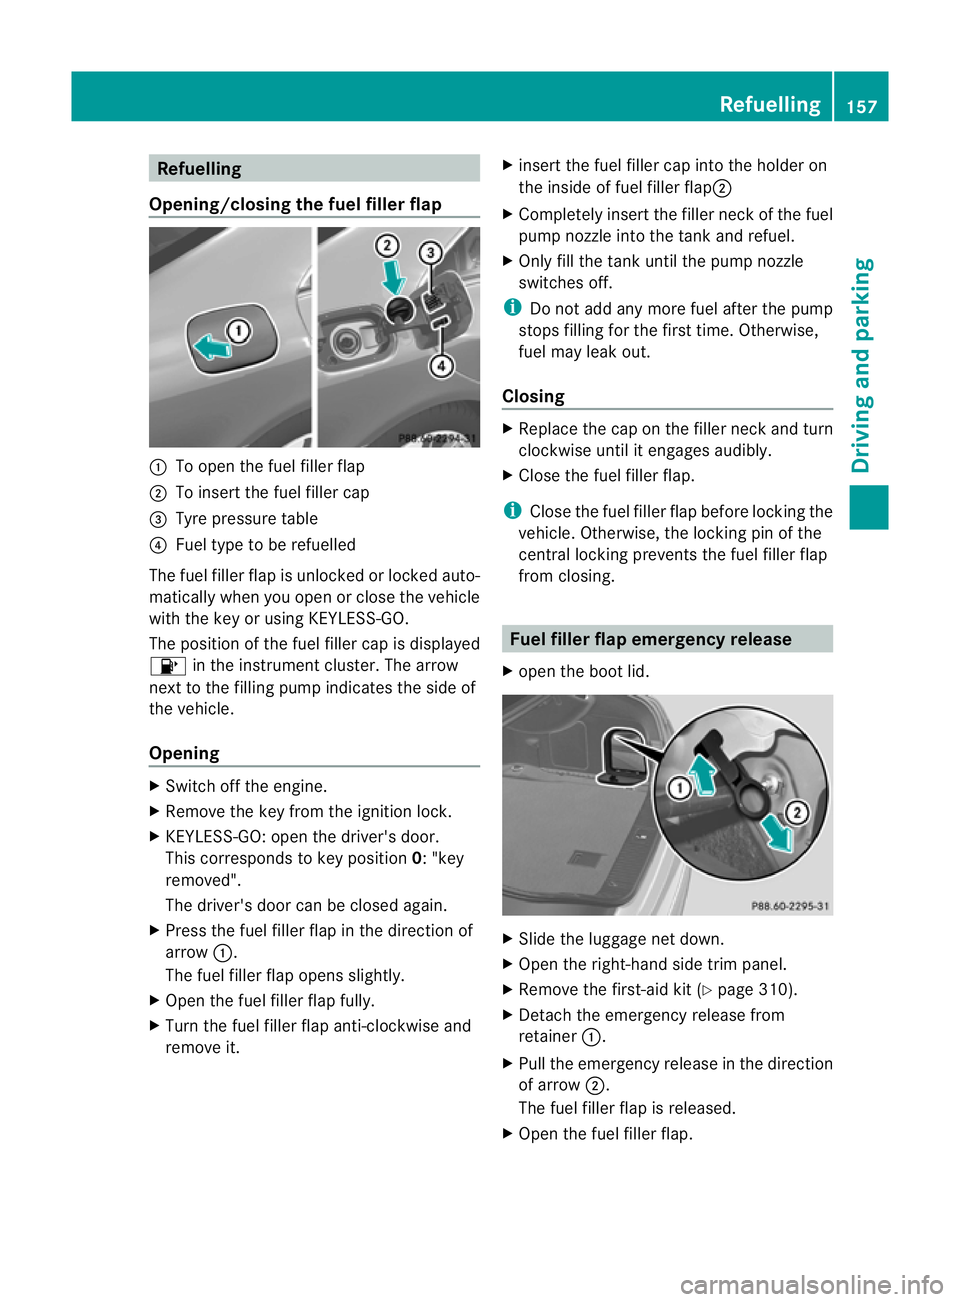
Opening/closing the fue lfille rflap :
To open the fuel filler flap
; To inser tthe fuel filler cap
= Tyre pressure table
? Fuel type to be refuelled
The fuel filler flap is unlocked or locked auto-
matically when you open or close the vehicle
with the key or using KEYLESS-GO.
The position of the fuel filler cap is displayed
8 in the instrumentc luster. The arrow
next to the filling pump indicates the side of
the vehicle.
Opening X
Switch off the engine.
X Remove the key from the ignition lock.
X KEYLESS-GO: open the driver's door.
This corresponds to key position 0:"key
removed".
The driver's door can be closed again.
X Press the fuel filler flap in the direction of
arrow :.
The fuel filler flap opens slightly.
X Open the fuel filler flap fully.
X Turn the fuel filler flap anti-clockwise and
remove it. X
insert the fuel filler cap into the holder on
the inside of fuel filler flap ;
X Completely insert the filler neck of the fuel
pump nozzle into the tank and refuel.
X Only fill the tank until the pump nozzle
switches off.
i Do not add any more fuel after the pump
stops filling for the first time. Otherwise,
fuel may leak out.
Closing X
Replace the cap on the filler neck and turn
clockwise until it engages audibly.
X Close the fuel filler flap.
i Close the fuel filler flap before locking the
vehicle. Otherwise, the locking pin of the
central locking prevents the fuel filler flap
from closing. Fuel filler flap emergency release
X open the boot lid. X
Slide the luggage net down.
X Open the right-hand side trim panel.
X Remove the first-aid kit (Y page 310).
X Detach the emergency release from
retainer :.
X Pull the emergency release in the direction
of arrow ;.
The fuel filler flap is released.
X Open the fuel filler flap. Refuelling
157Driving and parking Z
Page 261 of 373
Display messages Possible causes/consequences and
M Solutions
Â
Remove starting
button
,then insert key The KEYLESS-GO ke
yisnot continually detected.
KEYLESS-GO is temporaril ymalfunctioning or is defective. Awarn-
ing tone also sounds.
X Inser tthe keyintot he ignition loc kand tur nittot hedesired
position.
X Visi taq ualified specialist workshop. Â
Close doors to
lock vehicle At least one door is open.
Awarning tone also sounds.
X Close all door sand loc kthe vehicle again. Warning and indicator lamps in the
instrument cluster
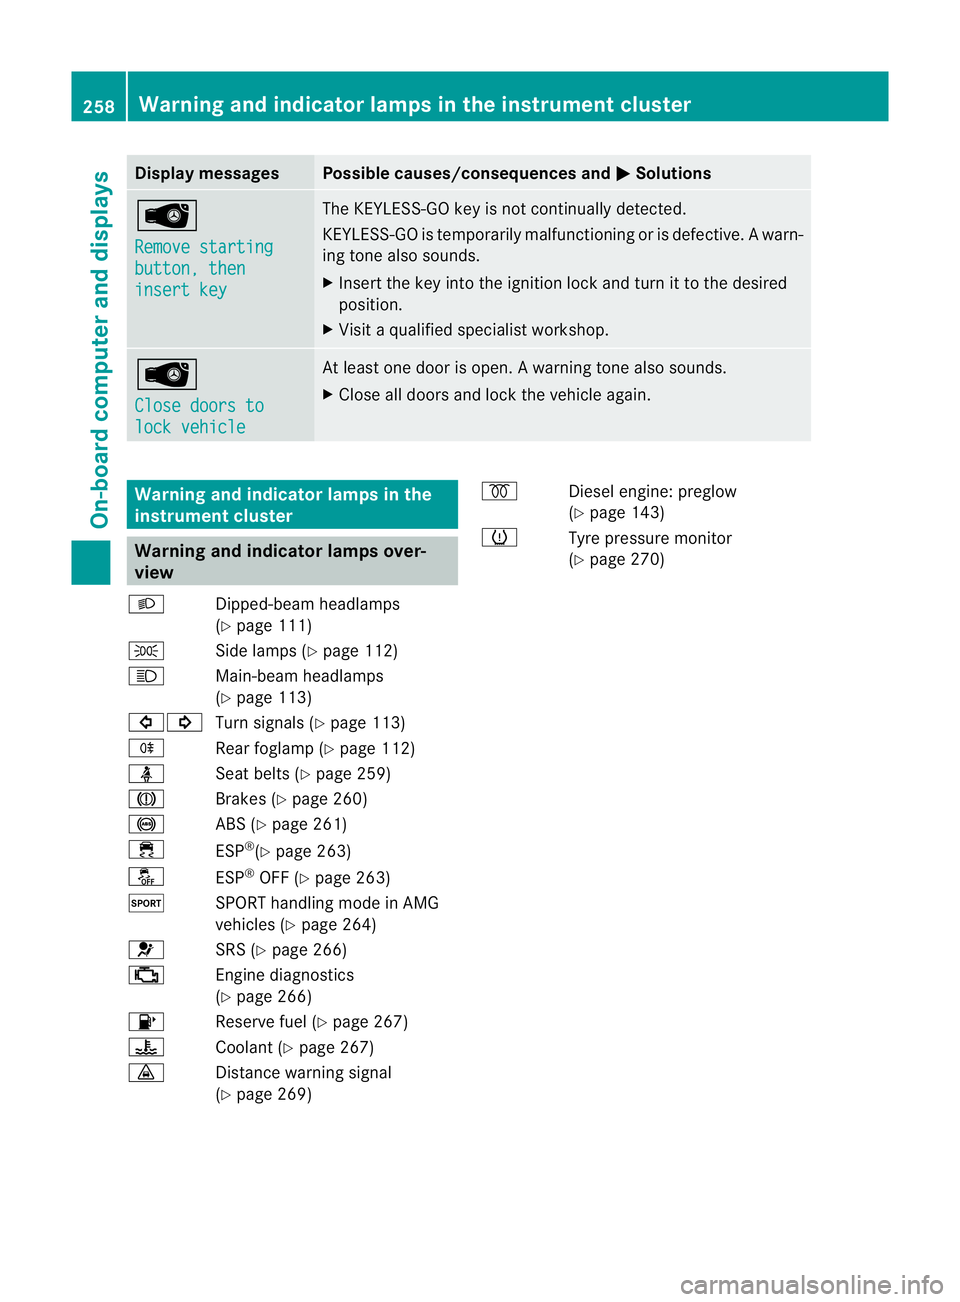
Warning and indicator lamps over-
view
L Dipped-beam headlamps
(Ypage 111)
T Side lamps (Y page 112)
K Main-beam headlamps
(Ypage 113)
#! Turn signals (Y page 113)
R Rear foglamp (Y page 112)
ü Seat belts (Y page 259)
J Brakes (Ypage 260)
! ABS (Ypage 261)
÷ ESP®
(Y page 263)
å ESP®
OFF (Y page 263)
M SPORT handling mode in AMG
vehicles (Ypage 264)
6 SRS (Ypage 266)
; Enginediagnostics
(Y page 266)
8 Reserve fuel (Y page 267)
? Coolant (Ypage 267)
· Distancewarning signal
(Y page 269) %
Diesel engine: preglow
(Ypage 143)
h Tyre pressure monitor
(Ypage 270) 258
Warning and indicator lampsint
he instrument clusterOn-board computer and displays
Page 319 of 373
icantly impair the vehicle's braking and driv-
ing characteristics. There is
arisk of accident.
Do not continue driving. Contact aqualified
specialist workshop.
X Correc tthe tyre pressure if it is still at least
130 kPa (1.3 bar/19 psi) (see the fuel filler
flap for values).
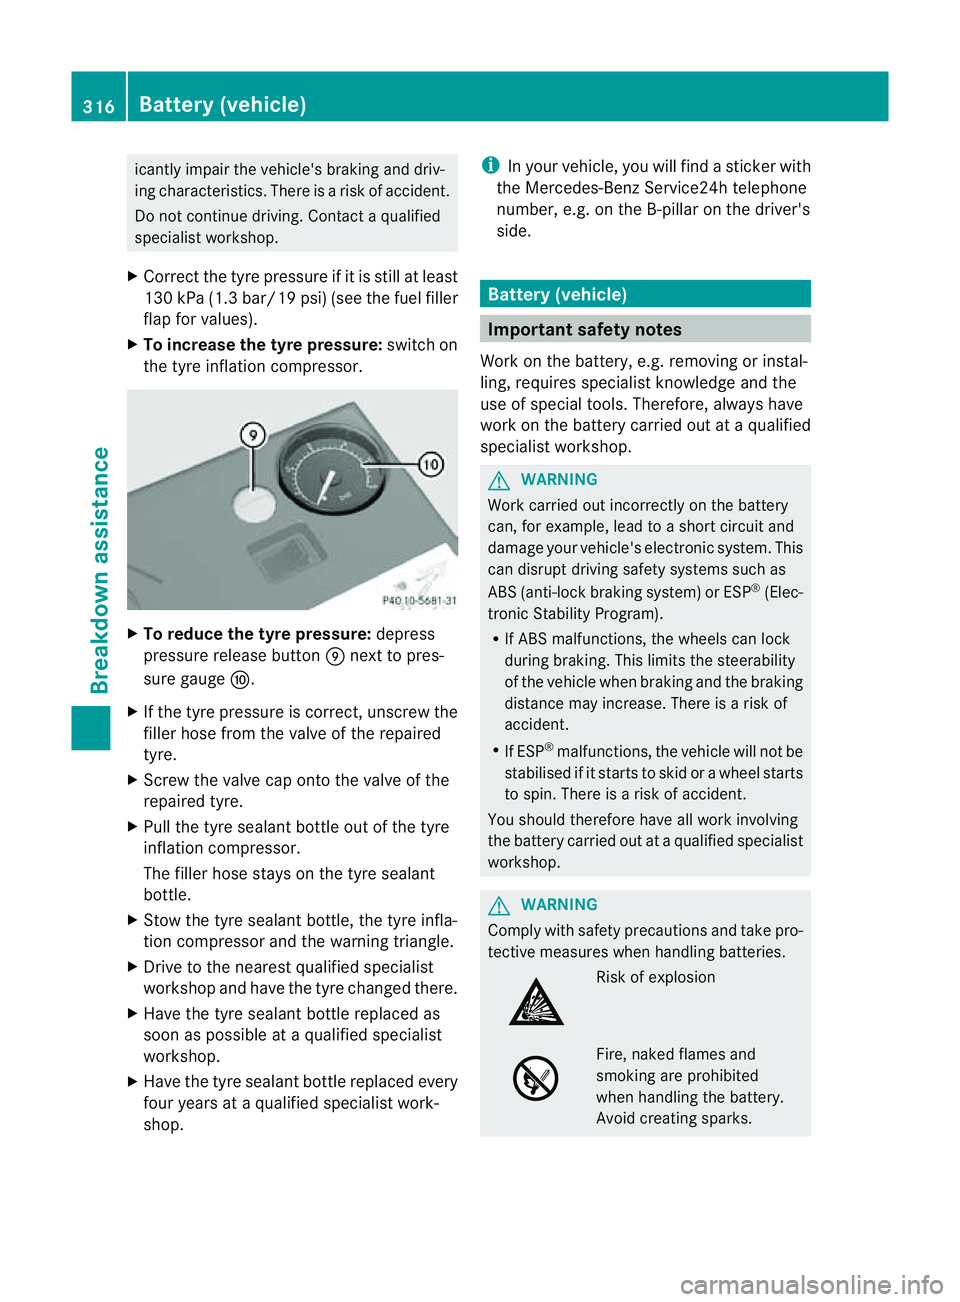
X To increase the tyre pressure: switch on
the tyre inflation compressor. X
To reduce the tyre pressure: depress
pressure release button Enext to pres-
sure gauge F.
X If the tyre pressure is correct,u nscrew the
filler hose from the valve of the repaired
tyre.
X Screw the valve cap onto the valve of the
repaired tyre.
X Pull the tyre sealant bottle out of the tyre
inflation compressor.
The filler hose stays on the tyre sealant
bottle.
X Stow the tyre sealant bottle, the tyre infla-
tion compressor and the warning triangle.
X Drive to the nearest qualified specialist
workshop and have the tyre changed there.
X Have the tyre sealant bottle replaced as
soon as possible at aqualified specialist
workshop.
X Have the tyre sealant bottle replaced every
four years at aqualified specialist work-
shop. i
In your vehicle, you will find asticker with
the Mercedes-Ben zService24h telephone
number, e.g. on the B-pillar on the driver's
side. Battery (vehicle)
Important safet
ynotes
Work on the battery, e.g. removin gorinstal-
ling, requires specialist knowledge and the
use of special tools. Therefore, alway shave
work on the batter ycarried out at aqualified
specialist workshop. G
WARNING
Work carried out incorrectly on the battery
can, for example, lead to ashort circuit and
damage your vehicle's electronic system. This
can disrupt driving safety systems such as
ABS (anti-lock brakin gsystem) or ESP ®
(Elec-
tronic Stabilit yProgram).
R If AB Smalfunctions, th ewheels can lock
during braking. This limits th esteerability
of th evehicl ewhen brakin gand th ebraking
distanc emay increase .There is arisk of
accident.
R If ESP ®
malfunctions, the vehicle will not be
stabilised if it starts to skid or awheel starts
to spin. There is arisk of accident.
You should therefore have all work involving
the battery carried out at aqualified specialist
workshop. G
WARNING
Comply with safety precautions and take pro-
tective measures when handling batteries. Risk of explosion
Fire, naked flames and
smoking are prohibited
when handling the battery.
Avoid creating sparks.316
Battery (vehicle)Breakdown assistance
Page 331 of 373
Useful information
i This Owner's Manual describes all mod-
els, series and optional equipment for your
vehicle that were available at the time of
going to press. National variation sare pos-
sible. Not ethat your vehicle may not be
equipped with all of the function sdescri-
bed. This is also the case for system sand
function srelevan ttosafety.
i Read the information on qualified special-
ist workshops: (Y page 23). Important safet
ynotes G
WARNING
If wheels and tyres of the wrong size are used,
the wheel brakes or suspension components
may be damaged. There is arisk of accident.
Always replac ewheels and tyre swith those
that fulfil the specifications of the original part
(designation ,manufacturer, model). G
WARNING
Af lat tyre severely impairs the driving, steer-
ing and braking characteristics of the vehicle.
There is arisk of accident.
Tyres without run-flat characteristics:
R do not drive with aflat tyre.
R immediately replac ethe flat tyre with your
emergenc yspare wheel or spare wheel, or
consult aqualified specialist workshop.
Tyres with run-flat characteristics:
R pay attention to the information and warn-
ing notices on MOExtended tyre s(tyres
with run-flat characteristics).
Accessories that are not approved for your
vehicle by Mercedes-Ben zorare not being
usedc orrectly can impair the operating
safety. Before purchasing and using non-approved
accessories, visit aqualified specialist work-
shop and enquire about:
R suitability
R lega lstipulations
R factory recommendations
Information on the dimensions and types of
wheels and tyres for yourv ehicle can be
found under "Wheel/tyre combinations"
(Y page 341).
Information on air pressure for the tyres on
your vehicle can be found:
R on the tyre pressure label on the fuel filler
flap (Y page 157)
R under "Tyre pressure" (Y page 331)
R in the "Tyre pressure" section
Modification work on the brake system and
wheels is not permitted. The use of wheel
spacers or brake dust shields is not permit-
ted. This invalidates the general operating
permit for the vehicle.
i Further information on wheels and tyres
can be obtained at any qualified specialist
workshop. Operation
Information on driving
Check the tyre pressures when the vehicle is
heavily laden and, if necessary, adjust.
While driving, pay attention to vibrations,
noises and unusual handling characteristics,
e.g. pulling to one side. This may indicat ethat
the wheels or tyres are damaged. If you sus-
pect that atyre is defective, reduce your
speed immediately. Stop the vehicle as soon
as possible to chec kthe wheels and tyres for
damage. Hidden tyre damage could also be
causing the unusual handling characteristics.
If you find no signs of damage, have the tyres
and wheels checked at aqualified specialist
workshop.
When parking your vehicle, make sure that
the tyres do not get deformed by the kerb or 328
OperationWheels and tyres