2012 MERCEDES-BENZ CLS COUPE inflation pressure
[x] Cancel search: inflation pressurePage 317 of 373
If you come into contact with the tyre sealant,
observe the following:
R Rinse off the tyre sealant from yours kin
immediately with water.
R If the tyre sealant comes into contact with
youre yes, immediately rinse them thor-
oughly wit hclean water.
R If tyr esealant is swallowed ,immediately
rinse your mout hout thoroughl yand drink
plenty of water. Do no tind ucev omiting,
and see kmedical attention immediately.
R Immediately change out of clothing which
has come into contact with tyre sealant.
R If an allergic reaction occurs ,seek medical
attention immediately.
! Do not operate the tyre inflation com-
pressor for longer than eight minutes at a
time without abreak. It may otherwise
overheat.
The tyre inflation compressor can be oper-
ated again onceith as cooled down.TIREFI
Tsticker, 2-part
X Do not remove any foreign objects which
have penetrated the tyre, e.g. screws or
nails.
X Remove the tyre sealant bottle, the accom-
panying TIREFI Tsticker and the tyre infla-
tion compressor from the stowage well
underneath the boot floor (Y page 311).
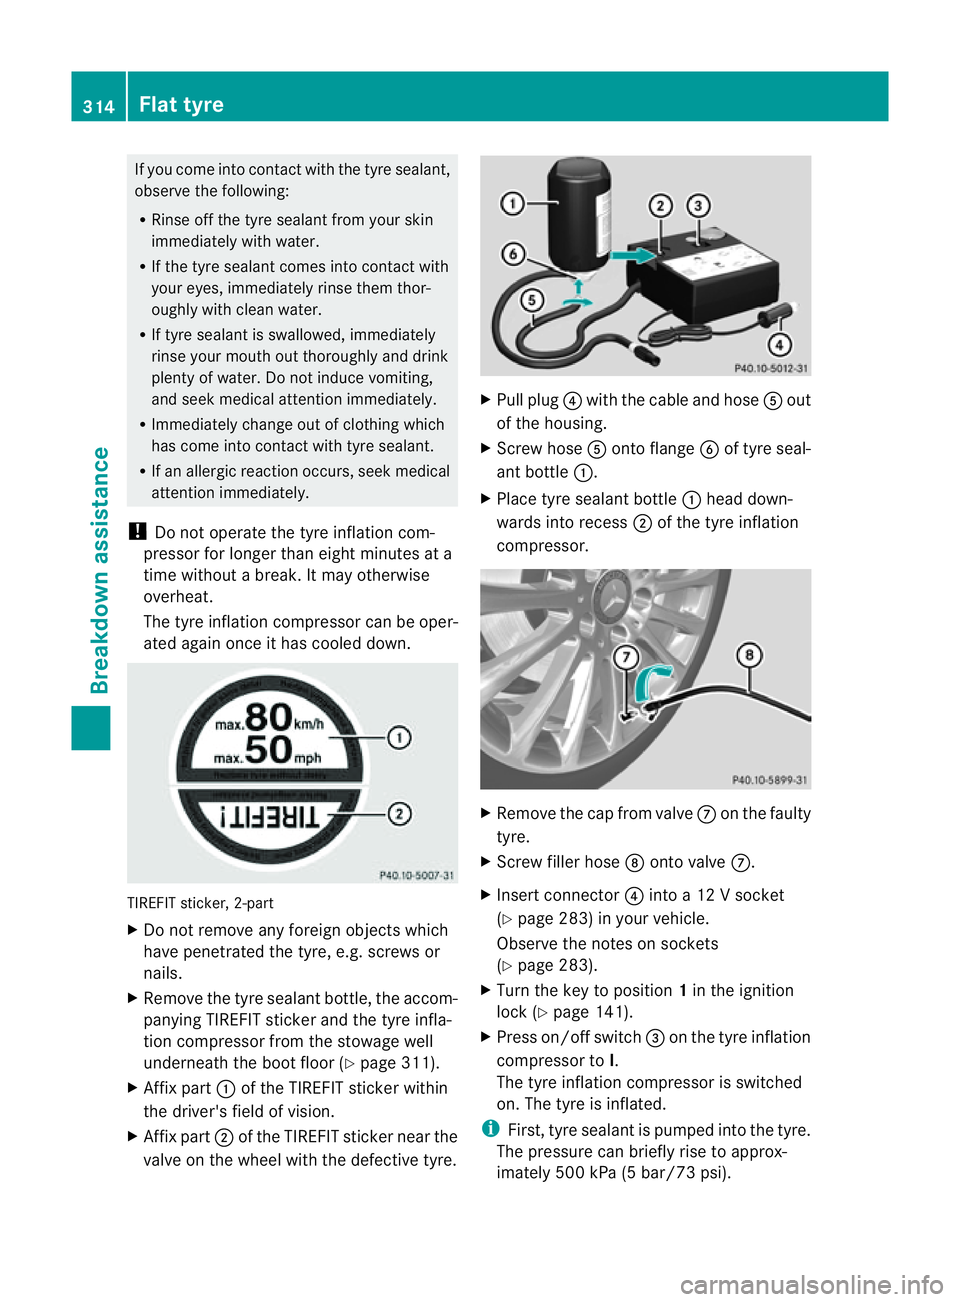
X Affix part :of the TIREFI Tsticker within
the driver's field of vision.
X Affix part ;of the TIREFI Tsticke rnearthe
valv eont he whee lwitht he defectiv etyre. X
Pull plug ?with the cable and hose Aout
of the housing.
X Scre whose Aonto flange Bof tyr eseal-
ant bottle :.
X Place tyr esealan tbottle : head down-
wards into recess ;of the tyr einflation
compressor. X
Remov ethe cap fro mvalve Con th efaulty
tyre.
X Screw fille rhose Dontov alveC.
X Insert connector ?into a12V socket
(Y page 283) in your vehicle.
Observe the notes on sockets
(Y page 283).
X Turn the key to position 1in the ignition
lock (Y page 141).
X Press on/offs witch=on th etyrei nflation
compressor to I.
The tyr einflatio ncompressor is switched
on. The tyre is inflated.
i First,t yre sealant is pumped into the tyre.
The pressure can briefly rise to approx-
imately 500 kPa (5 bar/73 psi). 314
Flat tyreBreakdown assistance
Page 318 of 373

Do not switch off th
etyrei nflation com-
pressor during this phase.
X Let th etyrei nflation compressor run for
fiv em inutes. The tyr eshould then have
attained apressur eofatl east180 kPa
(1.8 bar/26 psi).
If at yre pressure of 180 kPa (1.8 bar/
26 psi )has bee nattained after five minutes:
(Y page 315).
If at yrep ressure of 180 kPa (1. 8bar/
26 psi) ha snot been attaine dafter five
minutes: (Y page 315).
i If the tyr esealan tlea ks out, allo wittodry.
It can the nberemove dlikeal ayer of film.
If yo ugettyr es ealant on your clothing,
hav eitc leane dass oonasp ossible with
perchloroethylene.
Tyre pressure not reached If
ap ressure of 180 kPa (1.8 ba r/26 psi )has
not bee nachieved afte rfive minutes:
X Switch off the tyre inflation compressor.
X Unscrew the filler hose fro mthe valve of
the faulty tyre.
X Very slowly drive forwards or reverse
approximately 10 m.
X Pump up the tyre again.
After amaximum of five minutes the tyre
pressure must be at least 180 kPa (1.8 bar/
26 psi). G
WARNING
If the required tyre pressure is not reached
after the specified time, the tyre is too badly
damaged. The tyre sealant cannot repair the
tyre in this instance. Damaged tyres and atyre
pressure that is too low can significantly
impair the vehicle's braking and driving char-
acteristics .There is arisk of accident.
Do not continue driving. Contact aqualified
specialist workshop. Tyrep
ressur ereached G
WARNING
At yre temporarily sealed wit htyres ealant
impairs th edrivin gcharacteristics and is not
suitable for higher speeds .There is arisk of
accident.
You should therefore adapt your driving style
accordingly and drive carefully. Do not exceed
the specified maximum speed with atyre that
has been repaired using tyre sealant.
! After use, excess tyre sealant may run out
of the filler hose. This could cause stains.
Therefore, place the filler hose in the plastic
bag which contained the TIREFIT kit. H
Environmental note
Have the used tyre sealant bottle disposed of
professionally, e.g. at aqualifie dspecialist
workshop.
If at yrep ressur eof180 kP a(1.8 bar/26 psi)
has been attained after five minutes:
X Switc hoff the tyre inflation compressor.
X Unscrew the filler hose from the valve of
the faulty tyre.
X Stow the tyre sealant bottle, the tyre infla-
tion compressor and the warning triangle.
X Pull away immediately.
The maximum speed for atyre sealed with
tyre sealant is 80 km/h. The upper part of
the TIREFI Tsticker must be affixed to the
instrument cluster in the driver's field of
vision.
X Stop after driving for approximately ten
minutes and check the tyre pressure with
the tyre inflation compressor.
The tyre pressure must now be at least
130 kPa (1.3 bar/19 psi). G
WARNING
If the required tyre pressure is not reached
after driving for ashort period, the tyre is too
badly damaged. The tyre sealant cannot
repair the tyre in this instance. Damaged tyres
and atyre pressure that is too low can signif- Flat tyre
315Breakdown assistance
Z
Page 319 of 373
icantly impair the vehicle's braking and driv-
ing characteristics. There is
arisk of accident.
Do not continue driving. Contact aqualified
specialist workshop.
X Correc tthe tyre pressure if it is still at least
130 kPa (1.3 bar/19 psi) (see the fuel filler
flap for values).
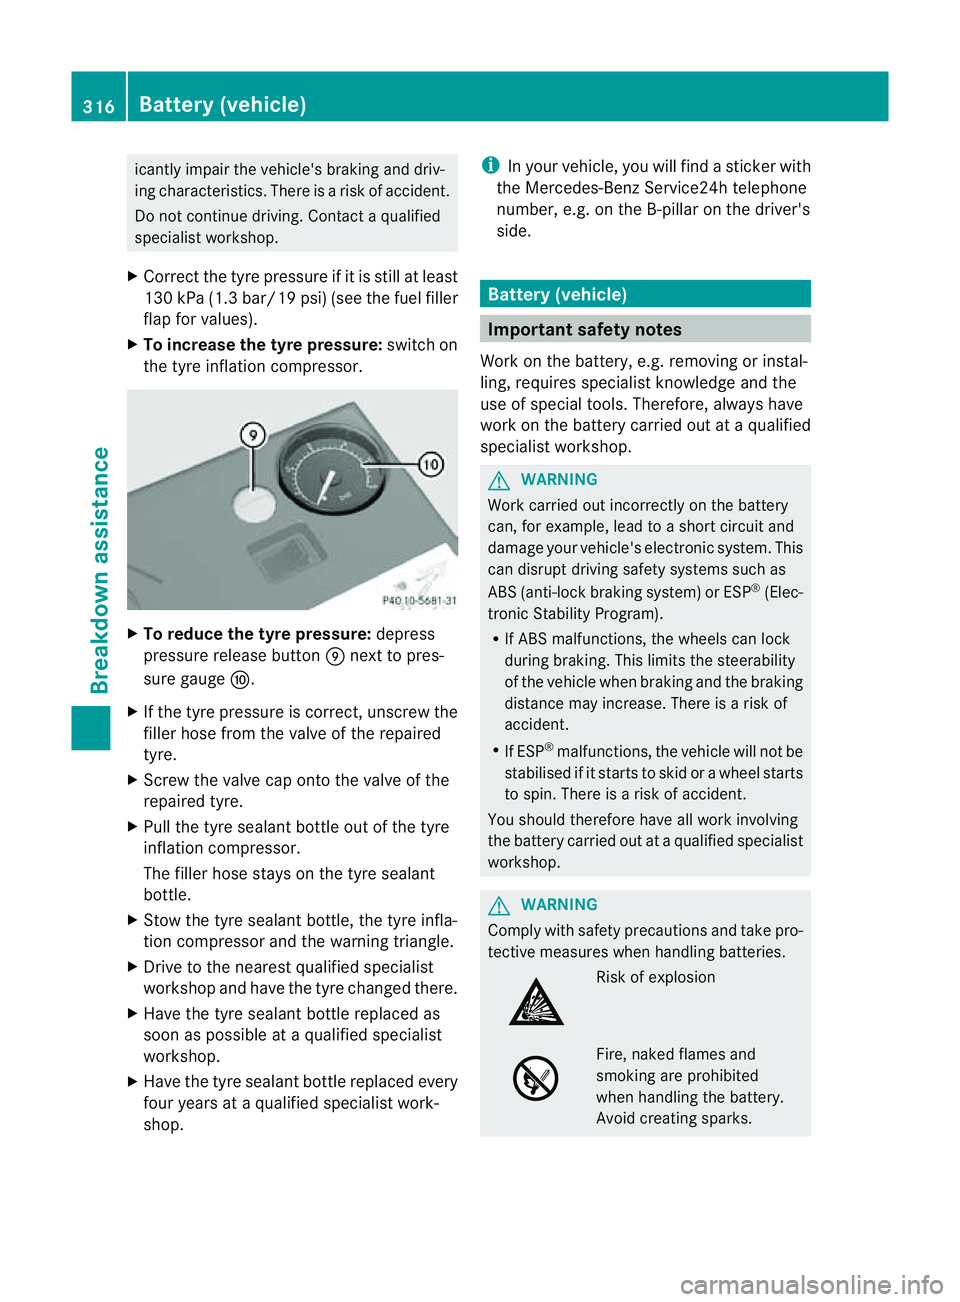
X To increase the tyre pressure: switch on
the tyre inflation compressor. X
To reduce the tyre pressure: depress
pressure release button Enext to pres-
sure gauge F.
X If the tyre pressure is correct,u nscrew the
filler hose from the valve of the repaired
tyre.
X Screw the valve cap onto the valve of the
repaired tyre.
X Pull the tyre sealant bottle out of the tyre
inflation compressor.
The filler hose stays on the tyre sealant
bottle.
X Stow the tyre sealant bottle, the tyre infla-
tion compressor and the warning triangle.
X Drive to the nearest qualified specialist
workshop and have the tyre changed there.
X Have the tyre sealant bottle replaced as
soon as possible at aqualified specialist
workshop.
X Have the tyre sealant bottle replaced every
four years at aqualified specialist work-
shop. i
In your vehicle, you will find asticker with
the Mercedes-Ben zService24h telephone
number, e.g. on the B-pillar on the driver's
side. Battery (vehicle)
Important safet
ynotes
Work on the battery, e.g. removin gorinstal-
ling, requires specialist knowledge and the
use of special tools. Therefore, alway shave
work on the batter ycarried out at aqualified
specialist workshop. G
WARNING
Work carried out incorrectly on the battery
can, for example, lead to ashort circuit and
damage your vehicle's electronic system. This
can disrupt driving safety systems such as
ABS (anti-lock brakin gsystem) or ESP ®
(Elec-
tronic Stabilit yProgram).
R If AB Smalfunctions, th ewheels can lock
during braking. This limits th esteerability
of th evehicl ewhen brakin gand th ebraking
distanc emay increase .There is arisk of
accident.
R If ESP ®
malfunctions, the vehicle will not be
stabilised if it starts to skid or awheel starts
to spin. There is arisk of accident.
You should therefore have all work involving
the battery carried out at aqualified specialist
workshop. G
WARNING
Comply with safety precautions and take pro-
tective measures when handling batteries. Risk of explosion
Fire, naked flames and
smoking are prohibited
when handling the battery.
Avoid creating sparks.316
Battery (vehicle)Breakdown assistance
Page 332 of 373
other obstacles. If it is necessary to drive over
kerbs, speed humps or similar elevations, try
to do so slowly and at an obtuse angle. Oth-
erwise, the tyres, particularly the sidewalls,
may be damaged. Regular checking of wheels and tyres
G
WARNING
Damaged tyres can cause tyre inflation pres-
sure loss. As aresult, you could lose control
of your vehicle. There is arisk of accident.
Check the tyres regularly for signs of damage
and replace any damaged tyres immediately.
Regularly check the wheels and tyres of your
vehicle for damage at least once amonth, as
well as after driving off-road or on rough
roads. Damaged wheels can cause aloss of
tyre pressure. Pay particular attention to
damage such as:
R cuts in the tyres
R punctures
R tears in the tyres
R bulges on tyres
R deformation or severe corrosion on wheels
Regularly check the tyre tread depth and the
condition of the tread across the whole width
of the tyre (Y page 329). If necessary, turn
the front wheels to full lock in order to inspect
the inner side of the tyre surface.
All wheels must have avalve cap to protect
the valve against dirt and moisture. Do not fit
anything ontot he valve other than the stand-
ard valve cap or other valve caps approved by
Mercedes-Benz for your vehicle. Do not fit any
other valve caps or systems, e.g. tyre pres-
sure monitoring systems.
Regularly check the pressure of all the tyres,
particularly prior to long trips. Adjust the tyre
pressure as necessary (Y page 331).
Observe the notes on the emergenc yspare
wheel (Y page 351). The service life of tyres depends on various
factors, including the following:
R
driving style
R tyre pressure
R tyre mileage Tyret
read G
WARNING
Insufficient tyre tread will reduce tyre trac-
tion. The tyre is no longer able to dissipate
water. This means that on wet road surfaces,
the risk of aquaplaning increases, in particular
where speed is not adapted to suit the driving
conditions. There is arisk of accident.
If the tyre pressure is too high or too low, tyres
may exhibit different levels of wear at differ-
ent locations on the tyre tread. Thus, you
should regularly check the tread depth and
the condition of the tread across the entire
width of all tyres.
Minimum tyre tread depth for:
R summer tyres: 3mm
R M+S tyres: 4mm
For safety reasons, replace the tyres before
the legally prescribed limit for the minimum
tyre tread depth is reached.. Selecting, fitting and replacing tyres
R Only fit tyres and wheels of the same type
and make.
R Only fit tyres of the correc tsize ontot he
wheels.
R Run in new tyres at moderate speeds for
the first 100 km. They only reach their full
performanc eafter this distance.
R Do not drive with tyres which have too little
tread depth. This otherwise significantly
reduces the traction on wet roads (aqua-
planing).
R Replace the tyres after six years at the lat-
est, regardless of wear. Operation
329Wheels and tyres Z
Page 334 of 373
Snow chains
G
WARNING
If you have fitted snow chains to the front
wheels, they may scrape against the vehicle
body or chassis components. This could
cause damage to the vehicle or the tyres.
There is arisk of an accident.
To avoid hazardous situations:
R never fit snow chains on the front wheels
R fit snow chains to the rear wheels in pairs.
For safety reasons, Mercedes-Benz recom-
mends that you only use snow chains that
have been specially approved for your vehicle
by Mercedes-Benz, or that are of acorre-
sponding standard of quality.
If you intendtof it snow chains, please bear
the following points in mind:
R snow chains cannot be fitted to all wheel-
tyre combinations. Permissible wheel-tyre
combination s(Ypage 341).
R only use snow chains when the road sur-
face is completely snow-covered. Remove
the snow chains as soon as possible when
you come to aroad that is not snow-cov-
ered.
R local regulations may restrictt he use of
snow chains. Observe the appropriate reg-
ulations if you wish to fit snow chains.
R do not exceed the maximum permissible
speed of 50 km/h.
R on vehicles with AIRMATIC, you must drive
at raised vehicle level if snow chains have
been fitted (Y page 181).
i You may wish to deactivate ESP ®
when
pulling away with snow chains fitted
(Y page 66). This way you can allow the
wheels to spin in acontrolled manner, ach-
ieving an increased driving force (cutting
action).
For more information on driving with an emer-
gency spare wheel, see (Y page 351). Tyrep
ressure Tyrep
ressur especifications G
WARNING
Tyres with too low or too high tyre pressure
contain the following hazards:
R they can burst, in particular if the vehicle is
heavily laden or when driven at high
speeds.
R the tyres can wear excessively and/or
unevenly, which can severely impair tyre
traction.
R the driving, steering and braking character-
istics may be severely impaired.
There is arisk of accident.
Follow recommended tyre inflation pressures
and check the pressure of all the tyres includ-
ing the spare wheel:
R at least every two weeks
R if the load changes
R before beginning along journey
R for changed operating conditions, e.g. off-
road driving
If necessary, correct the tyre pressure. G
WARNING
If you fit unsuitable accessories onto tyre
valves, the tyre valves may be overloaded and
malfunction, which can cause tyre pressure
loss. Due to their design, retrofitted tyre pres-
sure monitors keep the tyre valve open. This
can also result in tyre pressure loss. There is
ar isk of accident.
Only screw standard valve caps or valve caps
specifically provided by Mercedes-Ben zfor
your vehicle onto the tyre valve. G
WARNING
If the tyre pressure drops repeatedly, the
wheel, valve or tyre may be damaged. Tyre
pressure that is too low may result in atyre
blow-out. There is arisk of accident. Tyrep
ressure
331Wheels and tyres
Z
Page 356 of 373
X
Insert connector ?into the cigarette
lighter socket or into a12Vsocket in your
vehicle.
Observe the notes on the cigarette lighter
(Y page 283). Observe the notes on sock-
ets (Y page 283).
X Turn the key to position 1in the ignition
lock (Y page 141).
X Press on/off switch Aon the tyre inflation
compressor to I.
The tyre inflation compressor is switched
on. The tyre is inflated. The tyre pressure is
shown on pressure gauge =.
X Pump the tyre to the specified tyre pres-
sure.
The specified tyre pressure is printed on
the yellow label of the emergency spare
wheel.
X When the specified tyre pressure has been
reached, press on/off switch Aon the
electric air pump to 0.
The tyre inflation compressor is switched
off.
X Turn the key to position 0in the ignition
lock.
X If the tyre pressure is higher than the speci-
fied pressure, press pressure release but-
ton ;until the correct tyre pressure has
been reached.
X Unscrew union nut :on the air hose from
the valve.
X Screw the valve cap onto the collapsible
emergency spare wheel valve again.
X Stow plug ?and the air hose in the lower
section of the blower housing.
X Stow the tyre inflation compressor in the
vehicle. Emergency sparew
heel
353Wheels and tyres Z