2012 MERCEDES-BENZ CLS COUPE run flat
[x] Cancel search: run flatPage 13 of 373
Electronic Stability Program
see ESP ®
(Electronic Stabilit yProgram)
Electronic Traction System
see ETS/4ETS (Electronic Trac-
tionS ystem)
Emergency key
Unlocking th edriver's doo r.............. 84
Emergency key element
Function/notes ................................ 78
Locking vehicle ................................ 84
Emergency release
Driver's door .................................... 84
Fuel filler fla p................................. 157
Emergency spare wheel
Important safety notes ..................351
Inflating the collapsibl espare
wheel ............................................. 352
Points to remember .......................351
Removing ....................................... 351
Storage location ............................ 351
Stowing .......................................... 352
Technical data ............................... 354
Emergency unlocking
Vehicle ............................................. 84
Engine
Display message ............................ 240
ECO start/stop function ................144
Engine numbe r............................... 359
Jump-starting ................................. 319
Running irregularl y......................... 147
Starting problems ..........................147
Starting the engine with the key ....143
Starting with KEYLESS GO .............143
Stopping ........................................ 160
Tow-starting (vehicle )..................... 323
Warning lamp (engine diagnos-
tics) ............................................... 266
Engine electronics
Notes ............................................. 357
Problem (fault) ............................... 147
Engine oil
Additives ........................................ 364
Checking the oil leve l..................... 297
Checking the oil leve lusing the
dipstick .......................................... 298
Display message ............................ 242
Filling capacity ............................... 364Notes about oil grades ................... 363
Notes on oil level/consumption
....297
Temperature (on-board computer) .228
Topping up ..................................... 298
Viscosity ........................................ 364
Environmental protection
Returning an end-of-life vehicle .......21
ESP ®
(Electronic Stability Pro-
gram) AMG menu (on-board computer) ...228
Deactivating/activating (AMG
vehicles) .......................................... 66
Deactivating/activating (except
AMG vehicles) ................................ 219
Deactivating/activating (notes;
except AMG vehicles) ......................66
Display message ............................ 232
ETS/4ETS ........................................ 66
Function/notes ................................ 65
Important safety guidelines .............65
Warning lamp ................................. 263
ETS/4ETS (Electronic Traction Sys-
tem) ...................................................... 66
Exhaus ttail pipe (cleaning instruc-
tions) .................................................. 305
Exterior lighting Settings options ............................ .110
see Lights
Exterior mirrors
Adjusting ....................................... 105
Anti-dazzle mode (automatic) ........106
Folding in/ou t(automatically) .......106
Folding in/ou t(electrically) ...........105
Folding in whe nlocking( on-board
computer) ...................................... 227
Out of position (troubleshooting) ...106
Parking position ............................. 106
Resetting ....................................... 106
Storing settings (memory func-
tion) ............................................... 107 F
Faul tmessage
see Display messages
Filler cap
see Fuel filler flap
Fire extinguisher ............................... 31110
Index
Page 44 of 373
To ensure that the restraint systems can
deliver their full potential protection, make
sure that:
R
the seat and head restraint are adjusted
properly (Y page 96).
R the seat belt has been fastened properly
(Y page 48).
R the airbags can inflate unrestricted if
deployed (Y page 42).
R the steerin gwheel is adjusted properly
(Y page 102).
R the restraint systems have not been modi-
fied.
An airbag increases the protection of vehicle
occupant swearing aseat belt. However, air-
bags are only an additional restraint system
which complements, but does not replace,
the seat belt. All vehicle occupant smust wear
their seat belt correctly at all times, even if
the vehicle is equipped with airbags. The air-
bags are not deployed in all types of acci-
dents .For example, if the protective capacity
of correctly fastened seat belts is not
increased by deploying the airbags, the air-
bags will not deploy.
Airbag deployment only provides increased
protection if the seat belt is worn correctly.
First,t he seat belt helps to keep the vehicle
occupant in the best position in relation to the
airbag. Second, in ahead-on collision, for
example, the seat belt prevent sthe vehicle
occupant from being propelled towards the
point of impact. SRS (Supplemental Restraint System)
Introduction SRS consist
sof:
R the 6 SRS warning lamp
R airbags
R the airbag control unit with crash sensors
R belt tensioners
R belt force limiters SRS reduces the risk of occupant
scoming
into contact with the vehicle's interior in the
event of an accident .Itcan also reduce the
forces to which occupant sare subjected dur-
ing an accident.
SRS warnin glamp G
WARNING
If SRS is malfunctioning, individuals ystems
may be triggere dunintentionally or might not
be triggere dinthe event of an accident with
ah igh rate of vehicl edeceleration.
Am alfunction has occurred if:
R the 6 SRS warning lamp does not light
up when the ignitio nisswitched on.
R the engine is running and the 6SRS
warning lamp does not go out after afew
seconds.
R the engine is running and the 6SRS
warning lamp lights up again.
In this case, have SRS checked immediately
at aq ualified specialist workshop.
SRS functionsa re checked regularly when
you switch on the ignition and when the
engine is running. Therefore, malfunctions
can be detected in good time.
The 6 SRS warning lamp in the instrument
cluster lights up when the ignition is switched
on. It goes out no later than afew seconds
after the engine is started.
Triggering of belt tensioners, belt force
limiters and airbags During the first stage of
acollision, the airbag
control unit evaluates important physical
data relating to vehicle deceleration or accel-
eration, such as:
R duration
R direction
R magnitude
Based on the evaluation of this data, the air-
bag control unit pre-emptively triggers the
belt tensioners in the first stage. Occupant safety
41Safety Z
Page 253 of 373
Tyres
Display messages Possible causes/consequence
sand M Solutions
Tyr
epressure Check tyres The tyr
epressure loss warnin gsystem ha sdetecte das ignificant
loss in pressure.
Aw arning tone also sounds.
G WARNING
Wit htyrep ressure swhicha re to olow, there is ariskoft he fol-
lowing hazards:
R the tyres may burst, especiallyast he load and vehicle speed
increase.
R the tyres may wear excessively and/or unevenly, which may
greatly impair tyre traction.
R the driving characteristics, as well as steering and braking, may
be greatly impaired.
There is arisk of an accident.
X Stop the vehicle without making any sudden steering or braking
manoeuvres. Pay attention to the traffic conditionsasy ou do
so.
X Secure the vehicle against rolling away (Y page 159).
X If there is aflat tyre, inspect the tyres (Y page 312).
X Check the tyre pressures and, if necessary, correct the tyre
pressure.
X Restart the tyre pressure loss warning system when the tyre
pressure is correct (Y page 333).Check tyre pres‐
sures
then restart Run
Flat Indicator The tyre pressure loss warning system generated
adisplaym es-
sage and has not been restarted since.
X Set the correct tyre pressure in all four tyres.
X Restart the tyre pressure loss warning system (Y page 333).Run Flat Indicator
inoperative The tyre pressure loss warning system is faulty.
X
Visit aqualified specialist workshop. Tyre pressure
displayed after
driving for
afew minutes The tyre pressure monitor is measuring the tyre pressure.
X
Driv eon.
The tyre pressures appear in the multifunction display after you
have been driving for afew minutes. Tyre press. monitor
inoperative The tyre pressure monitor is faulty.
X
Visit aqualified specialist workshop. 250
Display messagesOn-boar
dcomputer and displays
Page 315 of 373
The vehicle tool kit contains:
R
Foldable wheel chock
R Fuse allocation chart
R Jack
R Centrin gpin
R One pair of gloves
R Wheel wrench
R Towing eye
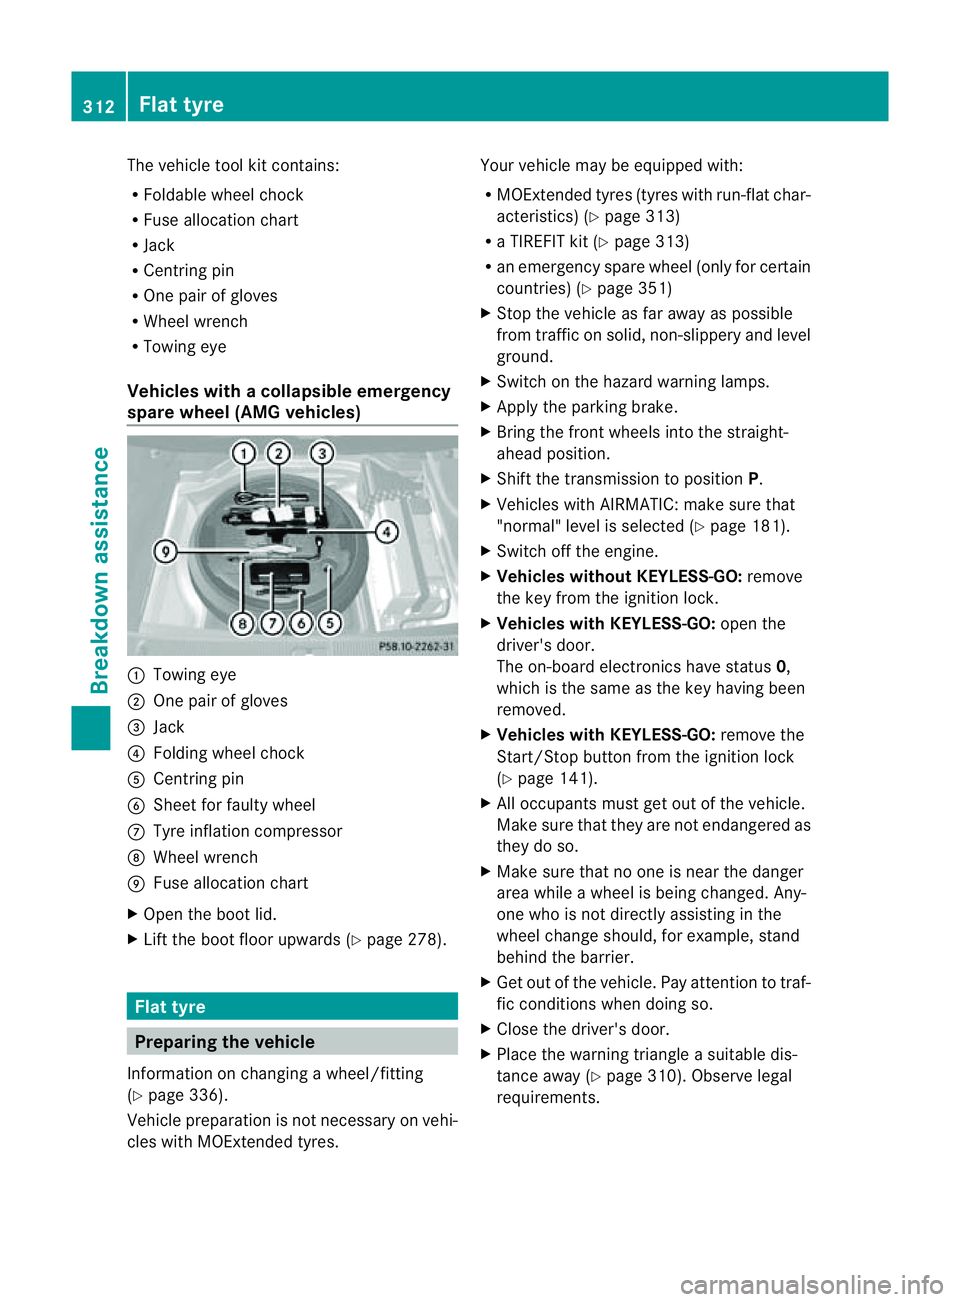
Vehicles with acollapsible emergency
spare wheel (AMG vehicles) :
Towin geye
; Onep air of gloves
= Jack
? Folding wheel chock
A Centrin gpin
B Sheet for fault ywheel
C Tyre inflatio ncompressor
D Wheel wrench
E Fuse allocation chart
X Open the boot lid.
X Lift the boot floor upwards (Y page 278).Flat tyre
Preparing the vehicle
Information on changing awheel/fitting
(Y page 336).
Vehicle preparation is not necessary on vehi-
cles with MOExtended tyres. Your vehicle may be equipped with:
R
MOExtended tyres (tyres with run-flat char-
acteristics) (Y page 313)
R aT IREFIT kit (Y page 313)
R an emergenc yspare wheel (only for certain
countries) (Y page 351)
X Stop the vehicle as far away as possible
from traffic on solid, non-slippery and level
ground.
X Switch on the hazard warning lamps.
X Apply the parking brake.
X Bring the front wheels into the straight-
ahead position.
X Shift the transmission to position P.
X Vehicles with AIRMATIC: make sure that
"normal" level is selected (Y page 181).
X Switch off the engine.
X Vehicles without KEYLESS-GO: remove
the key from the ignition lock.
X Vehicles with KEYLESS-GO: open the
driver's door.
The on-board electronics have status 0,
which is the same as the key having been
removed.
X Vehicles with KEYLESS-GO: remove the
Start/Stop button from the ignition lock
(Y page 141).
X All occupant smust get out of the vehicle.
Make sure that they are not endangered as
they do so.
X Make sure that no one is near the danger
area while awheel is being changed. Any-
one who is not directly assisting in the
wheel change should, for example, stand
behind the barrier.
X Get out of the vehicle. Pay attention to traf-
fic conditions when doing so.
X Close the driver's door.
X Place the warning triangle asuitable dis-
tancea way (Y page 310). Observe legal
requirements. 312
Flat tyreBreakdown assistance
Page 316 of 373

MOExtended tyres (tyres with run-flat
characteristics) G
WARNING
When driving in emergency mode, the driving
characteristics deteriorate, e.g. when corner-
ing, accelerating quickly and when braking.
There is arisk of accident.
Do not exceed the stated maximu mspeed.
Avoid abrupt steering and driving manoeu-
vres, and driving over obstacles (kerbs ,pot-
holes, off-road). This applies in particular to a
laden vehicle.
Stop driving in emergency mode if:
R you hear banging noises.
R the vehicle start stoshake.
R you see smok eand smell rubber.
R ESP ®
is intervening constantly.
R ther eare tears in the sidewalls of the tyre.
After driving in emergency mode, have the
wheel rims checked at aqualified specialist
workshop with regard to their further use. The
faulty tyre must be replaced.
With MOExtended tyres (tyres with run-flat
characteristics), you can continue to drive
your vehicle even if ther eisatotal loss of
pressure in one or more tyres.
MOExtended tyres may only be used in con-
junction with an activ etyre pressure loss
warning system or with an activ etyre pres-
sure monitor.
The maximum driving distance is approx-
imately 80 km when the vehicle is partially
laden, and approximately 30 km when the
vehicle is fully laden.
In addition to the vehicle load, the driving dis-
tanc epossible depends upon:
R speed
R road condition
R outside temperature
The driving distanc epossible in run-flat mode
may be reduced by extreme driving condi-
tions/manoeuvres, or it can be increased
through amoderat estyle of driving. The maximum permissible distanc
ewhich
can be driven in run-flat mode is counted from
the momen tthe tyre pressure loss warning
appears in the multifunction display.
You must not exceed amaximum speed of
80 km/h.
i When replacing one or all tyres, make
sure that you only use tyres marked
"MOExtended". Make sure that you only
use the size of tyre specified for the vehicle. TIREFIT kit
Using the TIREFIT kit TIREFIT is
atyre sealant.
You can use TIREFIT to seal punctures of up
to 4m m, particularly those in the tyre tread.
You can use TIREFIT at outside temperatures
down to Ò20 †. G
WARNING
In the following situations, the tyre sealant is
unable to provide sufficient breakdown assis-
tance, as it is unable to seal the tyre properly:
R there are cuts or punctures in the tyre
larger than those mentioned above.
R the wheel rim is damaged.
R you have driven at very low tyre pressures
or on aflat tyre.
There is arisk of accident.
Do not drive any further. Contact aqualified
specialist workshop. G
WARNING
The tyre sealant is harmful and causes irrita-
tion. It must not come into contact with your
skin, eyes or clothing or be swallowed. Do not
inhale TIREFIT fumes. Keep tyre sealant away
from children. There is arisk of injury. Flat tyre
313Breakdown assistance
Z
Page 318 of 373

Do not switch off th
etyrei nflation com-
pressor during this phase.
X Let th etyrei nflation compressor run for
fiv em inutes. The tyr eshould then have
attained apressur eofatl east180 kPa
(1.8 bar/26 psi).
If at yre pressure of 180 kPa (1.8 bar/
26 psi )has bee nattained after five minutes:
(Y page 315).
If at yrep ressure of 180 kPa (1. 8bar/
26 psi) ha snot been attaine dafter five
minutes: (Y page 315).
i If the tyr esealan tlea ks out, allo wittodry.
It can the nberemove dlikeal ayer of film.
If yo ugettyr es ealant on your clothing,
hav eitc leane dass oonasp ossible with
perchloroethylene.
Tyre pressure not reached If
ap ressure of 180 kPa (1.8 ba r/26 psi )has
not bee nachieved afte rfive minutes:
X Switch off the tyre inflation compressor.
X Unscrew the filler hose fro mthe valve of
the faulty tyre.
X Very slowly drive forwards or reverse
approximately 10 m.
X Pump up the tyre again.
After amaximum of five minutes the tyre
pressure must be at least 180 kPa (1.8 bar/
26 psi). G
WARNING
If the required tyre pressure is not reached
after the specified time, the tyre is too badly
damaged. The tyre sealant cannot repair the
tyre in this instance. Damaged tyres and atyre
pressure that is too low can significantly
impair the vehicle's braking and driving char-
acteristics .There is arisk of accident.
Do not continue driving. Contact aqualified
specialist workshop. Tyrep
ressur ereached G
WARNING
At yre temporarily sealed wit htyres ealant
impairs th edrivin gcharacteristics and is not
suitable for higher speeds .There is arisk of
accident.
You should therefore adapt your driving style
accordingly and drive carefully. Do not exceed
the specified maximum speed with atyre that
has been repaired using tyre sealant.
! After use, excess tyre sealant may run out
of the filler hose. This could cause stains.
Therefore, place the filler hose in the plastic
bag which contained the TIREFIT kit. H
Environmental note
Have the used tyre sealant bottle disposed of
professionally, e.g. at aqualifie dspecialist
workshop.
If at yrep ressur eof180 kP a(1.8 bar/26 psi)
has been attained after five minutes:
X Switc hoff the tyre inflation compressor.
X Unscrew the filler hose from the valve of
the faulty tyre.
X Stow the tyre sealant bottle, the tyre infla-
tion compressor and the warning triangle.
X Pull away immediately.
The maximum speed for atyre sealed with
tyre sealant is 80 km/h. The upper part of
the TIREFI Tsticker must be affixed to the
instrument cluster in the driver's field of
vision.
X Stop after driving for approximately ten
minutes and check the tyre pressure with
the tyre inflation compressor.
The tyre pressure must now be at least
130 kPa (1.3 bar/19 psi). G
WARNING
If the required tyre pressure is not reached
after driving for ashort period, the tyre is too
badly damaged. The tyre sealant cannot
repair the tyre in this instance. Damaged tyres
and atyre pressure that is too low can signif- Flat tyre
315Breakdown assistance
Z
Page 331 of 373
Useful information
i This Owner's Manual describes all mod-
els, series and optional equipment for your
vehicle that were available at the time of
going to press. National variation sare pos-
sible. Not ethat your vehicle may not be
equipped with all of the function sdescri-
bed. This is also the case for system sand
function srelevan ttosafety.
i Read the information on qualified special-
ist workshops: (Y page 23). Important safet
ynotes G
WARNING
If wheels and tyres of the wrong size are used,
the wheel brakes or suspension components
may be damaged. There is arisk of accident.
Always replac ewheels and tyre swith those
that fulfil the specifications of the original part
(designation ,manufacturer, model). G
WARNING
Af lat tyre severely impairs the driving, steer-
ing and braking characteristics of the vehicle.
There is arisk of accident.
Tyres without run-flat characteristics:
R do not drive with aflat tyre.
R immediately replac ethe flat tyre with your
emergenc yspare wheel or spare wheel, or
consult aqualified specialist workshop.
Tyres with run-flat characteristics:
R pay attention to the information and warn-
ing notices on MOExtended tyre s(tyres
with run-flat characteristics).
Accessories that are not approved for your
vehicle by Mercedes-Ben zorare not being
usedc orrectly can impair the operating
safety. Before purchasing and using non-approved
accessories, visit aqualified specialist work-
shop and enquire about:
R suitability
R lega lstipulations
R factory recommendations
Information on the dimensions and types of
wheels and tyres for yourv ehicle can be
found under "Wheel/tyre combinations"
(Y page 341).
Information on air pressure for the tyres on
your vehicle can be found:
R on the tyre pressure label on the fuel filler
flap (Y page 157)
R under "Tyre pressure" (Y page 331)
R in the "Tyre pressure" section
Modification work on the brake system and
wheels is not permitted. The use of wheel
spacers or brake dust shields is not permit-
ted. This invalidates the general operating
permit for the vehicle.
i Further information on wheels and tyres
can be obtained at any qualified specialist
workshop. Operation
Information on driving
Check the tyre pressures when the vehicle is
heavily laden and, if necessary, adjust.
While driving, pay attention to vibrations,
noises and unusual handling characteristics,
e.g. pulling to one side. This may indicat ethat
the wheels or tyres are damaged. If you sus-
pect that atyre is defective, reduce your
speed immediately. Stop the vehicle as soon
as possible to chec kthe wheels and tyres for
damage. Hidden tyre damage could also be
causing the unusual handling characteristics.
If you find no signs of damage, have the tyres
and wheels checked at aqualified specialist
workshop.
When parking your vehicle, make sure that
the tyres do not get deformed by the kerb or 328
OperationWheels and tyres
Page 332 of 373
other obstacles. If it is necessary to drive over
kerbs, speed humps or similar elevations, try
to do so slowly and at an obtuse angle. Oth-
erwise, the tyres, particularly the sidewalls,
may be damaged. Regular checking of wheels and tyres
G
WARNING
Damaged tyres can cause tyre inflation pres-
sure loss. As aresult, you could lose control
of your vehicle. There is arisk of accident.
Check the tyres regularly for signs of damage
and replace any damaged tyres immediately.
Regularly check the wheels and tyres of your
vehicle for damage at least once amonth, as
well as after driving off-road or on rough
roads. Damaged wheels can cause aloss of
tyre pressure. Pay particular attention to
damage such as:
R cuts in the tyres
R punctures
R tears in the tyres
R bulges on tyres
R deformation or severe corrosion on wheels
Regularly check the tyre tread depth and the
condition of the tread across the whole width
of the tyre (Y page 329). If necessary, turn
the front wheels to full lock in order to inspect
the inner side of the tyre surface.
All wheels must have avalve cap to protect
the valve against dirt and moisture. Do not fit
anything ontot he valve other than the stand-
ard valve cap or other valve caps approved by
Mercedes-Benz for your vehicle. Do not fit any
other valve caps or systems, e.g. tyre pres-
sure monitoring systems.
Regularly check the pressure of all the tyres,
particularly prior to long trips. Adjust the tyre
pressure as necessary (Y page 331).
Observe the notes on the emergenc yspare
wheel (Y page 351). The service life of tyres depends on various
factors, including the following:
R
driving style
R tyre pressure
R tyre mileage Tyret
read G
WARNING
Insufficient tyre tread will reduce tyre trac-
tion. The tyre is no longer able to dissipate
water. This means that on wet road surfaces,
the risk of aquaplaning increases, in particular
where speed is not adapted to suit the driving
conditions. There is arisk of accident.
If the tyre pressure is too high or too low, tyres
may exhibit different levels of wear at differ-
ent locations on the tyre tread. Thus, you
should regularly check the tread depth and
the condition of the tread across the entire
width of all tyres.
Minimum tyre tread depth for:
R summer tyres: 3mm
R M+S tyres: 4mm
For safety reasons, replace the tyres before
the legally prescribed limit for the minimum
tyre tread depth is reached.. Selecting, fitting and replacing tyres
R Only fit tyres and wheels of the same type
and make.
R Only fit tyres of the correc tsize ontot he
wheels.
R Run in new tyres at moderate speeds for
the first 100 km. They only reach their full
performanc eafter this distance.
R Do not drive with tyres which have too little
tread depth. This otherwise significantly
reduces the traction on wet roads (aqua-
planing).
R Replace the tyres after six years at the lat-
est, regardless of wear. Operation
329Wheels and tyres Z