2012 MERCEDES-BENZ CLS COUPE ignition
[x] Cancel search: ignitionPage 15 of 373

Heating
see Climate control
High-pressure cleaners ....................302
Hill start assist .................................. 144
HOLD function Display message ............................ 245
Function/notes ............................. 179I
Ignitio nlock
see Key positions
Immobiliser .......................................... 70
In-car hotspot see Separate operating instructions
Indicator and warning lamps
Coolant .......................................... 267
DISTRONI CPLUS ........................... 269
Engine diagnostics .........................266
Fuel tank ........................................ 267
SPORT handling mode ...................264
Indicator lamps
Display message ............................ 238
see Warning and indicator lamps
Insectp rotection on the radiator ....297
Inspection see ASSYST PLUS
Instrument cluster
Overview .................................. 30, 209
Settings ......................................... 221
Warning and indicator
lamps ...................................... .32, 258
Instrument cluster lighting ..............222
Intelligen tLight System
Activating/deactivatin g................. 222
Display message ............................ 239
Overview ........................................ 115
Setting the dipped-bea mhead-
lamps for driving on the right/left .223
Interior lighting ................................. 118
Automatic control system ..............118
Delayeds witch-off (on-board
computer) ...................................... 224
Emergency lighting ........................119
Manual control ............................... 119
Overview ........................................ 118
Reading lamp ................................. 118Setting brightness for display/
switches (on-board computer)
.......222
Setting the ambient lighting
brightness (on-board computer) ....223
Setting the ambient lighting col-
our (on-board computer) ................ 223
Interior motio nsensor ........................ 72
ISOFIXc hild seat securing system ....56 J
Jack Storage location ............................ 311
Using ............................................. 338
Jump start (engine)
see Jump starting (engine)
Jump starting (engine) ......................319 K
Key Changing the battery .......................79
Checking the battery .......................79
Convenience closing feature ............89
Convenience opening feature ..........89
Display message ............................ 256
Door central locking/unlocking .......77
Emergency key element ................... 78
Important safety notes ....................76
Loss ................................................. 81
Modifying the programming .............78
Positions (ignition lock) .................141
Problem (malfunction) .....................81
Starting the engine ........................143
KEYLESS-GO
Convenience closing ........................89
Display message ............................ 257
Locking ............................................ 77
Start/Stop button .......................... 141
Starting the engine ........................143
Unlocking ......................................... 77
Keyp ositions
Key ................................................ 141
KEYLESS GO .................................. 141
Kickdown
Driving tips .................................... 151
Manual drive program ....................154
Kneebag ............................................... 4412
Index
Page 31 of 373
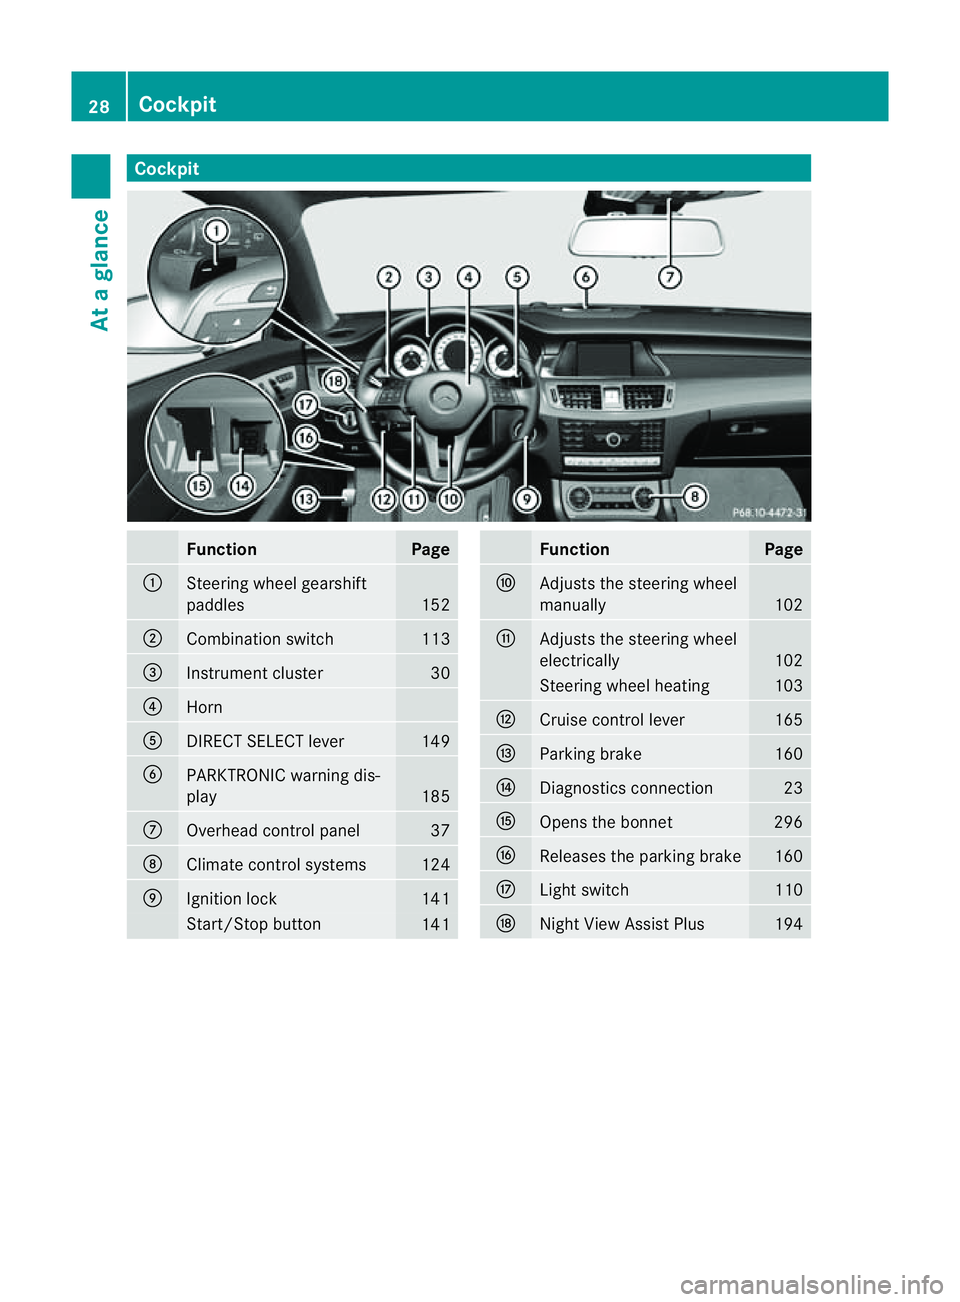
Cockpit
Function Page
:
Steering wheel gearshift
paddles
152
;
Combination switch 113
=
Instrumen
tcluster 30
?
Horn
A
DIRECT SELECT lever 149
B
PARKTRONIC warning dis-
play
185
C
Overhead control panel 37
D
Climat
econtro lsystems 124
E
Ignition lock 141
Start/Sto
pbutton 141 Function Page
F
Adjusts th
esteering wheel
manually 102
G
Adjusts th
esteering wheel
electrically 102
Steering wheel heating 103
H
Cruise control lever 165
I
Parking brake 160
J
Diagnostics connection 23
K
Open
sthe bonnet 296
L
Release
sthe parking brake 160
M
Ligh
tswitch 110
N
Night View Assist Plus 19428
CockpitAt
ag lance
Page 32 of 373
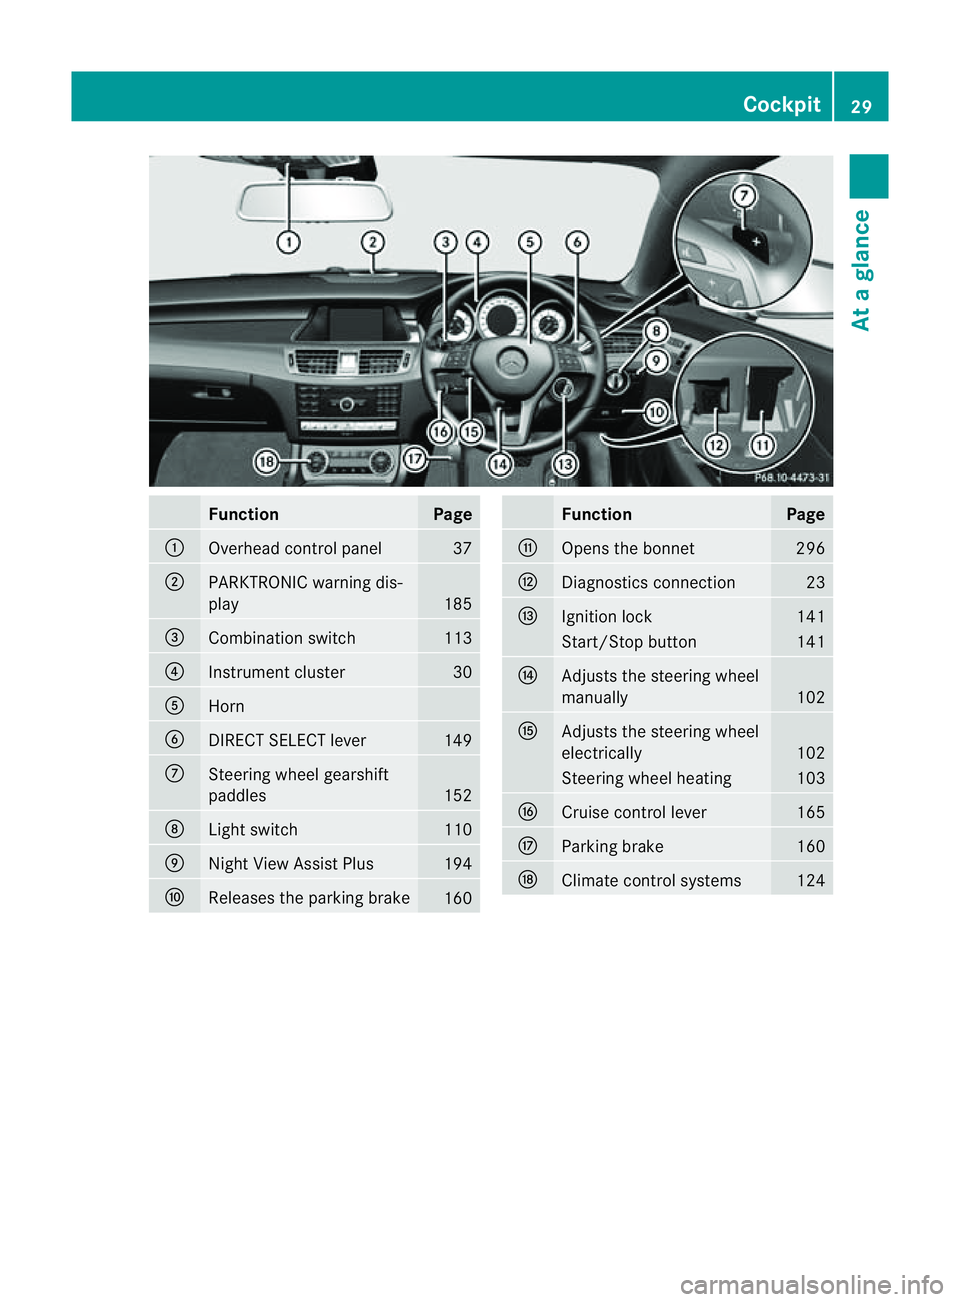
Function Page
:
Overhead control panel 37
;
PARKTRONIC warning dis-
play
185
=
Combination switch 113
?
Instrumen
tcluster 30
A
Horn
B
DIRECT SELECT lever 149
C
Steering wheel gearshift
paddles
152
D
Ligh
tswitch 110
E
Nigh
tView Assist Plus 194
F
Releases the parking brake
160 Function Page
G
Open
sthe bonnet 296
H
Diagnostics connection 23
I
Ignition lock 141
Start/Stop button 141
J
Adjusts the steerin
gwheel
manually 102
K
Adjusts the steerin
gwheel
electrically 102
Steerin
gwheel heating 103
L
Cruise control lever 165
M
Parking brake 160
N
Climate control systems 124Cockpit
29Atag lance
Page 43 of 373
Useful information
i This Owner's Manual describes all mod-
els, series and optional equipment for your
vehicle that were available at the time of
going to press. National variation sare pos-
sible. Not ethat your vehicle may not be
equipped with all of the function sdescri-
bed. This is also the case for system sand
function srelevan ttosafety.
i Read the information on qualified special-
ist workshops: (Y page 23). Panic alarm
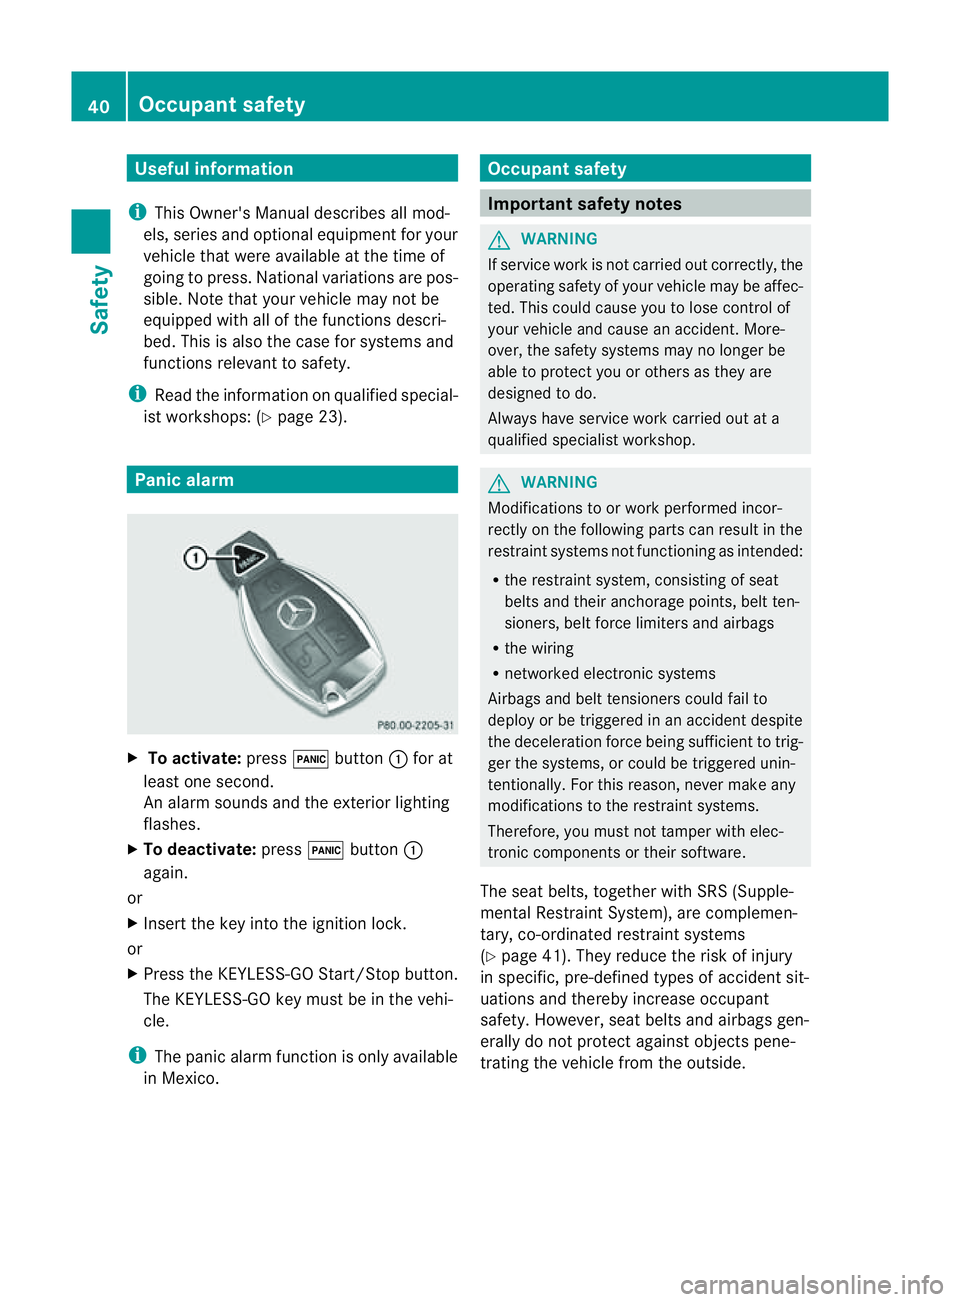
X
To activate: press!button :for at
least one second.
An alarm sounds and the exterior lighting
flashes.
X To deactivate: press!button :
again.
or
X Insert the key int othe ignition lock.
or
X Press the KEYLESS-GO Start/Stop button.
The KEYLESS-GO key must be in the vehi-
cle.
i The panic alarm function is only available
in Mexico. Occupant safety
Important safet
ynotes G
WARNING
If servic ework is not carried out correctly, the
operatin gsafet yofy our vehicle may be affec-
ted. This could cause you to lose contro lof
your vehicle and cause an accident. More-
over, the safet ysystem smay no longer be
able to protect you or other sastheya re
designed to do.
Always have servic ework carried out at a
qualified specialist workshop. G
WARNING
Modification stoorwork performed incor-
rectly on th efollowin gpartsc an result in the
restraint systems no tfunctionin gasintended:
R ther estraint system, consisting of seat
belt sand their anchorage points ,belt ten-
sioners ,belt force limiters and airbags
R thew iring
R networked electronic systems
Airbags and belt tensioners could fail to
deplo yorbet riggered in an acciden tdespite
the deceleration forc ebeing sufficien ttotrig-
ger the systems, or could be triggered unin-
tentionally. For this reason, never make any
modifications to the restraint systems.
Therefore, you must not tamper with elec-
tronic components or their software.
The seat belts, together with SRS (Supple-
mental Restraint System), are complemen-
tary, co-ordinated restraint systems
(Y page 41). They reduce the risk of injury
in specific, pre-defined types of accident sit-
uations and thereby increase occupant
safety. However, seat belts and airbags gen-
erally do not protect against object spene-
tratin gthe vehicle from the outside. 40
Occupant safetySafety
Page 44 of 373
To ensure that the restraint systems can
deliver their full potential protection, make
sure that:
R
the seat and head restraint are adjusted
properly (Y page 96).
R the seat belt has been fastened properly
(Y page 48).
R the airbags can inflate unrestricted if
deployed (Y page 42).
R the steerin gwheel is adjusted properly
(Y page 102).
R the restraint systems have not been modi-
fied.
An airbag increases the protection of vehicle
occupant swearing aseat belt. However, air-
bags are only an additional restraint system
which complements, but does not replace,
the seat belt. All vehicle occupant smust wear
their seat belt correctly at all times, even if
the vehicle is equipped with airbags. The air-
bags are not deployed in all types of acci-
dents .For example, if the protective capacity
of correctly fastened seat belts is not
increased by deploying the airbags, the air-
bags will not deploy.
Airbag deployment only provides increased
protection if the seat belt is worn correctly.
First,t he seat belt helps to keep the vehicle
occupant in the best position in relation to the
airbag. Second, in ahead-on collision, for
example, the seat belt prevent sthe vehicle
occupant from being propelled towards the
point of impact. SRS (Supplemental Restraint System)
Introduction SRS consist
sof:
R the 6 SRS warning lamp
R airbags
R the airbag control unit with crash sensors
R belt tensioners
R belt force limiters SRS reduces the risk of occupant
scoming
into contact with the vehicle's interior in the
event of an accident .Itcan also reduce the
forces to which occupant sare subjected dur-
ing an accident.
SRS warnin glamp G
WARNING
If SRS is malfunctioning, individuals ystems
may be triggere dunintentionally or might not
be triggere dinthe event of an accident with
ah igh rate of vehicl edeceleration.
Am alfunction has occurred if:
R the 6 SRS warning lamp does not light
up when the ignitio nisswitched on.
R the engine is running and the 6SRS
warning lamp does not go out after afew
seconds.
R the engine is running and the 6SRS
warning lamp lights up again.
In this case, have SRS checked immediately
at aq ualified specialist workshop.
SRS functionsa re checked regularly when
you switch on the ignition and when the
engine is running. Therefore, malfunctions
can be detected in good time.
The 6 SRS warning lamp in the instrument
cluster lights up when the ignition is switched
on. It goes out no later than afew seconds
after the engine is started.
Triggering of belt tensioners, belt force
limiters and airbags During the first stage of
acollision, the airbag
control unit evaluates important physical
data relating to vehicle deceleration or accel-
eration, such as:
R duration
R direction
R magnitude
Based on the evaluation of this data, the air-
bag control unit pre-emptively triggers the
belt tensioners in the first stage. Occupant safety
41Safety Z
Page 53 of 373
automaticall
yadjust to th eupper body
(Y page 50).
X If necessary, adjust the seat belt to the
appropriate height (Y page 50).
X If necessary, pull upwards on the shoulder
section of the seat belt to tighten the belt
across your body.
For more information about releasing the seat
belt with release button ?,see "Releasing
seat belts" (Y page 50).
Seat belt adjustment The seat-belt adjustment function adjusts the
driver' sand front-passenger seat belt to the
upper body of the occupants.
The belt strap is tightened slightly when:
R you engage the belt tongue in the belt
buckle and you then turn the key to position
2in the ignition lock.
R the key is in position 2in the ignition lock
and you then engage the belt tongue in the
buckle.
The seat-belt adjustment will apply acertain
tightenin gforc eifa ny slack is detected
between the occupant and the seat belt. Do
not hold on to the seat belt tightly while it is
adjusting. You can switc hthe belt adjustment
on and off in the on-board computer
(Y page 227).
The seat-belt adjustment is an integral part of
the PRE-SAFE ®
convenience function. More
information about PRE-SAFE ®
can be found
under "PRE-SAFE ®
(preventative occupant
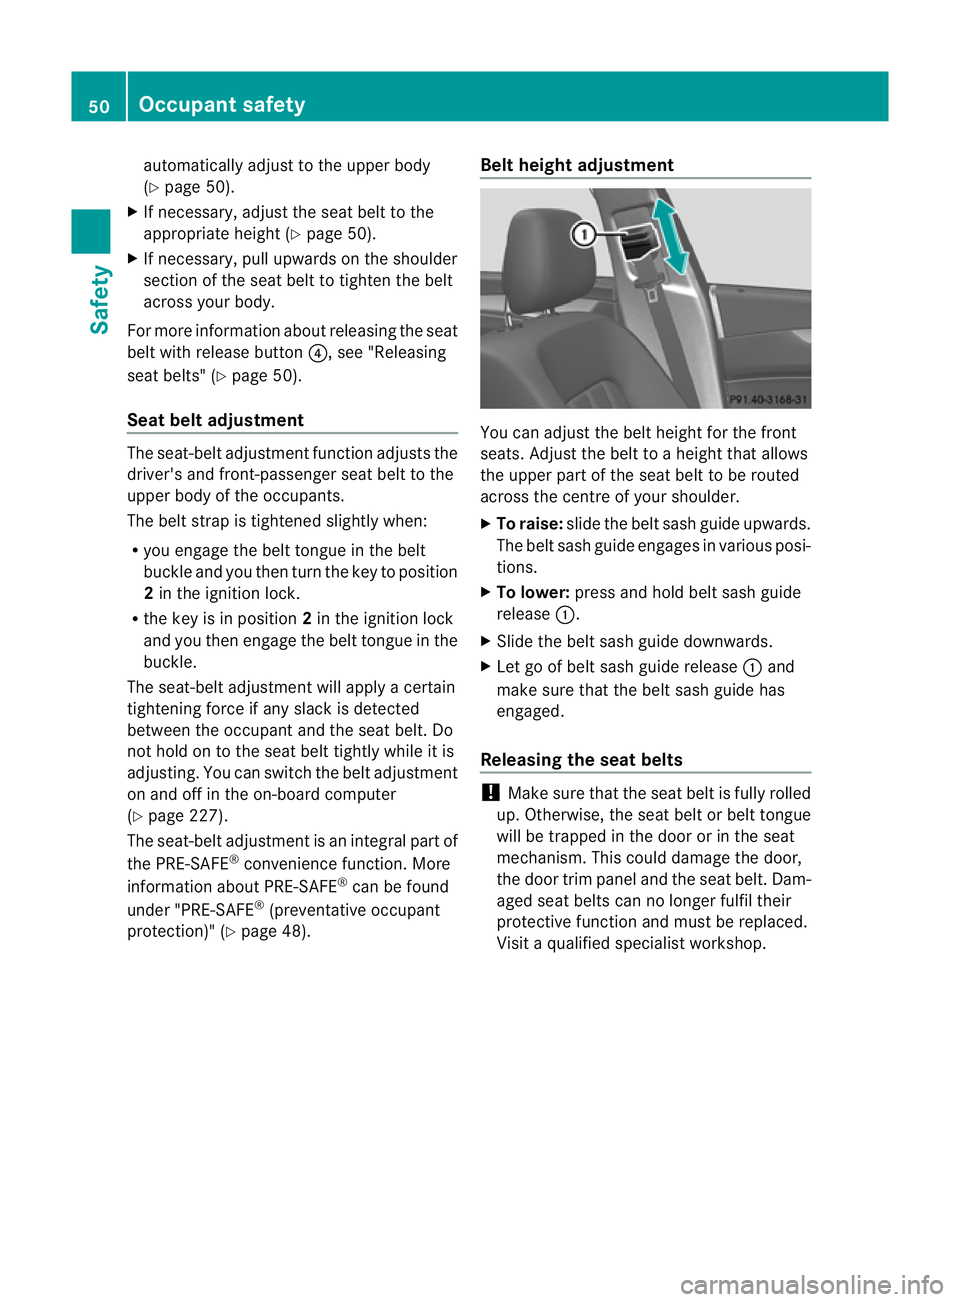
protection)" (Y page 48). Belt height adjustment You can adjust the belt height for the front
seats. Adjust the belt to
aheight that allows
the upper part of the seat belt to be routed
across the centre of your shoulder.
X To raise: slide the belt sash guide upwards.
The belt sash guide engages in various posi-
tions.
X To lower: press and hold belt sash guide
release :.
X Slide the belt sash guide downwards.
X Let go of belt sash guide release :and
make sure that the belt sash guide has
engaged.
Releasing the seat belts !
Make sure that the seat belt is fully rolled
up. Otherwise, the seat belt or belt tongue
will be trapped in the door or in the seat
mechanism. This could damage the door,
the door trim panel and the seat belt. Dam-
aged seat belts can no longer fulfil their
protective function and must be replaced.
Visit aqualified specialist workshop. 50
Occupant safetySafety
Page 55 of 373
Comply wit
hsafety regulation swhen dispos-
ing of belt tensioners. Any Mercedes-Benz
Service Centre can provide details of these
regulations.
! If the front-passenger seat is not occu-
pied, do not engage the seat belt tongue in
the buckle on the front-passenger seat.
Otherwise, the belt tensioner could be trig-
gered in the event of an accident.
The seat belts are fitted with belt tensioners.
The belt tensioners tighten the seat belts in
an accident, pulling them close against the
body.
Belt tensioners do not correct incorrects eat
positions or incorrectly fastened seat belts.
Belt tensioners do not pull vehicle occupants
back towards the backrest.
If the seat belt is also fitted with abelt force
limiter and this is triggered, the force exerted
by the seat belt on the vehicle occupant is
reduced.
The belt force limiters for the front seats are
synchronised with the front airbags, which
take on apart of the deceleration force. This
results in the force exerted on the occupant
being distributed over agreater area.
The belt tensioners can only be activated
when:
R the ignition is switched on.
R the restraint systems are operational; see
"SRS warning lamp" (Y page 41).
R the belt tongue is engaged in the buckle on
each of the three-point seat belts in front.
R
The belt tensioners on the seats in the rear
compartmenta re triggeredindependently of
the lock status of the seat belts.
The beltt ensioners are triggered depending
on the type and severit yofanaccident:
R if, in the event of ahead-on or rear-en dcol-
lision the vehicle decelerates or acceler- ates rapidly in
alongitudinal direction dur-
ing the initial stages of the impact
R if, in the event of aside impact, on the side
opposite the impact the vehicle deceler-
ates or accelerates rapidly in alateral direc-
tion
R in certain situation swhere the vehicle over-
turn sand the system determines that it can
provide additional protection
If the airbags are deployed, you will hear a
bang, and asmall amount of powder may also
be released. Only in rare cases will the bang
affect your hearing. The powder that is
released generally does not constitute a
health hazard. The 6SRS warning lamp
lights up. Children in the vehicle
Child restraint systems
Important safet ynotes G
WARNING
To reduce the risk of serious or even fatal
injur ytot he child in the event of asudden
change in direction, brakin goranaccident:
R children less than 1.5 0mtall and under
twelve years of age must alway sbesecured
in special child restraint systems on asuit-
able vehicle seat. This is necessary
because the seat belts are not designed for
children.
R Do not drive with achild secured in arear-
ward-facin gchild restraint system on the
front-passenger seat. Exception: if the vehi-
cle is equipped with automatic child seat
recognition on the front-passenger seat
and the child is secured in achild restraint
system with transponder sfor automatic
child seat recognition
R if you secure aforward-facing child
restraint system to the front-passenger 52
Children in thev
ehicleSafety
Page 58 of 373
R
only use aforward-facin gchild restraint
system on the front-passenger seat and
move the front-passenger seat to the rear-
most position.
R have the automatic child seat recognition
checked at aqualified specialist workshop.
To ensure that the automatic child seat rec-
ognition on the front-passenger seat func-
tions/communicates correctly, never place
objects, e.g. acushion, under the child
restraint system. The entire base of the child
restraint system must always rest on the seat
cushion. An incorrectly fitted child restraint
system cannot perform its intended protec-
tive function in the event of an accident, and
could lead to injuries. G
WARNING
Do not place electronic devices on the front-
passenger seat, e.g.:
R laptops, when switched on
R mobile phones
R cards with transponders, e.g. ski passes or
access cards
Signals from electronic equipment can cause
interference in the automatic child seat rec-
ognition sensor system. This can lead to a
system malfunction. This may cause the
4 PASSENGER AIRBAG OFF indicator
lamp to light up without there being achild
seat with transponders for automatic child
seat recognition fitted. The front-passenger
airbag will not then deploy during an accident.
It is also possible that the 6SRS warning
lamp lights up and/or the 4PASSENGER
AIRBAG OFF indicator lamp does not light up
briefly when you turn the key in the ignition
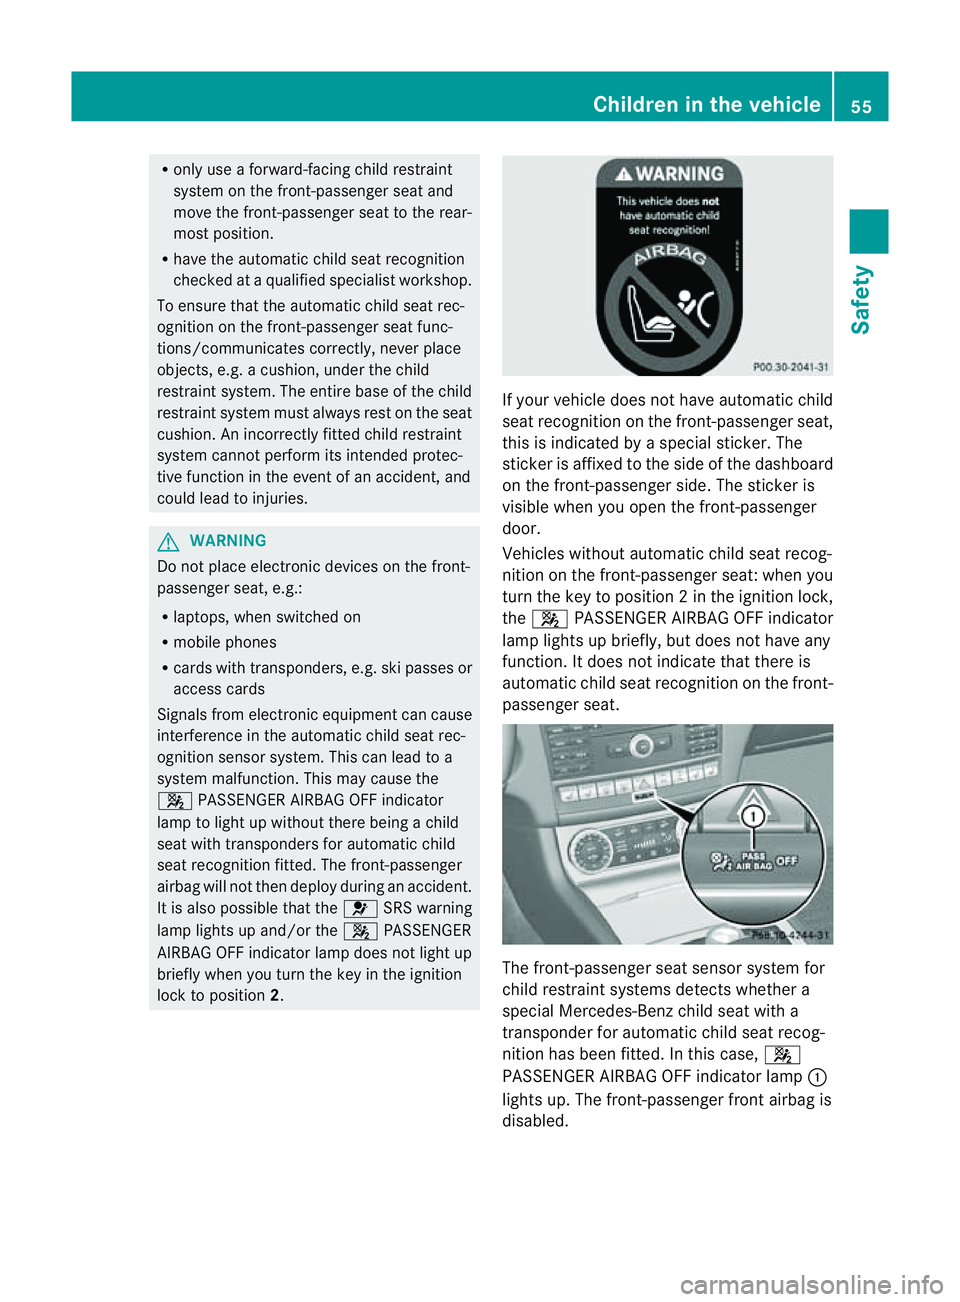
lock to position 2. If your vehicle does not have automatic child
seat recognition on the front-passenger seat,
this is indicated by
aspecial sticker. The
sticker is affixed to the side of the dashboard
on the front-passenger side. The sticker is
visible when you open the front-passenger
door.
Vehicles without automatic child seat recog-
nition on the front-passenger seat: when you
turn the key to position 2inthe ignition lock,
the 4 PASSENGER AIRBAG OFF indicator
lamp lights up briefly, but does not have any
function. It does not indicate that there is
automatic child seat recognition on the front-
passenger seat. The front-passenger seat sensor system for
child restraint systems detectsw
hether a
special Mercedes-Ben zchild seat with a
transponder for automatic child seat recog-
nition has been fitted. In this case, 4
PASSENGER AIRBAG OFF indicator lamp :
lights up. The front-passenger front airbag is
disabled. Children in the vehicle
55Safety Z