2012 MERCEDES-BENZ CLS COUPE buttons
[x] Cancel search: buttonsPage 20 of 373
Short journeys (diesel particle fil-
ter)
...................................................... 162
Sidebag ................................................ 45
Side lamps Switching on/off ........................... 112
Side windows
Convenience closing ........................89
Convenience opening ......................89
Important safety notes ....................87
Opening/closing .............................. 88
Problem (malfunction) .....................91
resetting .......................................... 90
Sliding sunroof
Important safety information ...........91
Opening/closing .............................. 92
Problem (malfunction) .....................93
Rain closing feature .........................92
Resetting ......................................... 92
Sno wchains ...................................... 331
Socket Centre console .............................. 284
Rea rcompartmen t......................... 284
Under the armrest .........................284
Sockets
General notes ................................ 283
Spare wheel
Storing ........................................... 352
Specialist workshop ............................ 23
Spectacle scom partment ................. 273
Speed, controlling see Cruise control
Spee dLimit Assist
Activating/deactivatin gthe warn-
ing function .................................... 218
Displayin g...................................... 218
Display message ............................ 244
Display message in the multifunc-
tion displa y.................................... 194
Important safety notes ..................193
Speedometer
Digita l............................................ 213
In the Instrument cluster .........30, 209
Segments ...................................... 210
Selecting the unit of measure-
ment .............................................. 221
see Instrument cluster SPEEDTRONIC
Deactivating variabl e..................... 170
Display message ............................ 249
Function/notes ............................. 168
Important safety notes ..................168
LIM indicator lamp .........................168
Permanent ..................................... 170
Selecting ........................................ 168
Storing the current spee d.............. 169
Variabl e......................................... 168
SPORT handling mode
Activating/deactivating (AMG
vehicles) .......................................... 66
Warning lamp ................................. 264
SRS (Supplemental Restrain tSys-
tem) Display message ............................ 236
Introduction ..................................... 41
Warning lamp ................................. 266
Warning lamp (function) ................... 41
Starting (engine) ................................ 142
Steering (display message) ..............256
Steering wheel Adjusting (electrically). ..................103
Adjusting (manually). .....................103
Button overview ............................... 33
Buttons (on-board computer) ......... 210
Cleaning ......................................... 306
Gearshift paddle s........................... 152
Important safety notes ..................102
Steering wheel heating ..................103
Storing settings (memory func-
tion) ............................................... 107
Steering wheel gearshift paddles ....152
Steering wheel heating Problem (malfunction) ...................104
Switching on/off ........................... 103
Stopwatch (RACETIMER) ................... 228
Stowage areas ................................... 272
Stowage compartment Spectacles compartment ...............273
Stowage compartments
Armrest (under) ............................. 274
Centre console .............................. 273
Centre console (rea rcompart-
ment). ............................................ 275
Cuph older..................................... 279
Glove compartment .......................273 Index
17
Page 81 of 373
Changing th
esettings of th elocking
system
You can chang ethe settings of th elocking
system. This mean stha tonlyt he driver' sdoor
and th efuel fille rflap are unlocked when the
vehicle is unlocked. This is useful if you fre-
quently travel on your own.
X To chang ethe setting: press and hold
down the %and& buttons on the
key simultaneously for approximately six
seconds until the battery chec klamp
flashes twice ( Ypage 79).
i If th esettin goft helockin gsystem is
changed within th esignal range of th evehi-
cle ,pressin gthe & or% button:
R locks or
R unlock sthe vehicle
The ke ynow function sasfollows:
X To unlock th edriver's door: pressthe
% buttononce.
X To unlock centrally: pressthe % but-
to nt wice.
X To lock centrally: pressthe & button.
The KEYLESS-GO function is changed as fol-
lows:
X To unlock th edriver's door: touch the
inner surface of th edoor handle on the
driver' sdoor.
X To unlock centrally: touch theinner sur-
fac eoft hedoor handle on th efront-
passenger door or th erear door.
X To lock centrally: touch theouter sensor
surface on on eofthedoor handles.
X To restor ethe factor ysettings: press
and hold down the %and& buttons
simultaneousl yfor approximately six sec-
onds until th ebattery check lamp flashes
twice (Y page 79). Emergency key element
General notes If th
evehicle can no longer be locke dor
unlocked wit hthe key, use th eemergency
ke ye lement.
If you use th eemergenc ykey element to
unlock and open the driver's door or the boot
lid, the anti-thef talarm system will be trig-
gered (Y page 71).
There are several ways to tur noff the alarm:
X To turn the alarm off with the key: press
the % or& button on the key.
or
X Insert the key into the ignition lock.
or
X To deactivate the alarm with KEYLESS-
GO: press the Start/Stop button in the igni-
tion lock. The key must be in the vehicle.
or
X Lock or unlock the vehicle using KEYLESS-
GO. The key must be outside the vehicle.
If you unlock the vehicle using the emergency
key element, the fuel filler fla pwilln ot be
unlocked automatically.
X To unlock the fuel filler flap: insert the
key into the ignition lock.
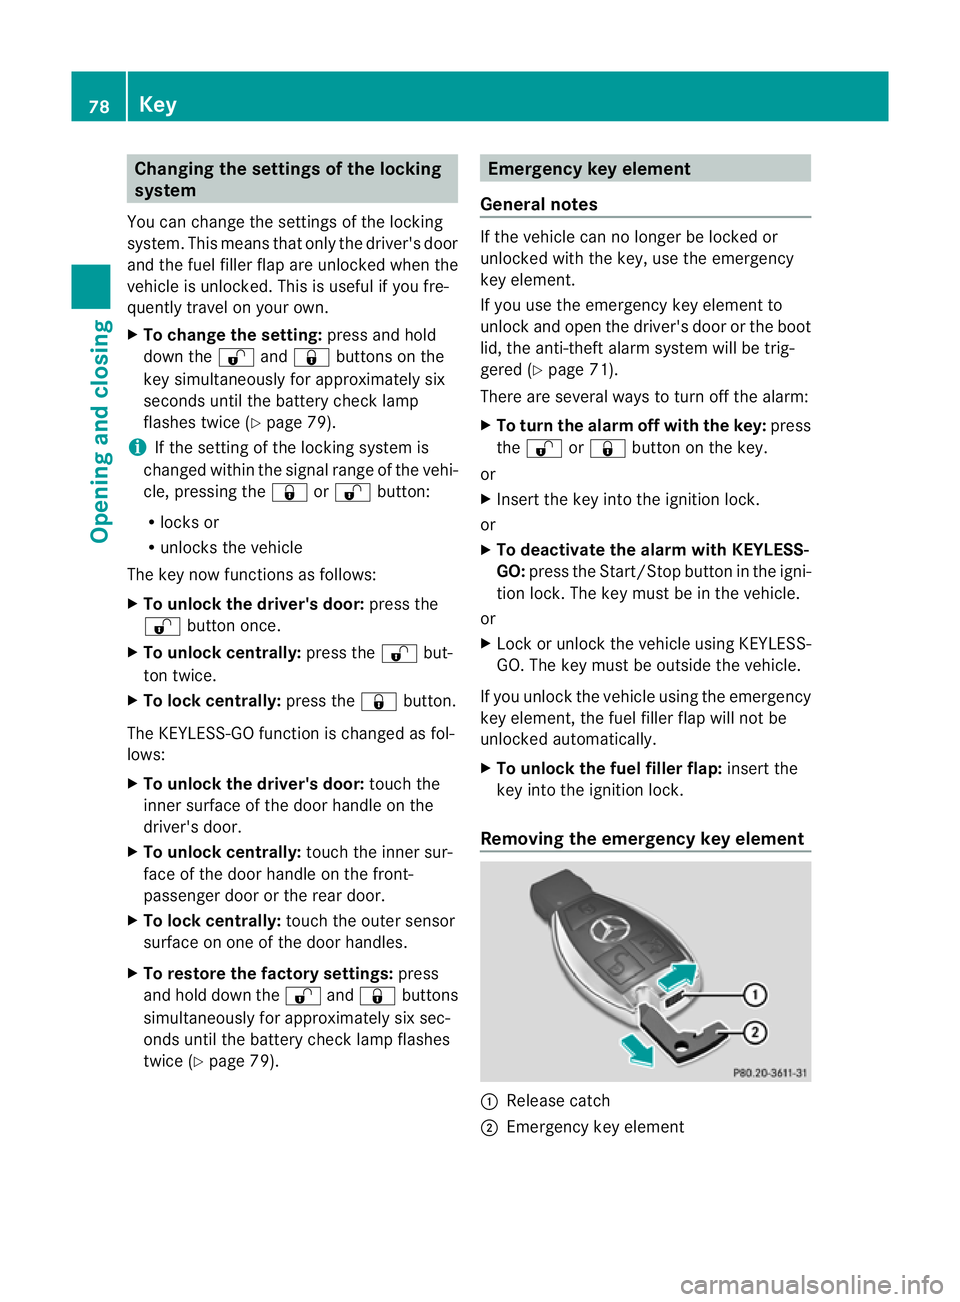
Removing the emergency key element :
Releas ecatch
; Emergency key element 78
KeyOpening and closing
Page 83 of 373
X
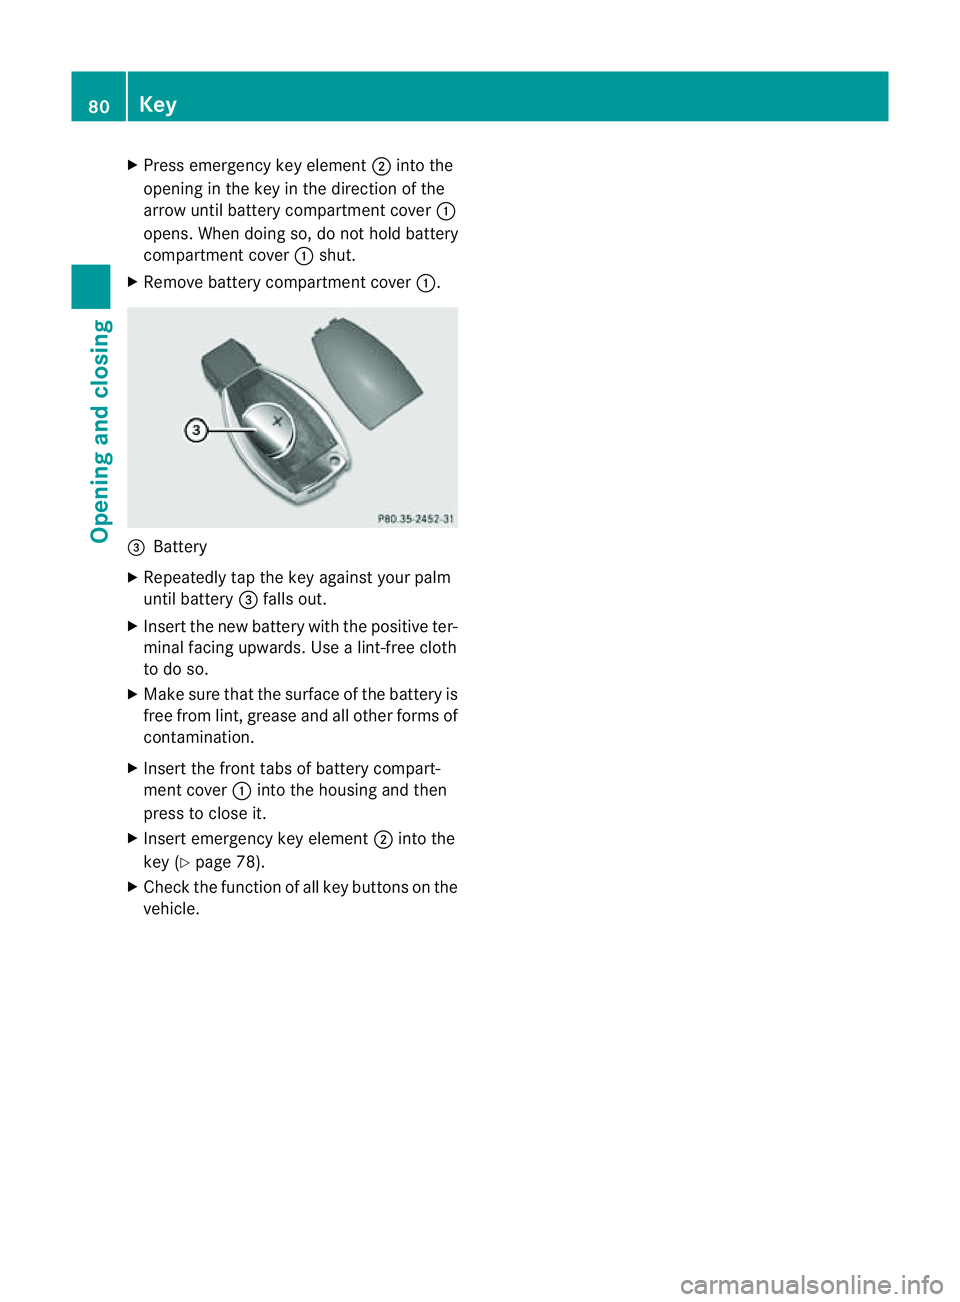
Press emergenc ykey element ;into the
opening in the key in the direction of the
arrow until batter ycompartment cover :
opens. When doing so, do not hold battery
compartment cover :shut.
X Remove batter ycompartment cover :.=
Battery
X Repeatedly tap the key against your palm
until battery =falls out.
X Inser tthe new battery with the positive ter-
minal facing upwards. Use alint-free cloth
to do so.
X Make sure that the surface of the battery is
free from lint, grease and all other forms of
contamination.
X Insert the front tabs of battery compart-
ment cover :into the housing and then
press to close it.
X Insert emergency key element ;into the
key (Y page 78).
X Check the function of all key buttons on the
vehicle. 80
KeyOpening and closing
Page 87 of 373
Automati
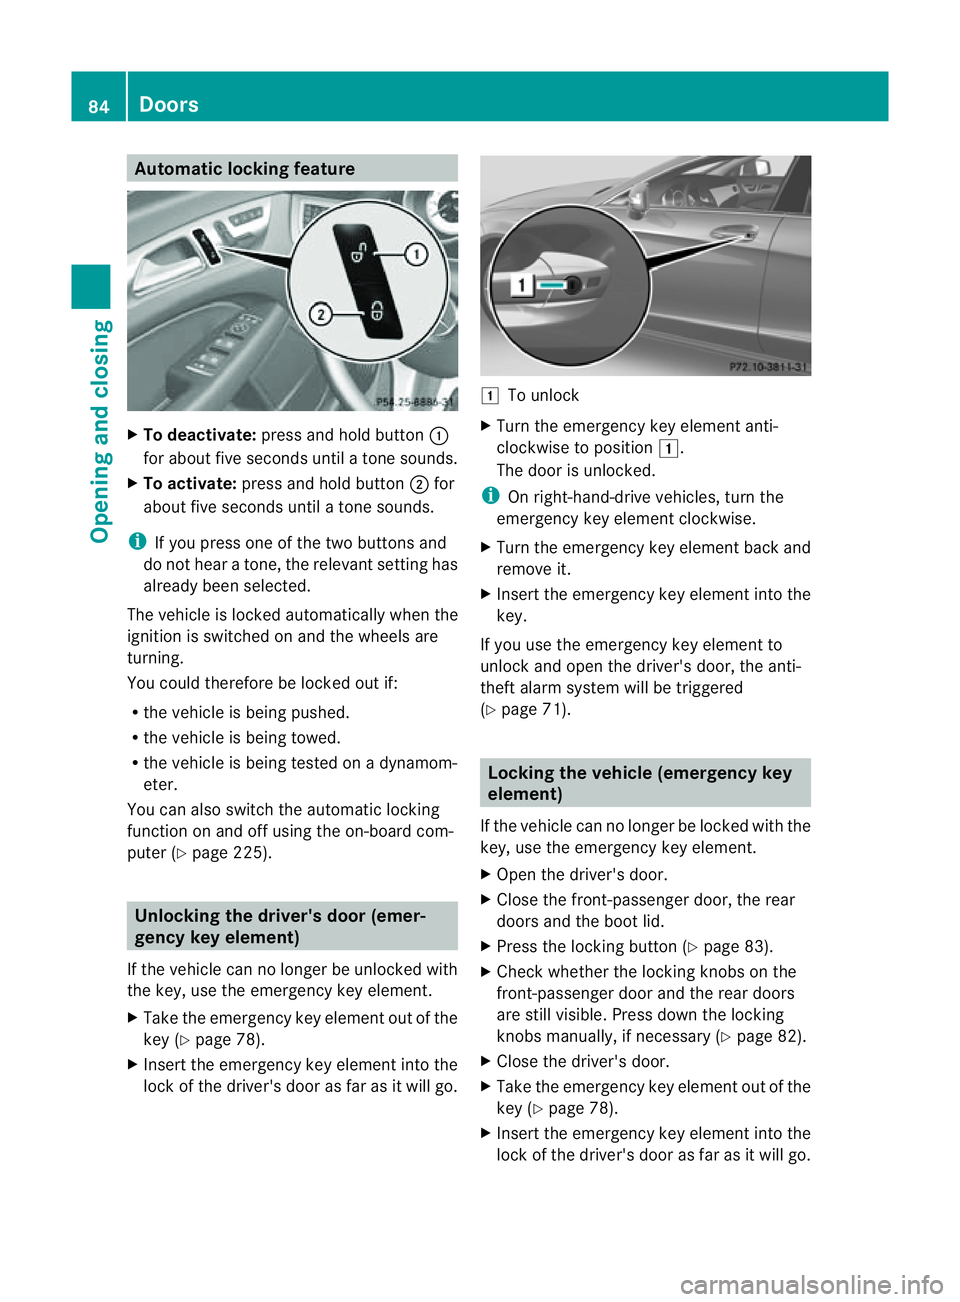
clocking feature X
To deactivate: press and hold button :
for about fiv eseconds until atones ounds.
X To activate: press and hold button ;for
about fiv eseconds until atones ounds.
i If you press on eofthe tw obuttons and
do not hear aton e, th erelevant settin ghas
already been selected.
The vehicle is locked automatically when the
ignitio nisswitched on and the wheels are
turning.
You could therefore be locked out if:
R the vehicle is being pushed.
R the vehicle is being towed.
R the vehicle is being tested on adynamom-
eter.
You can also switch the automatic locking
function on and off using the on-board com-
puter (Y page 225). Unlocking the driver's door (emer-
gencyk
ey element)
If th evehicle can no longer be unlocked with
th ek ey, use th eemergency key element.
X Take th eemergency key element out of the
key (Y page 78).
X Inser tthe emergency key element into the
lock of the driver's door as far as it will go. 1
To unlock
X Turn the emergency key element anti-
clockwise to position 1.
The door is unlocked.
i On right-hand-drive vehicles, turn the
emergency key element clockwise.
X Turn the emergency key element back and
remove it.
X Insert the emergency key element into the
key.
If you use the emergency key element to
unlock and open the driver's door, the anti-
theft alarm system will be triggered
(Y page 71). Locking the vehicle (emergency key
element)
If the vehicle can no longer be locked with the
key, use the emergency key element.
X Open the driver's door.
X Close the front-passenger door, the rear
doors and the boot lid.
X Press the locking button (Y page 83).
X Check whether the locking knobs on the
front-passenger door and the rear doors
are still visible. Press down the locking
knobs manually,ifn ecessary (Ypage 82).
X Close the driver's door.
X Take the emergency key element out of the
key (Y page 78).
X Insert the emergency key element into the
lock of the driver's door as far as it will go. 84
DoorsOpening and closing
Page 100 of 373
settings with the memory function
(Y
page 107). Seats
Important safety notes
G
WARNING
The seats can still be adjusted when there is
no key in the ignition lock. For this reason,
children should never be left unsupervised in
the vehicle. They could adjust the seats and
become trapped. G
WARNING
Only adjust the driver's seat when the vehicle
is stationary. You will otherwise be distracted
from the road and traffic conditions and you
could lose control of the vehicle as aresult of
the seat moving. This could cause an acci-
dent. G
WARNING
If you adjust the seat height carelessly,y ou or
others could be trapped and thereby injured.
Children in particular could unintentionally
press the buttons to electrically adjust the
seats and become trapped.
Take care that:
R while moving the seats, your hands do not
get under the lever assembly of the seat
adjustment system.
R children in the vehicle do not slide their
hands under the levers. G
WARNING
Make sure that nobody can become trapped
when adjusting the seats.
Observe the notes on airbags.
Secure children as recommended; see the
"Children in the vehicle" section. G
WARNING
Make sure that the back of your head is sup-
ported at eye level by the central area of the head restraint. If your head is not supported
correctly by the head restraint, you could suf-
fer asevere neck injury in the event of an
accident. Never drive if the head restraints are
not engaged and set correctly. G
WARNING
As eat belt can only offer its intended degree
of protection when the backrest is almost ver-
tical and the occupant is sitting upright. Avoid
seat position sthat do not allow the seat belt
to be routed correctly. Adjust the backrest so
that it is as upright as possible. Never travel
with the backrest reclined too far backwards.
You could otherwise be seriously or even
fatally injured in the event of an acciden tor
sudden braking.
! To avoid damage to the seats and the seat
heating, observe the following information:
R do not spill any liquids on the seats. If
liquid is spilled on the seats, dry them as
soon as possible.
R if the seat cover sare damp or wet, do not
switch on the seat heating. The seat
heating should also not be used to dry
the seats.
R clean the seat cover sasrecommended;
see the "Interior care" section.
R do not transport heavy loads on the
seats. Do not place sharp objects on the
seat cushions ,e.g. knives, nails or tools.
The seats should only be occupied by
passengers, if possible.
R when the seat heating is in operation ,do
not cover the seats with insulating mate-
rials, e.g. blankets, coats, bags, seat cov-
ers, child seats or booster seats.
! To avoid damage to the seats and the seat
heating, observe the following information:
R do not spill any liquids on the seats. If
liquid is spilled on the seats, dry them as
soon as possible.
R if the seat cover sare damp or wet, do not
switch on the seat heating. The seat Seats
97Seats, steering wheel and mirrors Z
Page 105 of 373
The three red indicator lamps in the button
indicate the heating level you have selected.
The system automatically switches down
from level 3to level 2after approximately
eight minutes.
The system automatically switches down
from level 2to level 1after approximately ten
minutes.
The system automatically switches off
approximately 20 minutes after it is set to
level 1.
X Make sure that the key is in position 1or
2 in the ignition lock.
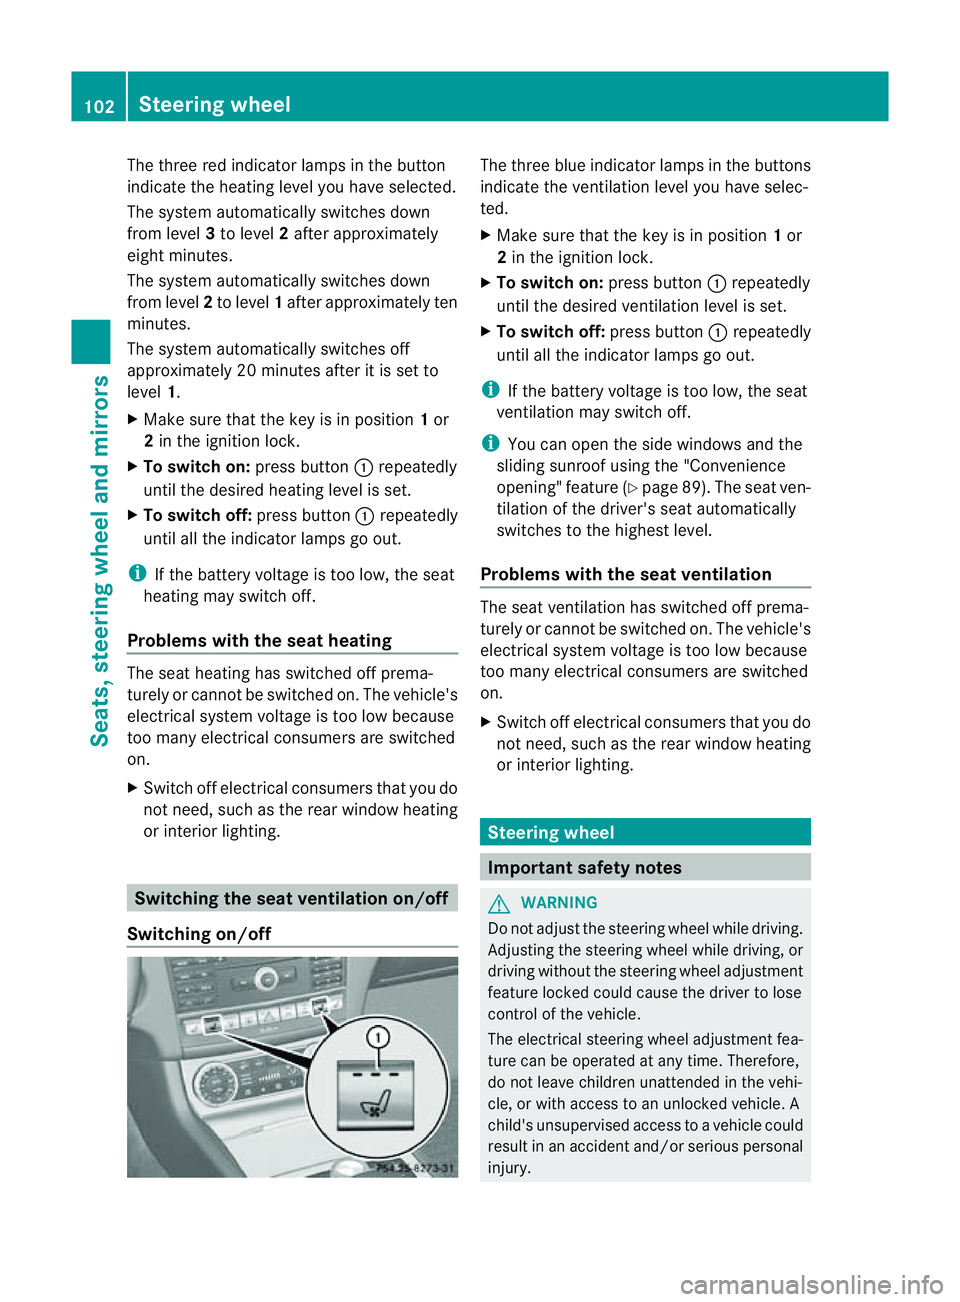
X To switch on: press button:repeatedly
until the desired heating level is set.
X To switch off: press button:repeatedly
until all the indicator lamps go out.
i If the battery voltage is too low, the seat
heating may switch off.
Problems with the seat heating The seat heating has switched off prema-
turely or cannot be switched on. The vehicle's
electrical system voltage is too low because
too many electrical consumers are switched
on.
X Switc hoff electrical consumers that you do
not need, such as the rear window heating
or interior lighting. Switching the seat ventilation on/off
Switching on/off The three blue indicator lamps in the buttons
indicate the ventilation level you have selec-
ted.
X
Make sure that the key is in position 1or
2 in the ignition lock.
X To switch on: press button:repeatedly
until the desired ventilation level is set.
X To switch off: press button:repeatedly
until all the indicator lamps go out.
i If the battery voltage is too low, the seat
ventilation may switch off.
i You can open the side windows and the
sliding sunroof using the "Convenience
opening" feature (Y page 89). The seat ven-
tilation of the driver's seat automatically
switches to the highest level.
Problems with the seat ventilation The seat ventilation has switched off prema-
turely or cannot be switched on. The vehicle's
electrical system voltage is too low because
too many electrical consumers are switched
on.
X
Switc hoff electrical consumers that you do
not need, such as the rear window heating
or interior lighting. Steering wheel
Important safety notes
G
WARNING
Do not adjust the steerin gwheel while driving.
Adjusting the steerin gwheel while driving, or
driving without the steerin gwheel adjustment
feature locked could cause the driver to lose
control of the vehicle.
The electrical steerin gwheel adjustmen tfea-
ture can be operated at any time. Therefore,
do not leave children unattended in the vehi-
cle, or with access to an unlocked vehicle. A
child's unsupervised access to avehicle could
result in an acciden tand/o rserious personal
injury. 102
Steering wheelSeats, steering wheel and mirrors
Page 107 of 373
Problems with the steering wheel heat-
ing If steering wheel heating indicator lamp
=is
flashing, the steering wheel heating has
switched off automatically. The vehicle's
electrical system voltage is too low because
too many electrical consumers are switched
on.
X Switch off electrical consumers that you do
not need, such as the rear window heating
or interior lighting.
Once the battery is sufficiently charged, the
steering wheel heating will switch back on
automatically. EASY-ENTRY/EXIT feature
Important safety notes G
WARNING
Make sure that nobody can become trapped
when you activate the EASY-ENTRY/EXIT fea-
ture.
If there is arisk of someone becoming trap-
ped, stop the adjustment procedure. To halt
the procedure:
R press the steering column adjustment but-
ton.
R briefly press one of the memory function
position buttons.
The steering column stops moving immedi-
ately.
Do not keep the memory function position
button pressed down, otherwise the memory
function will start and the steering wheel and
seat will begin to move.
Never leave children unsupervised in the vehi-
cle. They could open the driver's door and
thereby unintentionally activate the EASY-
ENTRY feature and become trapped.
The EASY-ENTRY/EXIT feature makes getting
in and out of your vehicle easier. You can activate and deactivate the EASY-
ENTRY/EXI
Tfeature in the on-board com-
puter (Y page 226).
Position of the steering wheel when the
EASY-ENTRY/EXIT featureisa ctive The steerin
gwheel tilts upwards if you:
R remove the key from the ignition lock
R open the driver's door and KEYLESS-GO is
in position 1
R open the driver's door and the key is in
position 0or 1in the ignition lock
i The steerin gwheel only moves upwards if
it has not already reached the upper end
stop.
Position of the steering wheel for driv-
ing The steerin
gwheel is moved to the previously
set position if:
R the driver's door is closed and
R you insert the key into the ignition lock
or
R you press the Start/Stop button onceon
vehicles with KEYLESS-GO.
If you close the driver's door with the key
inserted into the ignition lock, the steering
wheel is automatically moved to the previ-
ously set position.
The last position of the steerin gwheel is
stored when you switch off the ignition or
when you stor ethe setting with the memory
function (Y page 107).
Crash-responsive EASY-EXIT feature If the crash-responsive EASY-EXIT feature is
triggered in an accident
,the steerin gcolumn
will move upwards when the driver's door is
opened. This occurs irrespective of the posi-
tion of the key in the ignition lock. This makes
it easier to exit the vehicle and rescue the
occupants. 104
Steering wheelSeats, steering wheel and mirrors
Page 128 of 373
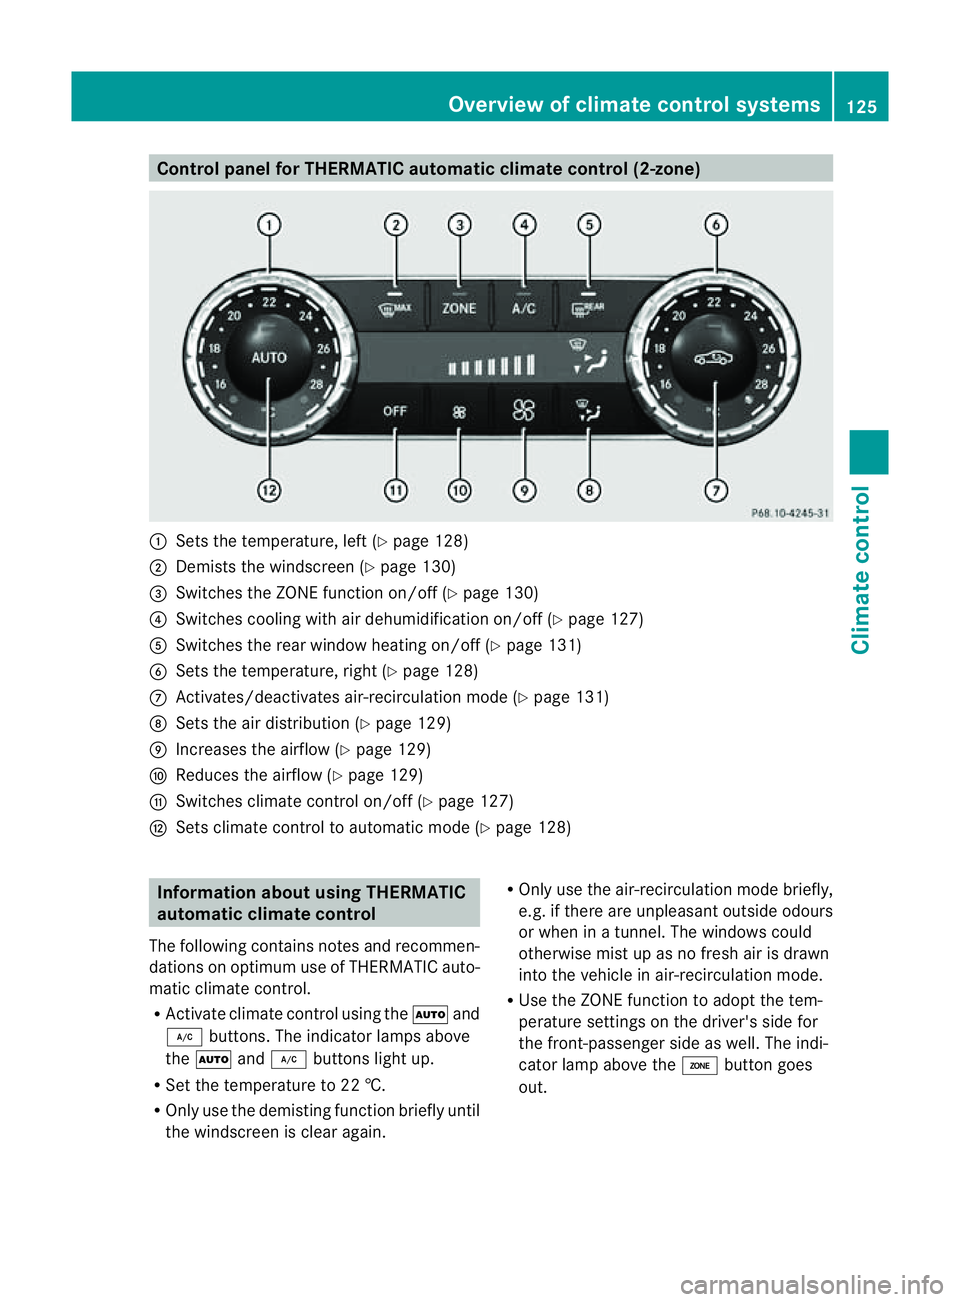
Control panel for THERMATIC automatic climat
econtrol (2-zone) :
Setsthe temperature, left (Y page 128)
; Demists th ewindscree n(Ypage 130)
= Switches th eZONE function on/of f(Y page 130)
? Switches coolin gwitha ir dehumidification on/of f(Ypage 127)
A Switches the rear window heatin gon/off (Y page 131)
B Setsthe temperature, right (Y page 128)
C Activates/deactivates air-recirculation mode (Y page 131)
D Setsthe air distribution (Y page 129)
E Increases the airflow (Y page 129)
F Reduces the airflow ( Ypage 129)
G Switches climat econtro lon/off (Y page 127)
H Setsclimate contro ltoautomatic mode (Y page 128) Information about using THERMATIC
automatic climat econtrol
The following contains notes and recommen-
dations on optimum use of THERMATIC auto-
matic climat econtrol.
R Activat eclimate contro lusing the Ãand
¿ buttons. The indicator lamps above
the à and¿ buttons light up.
R Set the temperature to 22 †.
R Only use the demisting function briefly until
the windscreen is clear again. R
Only use the air-recirculation mode briefly,
e.g. if there are unpleasant outside odours
or when in atunnel. The windows could
otherwise mist up as no fresh air is drawn
into the vehicle in air-recirculation mode.
R Use the ZONE function to adopt the tem-
perature settings on the driver's side for
the front-passenger side as well.T he indi-
cator lamp above the ábutton goes
out. Overview of climate control systems
125Climatecontrol Z