2012 MERCEDES-BENZ CLS COUPE buttons
[x] Cancel search: buttonsPage 130 of 373
Information abou
tusing
THERMOTRONIC automatic climate
control
The following contains instructions and rec-
ommendations to enable you to get the most
out of your THERMOTRONIC automatic cli-
mate control.
R Activate climate control using the Ãand
¿ buttons. The indicato rlamps above
the à and¿ buttons light up.
R In automatic mode, you can also use the
ñ buttontos etac limate mode
(FOCUS/MEDIUM/DIFFUSE). The
MEDIUM leve lisrecommended.
R Set th etem peratur eto22†.
R Only use th edemisting function briefly until
th ew indscree nisclear again.
R Only use the air-recirculation mode briefly,
e.g. if there are unpleasant outside odours
or when in atunnel. The windows could
otherwise mist up as no fresh air is drawn
into the vehicle in air-recirculation mode.
R Use the ZONE function to adopt the tem-
perature settings on the driver's side for
the front-passenger side and the rear com-
partment as well.T he indicator lamp above
the á button goes out.
R Use the residual heat function if you want
to heat or ventilate the vehicle interior
when the ignition is switched off. The resid-
ual heat function can only be activated or
deactivated with the ignition switched off. Operating the climate control system
Switching climate control on/off
Points to observe before use i
If climate control is switched off, the air
supply and air circulation are also switched
off. Only use this settingf orab rief period.
The windows could otherwise mist up.
i Switch on climate control primarily using
the à button (Y page 128). Switching on/off X
Turn the key to position 2in the ignition
lock.
X To switch on: press theÃbutton.
The indicator lamp in the Ãbutton lights
up. Airflow and air distribution are set to
automatic mode.
or
X Press the ^button.
The indicator lamp in the ^button goes
out. The previous settings are reactivated.
X To switch off: press the^button.
The indicator lamp in the ^button lights
up. Activating/deactivating the cooling
with air dehumidification function
Points to observe before use G
WARNING
If the "cooling with air dehumidification" func-
tion is deactivated, the air inside the vehicle
will not be cooled (during warm weather) or
dehumidified. The windows could mist up
more quickly. This may prevent you from
observing the traffic conditions, thereby caus-
ing an accident.
The cooling with air dehumidification function
is only available when the engine is running.
The air inside the vehicle is cooled and dehu-
midified according to the temperature selec-
ted.
Condensation may drip from the underside of
the vehicle when cooling mode is active. This
is normal and not asign that there is amal-
function.
i The cooling with air dehumidification
function uses refrigerant R134a. This
refrigerant does not contain chlorofluoro-
carbons, and therefore does not damage
the ozone layer. Operating the climate control system
127Climatecontrol Z
Page 138 of 373
Setting the departuret
ime
X Press the ,or. button repeatedly
until the time to be changed appears in the
display.
X Press the uand^ buttons simulta-
neously.
The Îsymbol in the remote control dis-
play flashes.
X Press the ,or. button to set the
desired departure time.
i The longer you press the ,or.
button, the faster the time changes.
X Press the uand^ buttons simulta-
neously.
The new departure time is stored.
Activating the set departuret ime
X Press the ,or. button repeatedly
until the desired departure time appears in
the display.
X Press the ubutton.
The Ísymbol and the departure time
appearint he display.
Deactivating aset departuret ime
X Press the ,or. button.
The status of the auxiliary heating is shown
in the display.
X Press the .button.
The first departure time stored appears in
the display.
X Press the ^button.
The displaym essageOFF appears in the
display.
Replacing the remote control battery G
WARNING
Batteries contain poisonous substances.
Swallowing/ingesting batteries can result in
serious personal injury or death.
Always keep batteries away from children. If
ab attery is swallowed, seek immediate med-
ical attention. H
Environmental note Batteries contain pollutants.
It is illegaltod
ispose of them
with the household rubbish.
They must be collected sep-
arately and disposed of in an
environmentally responsible
recycling system. Dispose of batteries in an
environmentally responsible
manner. Take discharged
batteries to aqualified spe-
cialist workshop or to acol-
lection point for used batter-
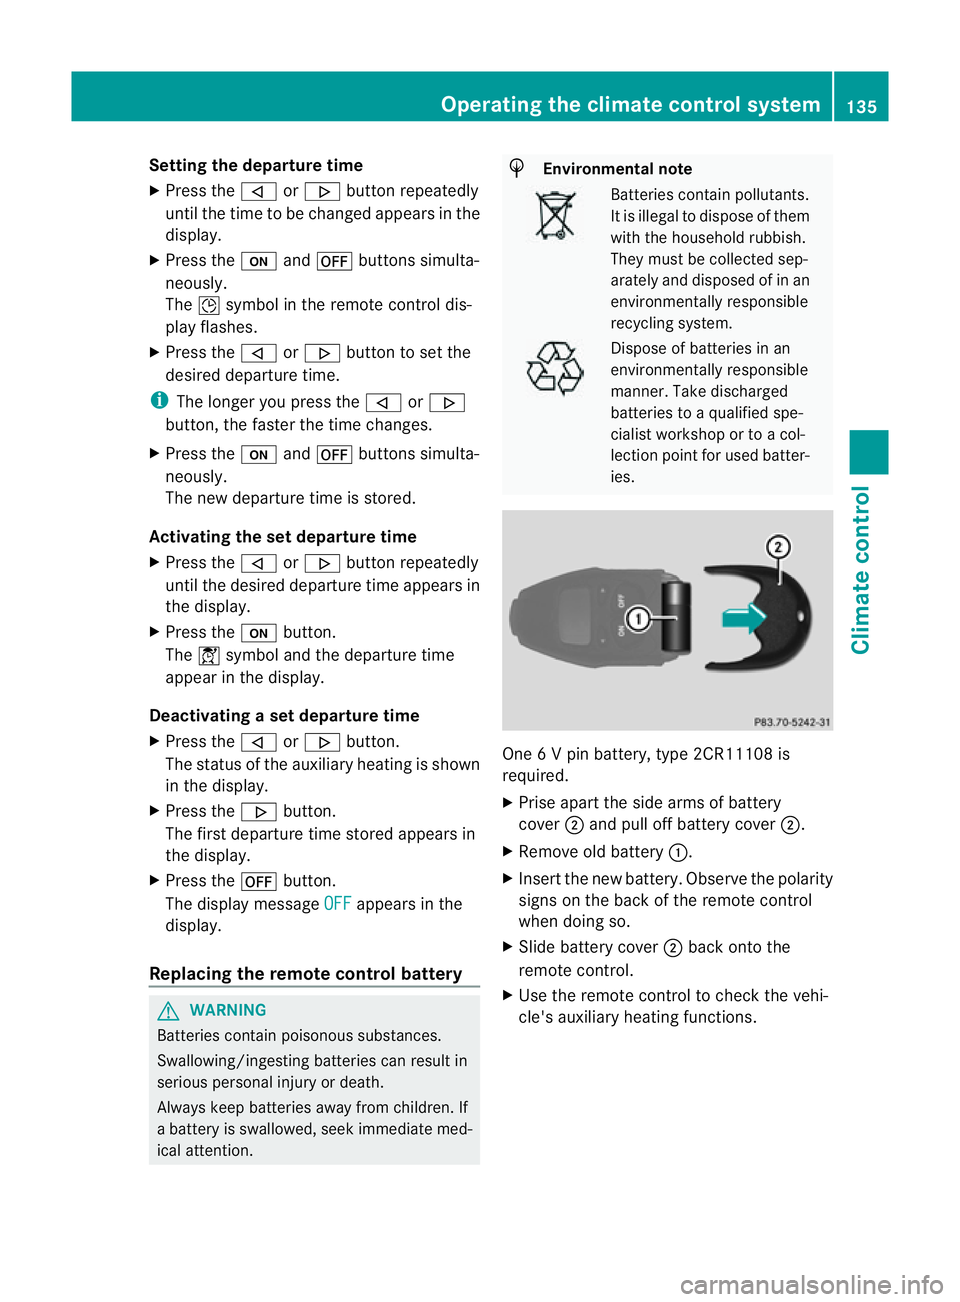
ies. One
6Vp in battery, type 2CR11108 is
required.
X Prise apart the side arms of battery
cover ;and pull off battery cover ;.
X Remove old battery :.
X Insert the new battery. Observe the polarity
signs on the back of the remote control
when doing so.
X Slide battery cover ;back onto the
remote control.
X Use the remote control to check the vehi-
cle's auxiliary heating functions. Operating the climate control system
135Climatecontrol Z
Page 214 of 373
X
To activate the on-board computer: turn
the key to position 1in the ignition lock.
Yo uc an contro lthe multifunctio ndisplay and
the settings in the on-board computer using
the buttons on the multifunction steering
wheel.
Left control panel =
; R
Calls up the men uand men ubar 9
:
Pres
sbriefly:
R Scrolls through lists
R Selects asubmen uorfunction
R In the Audio menu: selects a
stored station ,anaudio track or
av ideo scene
R In the Tel (telephone) menu:
switches to the phon ebook and
selects aname or telephone
number 9
:
Pres
sand hold:
R In the Audio menu: selects the
previous/next station or selects
an audio track or avideo scene
using rapid scrolling
R In the Tel (Telephone) menu:
start srapid scrolling if the phone
book is open a R
Confirms selection/display mes-
sage
R In the Tel (telephone) menu:
switches to the telephon ebook
and start sdialling the selected
number
R In the Audio menu: stops the
station searc hfunction at the
desire dstation Righ
tcontrol panel ~ R
Reject sorendsac all
R Exits telephone book/redial
memory 6 R
Makes or accept sacall
R Switche stotheredial memory W
X R
Adjust sthe volume 8 R
Mute Back button
%
Press briefly:
R
Back
R Switche soff LINGUATRONIC;
see th eseparate operating
instructions
R Hide sdisplay messages/calls
up th elast Trip men
ufunction
used
R Exits th etelephone book/redial
memory %
Press and hold:
R
Calls up th estandar ddisplay in
the Trip menu
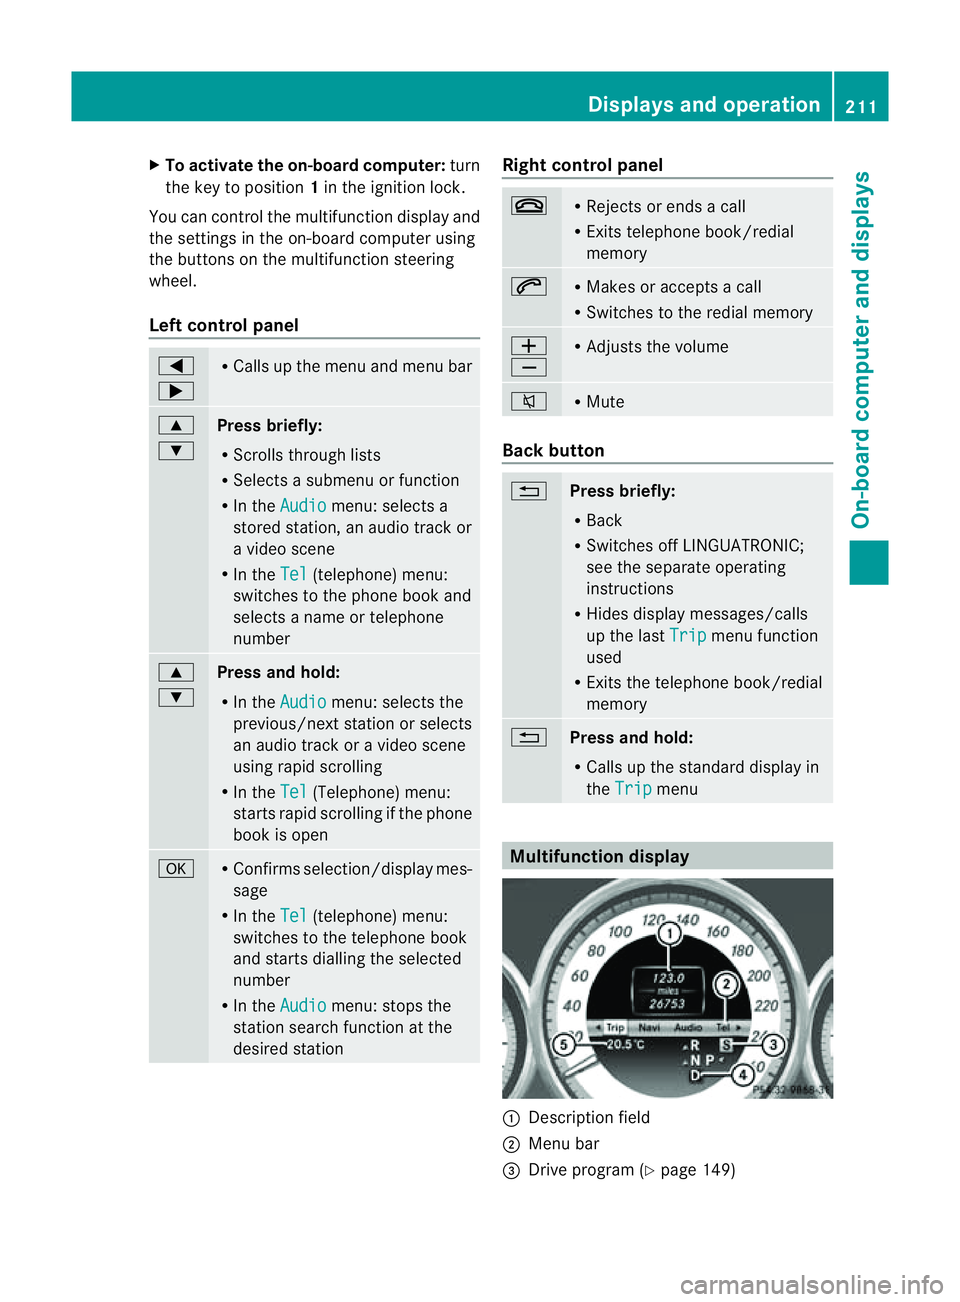
Multifunction display
:
Description field
; Men ubar
= Drive program (Y page 149) Displays and operation
211On-boardcomputer and displays Z
Page 288 of 373
If it is permitted by law to operate communi-
cations equipment whilet
he vehicle is in
motion, you must only do so if the traffic sit-
uationp ermits.Otherwise, yo ucould be dis-
tracted fro mthe traffi cconditions ,cause an
accident and injure yourself and others.
Two-way radios and fa xequipment used with-
out low-reflection exterior aerials can inter-
fere with the vehicle's electronic sand thereby
jeopardise the operatin gsafety of the vehicle
and your safety. Therefore, you must only use
this equipment if it is correctly connected to
as eparate reflection-free exterior aerial. G
WARNING
Excessiv elevels of electromagnetic radiation
may cause damage to your health and the
health of others. Using an exterior aerial takes
int oa ccoun tcurren tscientific discussions
relatin gtothe possible health risk posed by
electromagnetic fields.
Mercedes-Benz recommends the use of an
approved exterior aerial. This ensures:
R optimal mobile phone reception quality in
the vehicle
R mutual influences between the vehicle
electronic sand mobile phones are mini-
mised
An exterior aerial has the following advan-
tages:
R it conducts the electromagnetic fields gen-
erated by awireless device to the exterior.
R the field strengt hinthe vehicle interior is
lower than in avehicle that does not have
an exterior aerial.
i There are various mobile phone brackets
that may be fitted in your vehicle; in some
cases, these are country-specific.
i You can connec taBluetooth ®
-capable
mobile phone with Audio 20, Audio 50 or
COMAND Onlin evia the Bluetooth ®
inter-
face. This also applies if your vehicle is
equipped with convenience telephony. More information on suitable mobile phones,
mobile phone brackets and on connecting
Bluetooth
®
-capable mobile phones with
Audio 20, Audio 50 or COMAND Onlin ecan
be obtained:
R at your Mercedes-Benz Service Centre
R on the Internet at http://www.mercedes-
benz.com/connect
i The function sand services available when
you use the phone depend on your mobile
phone model and servic eprovider.
Using amobile phone If th
emobile phon eisinserted in th emobile
phon ebracket ,you can speak to th eperson
you are callin gusingthe hands-free system.
X Open th etelephone compartment
(Y page 274).
X If required by th edesig noft he mobile
phone bracket, install the sliding adapter
(Y page 286).
X Insert the mobile phone into the mobile
phone bracket (see the separate installa-
tion instructions for the mobile phone fit-
ting).
i On some mobile phone brackets, you first
have to connect the mobile phone via Blue-
tooth ®
to the mobile phone bracket (see
the separate operating instructions for the
mobile phone bracket).
If this is the case, the mobile phone does
not have to be inserted into the bracket for
you to be able to use the telephone func-
tions. However, the charging function and
aerial function are not available.
Operating the mobile phone You can operate the telephone using the
6
and~ buttons on the multifunction
steering wheel. You can operate other mobile
phone functions via the on-board computer
(Y page 217).
When you remove the key from the ignition
lock, the mobile phone stays switched on. Features
285Stowing and features Z
Page 289 of 373
However, yo
ucan no longer use the hands-
free system.
If yo uhaveana ctivecalla nd would like to
take the key ou tofthe ignition lock, first
remove the mobile phone from the bracket.
i Whe nusing abracket connected to the
mobile phone via Bluetooth ®
and yo uwish
to proceed with acall:
Switch to private mode before removing
the key from the ignition lock. Otherwise ,it
may take up to 20 seconds, before the
mobile phone separates from the system.
Only then can the telephone cal lcontinue.
Information on the necessary steps for set-
ting up "private mode "can be found in the
separate mobile phone operating instruc-
tions.
i Not al lmobile phones support "private
mode".
Sliding adapter for the mobile phone
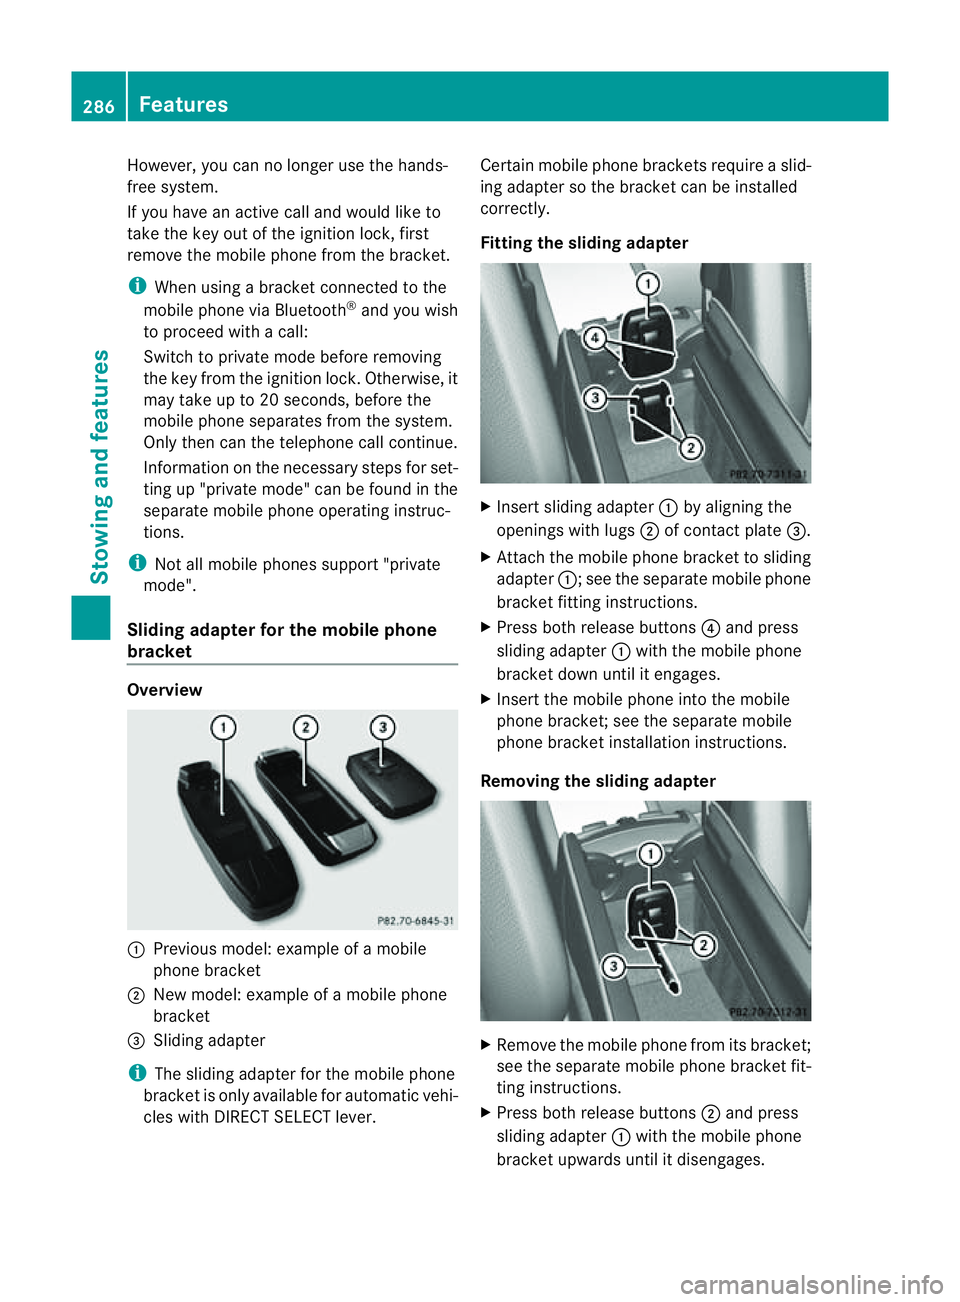
bracket Overview
:
Previou smodel: example of amobile
phone bracket
; New model: example of amobile phone
bracket
= Sliding adapter
i The sliding adapter for the mobile phone
bracket is only available for automati cvehi-
cles with DIRECT SELECT lever. Certain mobile phone brackets require
aslid-
ing adapter so the bracket can be installed
correctly.
Fitting the sliding adapter X
Inser tsliding adapter :by alignin gthe
openings with lugs ;of contac tplate =.
X Attac hthe mobile phon ebracket to sliding
adapter :;see the separat emobile phone
bracket fittin ginstructions.
X Press bot hrelease buttons ?and press
slidin gadapter :with the mobile phone
bracket down until it engages.
X Insert the mobile phon eintot he mobile
phon ebracket ;see the separat emobile
phon ebracket installation instructions.
Removing th eslidin gadapt er X
Remove the mobile phon efromi ts bracket;
se et he separate mobil ephone bracket fit-
ting instructions.
X Press both release buttons ;and press
sliding adapter :with the mobil ephone
bracket upwards unti litdisengages. 286
FeaturesSto
wing an dfeatures
Page 290 of 373
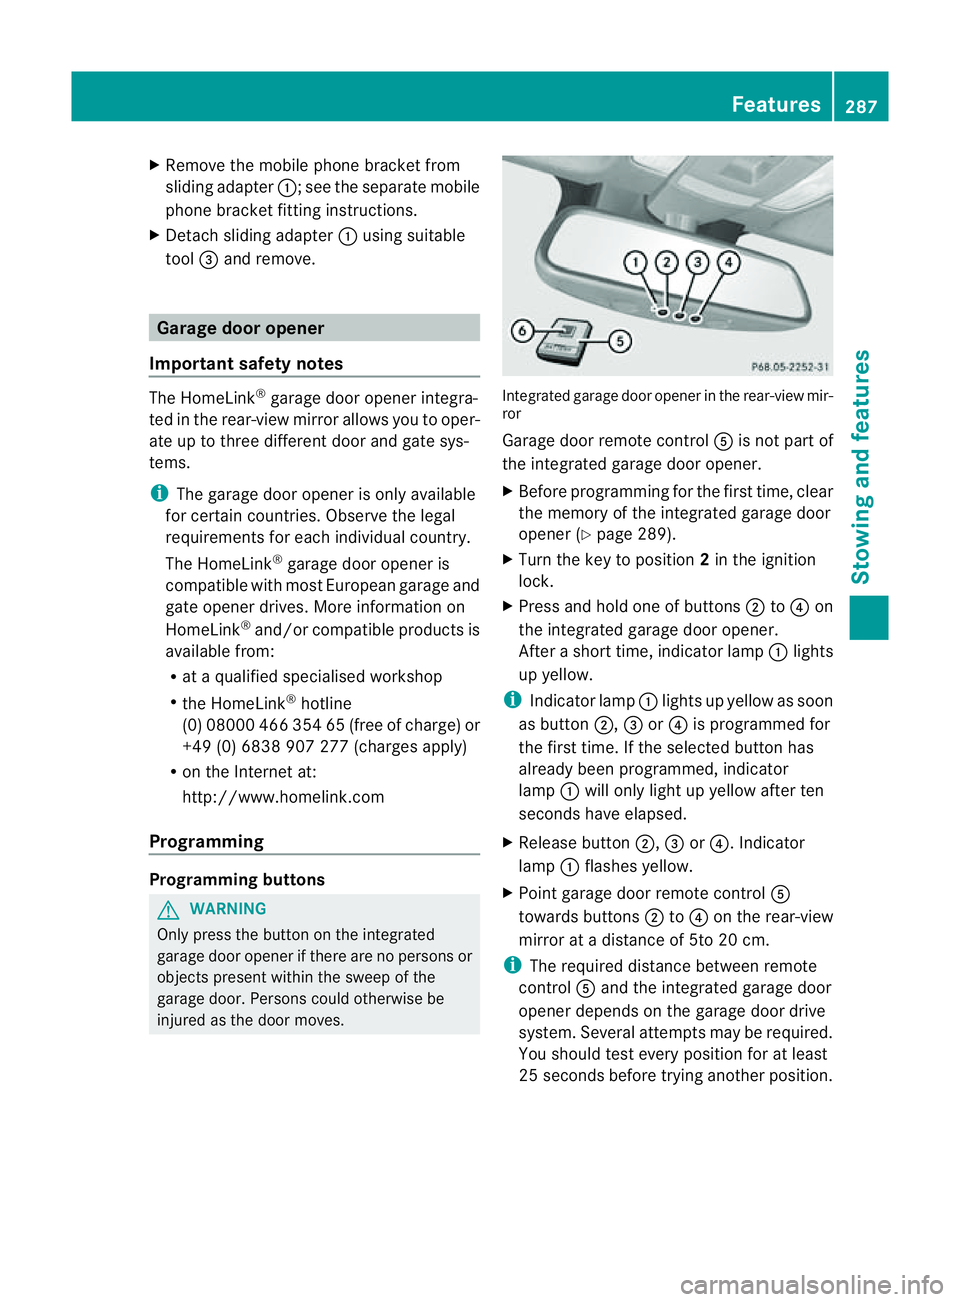
X
Remove th emobile phone bracke tfrom
sliding adapter :;see the separate mobile
phone bracket fitting instructions.
X Detach sliding adapter :using suitable
tool =and remove. Garage door opener
Important safety notes The HomeLink
®
garage door opener integra-
ted in the rear-view mirror allows you to oper-
ate up to three different door and gate sys-
tems.
i The garage door opener is only available
for certain countries. Observe the legal
requirements for each individualc ountry.
The HomeLink ®
garage door opener is
compatible with most European garage and
gate opener drives. More information on
HomeLink ®
and/or compatible products is
available from:
R at aq ualified specialised workshop
R the HomeLink ®
hotline
(0) 08000 466 354 65 (free of charge )or
+49 (0) 6838 907 277 (charges apply)
R on the Internet at:
http://www.homelink.com
Programming Programming buttons
G
WARNING
Only press the button on the integrated
garage door opene rifthere are no persons or
objects present within the sweep of the
garage door. Persons could otherwise be
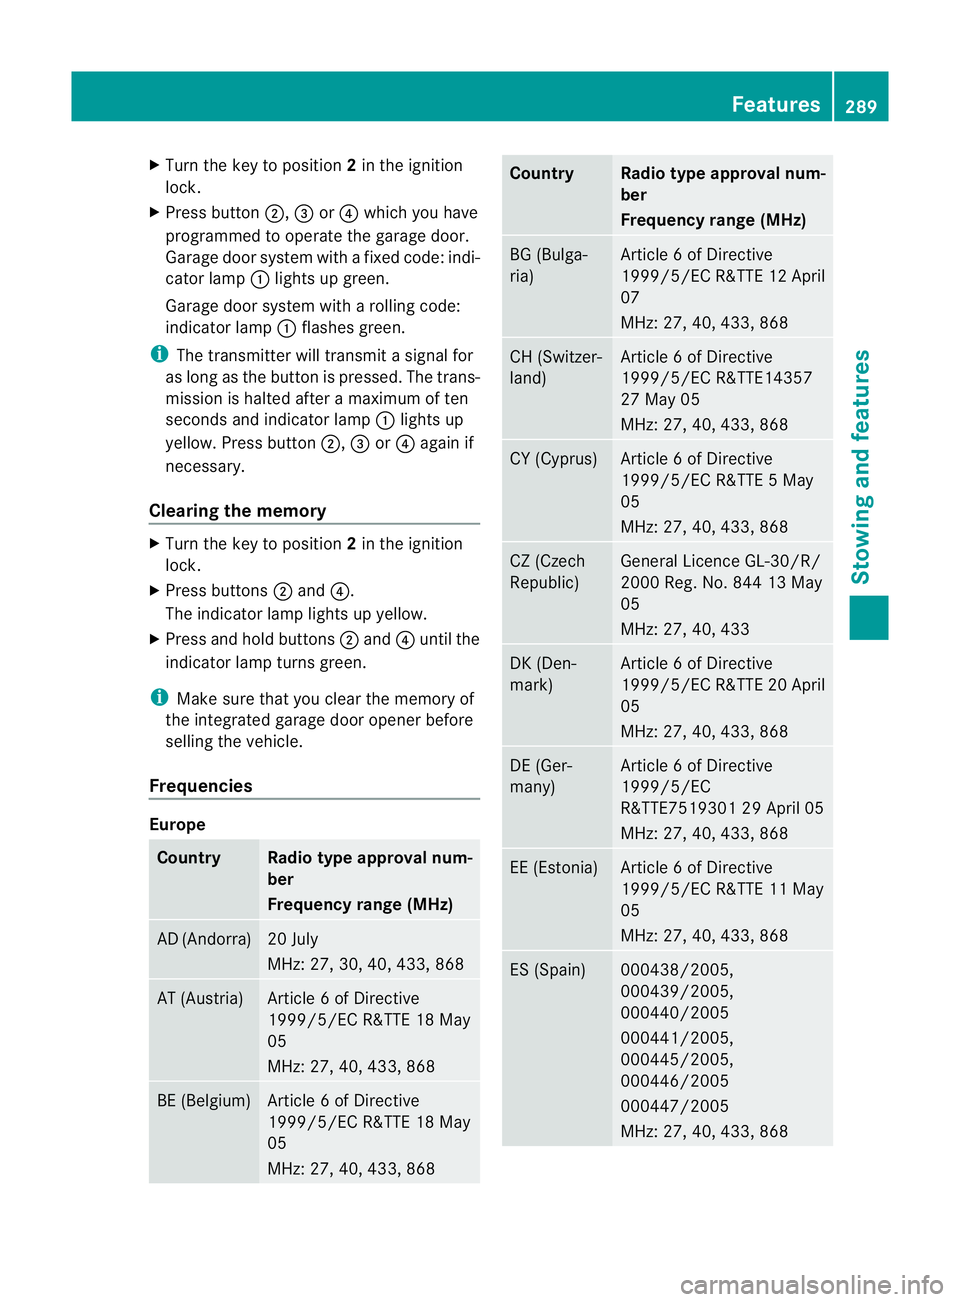
injured as the door moves. Integrated garage door opener in the rear-view mir-
ror
Garage door remote control Ais not part of
the integrated garage door opener.
X Before programming for the first time, clear
the memory of the integrated garage door
opener (Y page 289).
X Turn the key to position 2in the ignition
lock.
X Press and hold one of buttons ;to? on
the integrated garage door opener.
After ashort time, indicator lamp :lights
up yellow.
i Indicator lamp :lights up yellow as soon
as button ;,=or? is programmed for
the first time. If the selected button has
alreadyb een programmed, indicator
lamp :will only light up yellow after ten
seconds have elapsed.
X Release button ;,=or?.I ndicator
lamp :flashes yellow.
X Point garage door remote control A
towards buttons ;to? on the rear-view
mirror at adistance of 5to 20 cm.
i The required distance between remote
control Aand the integrated garage door
opener depends on the garage door drive
system. Several attemptsm ay be required.
You should test every positio nfor at least
25 seconds before trying another position. Features
287Stowing and features Z
Page 292 of 373
X
Turn the key to position 2in the ignition
lock.
X Press button ;,=or? which you have
programmed to operate the garage door.
Garage door system with afixed code: indi-
cator lamp :lights up green.
Garage door system with arolling code:
indicator lamp :flashes green.
i The transmitter will transmit asignal for
as long as the button is pressed. The trans-
mission is halted after amaximum of ten
seconds and indicator lamp :lights up
yellow. Press button ;,=or? again if
necessary.
Clearing the memory X
Turn the key to position 2in the ignition
lock.
X Press buttons ;and ?.
The indicator lamp lights up yellow.
X Press and hold buttons ;and ?until the
indicator lamp turns green.
i Make sure that you clear the memory of
the integrated garage door opener before
selling the vehicle.
Frequencies Europe
Country Radio typea
pproval num-
ber
Frequency range (MHz) AD (Andorra) 20 July
MHz: 27, 30, 40, 433, 868
AT (Austria) Article
6ofDirective
1999/5/EC R&TTE 18 May
05
MHz: 27, 40, 433, 868 BE (Belgium) Article
6ofDirective
1999/5/EC R&TTE 18 May
05
MHz: 27, 40, 433, 868 Country Radio typea
pproval num-
ber
Frequency range (MHz) BG (Bulga-
ria) Article
6ofDirective
1999/5/EC R&TTE 12 April
07
MHz: 27, 40, 433, 868 CH (Switzer-
land) Article
6ofDirective
1999/5/EC R&TTE14357
27 May 05
MHz: 27, 40, 433, 868 CY (Cyprus) Article
6ofDirective
1999/5/EC R&TTE 5May
05
MHz: 27, 40, 433, 868 CZ (Czech
Republic) General Licenc
eGL-30/R/
2000 Reg. No. 844 13 May
05
MHz: 27, 40, 433 DK (Den-
mark) Article
6ofDirective
1999/5/EC R&TTE 20 April
05
MHz: 27, 40, 433, 868 DE (Ger-
many) Article
6ofDirective
1999/5/EC
R&TTE751930129A pril 05
MHz: 27, 40, 433, 868 EE (Estonia) Article
6ofDirective
1999/5/EC R&TTE 11 May
05
MHz: 27, 40, 433, 868 ES (Spain) 000438/2005,
000439/2005,
000440/2005
000441/2005,
000445/2005,
000446/2005
000447/2005
MHz: 27, 40, 433, 868 Features
289Stowing and features Z