2012 MERCEDES-BENZ CLS COUPE charging
[x] Cancel search: chargingPage 8 of 373
ASSYS
TPLUS
Displaying aservice message ........300
Hiding aservice message ..............300
Notes ............................................. 300
Resetting the service interva ldis-
pla y................................................ 300
Service message ............................ 300
Specia lservice requirements ......... 301
ATA (Anti-Theft Alarm system)
Activating/deactivating ...................71
Function .......................................... .71
Interior motion sensor .....................72
Switching off the alarm ....................71
Tow-awa yprotectio n........................ 71
ATTENTIO NASSIST
Activating/deactivating .................220
Display message ............................ 243
Function/notes ............................. 192
Authorised workshop
see Qualified specialist workshop
AUTO lights
Display message ............................ 239
see Lights
Automatic engine start (ECO start/
stop function) .................................... 146
Automatic engine switch-off (ECO
start/stop function) ..........................145
Automatic headlamp mode ..............111
Automatic transmission Accelerator pedal position .............151
Automatic drive program ...............152
Changing gea r............................... 151
DIRECT SELECT leve r..................... 149
Display message ............................ 254
Drive position (ECO start/stop
function) ........................................ 150
Drive program displa y.................... 149
Driving tips .................................... 151
Emergency running mode ..............156
Engaging drive position .................. 150
Engaging neutra l............................ 150
Engaging revers egear ................... 150
Engaging the par kposition ............ 149
Kickdow n....................................... 151
Manual drive program ....................154
Neutral (ECO start/stop function) .150
Overview ........................................ 148
Problem (fault) ............................... 156Progra
mselector button ................151
Pulling away ................................... 143
Selector leve r................................ 148
Shift range s................................... 153
Starting the engine ........................143
Steering wheel gearshift paddle s... 152
Transmission position displa y........ 149
Transmission position display
(DIREC TSELECT lever) ................... 149
Transmission positions ..................150
Automatic transmission emer-
gency runnin gmode ......................... 156
Auxiliary heating Activating/deactivating .................133
Activating/deactivating (on the
centre console ).............................. 133
Display message ............................ 255
Important safety notes ..................132
Problem (display message) ............136
Remote control .............................. 133
Setting ........................................... 225
Setting the departur etime ............ .135
Auxiliary ventilation
Activating/deactivating .................133
Activating/deactivating (on the
centre console ).............................. 133
Problem (display message) ............136
Remote control .............................. 133 B
Bag hook ............................................ 277
BAS (Brake Assist System) .................63
BAS PLU S(Brake Assist System
PLUS) .................................................... 64
Battery (key) Checking .......................................... 79
Important safety notes ....................79
Replacing ......................................... 79
Battery (vehicle)
Charging ........................................ 318
Display message ............................ 242
Important safety notes ..................316
Jump starting ................................. 319
Belt
see Seat belt
Belt force limiters (activation) ...........41 Index
5
Page 121 of 373
Interior lighting
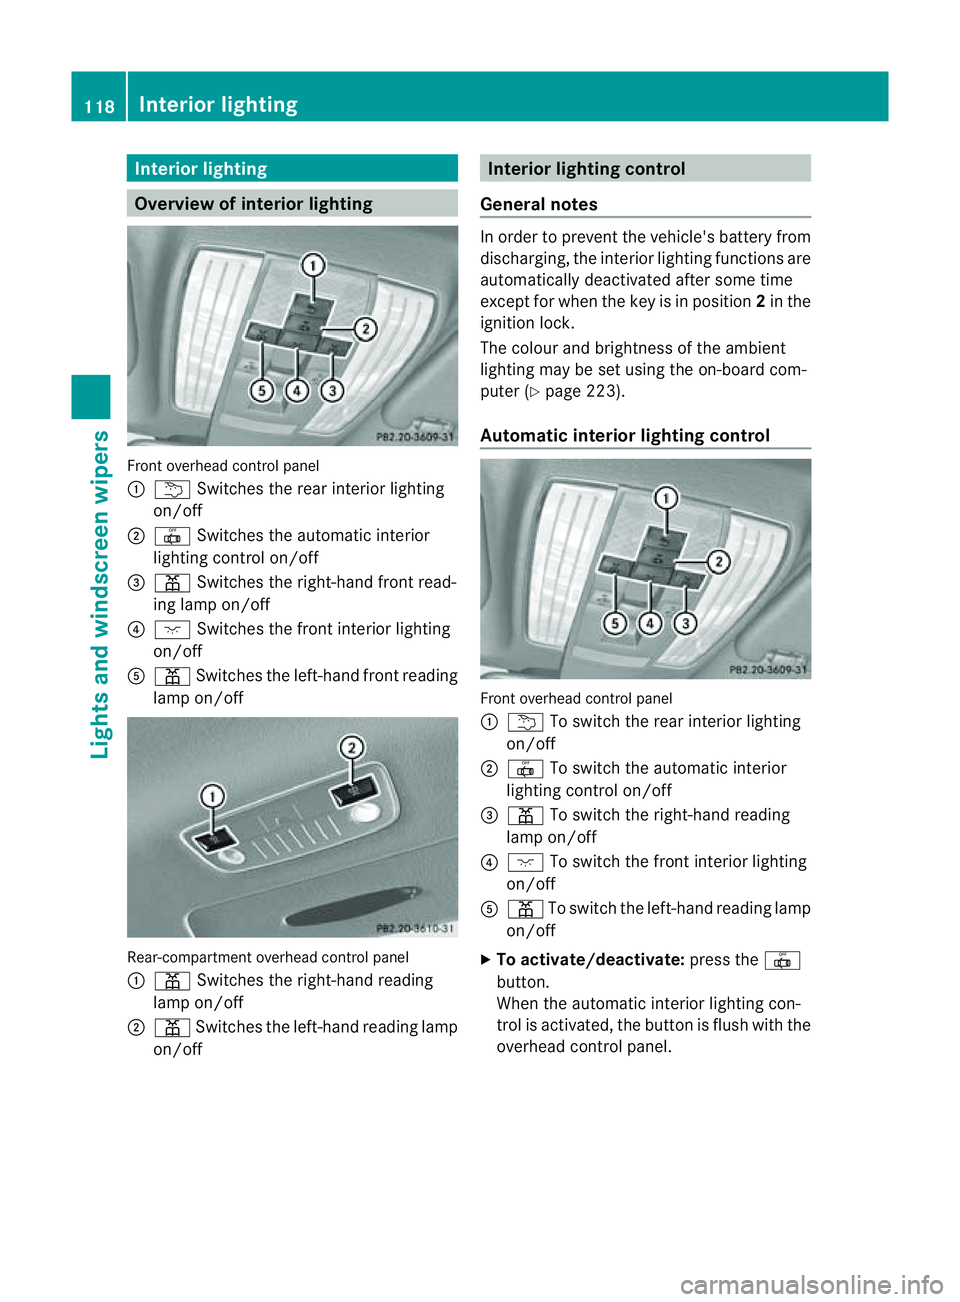
Overview of interior lighting
Fron
toverhead control panel
: u Switches th erear interio rlighting
on/off
; | Switches the automatic interior
lighting control on/off
= p Switches the right-han dfront read-
ing lamp on/off
? c Switches the front interior lighting
on/off
A p Switches the left-han dfront reading
lamp on/off Rear-compartment overhead control panel
:
p Switches the right-han dreading
lamp on/off
; p Switches the left-han dreadin glamp
on/off Interior lighting control
General notes In order to prevent the vehicle's battery from
discharging, the interior lighting function
sare
automatically deactivated after some time
except for when the key is in position 2in the
ignition lock.
The colour and brightnes softhe ambient
lighting may be set using the on-board com-
puter (Y page 223).
Automatic interior lighting control Front overhead control panel
:
u To switc hthe rear interior lighting
on/off
; | To switc hthe automatic interior
lighting control on/off
= p To switc hthe right-han dreading
lamp on/off
? c To switch the fron tinterior lighting
on/off
A p To switch the left-hand reading lamp
on/off
X To activate/deactivate: press the|
button.
When the automatic interior lighting con-
trol is activated, the button is flush with the
overhead control panel. 118
Interior lightingLights and windscreen wipers
Page 164 of 373
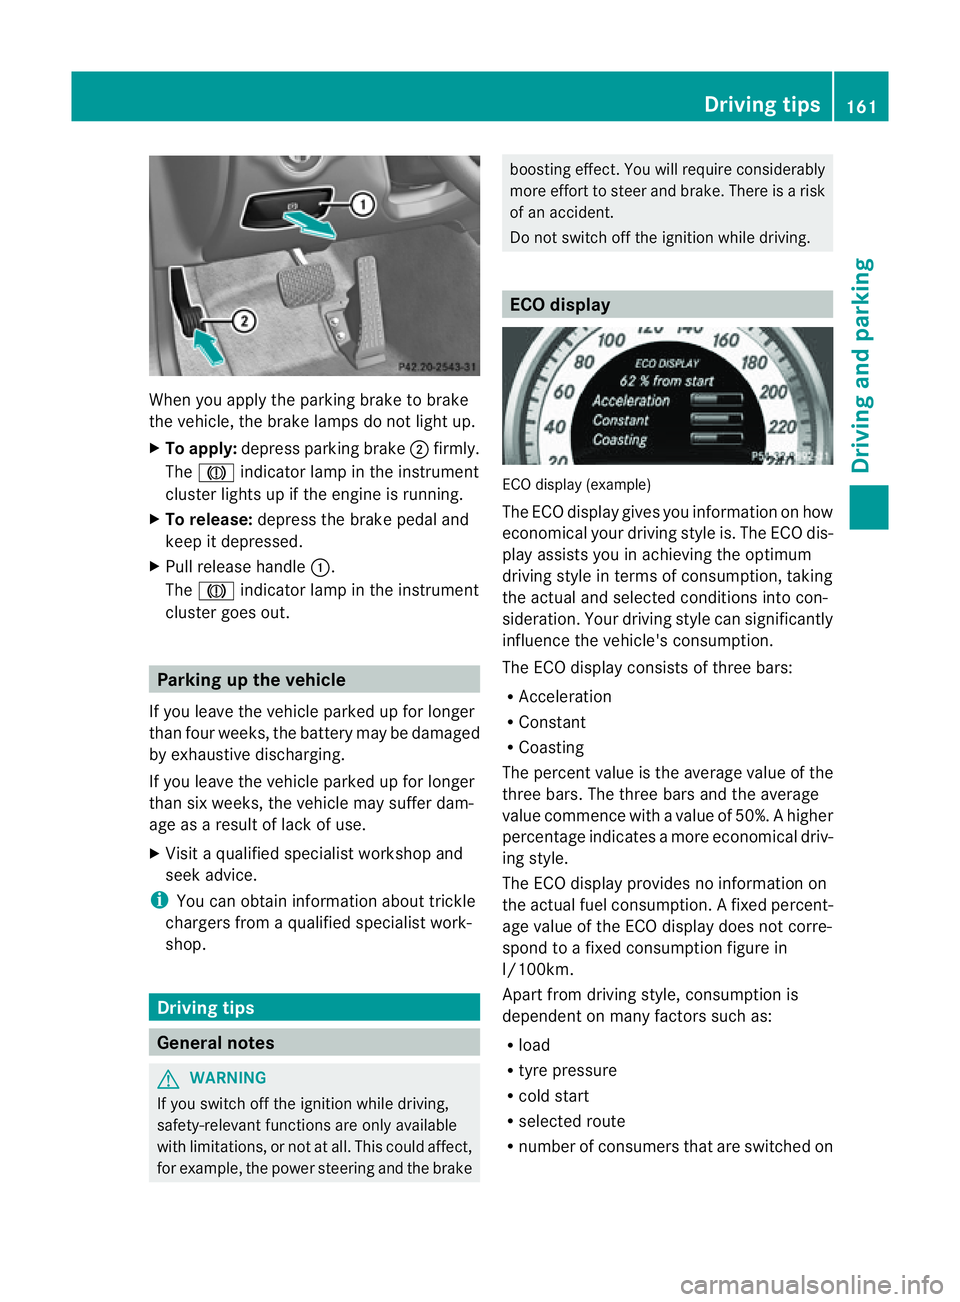
When you apply the parking brake to brake
the vehicle, the brake lamps do not light up.
X To apply: depress parking brake ;firmly.
The J indicato rlamp in the instrument
cluster lights up if the engine is running.
X To release: depress the brake pedal and
keep it depressed.
X Pull release handle :.
The J indicato rlamp in the instrument
cluster goes out. Parking up the vehicle
If you leave the vehicle parked up for longer
than four weeks, the batter ymay be damaged
by exhaustive discharging.
If you leave the vehicle parked up for longer
than six weeks, the vehicle may suffer dam-
age as aresult of lack of use.
X Visit aqualified specialist workshop and
seek advice.
i You can obtain information about trickle
chargers from aqualified specialist work-
shop. Driving tips
General notes
G
WARNING
If you switch off the ignition while driving,
safety-relevant functions are only available
with limitations, or not at all. This could affect,
for example, the power steerin gand the brake boostin
geffect. You will require considerably
more effort to steer and brake. There is arisk
of an accident.
Do not switch off the ignition while driving. ECO display
ECO display (example)
The ECO display gives you information on how
economical your driving style is. The ECO dis-
play assists you in achieving the optimum
driving style in term
sofconsumption ,taking
the actual and selected conditions into con-
sideration. Your driving style can significantly
influenc ethe vehicle's consumption.
The ECO display consists of three bars:
R Acceleration
R Constant
R Coasting
The percen tvalue is th eaverage value of the
three bars .The three bars and the average
value commence with avalue of 50%. Ahigher
percentage indicates amoree conomical driv-
ing style.
The ECO display provides no information on
the actual fue lconsumption. Afixed percent-
age value of the ECO display does not corre-
spon dtoaf ixed consumption figure in
l/100km.
Apar tfromd rivin gstyle, consumption is
dependent on many factors such as:
R load
R tyre pressure
R cold start
R selected route
R number of consumer sthat are switched on Driving tips
161Driving and parking Z
Page 288 of 373
If it is permitted by law to operate communi-
cations equipment whilet
he vehicle is in
motion, you must only do so if the traffic sit-
uationp ermits.Otherwise, yo ucould be dis-
tracted fro mthe traffi cconditions ,cause an
accident and injure yourself and others.
Two-way radios and fa xequipment used with-
out low-reflection exterior aerials can inter-
fere with the vehicle's electronic sand thereby
jeopardise the operatin gsafety of the vehicle
and your safety. Therefore, you must only use
this equipment if it is correctly connected to
as eparate reflection-free exterior aerial. G
WARNING
Excessiv elevels of electromagnetic radiation
may cause damage to your health and the
health of others. Using an exterior aerial takes
int oa ccoun tcurren tscientific discussions
relatin gtothe possible health risk posed by
electromagnetic fields.
Mercedes-Benz recommends the use of an
approved exterior aerial. This ensures:
R optimal mobile phone reception quality in
the vehicle
R mutual influences between the vehicle
electronic sand mobile phones are mini-
mised
An exterior aerial has the following advan-
tages:
R it conducts the electromagnetic fields gen-
erated by awireless device to the exterior.
R the field strengt hinthe vehicle interior is
lower than in avehicle that does not have
an exterior aerial.
i There are various mobile phone brackets
that may be fitted in your vehicle; in some
cases, these are country-specific.
i You can connec taBluetooth ®
-capable
mobile phone with Audio 20, Audio 50 or
COMAND Onlin evia the Bluetooth ®
inter-
face. This also applies if your vehicle is
equipped with convenience telephony. More information on suitable mobile phones,
mobile phone brackets and on connecting
Bluetooth
®
-capable mobile phones with
Audio 20, Audio 50 or COMAND Onlin ecan
be obtained:
R at your Mercedes-Benz Service Centre
R on the Internet at http://www.mercedes-
benz.com/connect
i The function sand services available when
you use the phone depend on your mobile
phone model and servic eprovider.
Using amobile phone If th
emobile phon eisinserted in th emobile
phon ebracket ,you can speak to th eperson
you are callin gusingthe hands-free system.
X Open th etelephone compartment
(Y page 274).
X If required by th edesig noft he mobile
phone bracket, install the sliding adapter
(Y page 286).
X Insert the mobile phone into the mobile
phone bracket (see the separate installa-
tion instructions for the mobile phone fit-
ting).
i On some mobile phone brackets, you first
have to connect the mobile phone via Blue-
tooth ®
to the mobile phone bracket (see
the separate operating instructions for the
mobile phone bracket).
If this is the case, the mobile phone does
not have to be inserted into the bracket for
you to be able to use the telephone func-
tions. However, the charging function and
aerial function are not available.
Operating the mobile phone You can operate the telephone using the
6
and~ buttons on the multifunction
steering wheel. You can operate other mobile
phone functions via the on-board computer
(Y page 217).
When you remove the key from the ignition
lock, the mobile phone stays switched on. Features
285Stowing and features Z
Page 321 of 373
Otherwise, the vehicle's electronic sys-
tem may be damaged.
R in vehicles with automatic transmission,
the transmission is locked in position P
after disconnecting the battery. The vehi-
cle is secured against rolling away. You
can then no longer move the vehicle.
The battery and the cover of the positive
terminal clamp must be fitted securely dur-
ing operation.
In order for the battery to achieve the maxi-
mum possibles ervice life, it must always be
sufficiently charged.
The vehicle battery, like other batteries, can
discharge over time if you do not use the
vehicle. In such cases, have the battery dis-
connected at aqualified specialist workshop.
You can also charge the battery with a
charger recommended by Mercedes-Benz.
For more information, please contact aquali-
fied specialist workshop.
Have the battery charge checked more fre-
quently if you use the vehicle mainly for short
trips or if you leave it standing idle for a
lengthy period. Consult aqualified specialist
workshop if you wish to leave your vehicle
parked up for along period of time.
i When you park the vehicle, remove the
key if you do not require any electrical con-
sumers. The vehicle will then use very little
energy, thus conserving battery power.
i After an interruption of the power supply,
e.g. the battery was discharged, you have
to:
R set the clock. Information on setting the
clock can be found in the separate oper-
ating instructions.
On vehicles with COMAND Online and a
navigation system, the clock is set auto-
matically.
R reset the function for folding the exterior
mirrors in/out automatically, by folding
the mirrors out once (Y page 106). Charging the battery
G
WARNING
Only charge the battery in awell-ventilated
area. As the battery is being charged, gases
can escape and generate minor explosions.
This could injure you and other persons or
cause damage to the paintwork or acid cor-
rosion on the vehicle.
You can obtain information on battery charg-
ers which allow the battery to be charged
while still installed from aqualified specialist
workshop. G
WARNING
There is arisk of acid burns during the charg-
ing process due to the gases which escape
from the battery. Do not lean over the battery
during the charging process. G
WARNING
Battery acid is caustic. Avoid contact with the
skin, eyes or clothing.
! Only charge the installed battery with a
battery charger which has been tested and
approved by Mercedes-Benz.T hese battery
chargers allow the battery to be charged
while still installed in the vehicle.
! Only use battery chargers with amaxi-
mum charging voltage of 14.8 V.
! Only charge the battery using the jump-
start connection point.
The jump-starting connection point is in the
engine compartment( Ypage 319).
Read the battery charger's operating instruc-
tions before charging the battery.
X Open the bonnet (Y page 296).
X Connect the battery charger to the positive
terminal and earth point in the same order
as when connecting the donor battery in
the jump-starting procedure
(Y page 319). 318
Battery (vehicle)Breakdown assistance