Page 25 of 233
 DOOR LOCKS
MANUAL DOOR LOCKS
To lock each door, push the door lock
knob on each door trim panel down-
ward. To unlock each door, pull the
inside door handle.
If the door lock knob is down when
you shu")
DOOR LOCKS
MANUAL DOOR LOCKS
To lock each door, push the door lock
knob on each door trim panel down-
ward. To unlock each door, pull the
inside door handle.
If the door lock knob is down when
you shut the door, the door will lock.
Make sure the keys are not inside the
vehicle before closing the door.
WARNING!
For personal security and safetyin the event of an accident, lock
the vehicle doors as you drive as
well as when you park and leave
the vehicle.
When leaving the vehicle, always
remove the key fob from the igni-
tion and lock your vehicle.
Never leave children alone in a
vehicle, or with access to an un-
locked vehicle.
Allowing children to be in a ve-
hicle unattended is dangerous for
a number of reasons. A child or
others could be seriously or fatally
injured. Children should be
warned not to touch the parking
brake, brake pedal or the shift
lever.
Do not leave the key fob in or near
the vehicle, and do not leave the
ignition in the ACC or ON/RUN
position. A child could operate
power windows, other controls, or
move the vehicle. POWER DOOR LOCKS
A door lock switch is located on the
driver and passenger door trim panel.
Press this switch to lock or unlock the
doors.
Automatic Door Locks
The auto door lock feature default
condition is disabled. When enabled,
the door locks will lock automatically
when the vehicle's speed exceeds
24 km/h. The auto door lock feature
can be enabled or disabled by your
authorized dealer. Please see your au-
thorized dealer for service.
Auto Unlock On Exit
The doors will unlock automatically
on vehicles with power door locks if:
1. The Automatic Unlock Doors On
Exit feature is enabled.
Manual Lock Knob
Power Door Lock Switch
18
Page 26 of 233
 2. The transaxle was in gear and the
vehicle speed returned to 0 km/h.
3. The transaxle is in NEUTRAL or
PARK.
4. The driver door is opened.
5. The doors were not previously un-
locked.
6. The vehicle")
2. The transaxle was in gear and the
vehicle speed returned to 0 km/h.
3. The transaxle is in NEUTRAL or
PARK.
4. The driver door is opened.
5. The doors were not previously un-
locked.
6. The vehicle speed is 0 km/h.
Auto Unlock Door On Exit
Programming
The Automatic Unlock Doors On Exit
feature can be enabled or disabled.
Refer to “Electronic Vehicle Informa-
tion Center (EVIC)/Personal Settings
(Customer-Programmable Fea-
tures)” in “Understanding Your In-
strument Panel” for further informa-
tion.
NOTE:
Use the Automatic Unlock Doors
On Exit feature in accordance with
local laws.WINDOWS
POWER WINDOWS
The window controls on the driver's
door trim panel operate the door win-
dows and the rear quarter windows.
There is a single window control on
the passenger's door trim panel,
which operates the passenger door
window. The window controls will op-
erate when the ignition switch is
turned to the ON/RUN or ACC posi-
tion, and when the accessory delay
feature is active.
NOTE:
If a fluttering noise is heard from
the rear seat belts while driving
with the windows down, safely
bring the vehicle to a stop and
buckle the rear seat belts over the empty seats. This will keep
tension on the seat belts and re-
move the fluttering condition.
WARNING!
Never leave children in a vehicle,
with the keys in the ignition switch.
Occupants, particularly unattended
children, can become entrapped by
the windows while operating the
power window switches. Such en-
trapment may result in serious in-
jury or death.
Smart Glass Feature
The door window will lower slightly if
the window is fully up when opening
the door. The window will return to its
full up position after closing the door.
This action allows the door to open
without resistance and prevents win-
dow and top seal damage.
Auto Window DownThe front window controls on the
driver and passenger door trim panels
have an Auto-Down feature. These
switches are labeled AUTO to indicate
this capability. Push the window switch
past the first detent, release, and the
window will go down automatically.
Power Window Switches
19
Page 27 of 233
 To open the window part way, push
the window switch to the first detent
and release it when you want the win-
dow to stop.To cancel the Auto-Down movement,
operate the switch either in the up or
down")
To open the window part way, push
the window switch to the first detent
and release it when you want the win-
dow to stop.To cancel the Auto-Down movement,
operate the switch either in the up or
down direction and release the switch.
The power window switches will re-
main active for up to 10 minutes after
the ignition switch is turned to the
LOCK position. Opening either door
will cancel this feature. The time for
this feature is programmable. Refer to
“Electronic Vehicle Information Center
(EVIC)/Personal Settings (Customer-
Programmable Features)” in “Under-
standing Your Instrument Panel” for
further information.Reset Window Smart Glass
Feature for Opening/Closing the
Door
If the vehicle battery goes dead, the
window Smart Glass Feature for
opening and closing the door will be
disabled. To reactivate the window
Smart Glass Feature, perform the fol-
lowing steps after vehicle power is
restored.1. Lowering all four windows to the
full open position.
2. Press and hold the Power Top
Switch in the Close direction. Once
the Power Top becomes fully closed,
all four windows will start closing.
3. Continue to hold the Power Top
Switch an additional two seconds af-
ter the windows are fully closed.
4. Push all the window switches
down firmly to open the windows
completely and continue to hold the
switch down for an additional two
seconds after the window is fully
open.
Window Lockout Switch
The window lockout switch on the
driver's door trim panel allows you to
disable the window control on the
passenger door. To disable the win-
dow control on the passenger door,
press and release the window LOCK
button (setting it in the down posi-
tion). To enable the window control,
press and release the window LOCK
button again (setting it in the up po-
sition).
WIND BUFFETING
Wind buffeting can be described as
the perception of pressure on the ears
or a helicopter-type sound in the ears.
Your vehicle may exhibit wind buffet-
ing with one window down in certain
open or partially open positions. This
is a normal occurrence and can be
minimized. If the buffeting occurs
with one window open, then open
both windows together to minimize
the buffeting.
TRUNK LOCK AND
RELEASE
To unlatch the trunk lid from inside
the vehicle, press and release the
TRUNK RELEASE Button located on
the instrument panel to the left of the
steering wheel.
Window Lockout Switch
20
Page 28 of 233
 NOTE:
The convertible top must be ei-ther closed and latched or open
and latched to release the trunk.
The transmission must be in PARK before the button will op-
erate.
The trunk release
button o")
NOTE:
The convertible top must be ei-ther closed and latched or open
and latched to release the trunk.
The transmission must be in PARK before the button will op-
erate.
The trunk release
button on the dash
will be disabled if
the vehicle is
locked by pressing
the power door
lock switch or by
pressing the LOCK
button on the Re-
mote Keyless Entry (RKE) transmit-
ter. The trunk release button will be
enabled when the vehicle is unlocked
by the RKE or if the key is inserted
into the ignition and turned to ON/
RUN or START.
NOTE:
This provides a locked area in the
vehicle even if the convertible top
is open.
To unlatch the trunk lid from outside
the vehicle, press and release the TRUNK RELEASE button on the
RKE transmitter two times.
The words “Trunk Ajar” will display
in the Electronic Vehicle Information
Center (EVIC).
TRUNK SAFETY
WARNING
WARNING!
Do not allow children to have access
to the trunk, either by climbing into
the trunk from outside, or through
the inside of the vehicle. Always
close the trunk lid when your vehicle
is unattended. Once in the trunk,
young children may not be able to
escape, even if they entered through
the rear seat. If trapped in the trunk,
children can die from suffocation or
heat stroke.
TRUNK INTERNAL
EMERGENCY RELEASE
As a security measure, a Trunk Inter-
nal Emergency Release lever is built
into the trunk latching mechanism. In
the event of an individual being
locked inside the trunk, the trunk can be simply opened by pulling on the
glow-in-the-dark handle attached to
the trunk latching mechanism.
OCCUPANT RESTRAINTS
Some of the most important safety
features in your vehicle are the re-
straint systems:
Three-point lap and shoulder belts
for all seating positions
Advanced Front Air Bags for driver and front passenger
Supplemental Active Head Re- straints (AHR) located on top of the
front seats (integrated into the head
restraint)
Supplemental Seat-Mounted Side Air Bags (SAB)
Trunk Release Button
Trunk Internal Emergency Release
21
Page 29 of 233
 An energy-absorbing steering col-umn and steering wheel
Knee bolsters/blockers for front seat occupants
Front seat belts incorporate preten- sioners that may enhance occupant
protection by manag")
An energy-absorbing steering col-umn and steering wheel
Knee bolsters/blockers for front seat occupants
Front seat belts incorporate preten- sioners that may enhance occupant
protection by managing occupant
energy during an impact event
Rear passenger seat belts include Automatic Locking Retractors
(ALRs), which lock the seat belt
webbing into position by extending
the belt all the way out and then
adjusting the belt to the desired
length to restrain a child seat or
secure a large item in a seat.
Please pay close attention to the infor-
mation in this section. It tells you how
to use your restraint system properly,
to keep you and your passengers as
safe as possible.
If you will be carrying children too
small for adult-sized seat belts, the
seat belts or the ISOFIX feature also
can be used to hold infant and child
restraint systems. For more informa-
tion, refer to ISOFIX — Child Seat
Anchorage System. NOTE:
The Advanced Front Air Bags have
a multistage inflator design. This
allows the air bag to have different
rates of inflation based on several
factors, including the severity and
type of collision.
Here are some simple steps you can
take to minimize the risk of harm
from a deploying air bag:
1.
Children 12 years old and un-
der should always ride buckled up
in a rear seat.
WARNING!
Infants in rear facing child restraints
should never ride in the front seat of
a vehicle with a passenger Advanced
Front Air Bag. An air bag deploy-
ment can cause severe injury or
death to infants in that position.
Children that are not big enough to
wear the vehicle seat belt properly
(see section on Child Restraints)
should be secured in the rear seat in
child restraints or belt-positioning
booster seats. Older children who do
not use child restraints or belt- positioning booster seats should ride
properly buckled up in the rear seat.
Never allow children to slide the
shoulder belt behind them or under
their arm.
You should read the instructions pro-
vided with your child restraint to
make sure that you are using it prop-
erly.
2.
All occupants should always
wear their lap and shoulder belts
properly.
3. The driver and front passenger
seats should be moved back as far
as practical to allow the Advanced
Front Air Bags room to inflate.
4. Do not lean against the door or
window. If your vehicle has side
air bags, and deployment occurs,
the side air bags will inflate force-
fully into the space between you
and the door.
5. If the air bag system in this ve-
hicle needs to be modified to ac-
commodate a disabled person,
contact the Customer Center.
22
Page 30 of 233
 WARNING!
Relying on the air bags alonecould lead to more severe injuries
in a collision. The air bags work
with your seat belt to restrain you
properly. In some collisions, the
air bags wont deploy")
WARNING!
Relying on the air bags alonecould lead to more severe injuries
in a collision. The air bags work
with your seat belt to restrain you
properly. In some collisions, the
air bags won't deploy at all. Al-
ways wear your seat belts even
though you have air bags.
Being too close to the steering
wheel or instrument panel during
Advanced Front Air Bag deploy-
ment could cause serious injury,
including death. Air Bags need
room to inflate. Sit back, comfort-
ably extending your arms to reach
the steering wheel or instrument
panel.
Seat-Mounted Side Air Bags
(SAB) need room to inflate. Do
not lean against the door or win-
dow. Sit upright in the center of
the seat.
(Continued)
WARNING!(Continued)
In a collision, you and your pas-
sengers can suffer much greater
injuries if you are not properly
buckled up. You can strike the
interior of your vehicle or other
passengers, or you can be thrown
out of the vehicle. Always be sure
you and others in your vehicle are
buckled up properly.
Buckle up even though you are an
excellent driver, even on short trips.
Someone on the road may be a poor
driver and cause a collision that in-
cludes you. This can happen far away
from home or on your own street.
Research has shown that seat belts
save lives, and they can reduce the
seriousness of injuries in a collision.
Some of the worst injuries happen
when people are thrown from the ve-
hicle. Seat belts reduce the possibility
of ejection and the risk of injury
caused by striking the inside of the
vehicle. Everyone in a motor vehicle
should be belted at all times. LAP/SHOULDER BELTS
All seating positions in your vehicle
are equipped with lap/shoulder belts.
The belt webbing retractor is de-
signed to lock during very sudden
stops or collisions. This feature allows
the shoulder part of the belt to move
freely with you under normal condi-
tions. However, in a collision, the belt
will lock and reduce the risk of you
striking the inside of the vehicle or
being thrown out.
WARNING!
Be sure everyone in your vehicle is
in a seat and using a seat belt
properly.
It is dangerous to ride in a cargo
area, inside or outside of a vehicle.
In a collision, people riding in
these areas are more likely to be
seriously injured or killed.
Do not allow people to ride in any
area of your vehicle that is not
equipped with seats and seat
belts.
(Continued)
23
Page 31 of 233
 WARNING!(Continued)
Wearing a seat belt incorrectly is
dangerous. Seat belts are designed
to go around the large bones of
your body. These are the strongest
parts of your body and can take
the force")
WARNING!(Continued)
Wearing a seat belt incorrectly is
dangerous. Seat belts are designed
to go around the large bones of
your body. These are the strongest
parts of your body and can take
the forces of a collision the best.
Wearing your belt in the wrong
place could make your injuries in
a collision much worse. You might
suffer internal injuries, or you
could even slide out of part of the
belt. Follow these instructions to
wear your seat belt safely and to
keep your passengers safe, too.
Two people should never be belted
into a single seat belt. People
belted together can crash into one
another in a collision, hurting one
another badly. Never use a lap/
shoulder belt or a lap belt for more
than one person, no matter what
their size.
Lap/Shoulder Belt Operating
Instructions
1. Enter the vehicle and close the
door. Sit back and adjust the front
seat. 2. The seat belt latch plate is on the
outboard side of the front seat, next to
your arm. Grasp the latch plate and
pull out the belt. Slide the latch plate
up the webbing as far as necessary to
allow the belt to go around your lap.
3. When the belt is long enough to fit,
insert the latch plate into the buckle
until you hear a “click.”
WARNING!
A belt that is buckled into the
wrong buckle will not protect you
properly. The lap portion could
ride too high on your body, possi-
bly causing internal injuries. Al-
ways buckle your belt into the
buckle nearest you.
A belt that is too loose will not
protect you properly. In a sudden
stop, you could move too far for-
ward, increasing the possibility of
injury. Wear your seat belt snugly.
A belt that is worn under your arm
is dangerous. Your body could
strike the inside surfaces of the
vehicle in a collision, increasing
head and neck injury. A belt worn
under the arm can cause internal
injuries. Ribs aren't as strong as
shoulder bones. Wear the belt over
your shoulder so that your stron-
gest bones will take the force in a
collision.
(Continued)
Pulling Out The Latch PlatePositioning The Lap Belt
24
Page 32 of 233
 WARNING!(Continued)
A shoulder belt placed behind you
will not protect you from injury
during a collision. You are more
likely to hit your head in a colli-
sion if you do not wear your shoul-
der be")
WARNING!(Continued)
A shoulder belt placed behind you
will not protect you from injury
during a collision. You are more
likely to hit your head in a colli-
sion if you do not wear your shoul-
der belt. The lap and shoulder belt
are meant to be used together.
4. Position the lap belt across your
thighs, below your abdomen. To re-
move slack in the lap belt portion, pull
up on the shoulder belt. To loosen the
lap belt if it is too tight, lift up on the
shoulder belt and pull on the lap belt.
A snug belt reduces the risk of sliding
under the belt in a collision.
WARNING!
A lap belt worn too high can in- crease the risk of internal injury in
a collision. The belt forces won't
be at the strong hip and pelvic
bones, but across your abdomen.
Always wear the lap belt as low as
possible and keep it snug.
A twisted belt may not protect you
properly. In a collision, it could
even cut into you. Be sure the belt
is straight. If you can't straighten
a belt in your vehicle, take it to
your authorized dealer immedi-
ately and have it fixed.
5. Position the shoulder belt on your
chest so that it is comfortable and not
resting on your neck. The retractor
will withdraw any slack in the belt.
6. To release the belt, push the red
button on the buckle. The belt will
automatically retract to its stowed po-
sition. If necessary, slide the latch
plate down the webbing to allow the
belt to retract fully.
WARNING!
A frayed or torn belt could rip apart
in a collision and leave you with no
protection. Inspect the belt system
periodically, checking for cuts,
frays, or loose parts. Damaged parts
must be replaced immediately. Do
not disassemble or modify the sys-
tem. Seat belt assemblies must be
replaced after a collision if they have
been damaged (i.e., bent retractor,
torn webbing, etc.).
LAP/SHOULDER BELT
UNTWISTING PROCEDURE
Use the following procedure to un-
twist a twisted lap/shoulder belt.
1. Position the latch plate as close as
possible to the anchor point.
2.
At about 15 to 30 cm above the
latch plate, grasp and twist the belt
webbing 180° to create a fold that be-
gins immediately above the latch plate.
3. Slide the latch plate upward over
the folded webbing. The folded web-
bing must enter the slot at the top of
the latch plate.
4. Continue to slide the latch plate up
until it clears the folded webbing.
Inserting Latch Plate Into Buckle
25
 1
1 2
2 3
3 4
4 5
5 6
6 7
7 8
8 9
9 10
10 11
11 12
12 13
13 14
14 15
15 16
16 17
17 18
18 19
19 20
20 21
21 22
22 23
23 24
24 25
25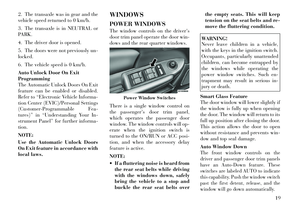 26
26 27
27 28
28 29
29 30
30 31
31 32
32 33
33 34
34 35
35 36
36 37
37 38
38 39
39 40
40 41
41 42
42 43
43 44
44 45
45 46
46 47
47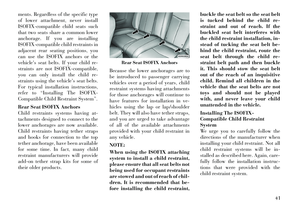 48
48 49
49 50
50 51
51 52
52 53
53 54
54 55
55 56
56 57
57 58
58 59
59 60
60 61
61 62
62 63
63 64
64 65
65 66
66 67
67 68
68 69
69 70
70 71
71 72
72 73
73 74
74 75
75 76
76 77
77 78
78 79
79 80
80 81
81 82
82 83
83 84
84 85
85 86
86 87
87 88
88 89
89 90
90 91
91 92
92 93
93 94
94 95
95 96
96 97
97 98
98 99
99 100
100 101
101 102
102 103
103 104
104 105
105 106
106 107
107 108
108 109
109 110
110 111
111 112
112 113
113 114
114 115
115 116
116 117
117 118
118 119
119 120
120 121
121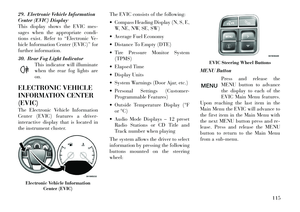 122
122 123
123 124
124 125
125 126
126 127
127 128
128 129
129 130
130 131
131 132
132 133
133 134
134 135
135 136
136 137
137 138
138 139
139 140
140 141
141 142
142 143
143 144
144 145
145 146
146 147
147 148
148 149
149 150
150 151
151 152
152 153
153 154
154 155
155 156
156 157
157 158
158 159
159 160
160 161
161 162
162 163
163 164
164 165
165 166
166 167
167 168
168 169
169 170
170 171
171 172
172 173
173 174
174 175
175 176
176 177
177 178
178 179
179 180
180 181
181 182
182 183
183 184
184 185
185 186
186 187
187 188
188 189
189 190
190 191
191 192
192 193
193 194
194 195
195 196
196 197
197 198
198 199
199 200
200 201
201 202
202 203
203 204
204 205
205 206
206 207
207 208
208 209
209 210
210 211
211 212
212 213
213 214
214 215
215 216
216 217
217 218
218 219
219 220
220 221
221 222
222 223
223 224
224 225
225 226
226 227
227 228
228 229
229 230
230 231
231 232
232