Page 105 of 233

NOTE:
The vehicle should be traveling at
a steady speed and on level ground
before pressing the SET button.
TO DEACTIVATE
A soft tap on the brake pedal, pushing
the CANCEL button, or normal brake
pressure while slowing the vehicle will
deactivate Electronic Speed Control
without erasing the set speed memory.
Pressing the ON/OFF button or turn-
ing the ignition switch OFF erases the
set speed memory.
TO RESUME SPEED
To resume a previously set speed,
push the RES (+) button and release.
Resume can be used at any speed
above 32 km/h.
TO VARY THE SPEED
SETTING
When the Electronic Speed Control is
set, you can increase speed by pushing
the RES (+) button. If the button is
continually pressed, the set speed will
continue to increase until the button is
released, then the new set speed will
be established.Pressing the RES (+) button once will
result in a 2 km/h increase in set
speed. Each subsequent tap of the
button results in an increase of
2 km/h.
To decrease speed while the Elec-
tronic Speed Control is set, push the
SET (-) button. If the button is con-
tinually held in the SET (-) position,
the set speed will continue to decrease
until the button is released. Release
the button when the desired speed is
reached, and the new set speed will be
established.
Pressing the SET (-) button once will
result in a 2 km/h decrease in set
speed. Each subsequent tap of the
button results in a decrease of 2 km/h.
TO ACCELERATE FOR
PASSING
Press the accelerator as you would
normally. When the pedal is released,
the vehicle will return to the set speed.
Using Electronic Speed Control
On Hills
The transmission may downshift on
hills to maintain the vehicle set speed.
NOTE:
The Electronic Speed Control sys-
tem maintains speed up and down
hills. A slight speed change on
moderate hills is normal.
On steep hills, a greater speed loss or
gain may occur so it may be prefer-
able to drive without Electronic Speed
Control.
WARNING!
Electronic Speed Control can be
dangerous where the system cannot
maintain a constant speed. Your ve-
hicle could go too fast for the condi-
tions, and you could lose control and
have an accident. Do not use Elec-
tronic Speed Control in heavy traffic
or on roads that are winding, icy,
snow-covered or slippery.
ELECTRICAL POWER
OUTLETS
There are two 12 Volt (13 Amp) elec-
trical power outlets on this vehicle.
Both of the power outlets are pro-
tected by a fuse.
98
Page 106 of 233

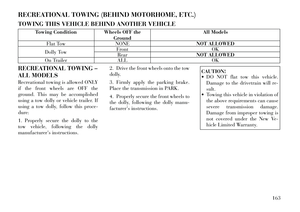
The instrument panel power outlet,
located below the climate control
knobs, has power available only when
the ignition is ON. This power outlet
will also operate a conventional cigar
lighter unit.
NOTE:
To preserve the heating element,
do not hold the lighter in the heat-
ing position.
A second power outlet is located in-
side the center console.The center console power outlet is
powered directly from the battery
(power available at all times). Items
plugged into this power outlet may
discharge the battery and/or prevent
the engine from starting.
CAUTION!
Do not exceed the maximum
power of 160 Watts (13 Amps) at
12 Volts. If the 160 Watt
(13 Amp) power rating is ex-
ceeded the fuse protecting the sys-
tem will need to be replaced.
(Continued)
CAUTION!(Continued)
Power outlets are designed for ac-
cessory plugs only. Do not insert
any other object in the power out-
lets as this will damage the outlet
and blow the fuse. Improper use
of the power outlet can cause
damage not covered by your New
Vehicle Limited Warranty.
Instrument Panel Power Outlet
Center Console
Power Outlet Fuse Locations
1 — #16 Fuse 15 A Blue Cigar
Lighter Instrument Panel
2 — #11 Fuse 15 A Blue Power
Outlet Inside Arm Rest
99
Page 107 of 233

WARNING!
To avoid serious injury or death:
Only devices designed for use inthis type of outlet should be in-
serted into any 12 Volt outlet.
Do not touch with wet hands.
Close the lid when not in use and
while driving the vehicle.
If this outlet is mishandled, it may
cause an electric shock and fail-
ure.CAUTION!
Many accessories that can beplugged in draw power from the
vehicle's battery, even when not in
use (i.e., cellular phones, etc.).
Eventually, if plugged in long
enough, the vehicle's battery will
discharge sufficiently to degrade
battery life and/or prevent the en-
gine from starting.
Accessories that draw higher
power (i.e., coolers, vacuum
cleaners, lights, etc.) will degrade
the battery even more quickly.
Only use these intermittently and
with greater caution.
(Continued)
CAUTION!(Continued)
After the use of high power draw
accessories, or long periods of the
vehicle not being started (with ac-
cessories still plugged in), the ve-
hicle must be driven a sufficient
length of time to allow the genera-
tor to recharge the vehicle'sbat-
tery.
CIGAR LIGHTER AND
ASH RECEIVER (for
versions/markets, where
provided)
An optional ash receiver is available
from your authorized dealer and will
fit in the center console front cup-
holder.
The optional ash receiver also comes
with a cigar lighter that can be used
with the power outlets. Refer to “Elec-
trical Power Outlets” in “Understand-
ing The Features Of Your Vehicle” for
further information. CUPHOLDERS
FRONT SEAT CUPHOLDER
The cupholder in the center console
will accommodate either two large
size cups or two 0.5 L bottles or cans.
The one-piece insert can be removed
easily for cleaning. An optional re-
movable ashtray may be located in
one of the cupholders.
Front Cupholders
100
Page 108 of 233

REAR SEAT CUPHOLDERS
Cupholders for the rear seat occu-
pants are located in the armrests.
Each cupholder is capable of holding
up to a 0.5 L bottle or can.WARNING!
If containers of hot liquid are place
in the cupholder, they can spill when
the door is closed, burning the occu-
pants. Be careful when closing the
doors to avoid injury.STORAGE
GLOVE BOX STORAGE
COMPARTMENT
The glove box storage compartment is
located on the right side of the instru-
ment panel. To open the glove box,
pull outward on the latch handle lo-
cated on the front of the glove box.
CONSOLE FEATURES
Storage
The center console is located between
the front driver and passenger seats.
The center console armrest slides for-
ward from design position to provide
added user comfort. The center con-
sole can be used for storage and is also
equipped with an electrical power
outlet. Refer to “Electrical Power Outlets” in “Understanding The Fea-
ture of Your Vehicle” for further infor-
mation.
Two separate storage compartments
are also located underneath the arm-
rest.
Rear Seat Cupholder
Glove Box Storage Compartment
Center Console
Center Console Storage
101
Page 109 of 233

To open the upper storage compart-
ment, pull upward on the smaller
latch located on the front of the lid.
The top compartment holds small
items, such as a pen and note pad,
while the larger bottom compartment
will hold CDs and alike.
Lift upward on the larger of the
latches to access the lower storage
compartment. The larger bottom
compartment will hold CDs and alike.
The bottom compartment also con-
tains a 12 Volt power outlet.
NOTE:
A notch in the front of the con-sole base allows for use of a cel-
lular phone while it is plugged
into the power outlet with the
armrest latched down.
The power outlet can also ener- gize the cigar lighter in the op-
tional cup holder ash receiver.
WARNING!
Do not operate this vehicle with a
console compartment lid in the open
position. Cellular phones, music
players, and other handheld elec-
tronic devices should be stowed
while driving. Use of these devices
while driving can cause an accident
due to distraction, resulting in death
or injury.
REAR WINDOW
FEATURES
REAR WINDOW
DEFROSTER The rear window defroster
button is located on the climate
control (Mode) knob. Press
this button to turn on the rear window
defroster and the heated outside mir-
rors. An indicator in the button will
illuminate when the rear window de-
froster is on. The rear window de-
froster automatically turns off after
approximately 10 minutes. For an ad-
ditional five minutes of operation,
press the button a second time. NOTE:
To prevent excessive battery drain,
use the rear window defroster only
when the engine is operating.
CAUTION!
Failure to follow these cautions can
cause damage to the heating ele-
ments:
Use care when washing the inside
of the rear window. Do not use
abrasive window cleaners on the
interior surface of the window.
Use a soft cloth and a mild wash-
ing solution, wiping parallel to the
heating elements. Labels can be
peeled off after soaking with
warm water.
Do not use scrapers, sharp instru-
ments, or abrasive window clean-
ers on the interior surface of the
window.
Keep all objects a safe distance
from the window.
102
Page 110 of 233

4
UNDERSTANDING YOUR INSTRUMENT
PANEL
INSTRUMENT PANEL FEATURES . . . . . . . . . . . 105
INSTRUMENT CLUSTER . . . . . . . . . . . . . . . . . . 106
INSTRUMENT CLUSTER DESCRIPTIONS . . . . 107
ELECTRONIC VEHICLE INFORMATION CENTER (EVIC) . . . . . . . . . . . . . . . . . . . . . . . . . 115
ELECTRONIC VEHICLE INFORMATION CENTER (EVIC) DISPLAYS . . . . . . . . . . . . . . 116
OIL CHANGE REQUIRED . . . . . . . . . . . . . . . 117
EVIC MAIN MENU . . . . . . . . . . . . . . . . . . . . . 117
COMPASS DISPLAY . . . . . . . . . . . . . . . . . . . . 117
AVERAGE FUEL ECONOMY (L/100KM) . . . . . 120
DISTANCE TO EMPTY (DTE) . . . . . . . . . . . . . 120
TIRE BAR . . . . . . . . . . . . . . . . . . . . . . . . . . . 120
ELAPSED TIME . . . . . . . . . . . . . . . . . . . . . . . 120
DISPLAY UNITS IN . . . . . . . . . . . . . . . . . . . . 120
SYSTEM STATUS . . . . . . . . . . . . . . . . . . . . . . 121
PERSONAL SETTINGS (CUSTOMER- PROGRAMMABLE FEATURES) . . . . . . . . . . . 121
SOUND SYSTEMS . . . . . . . . . . . . . . . . . . . . . . . 122
SETTING THE ANALOG CLOCK . . . . . . . . . . . . 122
103
Page 111 of 233
STEERING WHEEL AUDIO CONTROLS . . . . . . 123 RADIO OPERATION . . . . . . . . . . . . . . . . . . . . 123
CD PLAYER . . . . . . . . . . . . . . . . . . . . . . . . . . 123
RADIO OPERATION AND MOBILE PHONES . . . 123
CLIMATE CONTROLS . . . . . . . . . . . . . . . . . . . . 123 AUTOMATIC TEMPERATURE CONTROL(ATC) . . . . . . . . . . . . . . . . . . . . . . . . . . . . . . . 124
OPERATING TIPS . . . . . . . . . . . . . . . . . . . . . 127
104
Page 112 of 233
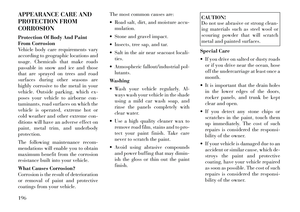
INSTRUMENT PANEL FEATURES1 — Air Outlet6 — Radio11 — Storage Compartment
2 — Side Window Demister Outlet 7 — Passenger Airbag 12 — Climate Control
3 — Instrument Cluster 8 — Glove Compartment13 — Trunk Release Button
4 — Ignition Switch 9 — Heated Seat Switch14 — Power Outlet
5 — Analog Clock 10 — Hazard Switch
105