Page 145 of 212

A new layer of a high-quality hard wax polish can be applied to the clean body-
work after it has dried thoroughly. Even if you use a wax preserver regularly we
still recommend that you treat the paintwork of the vehicle at least twice a year
with hard wax.
CAUTION
Never apply wax to the windows.
Polishing Polishing is only necessary if the paintwork of your vehicle has become unattrac-
tive and if it is no longer possible to achieve a gloss with wax preservers.
You must treat the paintwork with a wax preserver if the polish you use does not
contain any preserving elements ⇒
page 142, Wax treatment. CAUTION
● You must not treat mat painted parts or plastic with polishing products or hard
wax.
● Do not polish the paintwork of the vehicle in a dusty environment, otherwise
the paintwork can be scratched.
Chrome parts First clean the chrome parts with a damp cloth and then polish them with a soft,
dry cloth. If this method does not completely clean chrome parts, use a specific
chrome care product.
CAUTION
Do not polish the chrome parts in a dusty environment, otherwise they can be
scratched.
Paint damage Slight damage to paintwork such as scratches, scuffs or traces of chip damage
must be touched up immediately with paint (Škoda painting pen)
before any cor-
rosion can result. You can of course have this work carried out by authorised
ŠKODA Service Partners.
The authorised
ŠKODA Service Partners have a range of matching touch-up pens
or spray cans available in the colour of your vehicle. The paint number of the original paintwork of your vehicle is indicated on the ve-
hicle data sticker ⇒
page 192.
Any corrosion which has already have formed must be removed thoroughly. Apply
a corrosion protection primer and then the paint to the affected point. You can of
course have this work carried out by authorised ŠKODA Service Partners.
Plastic parts External plastic parts are cleaned by normal washing. Plastic parts and synthetic
leather can also be treated with special solvent-free plastic cleaning agents if a
damp cloth is not sufficient. Paint care products are not suitable for plastic parts. CAUTION
Solvent-free cleaners attack the material and can damage it.
Windows Only use a plastic ice scraper for removing snow and ice from the windows and
mirrors. You should not move the ice scraper forward and backward but in one di-
rection on the window which you are cleaning in order to avoid any damage to the
surface of the glass.
You can best remove residues of rubber, oil, grease, wax or silicone by using a
special window cleaner or a special silicone remover.
You should also clean the windows regularly from the inside.
Do not use window leathers which you have used to polish the vehicle body to dry
off the windows. Residues of preservatives in the window leather can dirty the
window and reduce visibility.
Do not affix any stickers over the inside of the rear window to avoid damage to
the heating wires of the rear window heater . CAUTION
● Never remove snow or ice from the glass parts with warm or hot water - risk of
formation of cracks in the glass!
● When removing snow or ice from the windows and mirror lenses make sure
not to damage the paintwork of the vehicle. 143
Taking care of your vehicle and cleaning the vehicle Using the system Safety Driving Tips General Maintenance Breakdown assis-
tance Praktik Technical data
Page 146 of 212
The headlight lenses
Please do not use any aggressive cleaning or chemical solvent products for clean-
ing the front headlights - risk of damage to the plastic lenses. Please use soap
and clean warm water. CAUTION
Never wipe the headlights dry and do not use any sharp objects for cleaning the
plastic lenses, this may result in damage to the protective paintwork and conse-
quently in formation of cracks on the headlight lenses, e.g. through effect of
chemical products.
Door and window seals The rubber seals on the doors, boot lid, bonnet and windows remain supple and
last longer if you treat them regularly with a rubber care product (e.
g. with a spray
with silicone-free oil). You also avoid premature wear of the seals and prevent
leakages in this way. It is also easier to open the doors. Rubber seals which are
well cared for also do not stick together in cold winter weather.
Locking cylinder Use specific products for de-icing locking cylinders.
Note
When washing your vehicle, ensure that as little water as possible gets into the
locking cylinders.
Wheels Steel wheels
You should also thoroughly wash the wheels and wheel trims when giving your
vehicle its regular wash. This prevents any brake dust, dirt and road salt from
sticking to the wheel hubs. You can remove stubborn brake abrasion adhering to
the wheels with an industrial cleaner. Touch up any damage to the paintwork on
the wheels before rust is able to form. Light alloy wheels
Regular care of light alloy wheels is necessary in order to retain their decorative
appearance over long periods. It is particularly important to remove regularly any
road salt and brake abrasion from light alloy wheels, otherwise the light metal will
suffer. Wash thoroughly and then treat the wheels with a protective product for
light alloy wheels which does not contain any acidic components. We recommend
to apply a hard wax layer onto the wheel hubs every three months. You must not
use any products which cause abrasion when treating the wheel hubs. Any dam-
age to the paint layer on the wheel hubs must be touched up immediately. WARNING
One should remember when cleaning the wheels that moisture, ice and road
salt may adversely affect braking efficiency - risk of an accident! Note
Severe layers of dirt on the wheels can also result in wheel imbalance. This may
show itself in the form of a wheel vibration which is transmitted to the steering
wheel which, in certain circumstances, can cause premature wear of the steering.
This means it is necessary to remove the dirt.
Underbody protection The underside of your vehicle is protected for life against chemical and mechanical
influences.
One cannot, however, completely rule out damage to the protective layer
when
driving so we recommend that you inspect the protective layer on the underside
of your vehicle and on the chassis at certain intervals - this is best done at the be-
ginning and end of the winter - and to touch up any damaged areas.
The authorised ŠKODA Service Partners have suitable spray products available as
well as the necessary equipment and are familiar with the instructions for use.
Therefore, we recommend you have such touch-up work or additional corrosion
protection measures carried out by an authorised ŠKODA Service Partner. WARNING
Never use additional underbody protection or corrosion-protection agents for
the exhaust pipes, catalytic converters, diesel particle filter or heat shields.
When the engine reaches its operating temperature, these substances might
ignite - risk of fire! 144
Taking care of your vehicle and cleaning the vehicle
Page 147 of 212

Protection of hollow spaces
All the cavities of your vehicle which are at risk from corrosion are protected for
life by a layer of protective wax applied in the factory.
This wax protection does not require to be inspected or re-treated. Please remove
any small amount of wax which flows out of the cavities at high temperatures
with a plastic scraper and clean the stains using petroleum cleaner. WARNING
Safety and environmental protection regulations should observed when using
petroleum cleaner to remove wax - a risk of fire!
Care of the interior of vehicle Plastic parts, artificial leather and cloths You can clean plastic parts and artificial leather with a moist cloth. You should on-
ly treat such parts with special solvent-free plastic cleaning and care products it
does prove to be adequate.
Upholstery cloth and cloth trim on the doors, luggage compartment cover, head-
liner etc. are best treated with special cleaning products, using if necessary a dry
foam and a soft sponge or brush. CAUTION
Solvent-free cleaners attack the material and can damage it.
Fabric covers of electrically heated seats Do not clean
the seat covers moist as this may result in damage to the seat heat-
ing system.
Clean such covers using special agents, for example dry foam. Natural leather Natural leather requires quite particular care and attention.
Leather should be treated from time to time according the following guidelines
depending on how much it is used.
Normal cleaning
– Clean soiled areas of the leather with slightly moistened cotton or woollen
cloth.
Severe soiling
– Clean severely soiled areas with a cloth dipped in a mild soapy solution (2
spoonfuls of natural soap to 1 litre of water).
– Ensure that the leather is not soaked through at any point and that no water
gets into the stitching of the seams.
– Dry off the leather with a soft, dry cloth.
Removing stains
– Remove fresh stains which are water-based (e.g. coffee, tea, juices, blood etc.)
with an absorbent cloth or household paper or use the cleaner from the care
set for a stain which has already dried in.
– Remove fresh stains on a fat base (e.g. butter, mayonnaise, chocolate etc.)
with an absorbent cloth or household cleaning paper or with the cleaner from
the care set if the stain has not yet penetrated into the surface.
– Use a grease dissolver for grease stains which have dried in .
– Eliminate special stains (e.g. ball-point pens, felt pen, nail varnish, dispersion
paint, shoe cream etc.) with a special stain remover suitable for leather.
Leather care
– Treat the leather every six months with a special leather care product.
– Apply only a small amount of the care product.
– Dry the leather off with a soft cloth £ 145
Taking care of your vehicle and cleaning the vehicle Using the system Safety Driving Tips General Maintenance Breakdown assis-
tance Praktik Technical data
Page 148 of 212
CAUTION
● You must on no account treat the leather with solvents (e.g. gasoline, turpen-
tine), floor wax, shoe cream or such like.
● Avoid leaving your vehicle for lengthy periods in bright sunlight in order to
avoid bleaching the leather. If you leave your vehicle parked in the open for
lengthy periods, protect the leather from the direct rays of the sun by covering it
over.
● Sharp-edged objects on items of clothing such as zip fasteners, rivets, sharp-
edged belts may leave permanent scratches or signs of rubbing on the surface.
● The use of a mechanical steering wheel lock may damage the leather surface
of the steering wheel. Note
● Use a care cream with light blocker and impregnation effect regularly and each
time after cleaning the leather. The cream nourishes the leather, allows it to
breathe and keeps it supple and also provides moisture. It also creates surface
protection.
● Clean the leather every 2 to 3 months, remove fresh soiling each time this oc-
curs.
● Remove fresh stains such as those from ball-point pens, ink, lipstick, shoe
cream, etc., as quickly as possible.
● Care also for the leather dye. Refreshen areas which have lost their colour
with a special coloured leather cream as required.
● The leather is a natural material with specific properties. During the use of the
vehicle, minor optical changes can occur on the leather parts of the covers (e. g
wrinkles or creases as a result of the stress of the covers).
Seat belts –
Keep the seat belts clean!
– Wash seat belts which have become soiled using a mild soapy solution.
– Inspect the seat belts regularly to ensure they are in good condition.
Belt webbing which has become severely soiled may prevent the inertia reel from
reeling up the belt properly. WARNING
● The seat belts must not be removed for cleaning.
● Never clean the seat belts chemically as dry cleaning may destroy the fab-
ric. The seat belts must also not be allowed to come into contact with corro-
sive liquids (such as acids etc.).
● Seat belts which have damage to the webbing, the connections, the inertia
reel or the lock should be replaced by a specialist garage.
● Inertia reel belts must be completely dried before being reeled up. 146
Taking care of your vehicle and cleaning the vehicle
Page 149 of 212

Fuel
Petrol
Unleaded petrol Your vehicle can only be operated with
unleaded petrol, which complies with the
standard EN 228 (In Germany: standard DIN 51626 - 1 or E10 for unleaded fuel with
octane rating 95 RON and 91 RON or DIN 51626 - 2 or E5 for unleaded fuel with
octane rating 95 RON and 98 RON). On the inside of the fuel filler flap, you will
find the information regarding the RON required by your engine ⇒
fig. 120 - right.
Prescribed fuel - unleaded petrol 95/91 RON
Use unleaded fuel with the octane rating 95 RON. You can also use unleaded pet-
rol 91 RON, but this leads to a slight loss in performance.
If, in case of necessity, the vehicle must be refuelled with petrol of a lower octane
number than the one prescribed, you must continue driving at medium engine
speeds and low engine load. Driving at high engine revs or a high engine load can
severely damage the engine! Refuel as soon as possible with petrol of the prescri-
bed octane number.
Prescribed fuel - unleaded petrol min. 95 RON
Use unleaded fuel with the octane rating 95 RON.
In case of necessity, you can refuel with petrol with the octane rating 91 RON if
petrol with the octane rating 95 RON is not available. You must continue driving at
medium engine speeds and minimum engine load. Driving at high engine revs or a
high engine load can severely damage the engine! Refuel as soon as possible with
petrol of the prescribed octane number.
Even in case of necessity, you must not use petrol of a lower octane number than
91 RON, otherwise the engine can be severely damaged!
You can find further information on refuelling ⇒ page 148.
Unleaded petrol with higher octane number
You can make unlimited use of unleaded petrol which has a higher octane number
than the one prescribed.
On vehicles with prescribed unleaded petrol 95/91 RON, the use of petrol with a
higher octane number than 95 RON does not result in a noticeable power increase
or a lower fuel consumption. On vehicles with prescribed unleaded petrol
min. 95 RON, the use of petrol with a
higher octane number than 95 RON does not result in a power increase or a lower
fuel consumption.
Prescribed fuel - unleaded petrol 98/95 RON
Use unleaded fuel with the octane rating 98 RON. You can also use unleaded pet-
rol 95 RON, but this leads to a slight loss in performance.
In case of necessity, you can refuel with petrol with the octane rating 91 RON of
unleaded fuel with octane rating 98
RON or 95 RON is not available. You must
continue driving at medium engine speeds and minimum engine load. Driving at
high engine revs or a high engine load can severely damage the engine! Refuel as
soon as possible with petrol of the prescribed octane number.
Even in case of necessity, you must not use petrol of a lower octane number than
91 RON, otherwise the engine can be severely damaged!
Fuel additives
Your vehicle can only be operated with unleaded petrol, which complies with the
standard EN 228 (in Germany: standard DIN 51626 - 1 or E10 for unleaded fuel with
octane rating 95 RON and 91 RON or DIN 51626 - 2 or E5 for unleaded fuel with
octane rating 95 RON and 98 RON). These meet all requirements for troublefree
engine operation. Therefore, we do not recommend the use of fuel additives. CAUTION
● All
ŠKODA vehicles with petrol engines are equipped with a catalytic converter
and must be driven only with unleaded petrol. Filling the tank even only once with
leaded petrol will result in the catalytic converter being destroyed!
● If you use petrol with a lower octane number than the one prescribed, the en-
gine can be severely damaged!
● The use of improper fuel additives can cause serious damage to the engine or
the catalytic converter. In no case may fuel additives with metal components be
used, especially not with manganese and iron content.
● Fuels with metallic content may not be used. Risk of engine or catalytic con-
verter damage!
● LRP (lead replacement petrol) fuels with metallic components may not be
used. Risk of engine or catalytic converter damage! 147
Fuel Using the system Safety Driving Tips General Maintenance Breakdown assis-
tance Praktik Technical data
Page 150 of 212

Diesel
Diesel fuel Your vehicle can only be operated with
diesel fuel, which complies with the stand-
ard EN 590 (standard DIN 51628 in Germany, standard ÖNORM
C 1590 in Austria,
GOST R 52368-2005/EN 590:2004 in Russia).
Fuel additives
You must not use fuel additives, so-called “flow improvers” (petrol and similar
products) in diesel fuel.
You can find information on refuelling ⇒ page 148, Refuelling. CAUTION
● Your vehicle can only be operated with diesel fuel, which complies with the
standard EN 590 (standard DIN 51628 in Germany, standard ÖNORM
C 1590 in
Austria, GOST R 52368-2005/EN 590:2004 in Russia). Filling the tank even only
once with diesel fuel which does not comply with the standard, can result in dam-
age to the engine parts, the lubrication system, the fuel and exhaust system.
● If by mistake you have refuelled with a different fuel other than the diesel fuel
which complies to the above mentioned standards (e.g. petrol), on no account
start the engine! Severe damage damage is possible! Contact a specialist garage.
● Water which has collected in the fuel filter can result in engine problems.
● Your vehicle is not adapted for use of biofuel (RME), therefore this fuel must
not be refuelled and driven. The use of biofuel (RME) can lead to damage to the
engine or the fuel system.
Operation in winter Winter-grade diesel fuel
A different grade of diesel fuel is available at filling stations in winter than during
the summer. Using
“summer-grade diesel fuel” at temperatures below 0 °C can re-
sult in operational problems because the diesel becomes viscous as a result of
paraffin separation.
It is therefore the case that the standard EN 590 (standard DIN 51628 in Germany,
standard ÖNORM C 1590 in Austria, GOST R 52368-2005/EN 590:2004 in Russia)
is the diesel fuel class prescribed for certain periods of the year which can also be
purchased at the corresponding time during the year. “Winter-grade diesel fuel”
will still operate properly even at a temperature of -20 °C. It is often the case in countries with different climatic conditions that diesel fuels
available have a different temperature characteristic. The authorised
ŠKODA Serv-
ice Partners and filling stations in the country concerned will be able to provide
you with information regarding the diesel fuels available.
Preheating fuel
The vehicle is fitted with a fuel filter preheating system. This secures operation of
a vehicle using diesel fuel down to an environmental temperature of -25 °C. CAUTION
It is not permitted to add the various fuel additives on the market, including pet-
rol, to diesel fuel in order to improve its flow properties.
Refuelling Fig. 120 Right rear side of the vehicle: Fuel filler flap/fuel filler flap with cap unscrewed
Opening the fuel filler cap
–
Open the fuel filler flap with the hand ⇒
fig. 120 - left.
– Hold the fuel tank cap of the fuel filler tube with one hand and unlock it by
turning with the vehicle key to the left.
– Unscrew the fuel filler cap anti-clockwise and place the fuel filler cap from
above on the fuel filler flap ⇒ fig. 120 on the right.
Closing fuel filler cap
– Screw on the cap by turning it to the right until it is heard to lock.
– Hold the fuel filler cap on the fuel filler tube with one hand and lock it by turn-
ing the vehicle key to the right and withdraw the key. £148
Fuel
Page 151 of 212

–
Press the fuel tank flap closed.
The correct grade of fuel for your vehicle as well as the tyre size and inflation
pressures are stated on a sticker affixed to the inside of the fuel filler flap. Further
information on fuel ⇒
page 147.WARNING
Pay attention to any legal requirements if you do carry a spare canister in the
vehicle. We do not recommend carrying any fuel canisters in your vehicle for
safety reasons. The canister can be damaged in the event of an accident and
fuel may leak out. CAUTION
● Remove any fuel which has spilled onto the paintwork of your vehicle immedi-
ately - risk of paint damage!
● On vehicles fitted with a catalytic converter, never let the fuel tank run com-
pletely empty. An irregular supply of fuel to the engine can result in misfiring and
unburnt fuel may get into the exhaust system, which may result in overheating
and damage to the catalytic converter.
● Make sure that the valve is not pressed into the filler tube when inserting the
pump nozzle into the filler tube. Otherwise you are unintentionally filling up the
volume, which in case of heat can cause an expansion of the fuel. This can lead to
an overflow of fuel or damage to parts of the fuel reservoir.
● The fuel tank is full just as soon as the pump nozzle switches off for the first
time, provided the nozzle has been operated properly. Do not continue refuelling -
otherwise the expansion volume is filled up. Note
The fuel tank has a capacity of about 55 litres, containing a reserve of 7 litres. 149
Fuel Using the system Safety Driving Tips General Maintenance Breakdown assis-
tance Praktik Technical data
Page 152 of 212

Inspecting and Replenishing
Engine compartment
Bonnet remote release Fig. 121 Bonnet release lever
Bonnet remote release
– Pull the unlocking lever below the dash panel on the left-hand side ⇒ fig. 121.
The bonnet jumps out of its lock as a result of the spring force.
Opening and closing the bonnet. Fig. 122 Radiator grille: Locking lever/securing the bonnet with the bonnet support
Opening the bonnet
–
Unlock the bonnet ⇒
fig. 121. –
Ensure that the arms of the windshield wipers are correctly in place against
the windshield before opening the bonnet, otherwise damage could occur to
the paintwork.
– Pull on the locking lever ⇒ fig. 122 - left, the bonnet is then unlocked.
– Grip the bonnet and lift it up.
– Take the bonnet support out of its holder and set it in the opening designed
for it ⇒ fig. 122 - right.
Closing the bonnet
– Lift the bonnet slightly and unhook the bonnet support. Press the bonnet sup-
port into the holder designed to hold it.
– Allow the bonnet to drop from a height of about 20 cm into the lock - bonnet
do not press down on it! WARNING
● Never open the bonnet if you see that steam or coolant is flowing out of
the engine compartment - risk of scalding! Wait long enough until the steam
or coolant has stopped escaping.
● For safety reasons, the bonnet must always be properly closed when driv-
ing. One should therefore check that the lock has in fact engaged properly af-
ter closing the bonnet.
● Stop your vehicle immediately while driving if you notice that the lock is
not properly engaged and close the bonnet properly - risk of an accident!
Working in the engine compartment Particular care is required when carrying out any work in the en-
gine compartment!
There is a risk of injuries, scalding, accidents and fire when working in the en-
gine compartment, e.g. inspecting and replenishing oil and other fluids. For this
reason, it is essential to comply with the warning instructions stated below and
with the general applicable rules of safety. The engine compartment of your car
is a hazardous area ⇒
.
£150
Inspecting and Replenishing
 1
1 2
2 3
3 4
4 5
5 6
6 7
7 8
8 9
9 10
10 11
11 12
12 13
13 14
14 15
15 16
16 17
17 18
18 19
19 20
20 21
21 22
22 23
23 24
24 25
25 26
26 27
27 28
28 29
29 30
30 31
31 32
32 33
33 34
34 35
35 36
36 37
37 38
38 39
39 40
40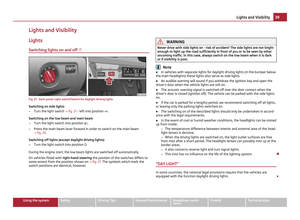 41
41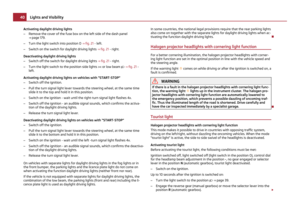 42
42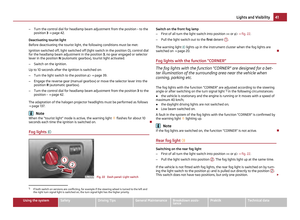 43
43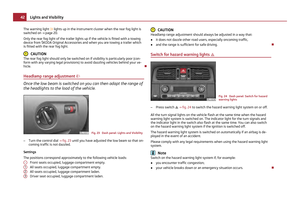 44
44 45
45 46
46 47
47 48
48 49
49 50
50 51
51 52
52 53
53 54
54 55
55 56
56 57
57 58
58 59
59 60
60 61
61 62
62 63
63 64
64 65
65 66
66 67
67 68
68 69
69 70
70 71
71 72
72 73
73 74
74 75
75 76
76 77
77 78
78 79
79 80
80 81
81 82
82 83
83 84
84 85
85 86
86 87
87 88
88 89
89 90
90 91
91 92
92 93
93 94
94 95
95 96
96 97
97 98
98 99
99 100
100 101
101 102
102 103
103 104
104 105
105 106
106 107
107 108
108 109
109 110
110 111
111 112
112 113
113 114
114 115
115 116
116 117
117 118
118 119
119 120
120 121
121 122
122 123
123 124
124 125
125 126
126 127
127 128
128 129
129 130
130 131
131 132
132 133
133 134
134 135
135 136
136 137
137 138
138 139
139 140
140 141
141 142
142 143
143 144
144 145
145 146
146 147
147 148
148 149
149 150
150 151
151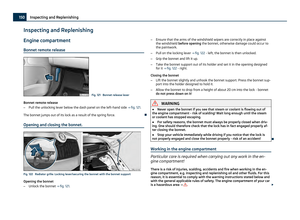 152
152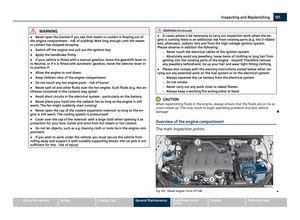 153
153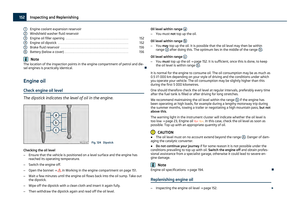 154
154 155
155 156
156 157
157 158
158 159
159 160
160 161
161 162
162 163
163 164
164 165
165 166
166 167
167 168
168 169
169 170
170 171
171 172
172 173
173 174
174 175
175 176
176 177
177 178
178 179
179 180
180 181
181 182
182 183
183 184
184 185
185 186
186 187
187 188
188 189
189 190
190 191
191 192
192 193
193 194
194 195
195 196
196 197
197 198
198 199
199 200
200 201
201 202
202 203
203 204
204 205
205 206
206 207
207 208
208 209
209 210
210 211
211


