Page 57 of 212

Pedals
Concerning a secure depressing of the pedal, you should use only footmats from
the ŠKODA Original Accessories.
Operation of the pedals must not be hindered! WARNING
● Greater pedal distances may be needed when there is a fault in the brake
system.
● Do not place any footmats or other additional floor coverings in the area of
the pedals in order to ensure that all the pedals can be fully depressed and are
able to return unobstructed to their initial position - risk of accident!
● There must be no objects on the floor which could roll under the pedals.
You would then no longer be able to apply the brakes, operate the clutch or
accelerator - risk of accident!
luggage compartment
Loading the luggage compartment Please observe the following in the interest of maintaining good handling charac-
teristics of your vehicle:
– Distribute the items of luggage as evenly as possible.
– Place heavy objects as far forward as possible.
– Attach the items of luggage to the lashing eyes or the fixing net
⇒
page 56.
In the event of an accident, there is such a high kinetic energy which is produced
by small and light objects that they can cause severe injuries. The magnitude of
the kinetic energy depends on the speed at which the vehicle is travelling and on
the weight of the object. The speed at which the vehicle is travelling is in this case
the more significant factor.
Example: In the event of a frontal collision at a speed of 50 km/h, an unsecured
object with a weight of 4.5 kg produces an energy, which corresponds to 20 times
its own weight. This means that it results in a weight of approx. 90 kg. You can
imagine the injuries that can occur, if this “bullet” is flying through the interior
compartment and hits an occupant. WARNING
● Store the objects in the luggage compartment and attach them to the
lashing eyes.
● Loose objects in the passenger compartment can be thrown forward dur-
ing a sudden manoeuvre or in case of an accident and can injure the occupants
or other oncoming traffic. This risk is still increased, if the objects which are
flying around are hit by a deployed airbag. In this case, the objects which are
thrown back can injure the occupants - hazard.
● Please note that the handling properties of your vehicle may be affected
when transporting heavy objects as a result of the displacement of the centre
of gravity. The speed and style of driving must be adjusted accordingly.
● The items carried in the luggage compartment should be stored in such a
way that no objects are able to slip forward if there are any sudden driving or
braking manoeuvres undertaken - risk of injury!
● When transporting fastened objects which are sharp and dangerous in the
luggage compartment enlarged by folding the rear seats forward or removing
the rear seats, ensure the safety of the passengers transported on the other
rear seats ⇒
page 103, Correct seated position for the occupants on the rear
seats.
● If the rear seats next to the folded forward seat are occupied, ensure max-
imum safety, e.g. by placing the goods to be transported in such a way that a
folding back of the seat is prevented in case of a rear collision.
● Never drive with the boot lid fully opened or slightly ajar otherwise ex-
haust gases may get into the interior of the vehicle - risk of poisoning!
● On no account exceed the permissible axle loads and the permissible gross
weight of the vehicle - risk of accident!
● Never transport occupants in the luggage compartment. CAUTION
Please ensure that the heating elements of the rear window heater are not dam-
aged as a result of objects sliding in this area. Note
● Tyre pressure must be adjusted to the load ⇒
fig. 130.
● The circulation of air in the vehicle helps to prevent the windows from misting
up. The used air streams out through the air venting slits which are located under
the bumper in the luggage compartment. Check for yourself that the air venting
slits are not covered. 55
Seats and Stowage Using the system Safety Driving Tips General Maintenance Breakdown assis-
tance Praktik Technical data
Page 58 of 212
 must be used for fasten-
ing t")
Vehicles of category N1
On vehicles of the category N1, which are not fitted with a protective grille, a lash-
ing set which complies with the standard EN
12195 (1 - 4) must be used for fasten-
ing the load.
Fastening elements Fig. 44 Luggage compartment: Lashing
eyes and fastening elements
Fastening eyelets and fastening elements are located on the sides of the luggage
compartment for securing the items of luggage ⇒
fig. 44.
You can also attach fixing nets to these fastening eyelets and fastening elements
for holding small objects.
The fixing nets and the installation instruction are located in the luggage com-
partment. WARNING
● The load to be transported must be fixed in place in such a way that it can-
not move during the journey and when braking.
● If the items of luggage or objects are attached to the lashing eyes with un-
suitable or damaged lashing straps, injuries can occur in the event of braking
manoeuvres or accidents. In order to prevent the items of luggage being
thrown forward, always use suitable lashing straps which are firmly attached
to the lashing eyes. Never attach a child seat to the lashing eyes! Folding hooks
Fig. 45 Luggage compartment: folding
hooks
Folding hooks for attaching small items of luggage, such as bags etc., are provided
on both sides of the luggage compartment ⇒ fig. 45 . WARNING
Please refer to the following guidelines ⇒ page 55
. CAUTION
An item of luggage weighing up to 7.5 kg can be attached to the hook.
Fixing nets - Net programme Fig. 46 Fixing net: double horizontal pocket, floor fixing net/double vertical pockets
Fixing examples of the fixing net as double horizontal pocket, floor fixing net
⇒ fig. 46 and double vertical pockets ⇒ fig. 46 on the right. £56
Seats and Stowage
Page 59 of 212

The fixing nets and the installation instruction are located in the luggage com-
partment. WARNING
● The strength of the net makes it possible to load the pocket with objects
of up to 1.5 kg in weight. Heavy objects are not secured sufficiently - risk of
injury and net damage!
● The load to be transported must be fixed in place in such a way that it can-
not move during the journey and when braking. CAUTION
Do not place any objects with sharp edges in the nets - risk of net damage.
Fixing floor covering of the luggage compartment You can lean against the raised floor cover between the backrests of the rear
seats and the luggage compartment cover, as if one needs to reach the spare
wheel.
Luggage compartment cover You can use the luggage compartment cover behind the head re-
straints for storing light and soft items.
Fig. 47 Removal of the luggage compartment cover/Luggage compartment cover in the lower
position
The luggage compartment cover can be removed as required if one must trans-
port bulky goods. –
Unhook the support straps 1 ⇒ fig. 47.
– Slightly raise the luggage compartment cover.
– Remove the luggage compartment cover from the holders 2 either by pulling
to the rear or by tapping slightly on the bottom side of the luggage compart-
ment cover in the area between the holders.
– Install again by pushing the luggage compartment cover forwards into the
holder 2 and hanging the support straps
1 on the boot lid.
The luggage compartment cover can also be put into the lower position on the
supporting elements ⇒
fig. 47 on the right.
The procedure of installing or removing is identical.
In this position you can store smaller objects up on the luggage compartment cov-
er up to a total weight of 2.5 kg. WARNING
No objects should be placed on the luggage compartment cover, the vehicle
occupants could be endangered if there is sudden braking or the vehicle col-
lides with something. CAUTION
● Please ensure that the heating wire of the rear window heater is not damaged
as a result of objects placed in this area. Note
When opening the boot lid, lift the luggage compartment cover - risk that objects
placed in this area can slip forward! 57
Seats and Stowage Using the system Safety Driving Tips General Maintenance Breakdown assis-
tance Praktik Technical data
Page 60 of 212

Static separation net
Fig. 48 Use of the static separation net behind the rear seats/behind the front seats
Install the static separation net behind the front seats or the rear seats.
Install the static separation net behind the rear seats
– Remove the luggage compartment cover.
– Take the separation net out of the bag.
– Unfold both parts of the cross rod until they are heard to engage.
– Insert the cross rod into the mount B first on the one side and push the cross
rod forward. In the same way, fix the cross rod to the other side of the vehicle,
mount B
⇒ fig. 48 .
– Hang the carabines C at the ends of the strap into the lashing eyes behind
the rear seats.
– Pull the strap through the tensioning clasp, first of all on the one side and
then on the other side.
Remove the static separation net behind the rear seats
– Slacken the bands on both sides and take off the carabines C
⇒ fig. 48 .
– Push the cross rod first of all on the one side and then on the other side to-
wards the rear.
– Take the cross rod out of the mounts B .
Pack static separation net
– Press the red button of the joint A - so that it releases.
– Put the separation net folded together in the bag and close it. –
Attach the bag with the aid of the plastic carabines to the eyes on the left and
right luggage compartment trim panel.
Installing and removing the static separation net behind the front seats ⇒ fig. 48
on the right is carried out analogously as behind the rear seats. Use the eyes be-
hind the front seats to attach the carabines. Remove the rear seats to enlarge the
luggage compartment.
Installing and removing the static separation net behind the rear seats with varia-
ble loading floor ⇒ page 58
is carried out analogously as behind the rear seats
without variable loading floor. Use the lower eyes at the fixing wedges on the
front part of the variable loading floor in order to attach the carabines.
Variable loading floor in the luggage compartment
Remove variable loading floor Fig. 49 Luggage compartment: Fold up variable loading floor/remove
The variable loading floor makes it easier to handle bulky luggage and creates an
even luggage compartment floor when the rear seats are folded forward. The
maximum permissible surface load of the variable loading floor is 75
kg.
Removing the variable loading floor
– Unhook the loops A
⇒ fig. 49 of the elastic partition out of the fixing points.
– Unlock the variable loading floor by turning the locking bolts B by approx.
180° to the left ⇒ fig. 49 .
– You can fold together the variable loading floor by moving it in the direction of
the arrow. £58
Seats and Stowage
Page 61 of 212

–
Lift up the variable loading floor in direction of arrow 1 ⇒ fig. 49
and remove
it by pulling in direction of arrow 2 ⇒
fig. 49 .
Installing the variable loading floor
– Place the variable loading floor once folded together onto the carrier rails.
– Fold open the variable loading floor.
– Lock the variable loading floor by turning the locking bolts B by approx. 180°
to the right.
– Attach the loops of the elastic partition to the fixing points. WARNING
Pay attention when installing that the carrier rails and the variable loading
floor are correctly fixed, otherwise the occupants are at risk. Note
If the variable loading floor is installed in the luggage compartment, no flexible
storage compartment or fixing net can be installed ⇒
page 56.
Remove carrier rails Fig. 50 Luggage compartment: Slacken check points/remove carrier rails
Remove carrier rails
–
Slacken the check point B on the carrier rails using the vehicle key or a flat
screwdriver ⇒
fig. 50 .
– Grasp the carrier rail A
⇒
fig. 50 on the right and take it out by pulling in direc-
tion of arrow. The carrier rail on the other side of the luggage compartment
can be removed in the same way. Install carrier rails
–
Position the carrier rails on the sides of the luggage compartment.
– Press the check point on each carrier rail up to the stop.
– Check the attachment of the carrier rails by pulling it. WARNING
Pay attention when installing that the carrier rails and the variable loading
floor are correctly fixed, otherwise the occupants are at risk.
Take out lateral carrier rail and fixing wedges Fig. 51 Luggage compartment: Take out lateral carrier rail/Take out fixing wedges
Remove lateral carrier rail and fixing wedges
–
Grasp the lateral carrier rail ⇒ fig. 51 and take it out by pulling in the direction
of arrow.
– Grasp the fixing wedge ⇒ fig. 51
on the right and take it out by pulling in the
direction of arrow. To remove the fixing wedge on the other side of the lug-
gage compartment, proceed in the same way.
Install lateral carrier rail and fixing wedges
– Position the fixing wedges at the attachment points and press these up to
stop in the direction of the luggage compartment sides.
– Insert the lateral carrier rail at an angle to the fixing wedges and press it up to
the stop.
– Check the attachment of the lateral carrier rail by pulling it. 59
Seats and Stowage Using the system Safety Driving Tips General Maintenance Breakdown assis-
tance Praktik Technical data
Page 62 of 212

Dividing the luggage compartment with variable loading floor
Fig. 52 Divide the luggage compartment
The luggage compartment can be divided with the variable loading floor.
– Lift up the part with the holder and secure it by sliding it into the grooves
⇒ fig. 52 .
Bicycle holder in the luggage compartment Install cross member Fig. 53 Install cross member
– Remove the rear seats or fold the seats fully forwards, in order to make availa-
ble the necessary space in the luggage compartment ⇒
page 53.
– Release the fixtures B at the ends of the cross member by
slightly pulling up
the securing screws C . –
Position the cross member with the fixed (not pulled out) part onto the right
(in direction of travel) lashing eye and then the pull out part A onto the left
lashing eye.
– Secure the fixture B to both sides and lock the fixing screws
C in place.
– Tighten the fixing screws C up to the stop.
– Check the attachment of the cross member by pulling it. WARNING
When transporting bicycles in the luggage compartment, ensure the safety of
passengers .
Install bicycle carrier Fig. 54 Install bicycle carrier
– Position the approved bicycle carrier on the cross member, after pulling up the
screw A
⇒ fig. 54 push the frame side rail (alu-part) towards the cross mem-
ber until the socket latches, and screw the screw A into the nut.
– Slacken the screw B on the moveable part of the bicycle carrier and pull out,
then position the moveable part of the carrier, depending on bicycle size, into
one of the possible positions.
– Insert the screw B into the desired position and tighten.
60
Seats and Stowage
Page 63 of 212

Put bicycle into the bicycle carrier
Fig. 55 Put in the bicycle/fastening the front wheel
– Remove the front wheel before putting the bicycle into the vehicle.
– Slacken the quick tension jack on the fixing axle of the bicycle carrier and ad-
just according to the width of the bicycle fork.
– Fit the bicycle fork onto the fixing axle and tighten with the quick tension jack
⇒ fig. 55 - left.
– It is best to push the removed front wheel between the crank of the left pedal
and the bicycle frame, attach it with a strap to the front fork ⇒
fig. 55 - right,
and/or to a fixing point.
– Make sure that it does not lead to damage of the trim panel of the luggage
compartment, the bicycle and the placed objects.
– Perform the installation of the second fixture and the attachment of the bicy-
cle analogously. Note
If the front wheel is equipped with disc brake, attach the wheel in such a way that
the brake disc is opposite the frame. Secure the stability of the bicycles with a strap Fig. 56 Securing the bicycles with clamps/securing the bicycles with a strap
–
To slacken the rubber part of the clamp, push both parts against each other
and open the clamp.
– Position the clamp with the rubber part to the front (in direction of travel) as
far as possible below the saddle support and close the clamp ⇒ fig. 56 .
– When transporting two bicycles tension the strap ⇒
fig. 56 between the sad-
dles, by pushing the bicycles apart.
– Hang the carabiners at the ends of the strap into the lashing eyes behind the
rear seats.
– Pull the strap through the tensioning clasp, first of all on the one side and
then on the other side.
– If it is necessary, the position of the bicycles in the vehicle can be additionally
rectified. WARNING
● When transporting passengers and objects, which require the seats to be
folded forwards, ensure the safety of the passengers being transported.
● Place the bicycles in the bicycle carrier in such a position that no collision
between the steering arm and the rear window can occur. 61
Seats and Stowage Using the system Safety Driving Tips General Maintenance Breakdown assis-
tance Praktik Technical data
Page 64 of 212

Roof rack
General information
CAUTION
● Only use roof racks approved by ŠKODA.
● If you use other roof rack systems or if the roof bars are not properly fitted,
then any damage which may result to your car is not covered by the warranty
agreements. It is therefore essential to pay attention to the fitting instructions
supplied with the roof luggage rack system.
● Ensure that the opened boot lid does not collide with the roof load. For the sake of the environment
The increased aerodynamic drag results in a higher fuel consumption. Note
If a vehicle is not factory-equipped with a roof rack, it can be purchased from the
ŠKODA Original Accessories
Roof load Distribute the weight evenly over the roof luggage rack system. The maximum
permissible roof load (including roof rack system) of
75 kg and the maximum per-
missible total weight of the vehicle should not be exceeded.
You cannot make full use of the permissible roof load if you use a roof luggage
rack system with a lower load carrying capacity. The load transported on the roof
luggage rack system must not exceed the weight limit which is stated in the fit-
ting instructions. WARNING
● The items which you transport on the roof bar system must be reliably at-
tached - risk of accident!
● You must on no account exceed the permissible roof load, the permissible
axle loads and the permissible gross weight of your vehicle - risk of accident!
● Please note that the handling properties of your vehicle change when you
transport heavy or bulky items on the roof bar system as a result of the dis-
placement of the centre of gravity and the increased wind attack area - risk of
accident! You must absolutely adapt your style of driving and the speed of the
vehicle to the specific circumstances.
Front cup holder Fig. 57 Front centre console: Cup holder
You can place two cups or beverage cans into the recesses ⇒
fig. 57. WARNING
● Do not place any hot beverages into the cup holder. If the vehicle moves,
they may spill - risk of scalding!
● Do not use any cups or beakers which are made of brittle material (e.g.
glass, porcelain). This could lead to injuries in the event of an accident. CAUTION
Do not open the beverages in the cup holder while driving. There is a risk of spill-
ing e.g. when braking and therefore the electrical components or the seat uphols-
tery can be damaged. 62
Seats and Stowage
 1
1 2
2 3
3 4
4 5
5 6
6 7
7 8
8 9
9 10
10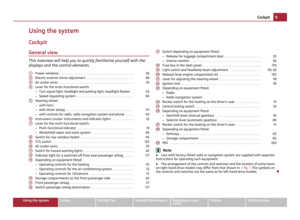 11
11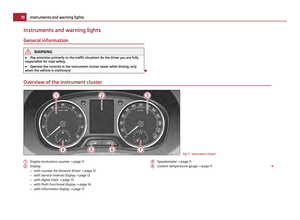 12
12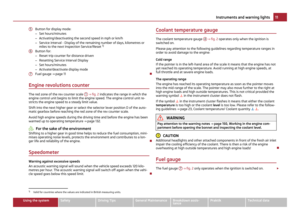 13
13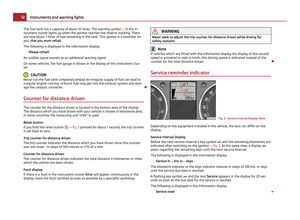 14
14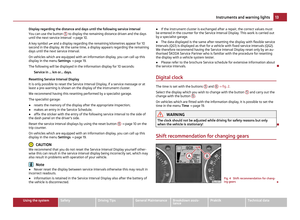 15
15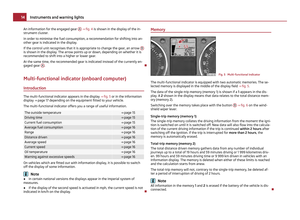 16
16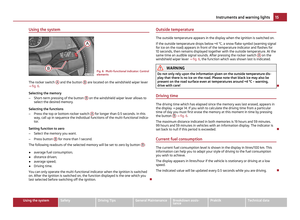 17
17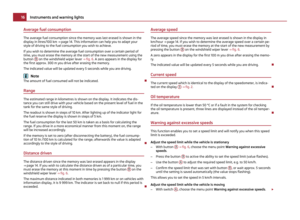 18
18 19
19 20
20 21
21 22
22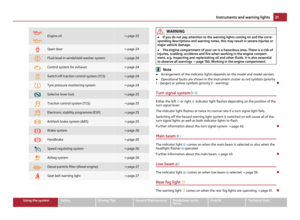 23
23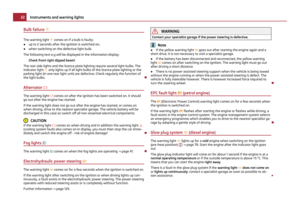 24
24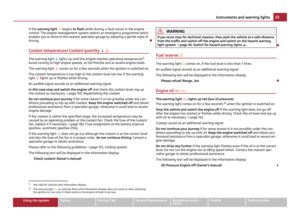 25
25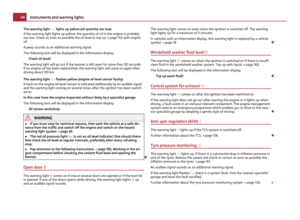 26
26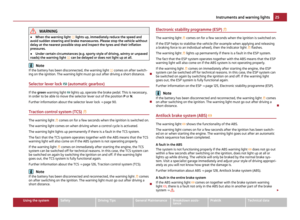 27
27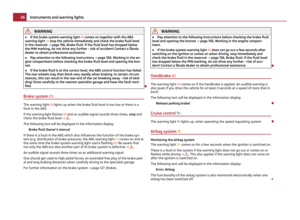 28
28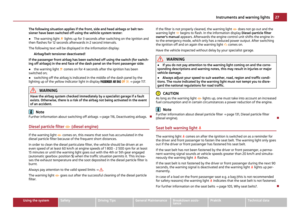 29
29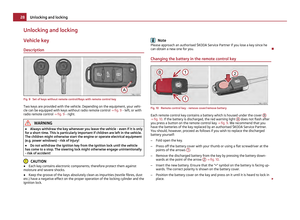 30
30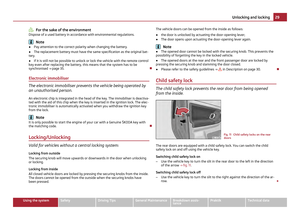 31
31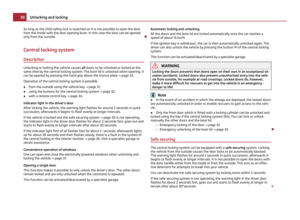 32
32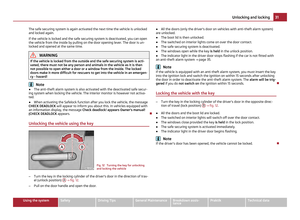 33
33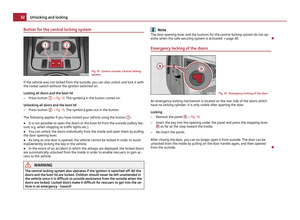 34
34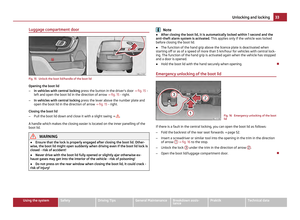 35
35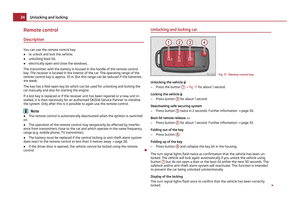 36
36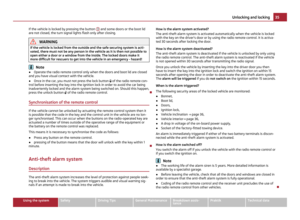 37
37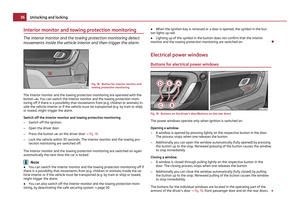 38
38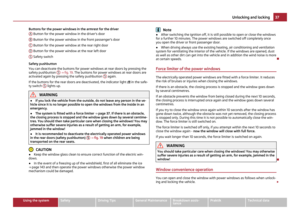 39
39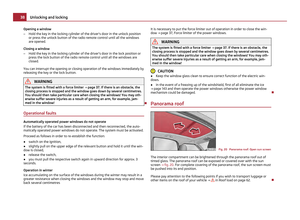 40
40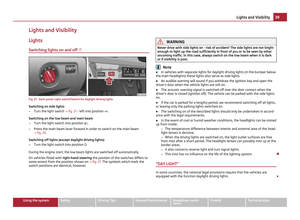 41
41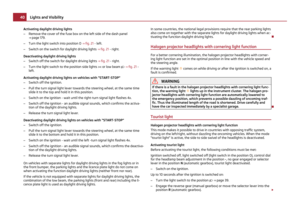 42
42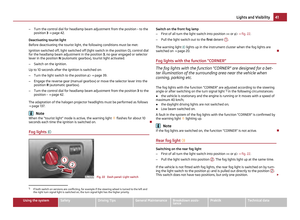 43
43 44
44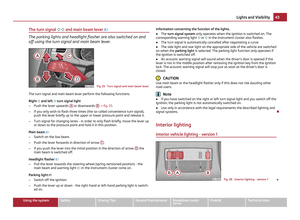 45
45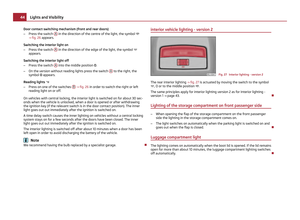 46
46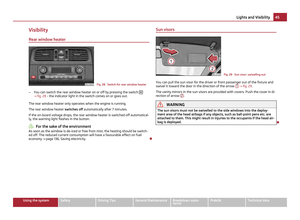 47
47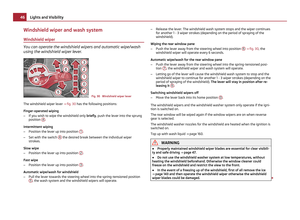 48
48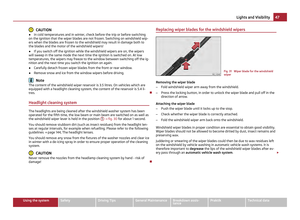 49
49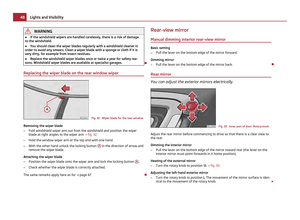 50
50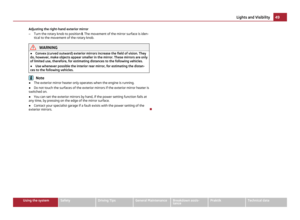 51
51 52
52 53
53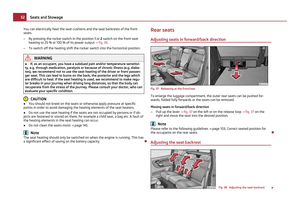 54
54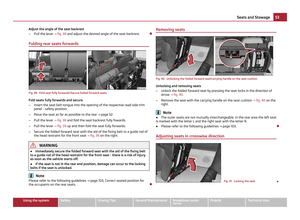 55
55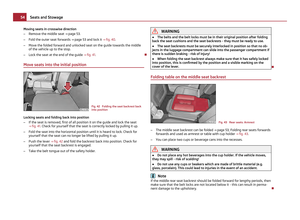 56
56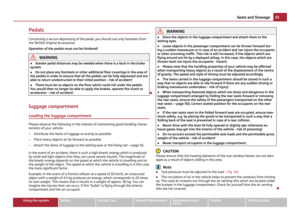 57
57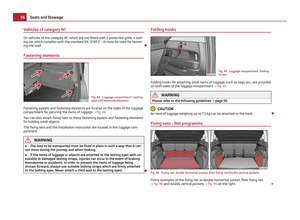 58
58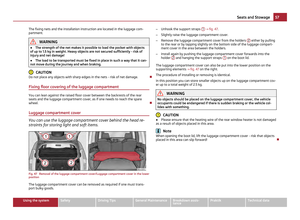 59
59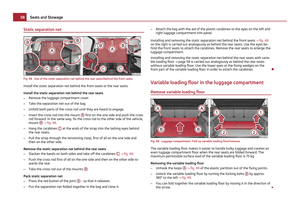 60
60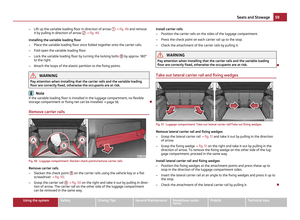 61
61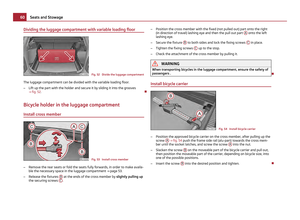 62
62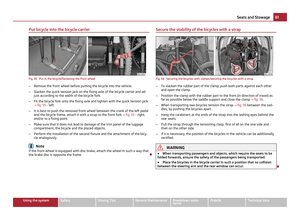 63
63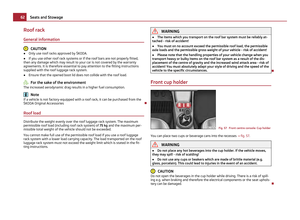 64
64 65
65 66
66 67
67 68
68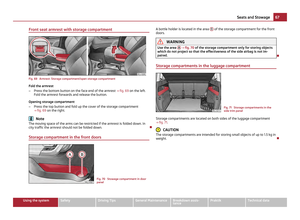 69
69 70
70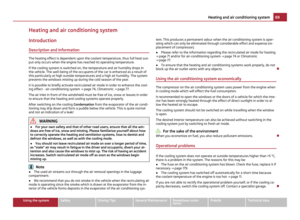 71
71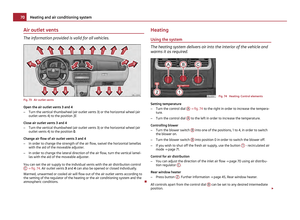 72
72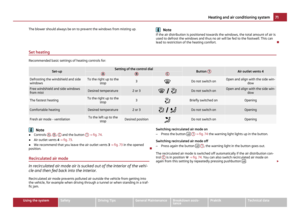 73
73 74
74 75
75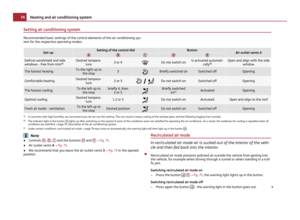 76
76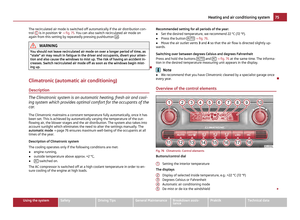 77
77 78
78 79
79 80
80 81
81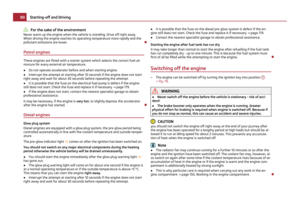 82
82 83
83 84
84 85
85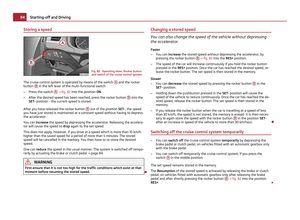 86
86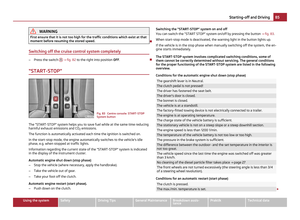 87
87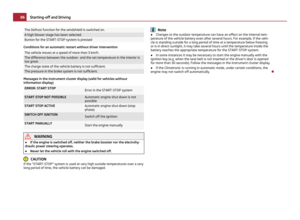 88
88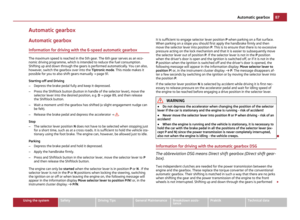 89
89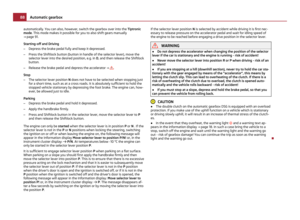 90
90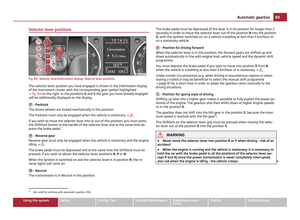 91
91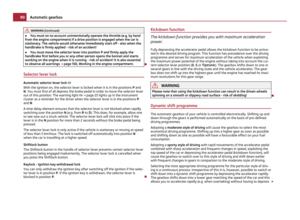 92
92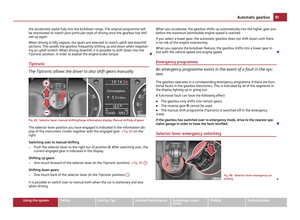 93
93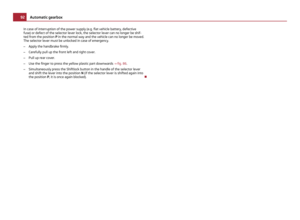 94
94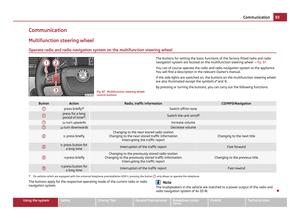 95
95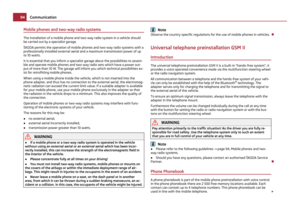 96
96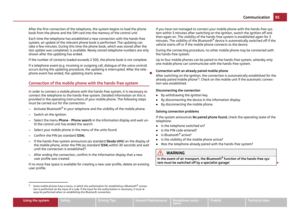 97
97 98
98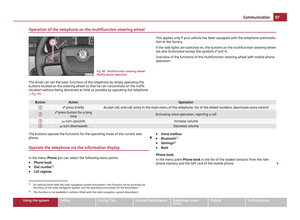 99
99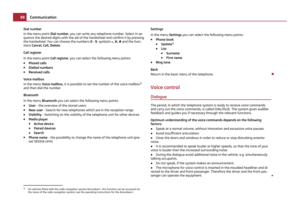 100
100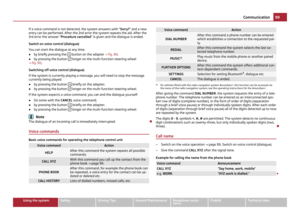 101
101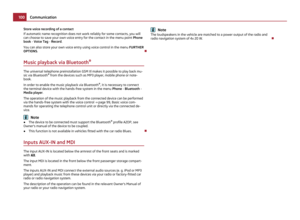 102
102 103
103 104
104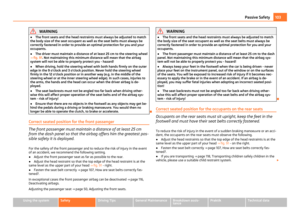 105
105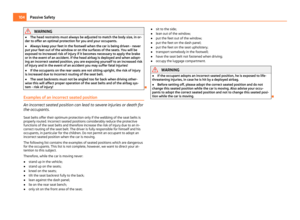 106
106 107
107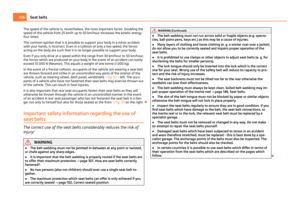 108
108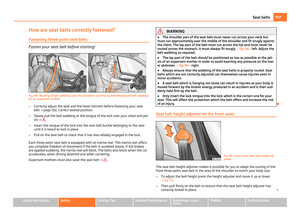 109
109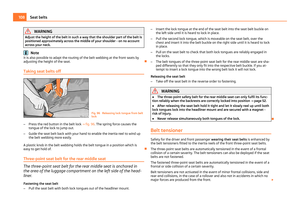 110
110 111
111 112
112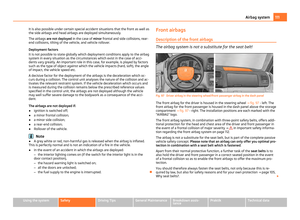 113
113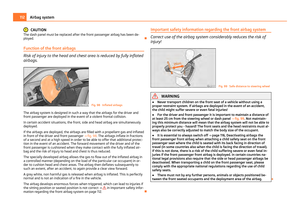 114
114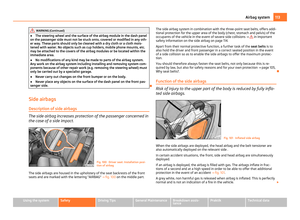 115
115 116
116 117
117 118
118 119
119 120
120 121
121 122
122 123
123 124
124 125
125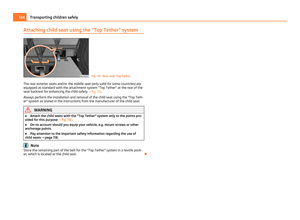 126
126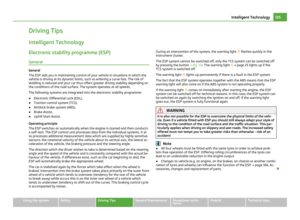 127
127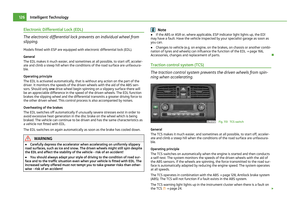 128
128 129
129 130
130 131
131 132
132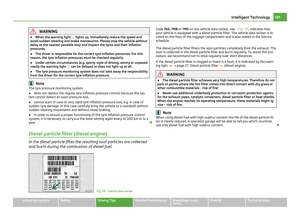 133
133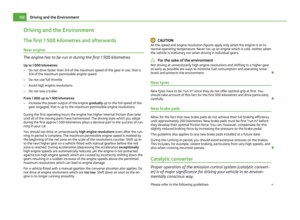 134
134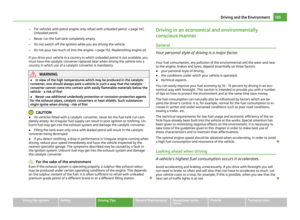 135
135 136
136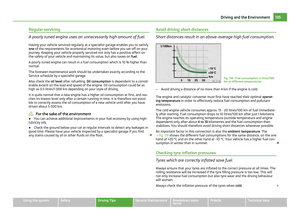 137
137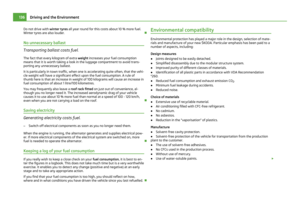 138
138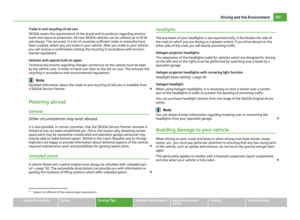 139
139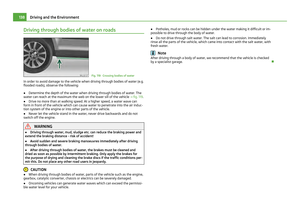 140
140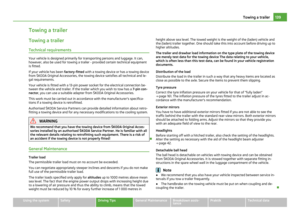 141
141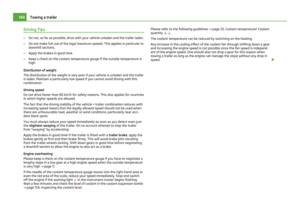 142
142 143
143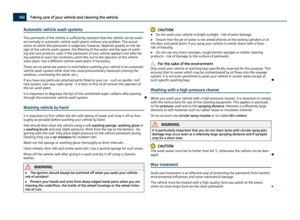 144
144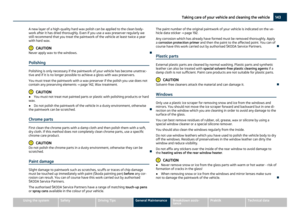 145
145 146
146 147
147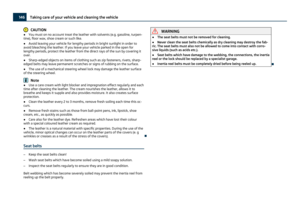 148
148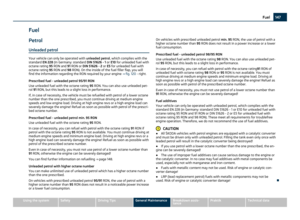 149
149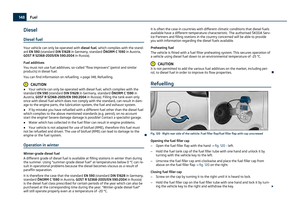 150
150 151
151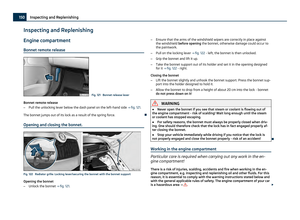 152
152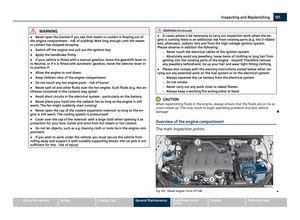 153
153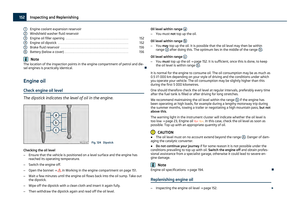 154
154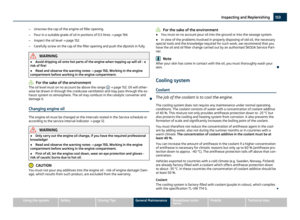 155
155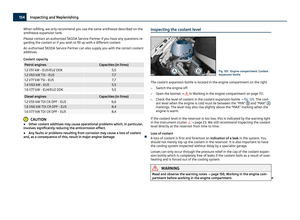 156
156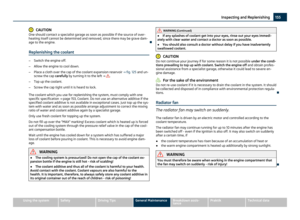 157
157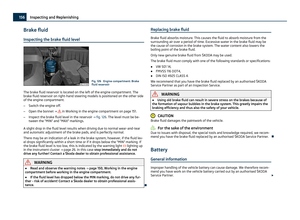 158
158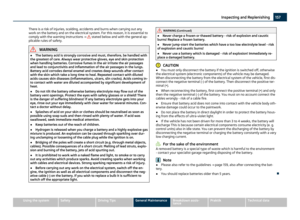 159
159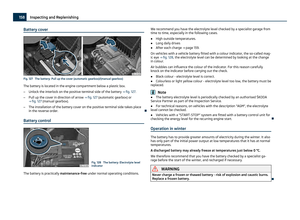 160
160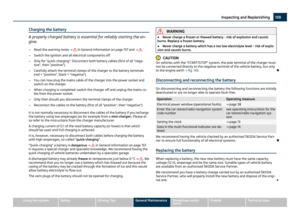 161
161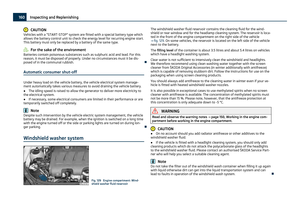 162
162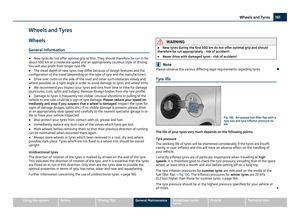 163
163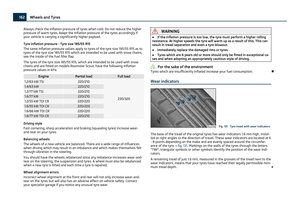 164
164 165
165 166
166 167
167 168
168 169
169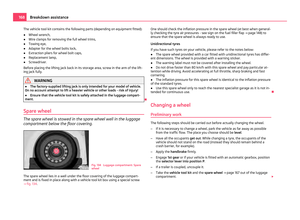 170
170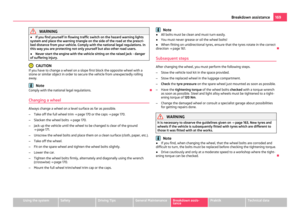 171
171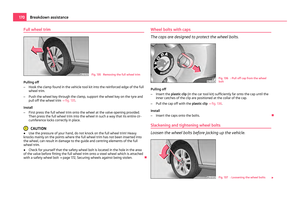 172
172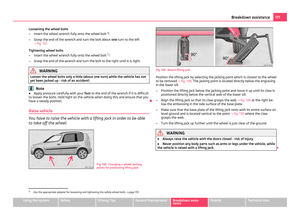 173
173 174
174 175
175 176
176 177
177 178
178 179
179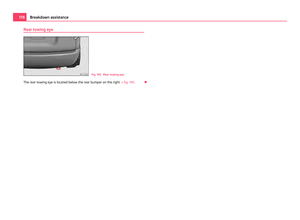 180
180 181
181 182
182 183
183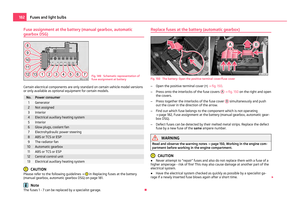 184
184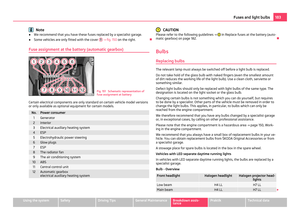 185
185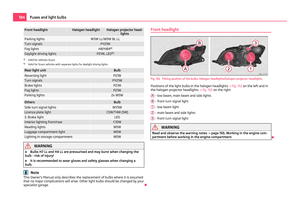 186
186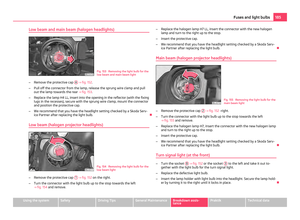 187
187 188
188 189
189 190
190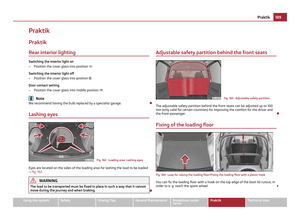 191
191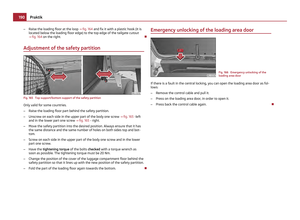 192
192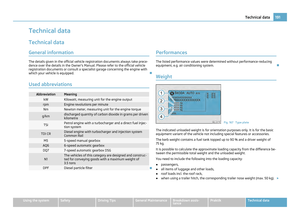 193
193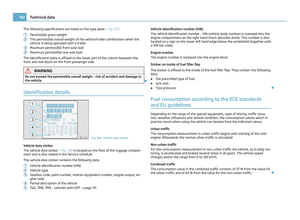 194
194 195
195 196
196 197
197 198
198 199
199 200
200 201
201 202
202 203
203 204
204 205
205 206
206 207
207 208
208 209
209 210
210 211
211