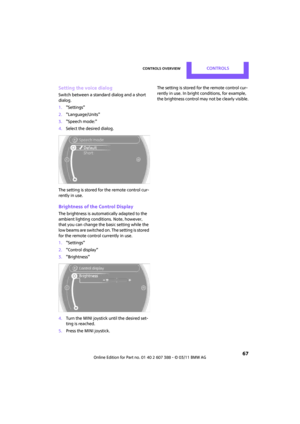
Page 17 of 256

CockpitAT A GLANCE
15
1Microphone for voice activation system*
and for telephone in hands-free mode*
2Indicator/warning lamp* for front passen-
ger airbags 79
4 Hazard warning flashers
5 Speedometer 12
6 Radio/CD
7 Air conditioner or automatic climate
control
*85 8
Switches in the center console
9 USB audio interface 143
10 Buttons on the center console
11 Changing to a differen t menu on the Control
Display
12 MINI joystick 16
Move in four directions, turn or press
13 Accessing the main me nu on the Control
Display 17
3
Reading lamps
*84
Color of ambient lighting
*84
Glass roof, electric
*35
Interior lamps 84
Changing the radio station or track
Changing the audio source
Selecting waveband
Temperature
Recirculated-air mode
Air distribution for air conditioner
Air distribution to the windshield
*
Air distribution to the upper body
area
*
Air distribution to the footwell*
Automatic air distribution and flow
rate
*
Maximum cooling*
Cooling function
Defrosting windows
*
Rear window defroster
Windshield heating
*
Air flow rate
Seat heating
*40
Power windows 35
Rear fog lamp 83
Fog lamps
*83
Central locking system, inside 30
Sport button
*71
Driving stability control systems
Dynamic Stability Control DSC 69
Dynamic Traction Control
DTC*70
Page 18 of 256
AT A GLANCEOn-board computer
16
On-board computer
The on-board computer integrates the functions
of a large number of switches. This allows these
functions to be operated from a single central
position. The following section provides an introduction to basic menu navigation. The con-
trol of the individual fu
nctions is described in
connection with the relevant equipment.
Controls
1 Control Display
2 MINI joystick
The MINI joystick can be used to select menu
items and to adjust settings:
>Move in four directions, arrows 5
> Turn, arrow 6
> Push, arrow 7
3 Accessing the main menu 17
4 Changing to another menu Make entries only when traffic and road
conditions permit; otherwise, you may
endanger vehicle occupants and other road
users by being distracted. <
Page 19 of 256

On-board computerAT A GLANCE
17
Operating principle
As of radio readiness, the following message
appears on the Control Display:
To hide the message:
Press the MINI joystick.
The main menu is displayed.
The message is automatically hidden after
approx. 10 seconds.
Open the main menu
Press the button.
All functions of the on-board computer can be
accessed via the main menu.
Selecting a menu item
Menu items in white can be selected. 1.
Turn the MINI joystick until the desired
menu item is highlighted.
2. Press the MINI joystick.
A new menu is displayed or the function is exe-
cuted.
Menu items in the Owner's Manual
In the Owner's Manual, the menu items that
should be selected are depicted in quotation
marks, e.g. "Settings".
Changing between panels
After selecting a menu item, e.g. "Radio", a new
menu is displayed on a panel. The panels can
overlap.
Move the MINI joystick to the left or right to
switch between the panels.
Arrows pointing left or right indicate that addi-
tional panels can be accessed.
Open the Options menu
Move the MINI joystick to the right repeatedly
until the "Options" menu is displayed.
Page 20 of 256

AT A GLANCEOn-board computer
18
The following is displayed in the "Options"
menu:
>Screen settings.
> Control options for the selected menu.
Adjusting settings
1.Select a field.
2. Turn the MINI joystick until the desired set-
ting is displayed.
3. Press the MINI joystick to confirm the set-
ting.
Activating/deactivating functions
Some menu items are preceded by a check box.
It indicates whether the function is activated or
deactivated.
Selecting the menu item activates or deactivates
the function.
Function is activated.
Function is deactivated.
Example: setting the clock
1. Press the button.
The main menu is displayed.
2. Turn the MINI joystick until "Settings" is
selected, and press the MINI joystick.
3. Turn the MINI joystick until "Time/Date" is
selected, and press the MINI joystick.
4. Turn the MINI joystick until "Time:" is
selected, and press the MINI joystick.
5. Turn the MINI joystick to set the hours and
press the MINI joystick.
6. Turn the MINI joystick to set the minutes and
press the MINI joystick.
Page 21 of 256
On-board computerAT A GLANCE
19
Status information
1Time
2 Telephone status
>Incoming, outgoing or missed call
> Roaming
* active
> Text message
* received
3 Reception strength of the wireless net-
work, depends on the mobile phone
4 Display for:
>Entertainment:
Radio, CD, external devices
> Telephone
*:
Name of the mobile phone paired with
the vehicle
5 Sound output is switched off or
display for traffic bulletins
*:
> "TI":
Traffic bulletins are switched on.
> No display:
Traffic bulletins are switched off.
Other displays:
Status information is temporarily hidden during
Check Control message displays or entries via
the voice activation system
*.
Switching Control
Display off/on
1. Move the MINI joystick to the right repeat-
edly until the "Options" menu is displayed.
2. "Switch off control display"
To switch on, press the MINI joystick.
Page 22 of 256

AT A GLANCELetters and numbers
20
Letters and numbers
Entering letters and
numbers
1.Turn the MINI joystick: select the letters or
numbers.
2. Select additional letters or numbers if
needed.
3. "OK": confirm entry.
Switching between letters and numbers
Depending on the menu, you can switch
between entering letters and numbers:
Switching between uppercase and
lowercase letters
Depending on the menu, you can switch
between entering uppercase letters and lower-
case letters:
Wordmatch concept during navigation
Entry of names and addre sses: the selection is
narrowed down every time a letter is entered
and letters may be added automatically.
Destination search: the en tries are continuously
compared to the data stored in the vehicle.
> The only letters of fered for entering
addresses are those for which data are avail-
able.
> Town/city names can be entered with the
spelling used in any of the languages avail-
able on the Control Display.
SymbolFunction
Press the MINI joystick:
delete one letter or num-
ber
Press and hold the
MINI joystick: delete all let-
ters or numbers
Enter a blank space
SymbolFunction
Entering letters
Entering numbers
SymbolFunction
Move the MINI joystick for-
ward: to switch from upper-
case letters to lowercase let-
ters
Move the MINI joystick for-
ward: to switch from lower-
case letters to uppercase let-
ters
Page 23 of 256

Voice activation systemAT A GLANCE
21
Voice activation system
The concept
The voice activation system allows you to con-
trol operation of various vehicle systems without
removing your hands from the steering wheel.
Most menu items on the Control Display can be
voiced as commands. It is not necessary to use
the MINI joystick.
The voice activation sy stem transforms oral
commands into control signals for the selected
systems and provides support in the form of
instructions or questions.
Prerequisite
Via the on-board computer, select the language
in which the voice activation system is operat-
ing, so that the spoken commands can be iden-
tified. Setting the on-board computer language,
page 66.
Symbols in the Owner's Manual
Saying commands
Activating voice activation system
1. Press the button on the steering wheel. This symbol on the Control Display and
an acoustic signal indicate that the voice
activation system is ready to receive spoken
commands.
2. Say the command.
The command appears on the Control Dis-
play.
This symbol is displayed on the Control Dis-
play when you can ente r additional commands.
If no further commands are possible, continue
by operating the item of equipment via the on-
board computer.
Terminating or canceling voice
activation system
Press the button on the steering wheel
or
Commands
Most menu items on the Control Display can be
voiced as commands.
The commands that are possible depend upon
which menu is currently shown on the Control
Display.
There are short commands for functions in the
main menu.
Some list items, for example telephone book
listings
*, can also be selected using the voice
activation system. Say the list items as they are
displayed in the respective list.
*
{ ...} Say the specified commands word for
word.
{{ ...}} Indicates responses of the voice acti-
vation system.
{ Cancel }
Page 24 of 256

AT A GLANCEVoice activation system
22
Having the possible commands read
aloud
Having the possible commands read aloud:
For example if you have selected "CD" the sys-
tem will read aloud the possible commands for
operating the CD player.
Help for the voice activation system
Calling up Help:
Additional commands
* for Help:
> {Help with examples }: information about
the current operating options and the most
important commands for them are
announced.
> {Help with voice activation }: information
regarding the principles behind the voice
activation system is announced.
Using alternative commands
There are often a number of commands to run a
function, e.g.:
Calling up functions immediately via
short commands
Short commands enable you to perform certain
functions immediately, irrespective of which
menu item is selected, page 230.
Open the main menu
Example: selecting the track of a CD
1.Switch on Entertainment sound output if
necessary.
2. Press the button on the steering wheel.
Setting the voice dialog
You can set whether the voice activation system
uses the standard dialog or the short version.
With the short version of the spoken dialog, the
requests and responses of the voice activation
system are shortened.
1."Settings"
2. "Language/Units"
3. "Speech mode:"
4. Select a setting:
>"Default"
> "Short"
{
Voice commands }
{ Help }
{ Radio } or {Radio on }
{Main menu }
3. Select the music track, e.g.:
{C D track 4 }
System says:
{{ Track 4 }}