Page 137 of 256

RadioENTERTAINMENT
135
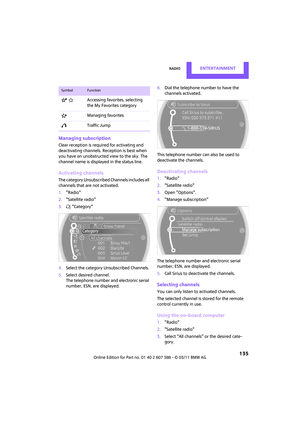
Managing subscription
Clear reception is required for activating and
deactivating channels. Reception is best when
you have an unobstructed view to the sky. The
channel name is displayed in the status line.
Activating channels
The category Unsubscribed Channels includes all
channels that are not activated.
1. "Radio"
2. "Satellite radio"
3. "Category"
4. Select the category Unsubscribed Channels.
5. Select desired channel.
The telephone number and electronic serial
number, ESN, are displayed. 6.
Dial the telephone number to have the
channels activated.
This telephone number can also be used to
deactivate the channels.
Deactivating channels
1. "Radio"
2. "Satellite radio"
3. Open "Options".
4. "Manage subscription"
The telephone number and electronic serial
number, ESN, are displayed.
5. Call Sirius to deactivate the channels.
Selecting channels
You can only listen to activated channels.
The selected channel is stored for the remote
control current ly in use.
Using the on-board computer
1."Radio"
2. "Satellite radio"
3. Select "All channels" or the desired cate-
gory.
Accessing favorites, selecting
the My Favorites category
Managing favorites
Traffic Jump
SymbolFunction
Page 138 of 256

ENTERTAINMENTRadio
136
4.Select desired channel.
Using the buttons near the CD player
Press the button fo r the corresponding
direction.
The next channel is selected.
Using direct channel entry
1. "Radio"
2. "Satellite radio"
3. "Set channel"
4. Turn the MINI joystick until you reach the
desired channel and then press the MINI joy-
stick.
Storing channel
1."Radio"
2. "Satellite radio"
3. Select "All channels" or a desired category.
4. Select desired channel.
5. Press again.
6. Press the MINI joystick again to confirm the
highlighted channel.
7. Select the desired memory location. The channels are stored for the remote control
currently in use.
Changing list view
The list view changes each time the first symbol
on the navigation bar is pressed.
Information about the channel is displayed.
Selecting category
1.
"Radio"
2. "Satellite radio"
3. "Category"
4. Select the desired category.
Time shift
Approximately one hour of the channel cur-
rently being listened to is temporarily stored in a
cache memory. Prerequisite: the signal must be
available.
The stored audio track can be played back at a
different time from the live broadcast. If the
cache memory is full, then the older tracks are
recorded over. The cache memory is deleted if a
new channel is selected.
Accessing Time shift
1. "Radio"
2. "Satellite radio"
SymbolFunction
Channel name
Artist
Track
Page 139 of 256

RadioENTERTAINMENT
137
3."Replay - Time shift"
> The red arrow indicates the current playback
position.
> The time difference fr om the live broadcast
is displayed next to the cache memory bar.
> For live transmissions: "live".
Time shift menu
Automatic time shift
When the function is acti vated, audio playback is
stopped automatically in the event of:
> Incoming and outgoing telephone calls.
> Activation of the voice activation system.
> Muting.
The audio playback then continues with a time
delay.
Activating
1. "Radio"
2. "Satellite radio"
3. "Replay - Time shift"
4. "Automatic time shift"
Deactivating
"Automatic time shift"
Storing favorites
Up to 30 favorites can be stored in the favorites
list. Possible favorites include artist, track, game,
league, and team.
Storing artist, track, or game
Only current broadcasts can be stored as favor-
ites. The channel informat ion must be available.
1. "Radio"
2. "Satellite radio"
3. Select "All channels" or the desired cate-
gory.
4. Select desired channel.
5. Press the MINI joystick again.
6. Select artist, track, or game.
Storing league or team
Leagues or teams can be added to the favorites
from a selection list.
1."Radio"
2. "Satellite radio"
3. "Manage favorites"
4. "Add sports information"
SymbolFunction
Go to live broadcast
Playback/pause
Next track
Previous track
Fast forward
Reverse
Automatic time shift deacti-
vated/activated
Page 140 of 256

ENTERTAINMENTRadio
138
5.Select the desired league.
6. Select "Add all teams" or a desired team.
Accessing favorites
If an activated favorite is being played, the mes-
sage "Favorite alert!" appears for approx.
20 seconds.
Select "Favorites" while the alert message is
being displayed.
The displayed favorite will be played.
If it receives no notification, the system switches
into the My Favorites category. All of the favor-
ites currently being broadcast can be selected
from a list.
Managing favorites
Activating/deactivating favorites
Favorites can be activated or deactivated glo-
bally and individually.
1. "Satellite radio"
2. "Manage favorites"
3. Select "Activate alert" or desired favorites.
The setting is stored fo r the remote control cur-
rently in use.
Deleting favorites
1. "Satellite radio"
2. "Manage favorites"
3. Highlight the favorites you wish to delete.
4. Open "Options".
5. "Delete entry"
Traffic Jump
Traffic and weather information for a selected
region are broadcast at intervals of a few min-
utes.
Selecting region
1."Radio"
2. "Satellite radio"
3. Open "Options".
4. "Set jump"
5. Select the desired region.
The region is stored fo r the remote control cur-
rently in use.
Activating/deactivating Jump
1. "Radio"
2. "Satellite radio"
3. "Jump to:"
As soon as information about the selected
region becomes availabl e, it is broadcast.
A new panel appears in the display.
Cancel Traffic Jump: "Cancel".
Select one of the symbols to deactivate Traffic
Jump.
Automatic update
About twice a year, Sirius carries out an update
of the names and positions of the channels. The
update occurs automati cally and can take sev-
eral minutes.
SymbolMeaning
Information will be broadcast
soon.
Information is currently being
broadcast.
Page 141 of 256
RadioENTERTAINMENT
139
Notes
>Under some circumstances, reception may
not be possible, e.g. under certain environ-
mental or topographical conditions. The sat-
ellite radio has no influence on this.
> The signal may not be available in tunnels or
underground garages or near trees, moun-
tains, or other powerful sources of radio
interference.
Page 142 of 256

ENTERTAINMENTCD player
140
CD player
General information
Inserting CD
Insert the CD into the drive with the labeled side
up. Die CD is automatically pulled in.
Playback starts automatically if the sound out-
put is on. For CDs with compressed audio files, it
can take several minutes to the data, depending
on the folder structure.
Playable formats
CD player*
> CD: CD-ROM, CD-R, CD-RW, CD-DA
> Compressed audio files: MP3, WMA, AAC
Ejecting CD
Press the button on the CD player.
The CD will be slid a sh ort distance out from the
drive.
Audio playback
Selecting the track using the button
Press the button fo r the corresponding
direction repeatedly unti l you reach the desired
track.
Selecting the track using the on-board
computer
Audio CDs
1. "CD/Multimedia"
2. "CD" 3.
Select the desired track. Press the
MINI joystick to start playback.
CDs with compressed audio files*
Depending on the data, it is possible that not all
indications on the CD will be correctly displayed.
1."CD/Multimedia"
2. "CD"
3. Select the directory, if necessary.
To change to a higher level directory: move
the MINI joystick to the left.
4. Select a track and press the MINI joystick.
*
Page 143 of 256
CD playerENTERTAINMENT
141
Displaying information about the track*
If information about a track has been stored, it is
displayed automatically:
>Artist
> Album title
> Number of tracks on the CD
> Track file name
Random play sequence
The tracks on the current CD are played once
each in random order.
1."CD/Multimedia"
2. "CD"
3. Select the desired CD.
4. Open "Options".
5. "Random"
CDs with compressed audio files:
The directories and the tr acks contained therein
are played back in random sequence.
Switch off random play sequence: press the
MINI joystick.
Fast forward/reverse
Press and hold the button for the corre-
sponding direction.
Automatic replay*
Selected tracks, folders, or CDs are automatically
repeated.
Page 144 of 256

ENTERTAINMENTExternal devices
142
External devices
Overview
AUX-IN connection
Overview
>It is possible to connect audio devices, e.g.
MP3 players. Sound is output over the vehi-
cle speakers.
> Recommended settings: mid-level tone and
volume settings on the audio device. Tone
may depend on the quality of the audio files.
Connecting
1USB interface
2 Connection for audio playback:
TRS connector 1/8"/3.5 mm
For audio playback through the vehicle speak-
ers, connect the headphones or line-out con-
nection of the device to the AUX-IN
connection 2.
Starting audio playback
The audio device must be switched on.
1. "CD/Multimedia"
2. Or "External devices" if applicable
3. "AUX front"
Sound is output on the vehicle loudspeakers.
Volume
The volume of the sound output depends on the
audio device. If this volume differs markedly
from the volume of the other audio sources, it is
advisable to adjust the volumes.
Adjusting volume
1. "CD/Multimedia"
2. Or "External devices" if applicable
3. "AUX front"
4. "Volume"
5. Turn MINI joystick until the desired volume
is set and then press the MINI joystick.
SymbolMeaning
USB audio interface*
Mobile phone audio interface*
Bluetooth audio*
AUX-IN connection