2011 MERCEDES-BENZ M-CLASS SUV lock
[x] Cancel search: lockPage 196 of 389

If indicato
rlamp :lights up, PARKTRONIC is
deactivated. Active Park Assis tisthen also
deactivated.
i PARKTRONIC is automatically activated
when you tur nthe key to positi on2in the
ignition lock.
Towing atrailer PARKTRONIC is deactivate
dfor the rear area
when you establish an electrical connection
between you rvehicle and atrailer.
! Foldint he ball couplin gifthe trailer tow
hitc hisn ot required .PARKTRONIC meas-
ures the minimum dete ction range to an
obstacle from the bumper, not the ball cou-
pling. Drivin
gsystems
193Drivingand park ing Z
Page 201 of 389

:
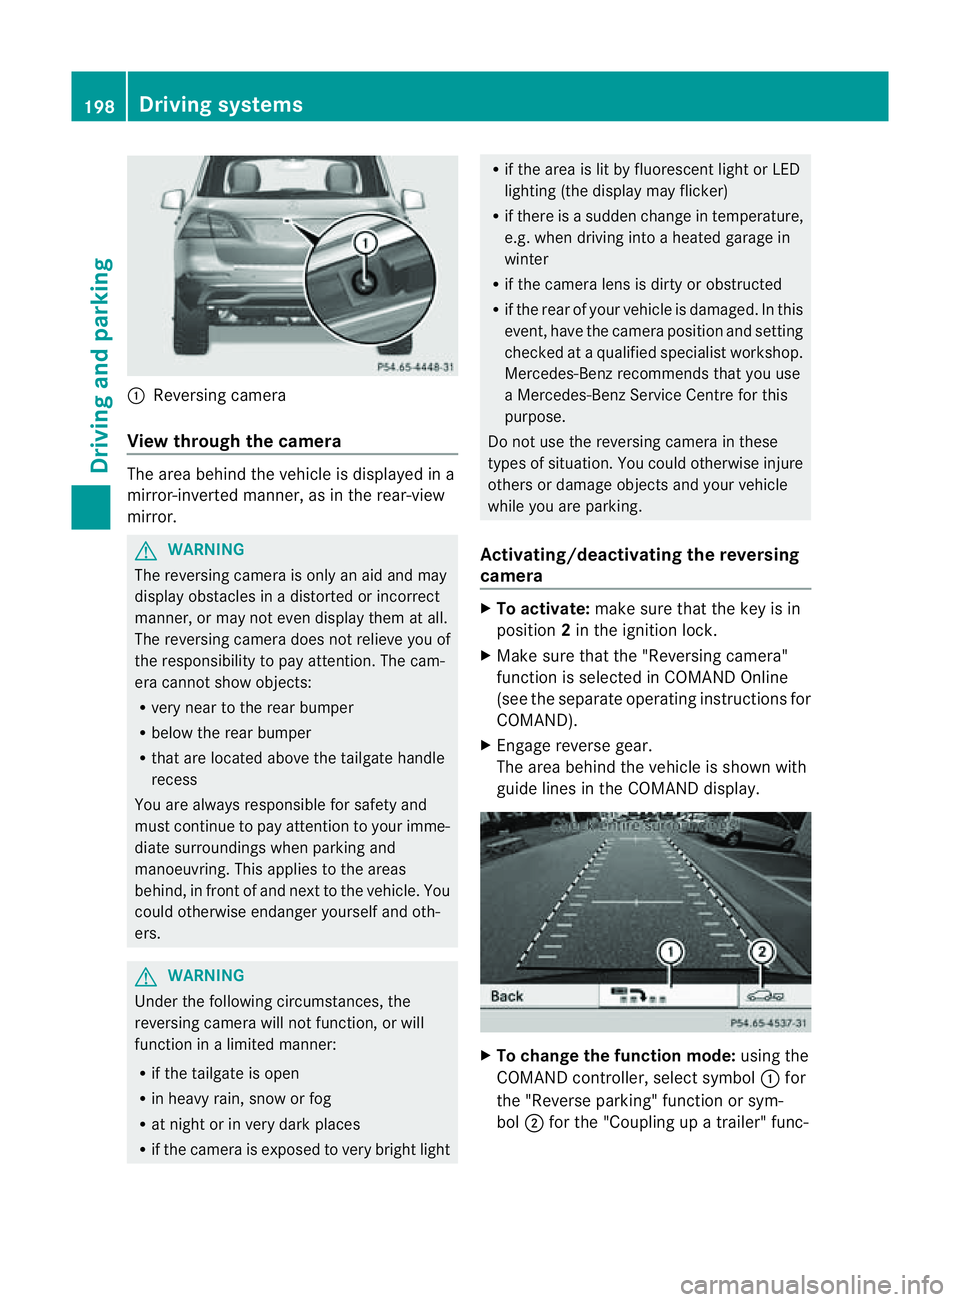
Reversin gcamera
View through th ecamera Th
ea rea behind the vehicle is displaye dina
mirror-inverted manner, as in the rea r-view
mirror. G
WARNING
The reversin gcamera is only an aid and may
display obstacles in adistorted or incorrect
manner, or may no teven display them at all.
Th er eversing camera does not relieve you of
the responsibility to pay attention. The cam-
era cannot show objects:
R ver ynear to the rear bumper
R belo wthe rea rbumper
R that are located above the tailgate handle
recess
You are alway sresponsible for safet yand
must continue to pay attentio ntoyourimme-
di at es urroundings when parking and
manoeuvring. This applie stothe areas
behind, in front of and nex ttothe vehicle. You
coul dotherwise endang er yourself and oth-
ers. G
WARNING
Under the following circumstances, the
reversing camera will not function, or will
function in alimited manner:
R if the tailgate is open
R in heavy rain, snow or fog
R at night or in very dark places
R if the camer aisexposed to very brigh tlight R
if the area is lit by fluorescen tlight or LED
lighting (the display may flicker)
R if there is asudden change in temperature,
e.g. when driving into aheated garage in
winter
R if the camera lens is dirt yorobstruc ted
R if the rear of your vehicle is damaged. In this
event ,have the camera positio nand setting
checked at aqualified specialist workshop.
Mercedes-Benz recommends that you use
aM ercedes-Benz Servic eCentr efor this
purpose.
Do not use the reversin gcamera in these
types of situation. You could otherwise injure
others or damage objects and your vehicle
while you are parking.
Activating/deactivating the reversing
camera X
To activate: make sure that the key is in
position 2in the ignition lock.
X Make sure that the "Reversing camera"
function is selected in COMAND Online
(see the separate operating instructions for
COMAND).
X Engage reverse gear.
The area behind the vehicle is shown with
guide lines in the COMAND display. X
To change the function mode: using the
COMAND controller, select symbol :for
the "Reverse parking" function or sym-
bol ;for the "Coupling up atrailer" func- 198
Dri
ving systemsDriving and parking
Page 209 of 389

position "Automatic drivin
glights/daytime
drivin glights" is located on the light switch. You can only activat
eNight View Assist Plus
if:
R the key is in position 2in the ignition lock.
R it is dark.
R the light switc hisset to either c,
à orL.
R rev ers egear has not been engaged.
X Make sure COMAND Onlin eisswitched on.
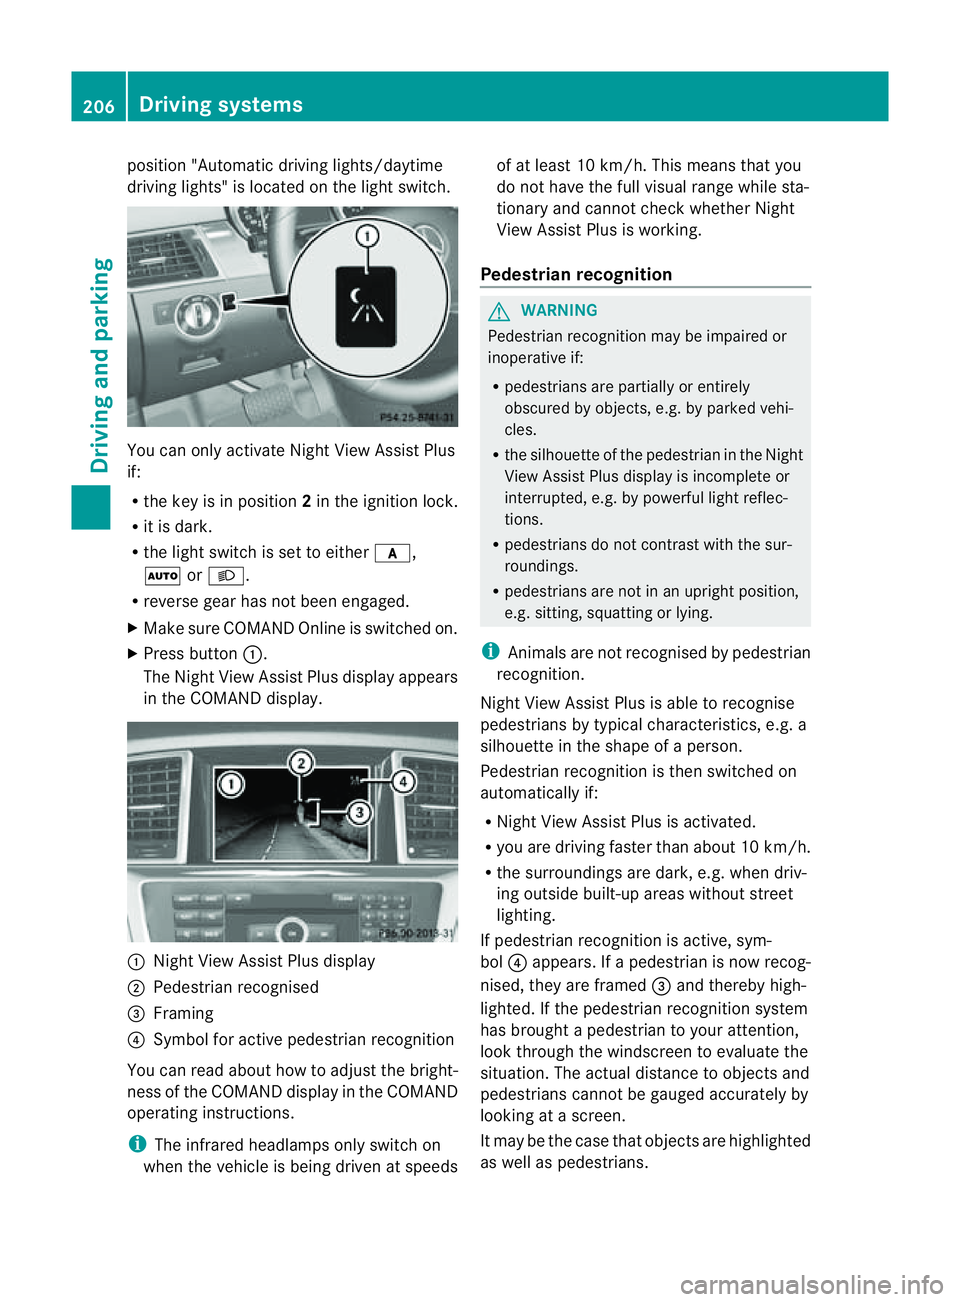
X Press button :.
The Night View Assist Plus display appears
in the COMAN Ddisplay. :
Night View Assist Plus display
; Pedestrian recognised
= Framing
? Symbol for active pedestrian recognition
You can read abou thow to adjust the bright-
nes soft he COMAND displa yinthe COMAND
operating instructions.
i The infrared headlamps only switc hon
when the vehicle is being drive natspeeds of at least 10 km/h. This mean
sthat you
do not hav ethe full visual range while sta-
tionar yand cannot check whether Night
View Assist Plus is working.
Pedestrian recognition G
WARNING
Pedestrian recognition may be impaired or
inoperative if:
R pedestrians are partiall yorentirely
obscured by obje cts, e.g. by parked vehi-
cles.
R the silhouett eofthe pedestrian in the Night
View Assist Plus displa yisincomplete or
interrupted, e.g. by powerful ligh treflec-
tions.
R pedestrians do not contrast with the sur-
roundings.
R pedestrians are not in an upright position,
e.g. sitting, squattin gorlying.
i Animals are not recognised by pedestrian
recognition.
Night View Assist Plus is able to recognise
pedestrians by typical characteristics, e.g. a
silhouette in the shape of aperson.
Pedestrian recognition is then switched on
automatically if:
R Night View Assist Plus is activa ted.
R you are driving faster than about 10 km/ h.
R the surrounding sare dark ,e.g.w hen driv-
ing outside built-up areas without street
lighting.
If pedestrian recognition is active ,sym-
bol ?appears. If apedestrian is now recog-
nised, they are framed =and thereby high-
lighted. If the pedestrian recognition system
has brought apedestrian to your atten tion,
look through the windscreen to evaluate the
situation .The actual distanc etoobjectsand
pedestrians cannot be gauged accurately by
looking at ascreen.
It may be the case that objects are highlighted
as wel laspedestrians. 206
Driving systemsDriving and parking
Page 213 of 389

the warning onl
yoccurs if the differenc ein
spee dislesst han 12 km/h.
The yellow indicator lamp goes out if reverse
gea rise ngaged. Blind Spot Assist is then
deactivated.
The brightness of the indicator/warning
lamps is adjusted automaticall yaccording to
the ambient light. G
WARNING
Blind Spot Assist is not active at speeds below
30 km/h, and the indicator lamps in the exte-
rior mirrors are yellow. Vehicles in the moni-
toring range are the nnot indicated.
Always pay attention to traffic condition sand
your surroundings .Otherwise, you may fail to
recognis edangers in time, cause an accident
and injure yoursel fand others.
Collisio nwarning
If av ehicle is detected in the mon itoring range
of Blind Spot Assis tand you switch on the turn
signal, adouble warnin gtone sounds. Red
warnin glamp :flashes .Ifthe tur nsignal
remains on, detected vehicles are indicated
by the flashing of red warnin glamp :.T here
ar enof urther warning tones.
Switching on Blind Spot Assist
X On vehicles without anavigation system,
make sure that the Becker ®
MAP PILOT is
connected; see the separate operating
instructions for Audio 20.
X Make sure that the radar senso rsystem
(Y page 249) and Blind Spot Assist
(Y page 245) are activated in the on-board
computer.
X Turn the key to position 2in the ignition
lock.
Warning lamps :ligh tupr ed in the exte-
rior mirror sfor approximately 1. 5seconds
and then tur nyellow.
Trailer towing
If you attach atrailer, make sure that yo uhave
correctly established the electrical connec-
tion. This can be accomplished by checking the trailer lighting
.Blind Spot Assist is then
deactivated. The indicator lamp in the exte-
rior mirrors lights up yellow, and the Blind Spot Assist currentl
yunavailable See Owner's Manual message appe
arsin
the multifunction display.
i You can deactivate the indicato rlamps in
the exterior mirrors.
To do so, switch off Blind Spot Assis tif:
R thek ey is in position 2in the ignition
lock.
R the engine is not running.
R the electrical connection to the trailer
has been established.
Lane Keeping Assist Important safety notes
Lan
eKeeping Assist monitor sthe area in
front of your vehicle by means of acamera at
the top of the windscreen. Lane Keeping
Assis tdetect slane markings on the road and
warns you before you leave your lane unin-
tentionally. :
Lane Keeping Assis tcamera
If you have chose nthe Displa yunit Speed-/odometer (Y
page 246) functio nin
the on-board computer and select km as the
unit of measurement, Active Lane Keeping
Assist is active from speeds of 60 km/h. If
the miles displa
yunit is selected ,the assis-
tance range begin sat40mph. 210
Driving systemsDriving and parking
Page 218 of 389

R
the Off-roa dprogra misa ctivate d(vehicles
without th eON&OFFROAD package).
R Off-road progra m1or2isactivated(vehi-
cle sw ith the ON&OFFROAD package).
R the LOW RANGE off-road gear is activated
(vehicles with the ON&OFFROAD package).
R al oss of tyr epressure or adefectiv etyre is
detected.
Activating Active Blind Spot Assist
X On vehicles without anavigation system,
make sure that the Becker ®
MAP PILOT is
connected; see the separate operating
instructions for Audio 20.
X Make sure that the radar senso rsystem
(Y page 249) and Active Blind Spot Assist
(Y page 245) are activated in the on-board
computer.
X Turn the key to position 2in the ignition
lock.
Warning lamps :ligh tupr ed in the exte-
rior mirror sfor approximately 1. 5seconds
and then tur nyellow.
Trailer towing
If you attach atrailer, make sure that yo uhave
correctly established the electrical connec-
tion. This can be accomplished by checking
the trailer lighting .Active Blind Spo tAssist is
then deactivated. The indicator lam plights up
yellow in the exterior mirrors and the ActiveBlind Spot Assist currently unavail‐
able Se
eOwner's Manual message
appe arsint he multifunction display.
Active Lan eKeeping Assist Import
ants afety notes
Active Lane Keeping Assis tmonitors the area
in front of your vehicle by means of acamera
at the top of the windscreen. Active Lane
Keeping Assis tdetect slane markings on the
road and warns you before you leave your
lane unintentionally .Ifyou do not react to the
warning, alane-correcting application of the
brakes can bring the vehicle back into the
original lane. :
Active Lane Keeping Assis tcamera
If you have selected the Displayunit Speed-/odometer (Y
page 246) function in
th eo n-board compute rand select km as the
unit of measurement, Active Lane Keeping
Assist is active from speeds of 60 km/h. If
the miles display unit is selected
,the assis-
tan ce ra nge begins at 40 mph. G
WARNING
Active Lane Keeping Assist doe snot keep
your vehicle in its lane. It is only an aid and
may detec tthe lan emarkings on the road
incorrectly or not at all.
The system may be impaired or may not func-
tion if:
R several or no lane markings for asingle lane
are present.
R there is poor visibility, e.g. due to insuffi-
cient illumination of the road, or due to
snow, rain, fog or spray.
R there is glare, e.g. from oncoming traffic,
the sun, or reflec tion from other vehicles.
R the windscreen is dirty, misted up or cov-
ered, for insta ncebyasticker, in the vicinity
of the camera.
R the lane markings are worn away ,dark or
covered up, e.g. by dirt or snow.
R the distance to the vehicle in front is too
small and the lane markings thus cannot be
detected.
R the lane markings on the road are unclear,
e.g. near roadworks. Driving systems
215Drivingand park ing
Z
Page 221 of 389

On-roa
dprogram (vehicle swith the
ON&OFFROAD package)
Genera lnotes The on-road program
ssupport you when driv-
ing on roads and the off-road programs sup-
port you when driving off-road (Y page 222).
The following program messages remain in
the multifunction display until the corre-
spondin gvehicle level has been set. Up to off-
road level 2, you can hide the program mes-
sages using the %ora button on the
multifunction steering wheel.
AUTO program Selec
tthe AUTO program for amore com-
for table ride under all normal driving condi-
tions.
Your selection remains stored even if you
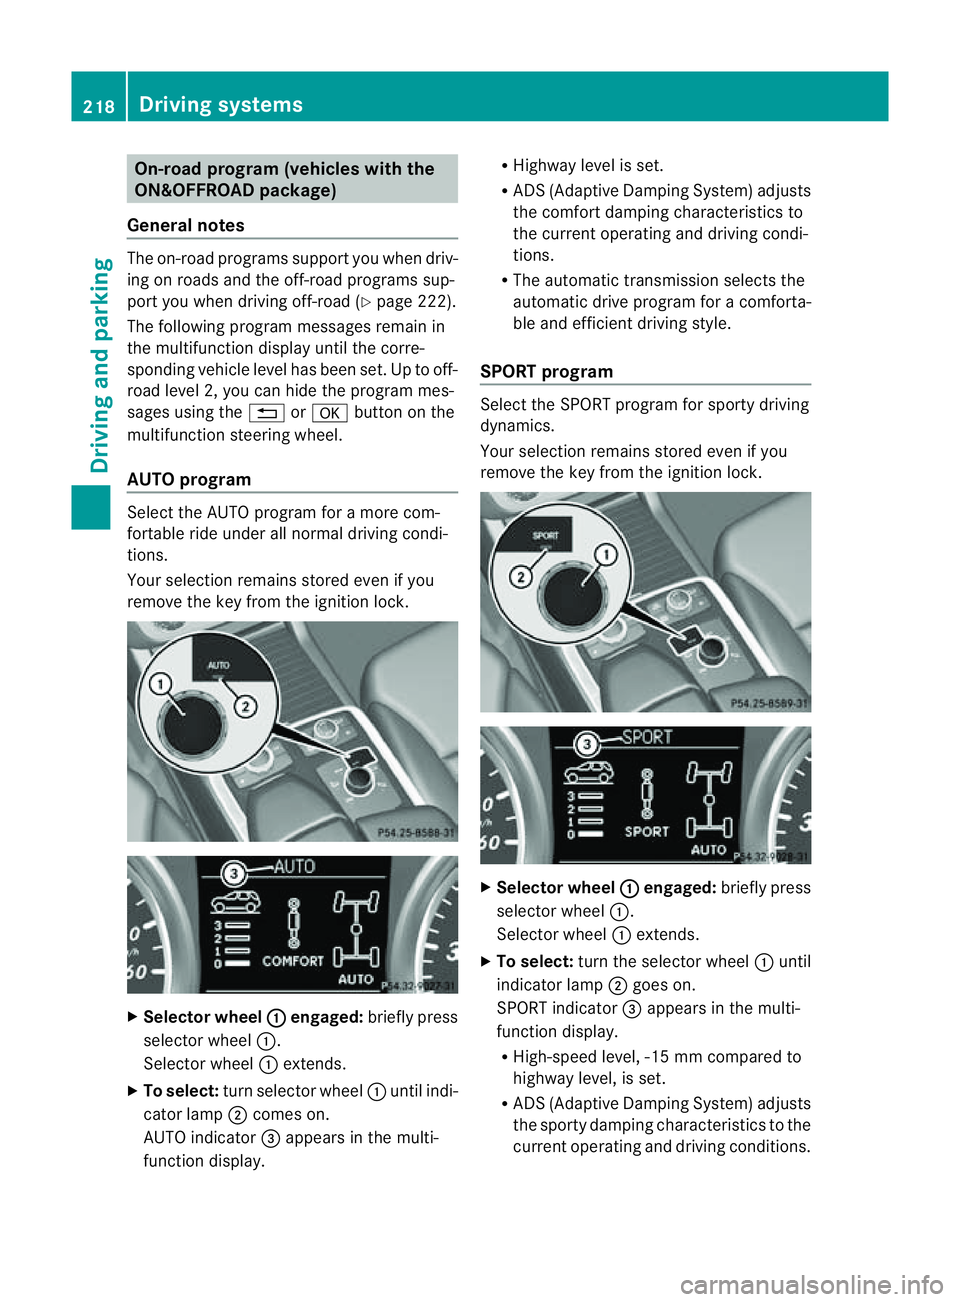
remove the key from the ignition lock. X
Selecto rwheel : engaged:
brieflypress
selector wheel :.
Selector wheel :extends.
X To select: turn selector wheel :unti lindi-
cator lamp ;comes on.
AUTO indicator =appears in the multi-
function display. R
Highway level is set.
R AD S(Adaptive Damp ingS ystem) adjusts
the comfort damping characteristics to
the current operating and driving condi-
tions.
R The automatic transmission selects the
automatic drive progra mforac omforta-
ble and efficien tdriving style.
SPORT program Select th
eSPORT program for sport ydriving
dynamics.
Your selection remains store deven if you
remove th ekey from the ignition lock. X
Selector wheel : engaged:
briefly press
selector wheel :.
Selec torw heel :extends.
X To select: turnthe selector wheel :until
indicator lamp ;goes on.
SPOR Tindicator =appears in the multi-
function display.
R High-speed level ,-15 mm compared to
highway level ,isset.
R AD S(Adaptive Damp ingS ystem) adjusts
the sporty damping characteristics to the
current operating and driving conditions. 218
Driving systemsDriving and
parking
Page 222 of 389

R
The automatic transmission select sthe
automatic drive program for asporty
driving style.
R The sporty accelerator pedal curve is
selected. This mean sthat the accelera-
tor pedal does not need to be depressed
as fa rwhen accelerati ng.
R The sport ysteering curve is selected.
Thi sm eans that mor eeffort is required
when steering.
i Youc annot select the SPORT program if
LOW RANGE has been selected .The
Driv eprogram SPORT Not in LOW RANGE message appears in th
emultifunc-
tion display.
Snow program Select the snow program when driving in
snow or with snow chains. X
Selector wheel : engaged:
briefly press
selector wheel :.
Selector wheel :extends.
X To select: turn selector wheel :until indi-
cator lamp ;comes on.
Snow indicator =appears in the multi-
function display. R
Highway level is set.
R AD S(Adaptive Damp ingS ystem) adjusts
the comfort damping characteristics to
the current operating and driving condi-
tions.
R 4ETS and the differential lock are adap-
ted for driving on snow-covered roads.
R The automatic transmission selects the
automatic drive progra mforac omforta-
ble and efficien tdriving style.
R Th es mooth accelerato rpedal curve is
selected. This mean sthat the accelera-
tor pedal needs to be depressed much
further when accelerating.
R The optimal gear for pulling away is
engaged.
Trailer program Select the trailer program when towing a
trailer. X
Selector wheel : engaged:
brieflypress
selecto rwheel :.
Selector wheel :extends.
X To select: turnselector wheel :until indi-
cator lamp ;comes on.
Trailer indicator =appear sint he multi-
func tion display. Driving systems
219Drivingand parking Z
Page 223 of 389

R
Hig hway level is set.
R ADS (Adaptive Damping System) adjusts
the comfort damping characteristics to
the current operating and driving condi-
tions.
R The automatic transmission selects the
automatic drive progra mforac omforta-
ble and efficien tdriving style ,and the
shift points are optimally adjusted.
R The differential lock is engaged when
pulling away. Off-road driving systems
4MATIC (permanent all-wheel drive)
4MATIC ensures that all four wheels are per-
manently driven. Togethe rwith ESP ®
and
4ETS, it improves the trac tion of your vehicle
whenever adrive whee lspins due to insuffi-
cient grip. G
WARNING
4MATI Ccannot reduce the risk of an accident
if you drive too fast.
If ad rive whee lspins due to insufficien tgrip:
R onl ydepress the accelerator peda lasfar as
necessary when pulling away.
R accelerate less when driving.
R adapt you rdriving style to su itroa dand
traffic conditions.
! Never tow the vehicle with one axle
raised. Thi smay damage the transfer case.
Damage of this sort is not covered by the
Mercedes-Benz implied warranty. All
wheels must remain either on the ground
or be fully raised. Observe the instructions
for towing the vehicle with all wheels in full
contact with the ground.
i In wintry driving conditions, the maximum
effect of 4MATIC can only be achieved if
you use winter tyres (M+S tyres), with snow
chains if necessary. !
Functio norperformanc etests ma yonly
be performed on a2-axle dynamometer. If
you wis htooperatethe vehicle on such a
dynamometer, pleas econsult aMercedes-
Benz Service Centr ebeforehand. You could
otherwise damage th edrive train or the
bra kesystem.
Fo rinformation abou tdriving off-roa d, see
( Y page 166). DSR (Downhill Speed Regulation)
Important safety notes DSR assists you when driv
ingd ownhill .It
keeps the spee doftravel at th espeed set on
the on-board comp uter. Th esteeper the
downhil lgradient ,the greate rthe DS Rbrak-
ing effect on th evehicle. When driving on flat
stretches of road or on an uphill gradient, the
DSR braking effect is minima lornon-existent. G
WARNING
DSR is only an aid designe dtoassist you when
driving downhill. You ar eresponsible for keep-
ing control of the vehicle and for assessing
whether the downhill gradien tcan be man-
aged.
When activating DSR the vehicle may brake
suddenly due to DSR intervening. This is
dependent on the downhill gradient and the
difference between the current spee dand the
speed set. DSR may not always be able to
keep to the set speed, depending on road sur-
face and tyre conditions .You coul dlose con-
trol of the vehicle and cause an accident.
Selec taset speed suitable for the prevailing
conditions and when necessary, apply the
brakes manually.
DSR con trols the set speed when it is active
and the automatic transmission is in the D,
R or Nposition. By accelerating or braking,
you can always drive at ahigher or alower
speed than that set on the on-boar dcom-
puter. 220
Off-road driving systemsDriving and parking