2011 MERCEDES-BENZ M-CLASS SUV lock
[x] Cancel search: lockPage 144 of 389
X
Depres sthe brake peda land kee pit
depressed.
X To star tapetrol engine: press the Start/
Stop button (Y page 139) once.
The engin estarts.
X To start adiesel engine: press the Start/
Stop button (Y page 139)once.
Preglow is activated and the engin estarts. Pulling away
Automatic transmission i
It is only possible to shift the transmission
from position Pto the desired position if
you depress the brake pedal. Only then is
the parkin glock released. If the brake
pedal is not depressed, the DIREC TSELE CT
lever can still be move dbut the parking lock
remains engaged.
X Depress the brak epedal and keep it
depressed.
X Shift th etransmissio ntoposition Dor R
(Y page 145).
X Releas ethe brak epedal.
X Carefully depress th eaccele rator pedal.
The electric parki ngbrak e(Ypage 16 1)is
automatically released.
The red !indicator lamp in the instru-
ment cluster goes out.
i The vehicle locks centrally onc eyou have
pulled away .The lockin gknobs in the doors
drop down.
You can open the doors from the inside at
any time.
You can also deactivat ethe automatic lock-
ing featur e(Ypage 24 9).
i Upshif tstake place at higher engine
speeds after acold star t.This helps the
catalytic converter to reach its operating
temperature mor equickly. Pullin
gaway with atrailer To ensure that you do not roll backwards
when pulling away on an uphill slope, engage
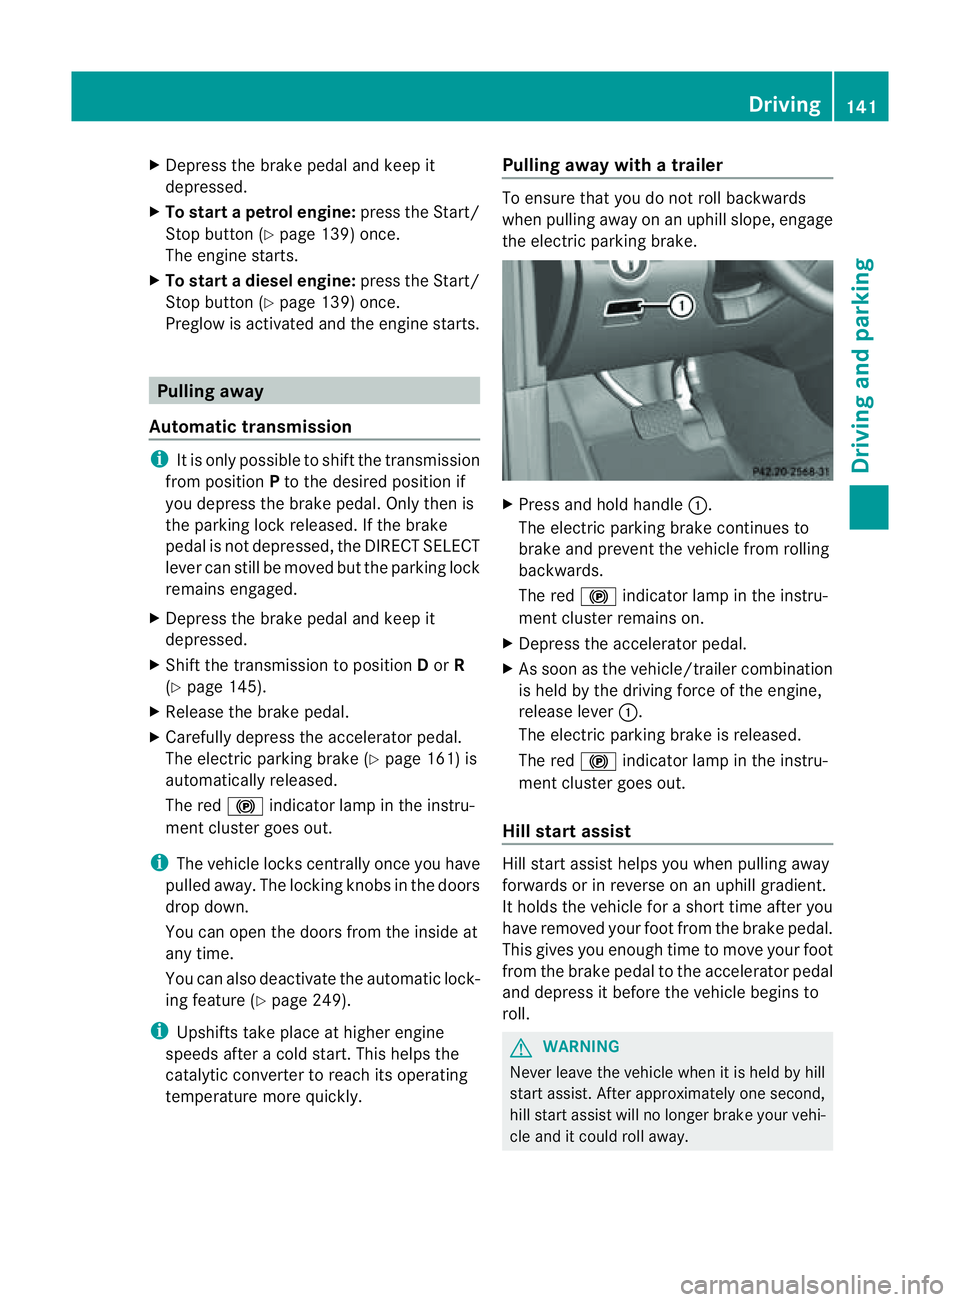
the electric parking brake. X
Press and hol dhandle :.
The electric parking brake continues to
brake and prevent the vehicle from rolling
backwards.
The red !indicator lamp in the instru-
ment cluster remains on.
X Depress the accelerator pedal.
X As soon as the vehicle/trailer combination
is held by the driving force of the engine,
release lever :.
The electric parking brake is released.
The red !indicator lamp in the instru-
ment cluster goes out.
Hill star tassist Hill star
tassist helps you when pulling away
forwards or in reverse on an uphil lgradient.
It hold sthe vehicle for ashort tim eafter you
have removed you rfoot from the brake pedal.
This gives you enough tim etomove your foot
from the brake pedal to the accelerator pedal
and depress it befor ethe vehicle begin sto
roll. G
WARNING
Neve rleave the vehicle when it is held by hill
star tassist. Af tera pproximately one second,
hill start assist will no longer brak eyour vehi-
cle and it coul droll away. Driving
141Drivingand parking Z
Page 149 of 389

P
Park position with parkin glock
R Reverse gear
N Neutral
D Drive
i The DIREC TSELE CT lever alway sretur ns
to its original position. The curren ttrans-
mission position P,R, Nor Dap pe ars in the
transmission position display
(Y pag e146) in the mult ifunction display.
Transmissi onposition and driv epro-
gram display The current transmission pos
ition and drive
program appear in the multifunction display. :
Trans mission position display
; Driv eprogram display
i Thea rrow sint he transmission position
displa yshow how and int owhich transmis-
sion position syou can chan ge usingthe
DIRECT SELECT lever.
! If the transmission position displa yint he
multifunction displa yisnot working, you
should pull away carefully to chec kwhether
the desired transmission position is
engaged. Ideally, you should selec ttrans-
mission position Dand drive program Eor
S.Don ot restric tthe shift range. Engaging pa
rk position P X
Push th eDIRECT SELECT lever in the direc-
tion of arrow P.
i The automatic transmission shi ftsa uto-
matically int opark posi tion Pif you open
th ed river' sdoor when th evehicle is sta-
tionar yordriving at very lo wspeed ,and the
transmission is in position Dor R.
i If you dep ress th ebrake peda land push
the DIRECT SELECT lever up or dow n,the
parking lock is disengaged and the trans-
mission shifts to neutral N.
If you want to shift from park position P
directly to Ror D,d epress the brak eand
pus hthe DIREC TSELECT lever up or down
past the first point of resistance.
! If the engine speed is too high, do not shift
the automatic transmission directly from
D to R,f rom Rto Dor directly to P.Other-
wise ,the automatic transmission could be
damaged.
Engaging pa rk position Pautomatically Park position
Pis automatically engaged if:
R you switch off th eengine using the key and
remove the key, or if you swi tcho ff the
engin eusingthe Start/Stop button and
open on eofthe front do ors.
R HOL D(Ypage 187) or DISTRONI CPLUS
(Y page 174) bra keyour vehicle until it is
stationar yand at leas tone of th efollowing
condition sisfulfilled:
- there is asystem malfunction.
- there is asevere uphill or downhill slope.
The electric parking brak eisthena lso
applied.
Engaging revers egear R !
Only shif tthe automatic transmission to
R when the vehicle is stationary.
X Push the DIREC TSELECT lever up past the
first point of resistance. 146
Automatic transmissionDrivin
gand parking
Page 156 of 389
R
M85 (petrol with 85 %methanol)
R M10 0(100% methanol)
R Petrol wit hmetallic additives
R Diesel
Do not mix fuel ssuch as this with petrol
and do not use any additives. Doing so may
cause engine damage. This does not
include additives for the removal and pre-
vention of residue build-up. Petrol must
only be mixed with additives recommended
by Mercedes-Benz. More information about
recommended additives can be obtained
from any Mercedes-Ben zService Centre.
! Use afilter when adding fuel from afuel
can. The fuel lines and/or the diesel injec-
tion system could otherwis ebeblocked by
particles from the fuel can.
i E10 fuel contains up to 10% bioethanol.
Your vehicle is E10 compatible. You can
refuel your vehicle using E10 premium-
grade petrol.
i If the recommended fuel is not available,
but only as atemporary measure, you may
also use regula runleaded petrol,
91 RON/82.5 MON. Thi smay reduce
engine performance and increase fuel con-
sumption. Avoid driving at full throttle.
In some countries, the fuel grade available
may not be adequate and could cause
deposits to build up. In consultation with a
Mercedes-Ben zService Cent re,this petrol
ma ybem ixed with the additive recommen-
ded by Mercedes-Ben z(part no.
A0009 89254510). Yo umust observe the
notes and mixin gratios specified on the
container.
For further information on "Fuel", see
(Y page 374). !
Only refuel using unleaded, sulphur-free
premium-grade petrol with at least
95 RON/85 MON, which conform stoEuro- pean standar
dEN2 28or an equivalent
specifi cation.
You can otherwise impair engine output or
damage the emission contro lsystem.
i In some countries, the available petrol
may not be sufficiently low in sulphur. This
fuel can temporarily produce unpleasant
odours, especially on short journeys. As
soo nassulphur-free fuel (sulphur content
<10p pm) is used for refuelling, the odours
are reduced. Diesel (EN 590)
Fuel grade !
When refuelling, only use diesel fuel that
confor ms to th eEuropean standard EN 590
or is of equivalent quality. You can other-
wise impair engine output or damage the
engine.
! Vehicles with diesel particle filters: in
countries outsid ethe EU ,only use low sul-
phu rEuro diesel with asulphu rcontent of
under 50 ppm. Otherwise, the emission
con trol system coul dbedamaged.
! Vehicles without adiesel particle fil-
ter: in countries where only diesel fuels
with ahigher sulphur conten tare avail able,
the vehicle's oil change intervals are
shorter. More information about intervals
for changing the oil can be obtained from
any Mercedes-Benz Service Centre.
! Only use fuel that complies with the EN
590 European standard. Fuel that does not
compl ywithEN5 90can lea dtoincreased
wear, engin edamag eand damage to the
exhaust system.
Do not use the following:
R marine diesel
R heating oil
R bio-diesel
R vegetable oil
R petrol Refuelling
153Drivingand park ing Z
ML 350 4MATIC
Page 157 of 389
R
paraffin
R kerosene
Do not mix these fuels with diesel fuels and
do not use any special additives. Other-
wise, this can lead to damage to the engine.
This excludes flow improver ;see "Low out-
side temperatures".
! Use afilter when adding fuel from afuel
can. Otherwise, the fuel lines and/or the
diesel injection system could be blocked by
particles from the fuel can.
For further information on "Fuel", see
(Y page 374).
Low outsid etemperatures Diesel fuel with improved cold flow qualities
is available during the winter months. In
Europe, various climate-dependent low-tem-
peratur eclasses are defined in EN 590 .Refu-
elling with diesel fuel which complies with the
climatic specification sofstandard EN 590
can hel ptoprevent operatin gproblems. At
exceptionall ylow tempera tures, it is possible
that the flow properties of the fuel ma ybe
inadequate. This also applies to fuel that has
not been adapted to suit the climatic condi-
tions, e.g. diesel fuel from warmer regions.
i Further information about country-spe-
cific fuel properties can be obtained from
oil companies, e.g. at filling stations.
Flow improver Flow improvers can be added to improv
ethe
cold resistan ceof diesel fuel. The effective-
ness of aflow improver is not guaranteed with
every diesel fuel.
Correc tdosage and thorough mixing ar edeci-
sive factor sinensuring improvement in low-
temperature resistance. Avoid excessive dos-
age .Exce ssiv edosage ma yactuall ydecrease
low-temperature resistanc eunder certain cir-
cumstances. Follo wthe manufacturer's dos-
ing inst ructions. Mix the additive with the diese
ling ood time,
befor ethe flo wproperties of th ediesel
become inadequate. Malfunction scan other-
wise only be rectified by heating the entire
fuel system, e.g. by parking the vehicle in a
heated garage.
Observe the information provided by the man-
ufacturer when using aflow improver. Only
use flow improvers that have been tested and
approved by Mercedes-Benz. You can obtain
further information from any Mercedes-Benz
Servic eCentre. Refuelling
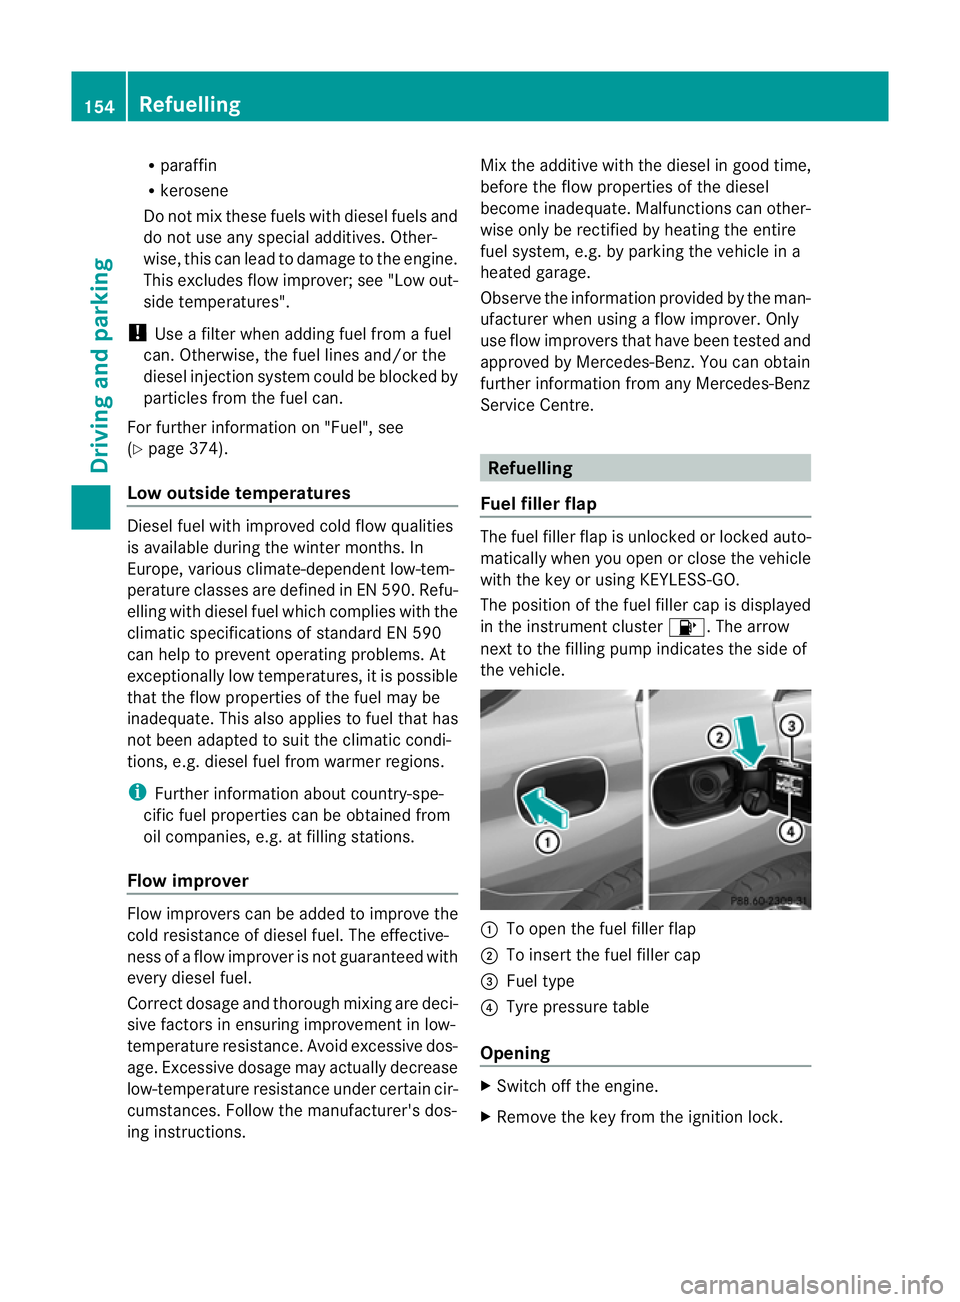
Fuel filler flap The fuel filler fla
pisunlocke dorlockedauto-
matically when you open or close the vehicle
with the key or using KEYLESS-GO.
The position of the fuel filler cap is displayed
in the instrument cluster 8.The arrow
nex ttot he filling pum pindicate sthe side of
the vehicle. :
To open the fuel filler flap
; To inser tthe fuel filler cap
= Fue ltype
? Tyre pressure table
Opening X
Switch off the engine.
X Remove the key from the ignitio nlock. 154
RefuellingDriving and parking
Page 158 of 389
KEYLESS-GO: open th
edriver's door. This
switche sthe ignition to positi on0,w hich
corresponds to having removed the key.
The driver's door can be closed again.
X Press the fuel filler fla pint he direction of
arrow :.
The fuel filler fla pswings up.
X Turn the fuel filler cap anti-clockwise and
remove it.
X Insert the fuel filler cap into the holder
bracket on the inside of filler flap ;.
X Completely insert the pump nozzle into the
filler neck and refuel.
X Only fill the tank until the pump nozzle
switches off.
! Overfilling the fuel tank could damag ethe
fuel system.
Closing X
Replace the fuel filler cap and tur nitclock-
wise .The fuel filler cap audibly engages.
X Close the fuel filler flap. Refuelling
155Drivingand park ing Z
Page 159 of 389
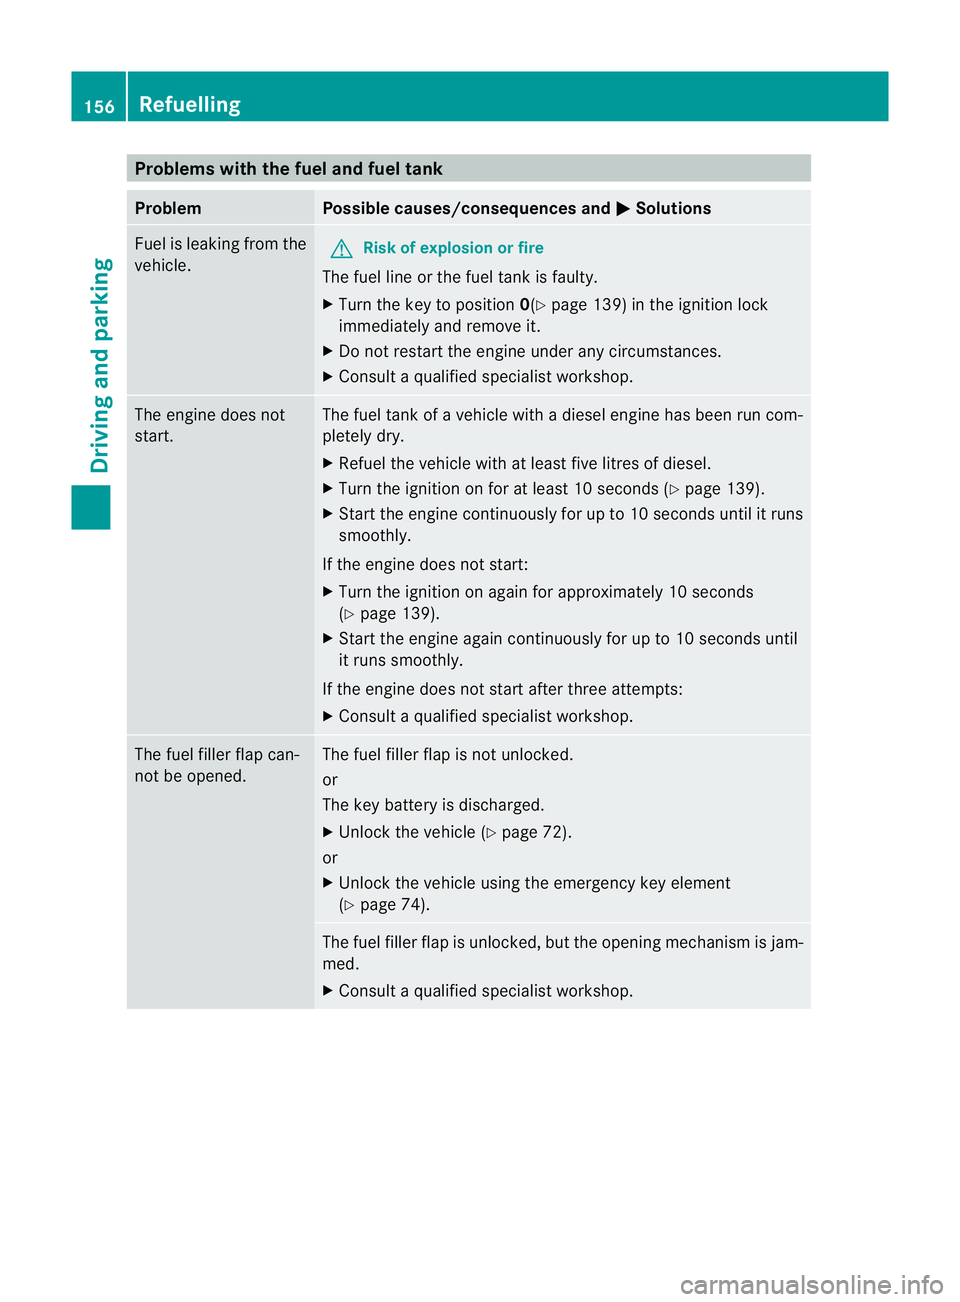
Problems wit
hthe fuel and fuel tank Problem Possible causes/consequences and
M Solutions
Fue
lisl eakin gfrom the
vehicle. G
Ris
kofe xplosion or fire
The fuel line or the fuel tan kisf aulty.
X Turn the key to position 0(Ypage 139 )inthe ignition lock
immediately and remove it.
X Do not restar tthe engin eunder any circumstances.
X Consult aqualified specialist workshop. The engine does not
start. The fuel tank of
avehicle with adiesel engine has been run com-
pletely dry.
X Refuel the vehicle with at least fiv elitres of diesel.
X Turn the ignition on for at least 10 seconds (Y page 139).
X Star tthe engin econtinuously for up to 10 second suntil it runs
smoothly.
If the engine doe snot start:
X Tur nthe ignition on again for approximatel y10seconds
(Y page 139).
X Start the engine again continuously for up to 10 seconds until
it run ssmoothly.
If th eengine doe snot star tafter three attempts:
X Consult aqualified specialist workshop. The fuel filler flap can-
not be opened. The fuel filler flap is not unlocked.
or
The key battery is discharged.
X Unlock the vehicle (Y page 72).
or
X Unlock the vehicle using the emergency key element
(Y page 74). The fuel filler flap is unlocked, but the opening mechanism is jam-
med.
X Consult aqualified specialist workshop. 156
RefuellingDrivin
gand parking
Page 161 of 389

ded. Fillin
gavehicle standing on an uneven
surface is not permitted. There is adanger
of overfilling, which can cause damage to
BlueTEC exhaust gas aftertreatment com-
ponents.
Have the AdBlue ®
tank refilled at aqualified
specialist workshop. However ,you can also
top up the AdBlue ®
tan k:
R at afilling station with an AdBlue ®
filling
pump
R with AdBlue ®
refill bottles
R with an AdBlue ®
refill canister
If the outside temperature is lower than
Ò 11 †, it may be difficult to top up. If
AdBlue ®
is frozen and ther eisanactive warn-
ing indicator, topping up may not be possible.
Park the vehicle in awarmer place, e.g. in a
garage, until AdBlue ®
has become fluid again.
Topping up is then possible again. Alterna-
tively, have the AdBlue ®
tank refilled at a
qualified specialis tworkshop.
When the pum pnozzle switches off automat-
ically during filling at afilling pump, the
AdBlue ®
tank has been completely filled. Do
not fill the the AdBlue ®
tank any fur ther.
AdBlue ®
may possibly leak.
! Surfaces which have com eintoc ontact
with AdBlue ®
while refillin gshould be
rinsed immediately with water, or remove
AdBlue ®
with amoist clot hand cold water.
If AdBlue ®
has alread ycrystallised, us ea
sponge and cold water to clean the area.
AdBlue ®
residue crystallises after acertain
amount of tim eand soils the affected sur-
faces.
! AdBlue ®
is not afuel additive and must
not be added to the fuel tank .IfAdBlue ®
is
added to the fuel tank ,this can lead to
engin edamage.
Further information on
AdBlue ®
(Y page 374). Opening the AdBlue
®
filler cap The filler nec
kfor AdBlue ®
is located behind
the fuel filler flap.
The fuel filler fla pisunlocked or locked auto-
matically whe nyou open or close the vehicle
with the key or using KEYLESS-GO. X
Swit choff the ignition.
X Press the fuel filler fla pinthe direction of
arrow :.
The fuel filler fla pswings up.
X Turn blue AdBlue ®
filler cap ;anti-clock-
wise and remov eit.
AdBlue ®
filler cap ;is secured with aplas-
tic strip.
AdBlue ®
refill canisters AdBlue
®
refill canisters can be obtained at
many filling stations or at aMercedes-Benz
Ser vice Centre. AdBlue ®
refill canis ters are
often sold with afiller hose. Afiller hose that
does not exactly fit the vehicle's AdBlue ®
tan koffers no pro tection agains toverfilling.
AdBlue ®
could leak ou tasar esult of overfill-
ing. Mercedes-Ben zoffers aspecial disposa-
ble hose with overfill protection. You can
obtain this from any Mercedes-Benz Service
Centre. AdBlue ®
is available in avariety of
containers and receptacles. Only use the dis-
posable hos ewith the Mercedes-Benz
AdBlue ®
refill canister s.158
RefuellingDriving and parking
Page 162 of 389

X
Unscre wthe cap from the opening on top
of AdBlue ®
refill canister ;.
X Plac edisposable hose :on the opening
of AdBlue ®
refill canister ;and screw it
on clockwise until hand-tight.
i Disposable hose :remains closed until
you fasten disposable hose :to the
AdBlue ®
filler neck of the vehicle. X
Place disposable hose :on the filler neck
on the vehicle and screw it on clockwise
until hand-tight. When you feel resistance,
disposable hose :is sufficiently secured.
! Do not tighten disposable hose :with
too muc hforce. Disposabl ehose :may
otherwise be destroyed.
X Lif tu pa nd tip AdBlue ®
refill canister ;.
i Filling stops whe nthe AdBlue ®
tan kis
completely fille d.Do no tfill the AdBlue ®
tank any further. AdBlue ®
refill canis-
ter ;can be removed when it has been
only partially emptied. X
Turn disposable hose :on the filler neck
of the vehicle anti-clockwise and remov eit.
X Turn disposable hose :on the opening of
AdBlue ®
refill canister ;anti-clockwise
and remove it.
X Reseal AdBlue ®
refill canister ;with the
cap.
AdBlue ®
refill bottle AdBlue
®
refill bottle scan be obtained at many
filling stations or at aMercedes-Benz Service
Cent re.R efill bottles without athreaded seal
offer no protection against overfilling.
AdBlue ®
could leak out as aresult of overfill-
ing. Mercedes-Ben zoffers special refi llbot-
tles with athrea deds eal. You can obtain
these from any Mercedes-Ben zService
Centre. X
Unscrew the protectiv ecap from AdBlue ®
refill bottle :.
X Place AdBlue ®
refill bottle :on the filler
neck as sho wn andscre witonh and-tight.
! Screw on the AdBlue ®
refill bottle only
hand-t ight.Itm ay other wise be destroyed.
X Press AdBlue ®
refil lbottle : toward sthe
fille rneck.
The AdBlue ®
tank is filled. Thi scould last
up to one min ute.
i Whe nAdBlue ®
refill bottle :is no longer
pressed, filling stops and the bottle may be
taken off again after being only partially
emptied. Refuelling
159Drivingand parking Z