2011 MERCEDES-BENZ M-CLASS SUV lock
[x] Cancel search: lockPage 163 of 389

X
Release AdBlue ®
refill bottle :.
X Turn AdBlue ®
refill bottle :anti-clockwise
and remove it.
X Screw the protective cap onto AdBlue ®
refill bottle :again.
Closing th eAdBlue ®
filler cap and fuel
filler flap X
Fit AdBlue ®
filler cap ;on the filler neck
and tur nitclockwise.
X To close th efuel filler flap ,press it in the
di rectio nofarrow:.
X Drive faster than 15 km/h.
The Refill AdBlue See Owner' sMan‐ ual messag
egoeso ut after approximately
on em inute.
i If the Refill AdBlue See Owner's Manual messag
eremain sinthe mu ltifunc-
tion display, you mus ttop up with more
AdBlue ®
. Parking
Important safety notes
G
WARNING
Only remove the key from the ignition lock
when the vehicle is stationary, as you can not
steer the vehicle when the key is removed.
Never leav echildren unsupervised in the vehi-
cle. They might release the electric parking
brake. This coul dlead to aserious or fatal
accident. G
WAR
NING
Under no circumstances should the exhaust
system come into contact with flammable
materials such as dry grass or petrol ,for
example. Do not par kthe vehicle on dry grass-
lan dorh arvested grain fields. The hot exhaust
system could otherwise ignite the flammable
material and set the vehicle on fire.
To ensure that the vehicle is secured against
rolling away unintentionally:
R the electric parking brake must be applied.
R the transmission must be in position Pand
the key must be removed from the ignition
lock.
R on steep uphill or downhill gradients, turn
the fron twheels towards the kerb. Switching of
fthe engine
Important safety notes G
WARNING
Neve rswitch off the engine while the vehicle
is in motion.
There is no brake boost for the service brake
if the engine is not running. If the ignition is
switched off, there is also no power assis-
tance for the steering.
You will require considerably more effort to
steer and brake and you could therefore lose
control of the vehicle and cause an accident.
X Apply the electric parking brake.
X Shift the transmission to position P.
Using the key X
Turn the key to position 0in the ignition
lock and remove it.
The immobiliser is activated.
i If you switch the engine off with the trans-
mission in position Ror D,t he automatic
transmission shift stoNautomatically. 160
ParkingDriving and parking
Page 164 of 389

If yo
uthen open one of the front doors or
remove the key from the ignition ,the auto-
matic transmission shift stoP.
If yo ushift the automatic transmission to
N before switching off the engine, the auto-
matic transmission remains in Neven when
ad oor is opened.
Using KEYLESS-GO X
Press the Start/Stop button (Y page 139).
The engin estops and all the indicator
lamp sint he instrumen tcluster go out.
i If you use the Start/Stop button to switch
off the engine, the automatic transmission
shifts to Nautomatically. If you then open
one of the front doors, the automatic trans-
missio nshift stoP .
i The engin ecan be turned off while the
vehicle is in motion by pressing and holding
the Start/Stop button for three seconds.
This function operates independently of the
ECO start/stop automatic engine switch-
off function. Electric parking brake
General notes i
The electric parking brake carries out a
function check at regular intervals when
the engine is switched off. Noises that
occur are normal. Engaging/releasing manually
X
To engage: push handle :.
The red !indicator lamp in the instru-
ment cluster lights up.
i The electric parking brake can also be
applied when the key is removed.
X To release: pull handle:.
The red !indicator lamp in the instru-
ment cluster goes out.
i The electric parking brake can only be
released when the key in the ignition lock
is in position 1or the ignition is switched
on using the Start/Stop button.
To ensure that you don't roll backwards when
pulling away on an uphill slope, engage the
electric parking brake (Y page 141).
Engaging automatically Your vehicle's electric parking brake is auto-
matically applied if DISTRONIC PLUS or the
HOLD function bring the vehicle to
astand-
still ,ora re engaged to kee pthe vehicle sta-
tionary. In addition, at least one of the follow-
ing condition smust be fulfilled:
R the engine is switched off.
R the driver' sdoor is open and the seat belt
is not fastened.
R the vehicle is stationar yfor alengthy
period.
The red !indicator lam pint he instrument
cluster lights up.
i The electric parkin gbrake is not automat-
icall yengaged if the engine is switched off
by the ECO start/stop function.
Releasing automatically The electric parking brake of your vehicl
eis
release dautomatically when all of the follow-
ing conditions are fulfilled:
R the engine is running.
R the transmission is in position Dor R. Parking
161Drivingand park ing Z
Page 169 of 389

Off-road driving
Important safet ynotes G
WARNING
Driv eslowly in rough terrain with which you
are unfamiliar. This will allow you to detect
unexpected obstacles more easily and, there-
fore, to reduce the risk of an accident.
Do not make U-turns on mountain roads. Oth-
erwise, the vehicle could tip over. If aslope is
too steep for the vehicle, drive back in reverse
gear.
Do not drive at an angle up steep inclines.
Otherwise, the vehicle could tip over. If you
drive up asteep incline at an angle and the
vehicle threatens to overturn, stee rinto the
line of fall immediately.
Never allo wthe vehicle to roll backwards. The
brakin geffect of the engine canno tbeu tilised
in neutral. If you only use the service brake,
you could los econtrol of the vehicle. G
WARNING
Grains of sand, particles of dirt and other
abrasiv ematerials can enter the brake sys-
tem. This can lead to excessive wear and
unpredictable braking efficiency.
After the brakes have been expose dtodirty
conditions ,have them checked and cleaned
at aq ualified specialist workshop ,e.g. a
Mercedes-Benz Service Cent re.O therwise,
there is arisk that braking power may be
insufficient in the event of an emergency, or
that the braking effec tmay be unpredictable. G
WARNING
Damage to the vehicle creates the risk of an
accident for yourself and other road users. If
in doubt, have your vehicle chec kedataq uali-
fied specialist workshop which has the nec-
essary specialist knowledg eand tool stocarry
out the work required. Mercedes-Benz rec-
ommends that you use aMercedes-Benz
Servic eCentr efor this purpose. General notes Read this section befor
edriving your vehicle
off- road. Practise by travelling over more gen-
tle off-road terrain first.
The following driving systems are specially
adapted to off-road driving:
R Off-road program (vehicles without the
ON&OFFROAD package) (Y page 222)
R Off-road program 1and 2(vehicles wit hthe
ON&OFFROAD package) (Y page 222)
R LOW RANGE off-road gear (vehicles with
the ON&OFFROAD package)
(Y page 223)
R Differential lock (vehicles wit hthe
ON&OFFROAD package) (Y page 223)
R Off-road AB S(Ypage 61)
R Off-road 4ETS (Y page 64)
R Off-road ESP ®
(Y page 65)
R AIRMATI Cpackag e(veh icle level)
(Y pag e188)
R DSR (Downh illS peed Regulation)
(Y page 220)
Observe the following notes:
R stop your vehicle and, if necessary, select
the off-road program (Y page 222)orthe
LOW RANGE off -road gear (Y page 223)
befor edriving off-road.
R select avehicle level suitable for the off-
road ter rain. Make sure ther eisalways suf-
ficien tground clearance to prevent dam-
ag etot he vehicle.
R chec kthat item sofluggage and loads are
stowe dsafely and are well secured
(Y page 300).
R always keep the engine running and in gear
when driving on adownhil lgradient. Acti-
vate DSR (Y page 220).
R drive slowly and evenly ,ifnecessar yata
walking pace.
R ensure that the wheels are in contact with
the ground at all times.
R drive with extreme care on unknown off-
road routes where visibility is poor. For 166
Driving tipsDriving and parking
Page 173 of 389

erwise, the vehicle could slip sideways, tip
and over turn.
R Before tackling steep downhill gradients,
select shift range 1.
R Activat eDSR. If this is not suffici ent, brake
gently. Whe ndoing so, make sure that the
vehicle is facing in the direction of the line
of fall.
R Check that the brakes ar eworking normally
after along downhil lstretch.
i Off-road ABS is activated when the off-
road program or LOW RANGE off-road gear
is selected.
At speeds belo w30km/h, th efront wheels
lock cyclicall yduring braking. The digging-
in effect achieved in the process reduces
the stopping distance when driving off-
road. The steerability of the vehicle is con-
siderably reduced if the wheel slock. Driving systems
Cruise control
Important safety notes G
WARNING
Do not change down for additiona lengine
braking on aslippery road surface. This could
cause the drive wheels to lose their grip and
the vehicle could skid. G
WARNING
Cruise control cannot take account of road
and traffic conditions.
Always pay attention to traffic conditions
even when cruise control is activated.
Cruise control is only an aid designed to assist
driving. You are responsible for the vehicle's
speed and for braking in good time. G
WARNING
Do not use cruise control
R in traffic conditions that do not allow you to
drive at aconstant speed (e.g. heavy traffic or winding roads). You may otherwise
cause an accident.
R on slipper yroads. The driv ewheels may
lose their grip when brakin goraccelerating
and the vehicle may skid.
R whe nthere is low visibility, e.g. due to fog,
heav yrain or snow.
General notes Cruise control maintains
aconstant road
speed for you. It brakes automatically in order
to avoid exceeding the set speed. On long and
steep downhil lgradients ,especially if the
vehicle is laden or towing atrailer, yo umust
select shift range 1,2or 3in good time. By
doing so, you will make use of the braking
effect of the engine. This relieves the load on
the brake system and prevent sthe brakes
from overheating and wearing too quickly.
Use cruise con trol only if roa dand traffic con-
ditions make it appropriate to maintain a
steady speed for aprolonged period. Yo ucan
store any road spee dabove 30 km/h.
Cruise contro llever :
To activate or increase speed
; LIMi ndicato rlamp
= To activate at the current speed/last
stored speed
? To activate or reduce speed
A To switch between cruise control and var-
iable SPEEDTRONIC
B To deactivate cruise control 170
Driving systemsDriving and parking
Page 187 of 389

R
Off-road level 2: 60 mm abov ehighway
level
R Off-road level 3: 90 mm above highway
level
Highway/high-speed level !
Make sure there is enough ground clear-
ance when the vehicle is being lowered .It
could oth erwise hit the ground, damaging
the underbody. :
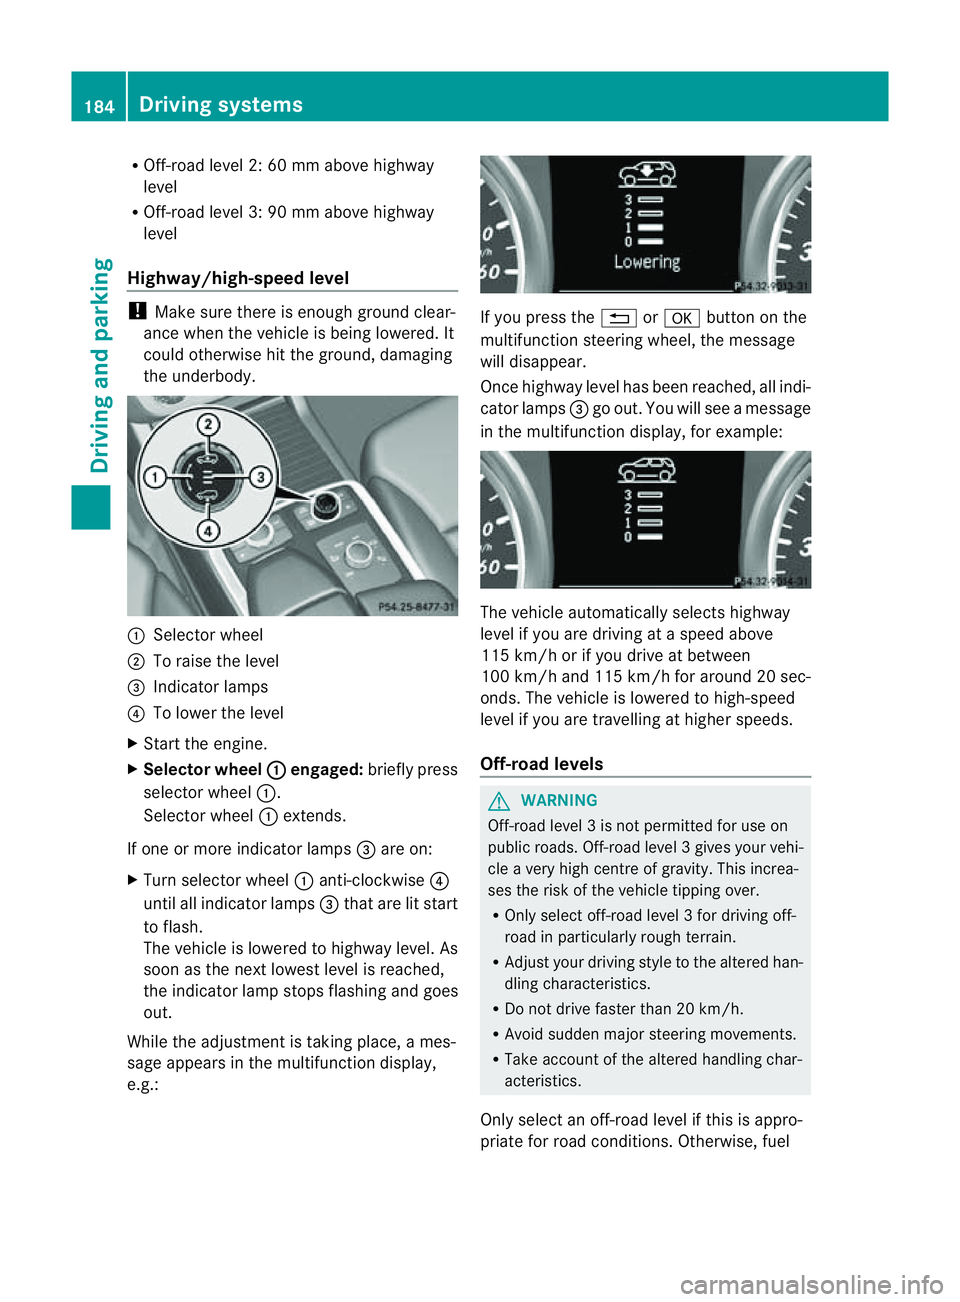
Selector wheel
; To raise the level
= Indicator lamps
? To lowe rthe level
X Star tthe engine.
X Selector wheel : engaged:
brieflypress
selecto rwheel :.
Selector wheel :extends.
If one or mor eindicato rlamps =are on:
X Turn selector wheel :anti-clockwise ?
until all indicator lamps =that are lit start
to flash.
The vehicle is lowered to highway level. As
soon as the next lowes tlevel is reached,
the indicator lam pstops flashing and goes
out.
While the adjustment is taking place, ames-
sage appears in the multifunction display,
e.g.: If you press the
%ora button on the
multifunction steerin gwheel, the message
will disappear.
Onc ehighway level has been reached, all indi-
cator lamps =go out. You will see amessage
in the multifunction display, for example: The vehicle automatically select
shighway
level if you are drivin gataspeed above
11 5k m/ horify ou drive at between
10 0k m/ hand 11 5km/ hfor aroun d20sec-
onds. The vehicle is lowered to high-speed
level if you are travelling at higher speeds.
Off-road levels G
WARNING
Off-road level 3isnot perm itted for use on
public roads. Off-road leve l3gives your vehi-
cle avery high centr eofgravity. This increa-
se st he risk of the vehi clet ippin gover.
R Onl yselec toff-road level 3for drivin goff-
road in particularl yrough terrain.
R Adjust your drivin gstyle to the altered han-
dling charac teristics.
R Do not drive faster than 20 km/h.
R Avoid sudden majo rsteering movements.
R Take account of th ealtered handling char-
acteristics.
Only select an off-road level if this is appro-
priate for road conditions. Otherwise, fuel 184
Drivin
gsystemsDrivin gand parking
Page 188 of 389

cons
umption may incr easeand handling per-
formance may be affected. X
Start the engine.
X Selecto rwheel : en
gaged: briefly press
selector wheel :.
Selector wheel :extends.
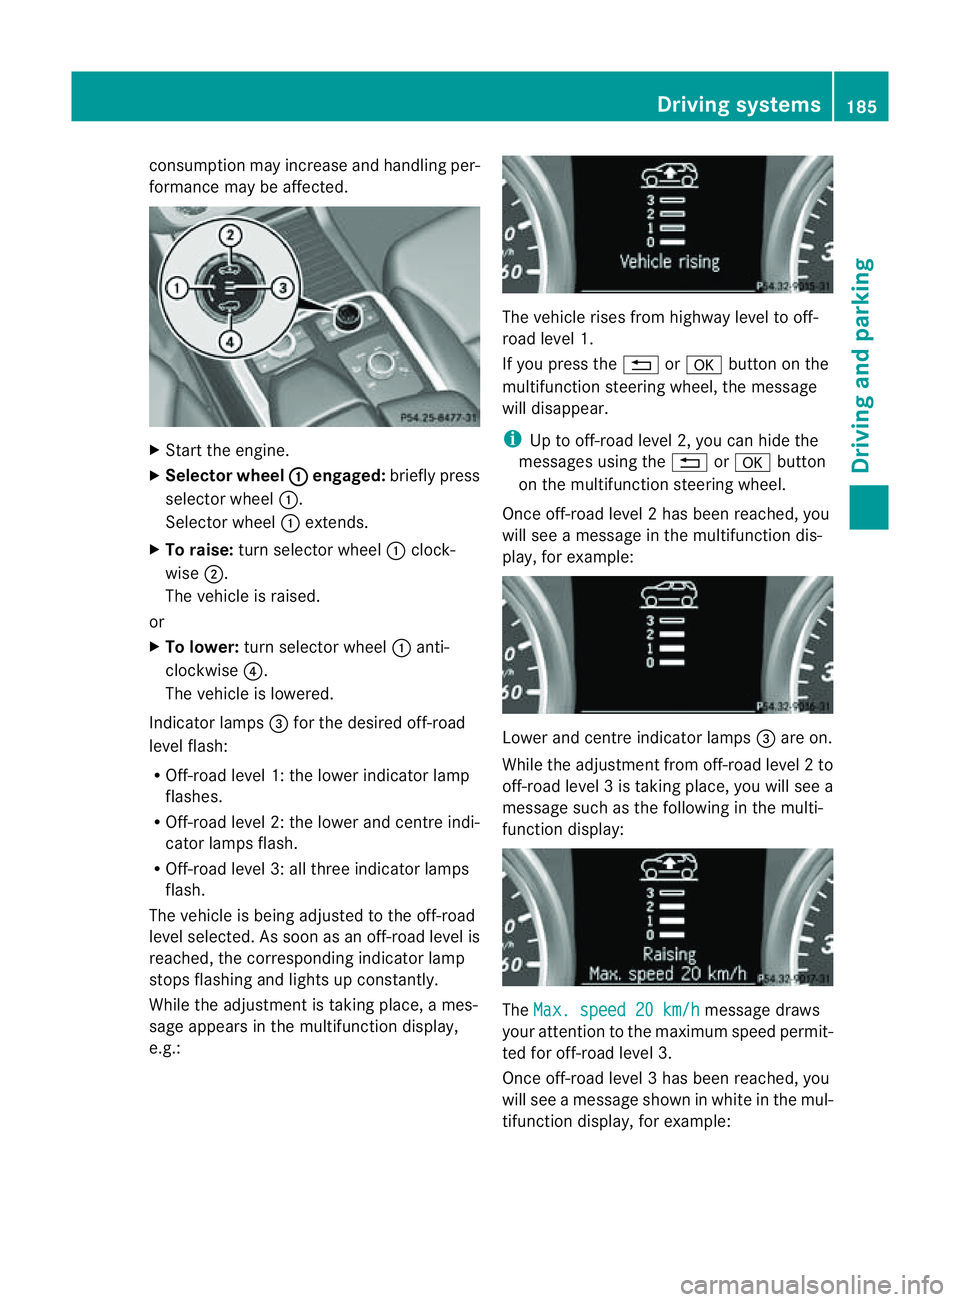
X To raise: turns elector wheel :clock-
wise ;.
The vehicle is raised.
or
X To lower: turns elector wheel :anti-
clockwise ?.
The vehicle is lowered.
Indicator lamps =for the desired off-road
level flash:
R Off-road level 1: thel ower indicator lamp
flashes.
R Off-road level 2: thel ower and centr eindi-
cator lamps flash.
R Off-road leve l3:allthree indicator lamps
flash.
The vehicle is being adjusted to the off-road
leve lselected. As soon as an off-road level is
reached, the corresponding indicator lamp
stops flashing and lights up constantly.
Whil ethe adjustment is taking place, ames-
sage appears in the multifunction display,
e.g.: The vehicle rises from highway level to off-
road level 1.
If you press the %ora button on the
multifunction stee ring wheel, the message
will disappear.
i Up to off-road level 2, you can hid ethe
messages usin gthe % ora button
on the multifunction steering wheel.
Onc eoff-roa dlevel 2has been reached, you
will see amessage in th emultifunction dis-
play, for example: Lower and
centre indicator lamps =areo n.
While the adjustment from off-ro adlevel 2to
off -ro ad level 3istaking place, you will see a
message such as the following in the multi-
function displ ay: The
Max. speed 20 km/h message draws
your attentio ntothe maximum speed permit-
ted for off-road level 3.
Onc eoff-roa dlevel 3has been reached, you
will see amessage shown in whit einthe mul-
ti fu nction display, for example: Driving systems
185Drivingand pa rking Z
Page 191 of 389

R
the electrica lsystem in thee ngine com-
partment, the battery or the fuses are tam-
pered with.
R the battery is disconnected.
If you leave the vehicl eorpark it, deactivate
the HOLD function and secure the vehicle
against rolling away.
The electric parking brake secures the vehicle
automatically if the HOLD function is activa-
ted and:
R the driver' sdoor is open and the driver's
seat belt is unfastened.
R the engin eisswitched off, unless it is auto-
matically switched off by the ECO start/
stop func tion.
R as ystem fault occurs.
R the powe rsupply is not sufficient.
On steep uphill or downhill inclines or if there
is am alfunction, the transmission may also
automatically be shifted into position P.AIRMATIC package
General notes AIRMATIC enables
asuspension tuning set-
ting to be selected and regulates the damping
behaviou rand level of your vehicle. The sys-
tem comprises aminimum of two compo-
nents. These are ADS (Adaptive Damping Sys-
tem) (Y page 188 )and level control
(Y page 189) .Your vehicle ma yalso be equip-
ped with the Active Curv eSystem
(Y page 188).
Observe the notes on driving with atrailer
(Y page 226).
ADS (Adaptive Damping System) General notes
ADS adapts th
edamping characteristic sto
the curren toperatin gand driving situation. Thi
sd epends on:
R your drivin gstyle
R the road surface conditions
R the AD Ssetting
R the vehicle level setting
Your selection remains stored even if you
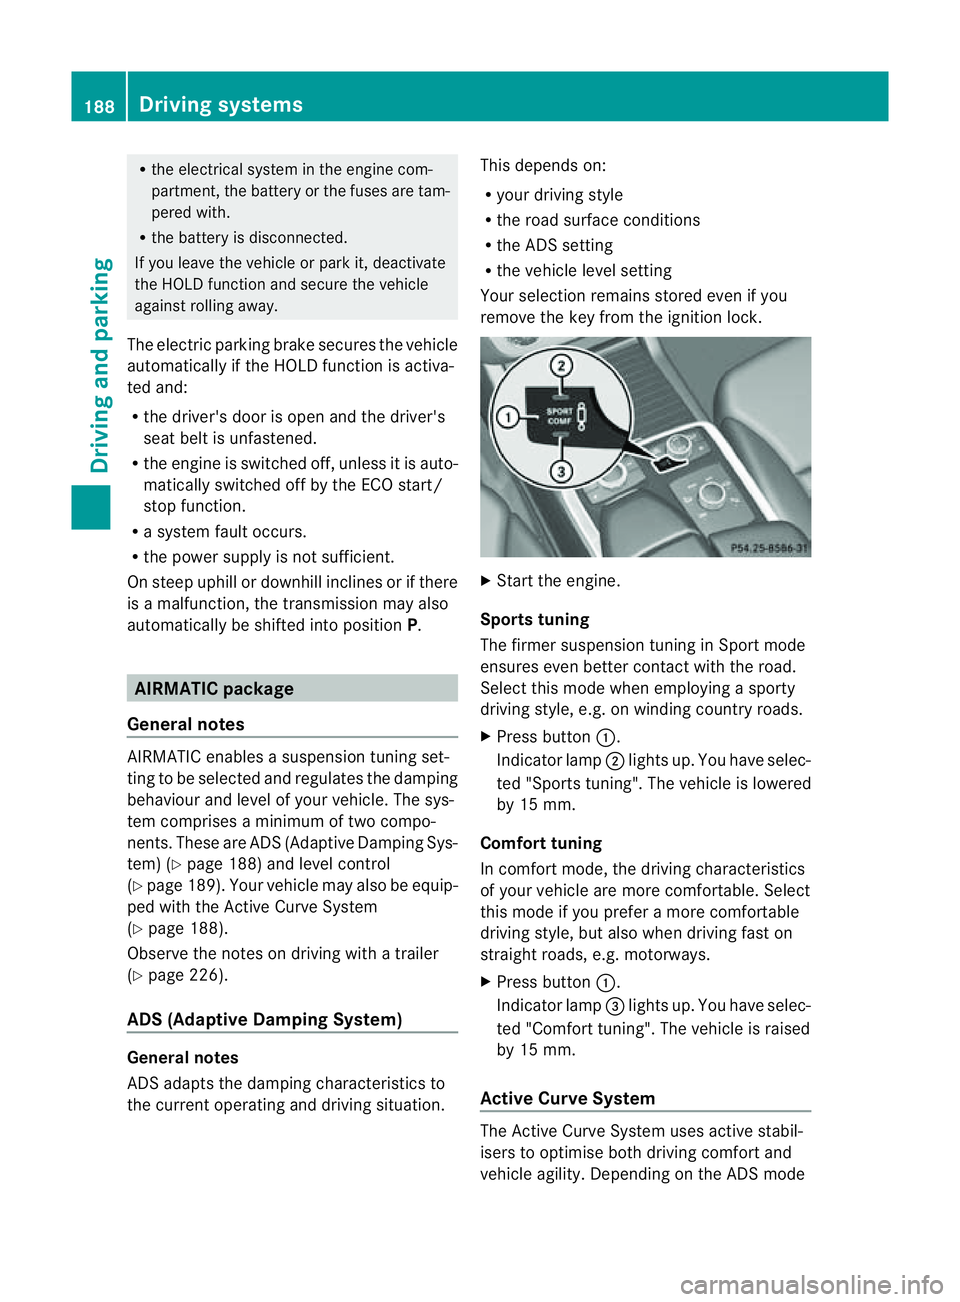
remov ethe key from the igni tion lock. X
Star tthe engine.
Sports tuning
The firmer suspension tunin ginSport mode
ensures even better contact with the road.
Select this mode when employing asporty
drivin gstyle, e.g. on winding country roads.
X Press button :.
Indicator lamp ;lights up. You have selec-
ted "Sports tuning". The vehicle is lowered
by 15 mm.
Comfort tuning
In comfort mode, the driving characteristics
of your vehicle are more comfortable. Select
this mode if you prefer amore com fortable
driving style ,but also when drivin gfast on
straight roads, e.g. motorways.
X Press button :.
Indicator lamp =lights up. You have selec-
ted "Comfort tuning". The vehicle is raised
by 15 mm.
Active Curve System The Active Curve System uses activ
estabil-
isers to optimis eboth drivin gcomfort and
vehicle agility. Depending on the AD Smode 188
Driving systemsDriving and parking
Page 192 of 389

selected (Y
page 188), the Ac tiveCurve Sys-
tem also changes the setting.
If you select ADS comfort mode:
R rolling movement is reduced in the event of
changing surface undulations.
R the roll angle when cornering is reduced.
R the driving style is agile.
If you select ADS sport mode:
R the roll angle is reduced significantly.
R the driving style is even more agile.
Leve lcontrol Import
ants afety notes
Leve lcontrol adapts the vehicle leve lauto-
matically to the current operating and driving
situation. This results in reduced fuel con-
sumption and improved handling.
If you select ADS comfort mode
(Y page 188), the vehicle is lowered to high-
spee dlevel as the speed increases. As the
vehicle decelerates, the vehicle is raised back
up to highway level.
If you select ADS sport mode (Y page 188),
the vehicle skips highway level and lowers
directly to high-speed level dependin gonthe
basic setting (Y page 189).
Make changes to the vehicle level while the
vehicle is in motion. This enables the vehicle
to adjust to the new level as quickly as pos-
sible.
The vehicle level ma ychange visibly if you
par kthe vehicle and the outside temperature
changes. If the temperature drops, the vehi-
cle level lowers; with an increase in temper-
ature, the vehicle level rises.
If you unlock the vehicle or open adoor, the
vehicle begins to compensat efor load dis-
crepancies while still parked. However, for
significant leve lchanges, e.g. after the vehi-
cle has been stationary for along period, the
engin emust be on. For safety reasons, the
vehicle is only lowered when the doors are
closed .Lowering is interrupted if adoor is opened; it con
tinues once the doo rhas been
closed. G
WARNING
Make sure that nobody is near the wheel arch
or vehicle underside when you make achange
to the vehicle level. Otherwise, you or others
ma ybet rapped. G
WARNING
Always select as lo wavehicle level as possi-
ble. If the vehicle level is high, the vehicle
centre of gravity shifts upwards. This increa-
ses the risk of the vehicle tipping over.
Adapt your driving style to suit the vehicle
level. ESP ®
cannot reduc ethe risk of an acci-
dent if you drive too fast. ESP ®
cannot over-
rid ethe laws of physics.
! When driving on extremel yrough terrain,
select ahigh vehicle level in good time.
Make sure there is always sufficient ground
clearance to prevent damage to the vehi-
cle.
For information abou tdriving off-roa d, see
( Y page 166).
Basic settings
The exten ttowhich the vehicle is rai sedor
lowered depends on the basic setting selec-
ted. Select raised level for off-road driving or
highway/high-spee dlevel for normal roads.
The indiv idua lvehicle levels differ from high-
way level as follows:
R Highway level: +/ –0mm
R High-speed level: –15 mm
R Raised level: +60 mm
Raise dlevel
Only select raise dlevel if this is appropriate
for the road conditions. Otherwise, fuel con-
sumption may increase and handling may be
affected. Driving systems
189Drivingand parking Z