2011 MERCEDES-BENZ M-CLASS SUV lock
[x] Cancel search: lockPage 292 of 389
Problem Possible causes/consequences and
M Solutions
֌
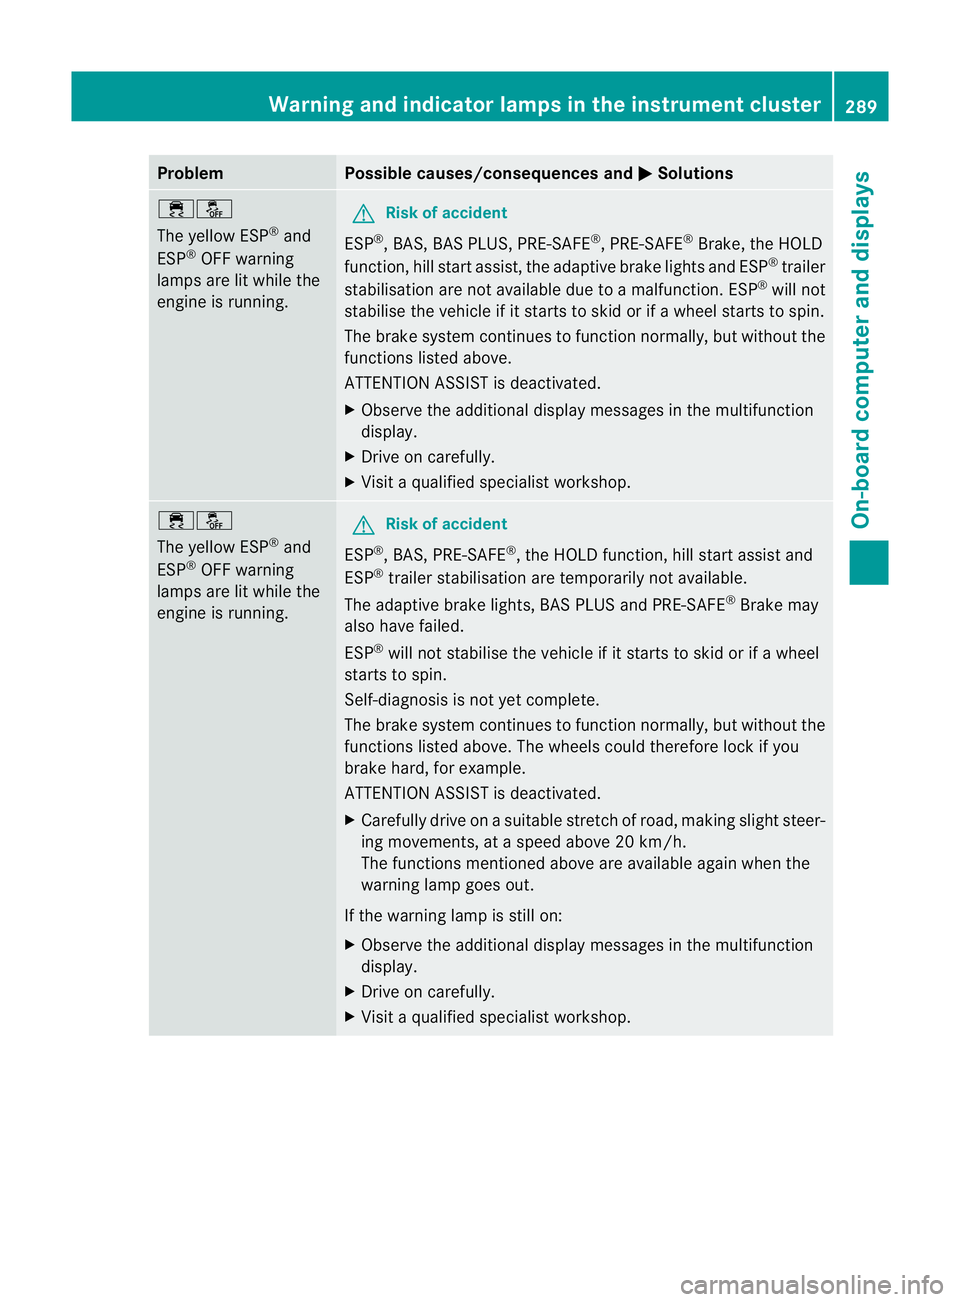
The yellow ESP
®
and
ESP ®
OFF warning
lamps ar elit while the
engine is running. G
Risk of accident
ESP ®
,B AS ,BAS PLUS, PRE-SAFE ®
,P RE-SAFE ®
Brake, the HOLD
function, hill start assist, the adaptive brake lights and ESP ®
trailer
stabilisatio nare not availabl edue to amalfunction .ESP ®
will not
stabilise the vehicl eifitstarts to skid or if awheel starts to spin.
The brake system con tinues to function normally, but without the
functions listed above.
ATTENTION ASSIST is deactivated.
X Observe the additional displa ymessages in the multifunction
display.
X Drive on carefully.
X Visit aqualified specialist workshop. ֌
The yellow ESP
®
and
ESP ®
OFF warning
lamps are lit while the
engine is running. G
Risk of accident
ESP ®
,B AS ,PRE-SAFE ®
,t he HOL Dfunction, hill start assis tand
ESP ®
trailer stabilisation are temporarily not available.
The adaptive brake lights ,BAS PLUS and PRE-SAFE ®
Brake may
also have failed.
ESP ®
will not stabilis ethe vehicle if it starts to skid or if awheel
starts to spin.
Self-diagnosis is not yet complete.
The brake system con tinues to function normally, but without the
functions listed above .The wheels could therefor elock if you
brake hard ,for example.
ATTENTIO NASSIST is deactivated.
X Carefully drive on asuitable stretc hofroad, makin gslight steer-
ing movements, at aspeed above 20 km/h.
The functions mentioned above are available again when the
warning lamp goes out.
If the warning lamp is still on:
X Observe the additional display messages in the multifunction
display.
X Drive on carefully.
X Visit aqualified specialist workshop. Warnin
gand indicator lam psin the instru ment cluster
289On-boardcomput er anddisplays Z
Page 295 of 389
Problem Possible causes/consequences and
M Solutions
?
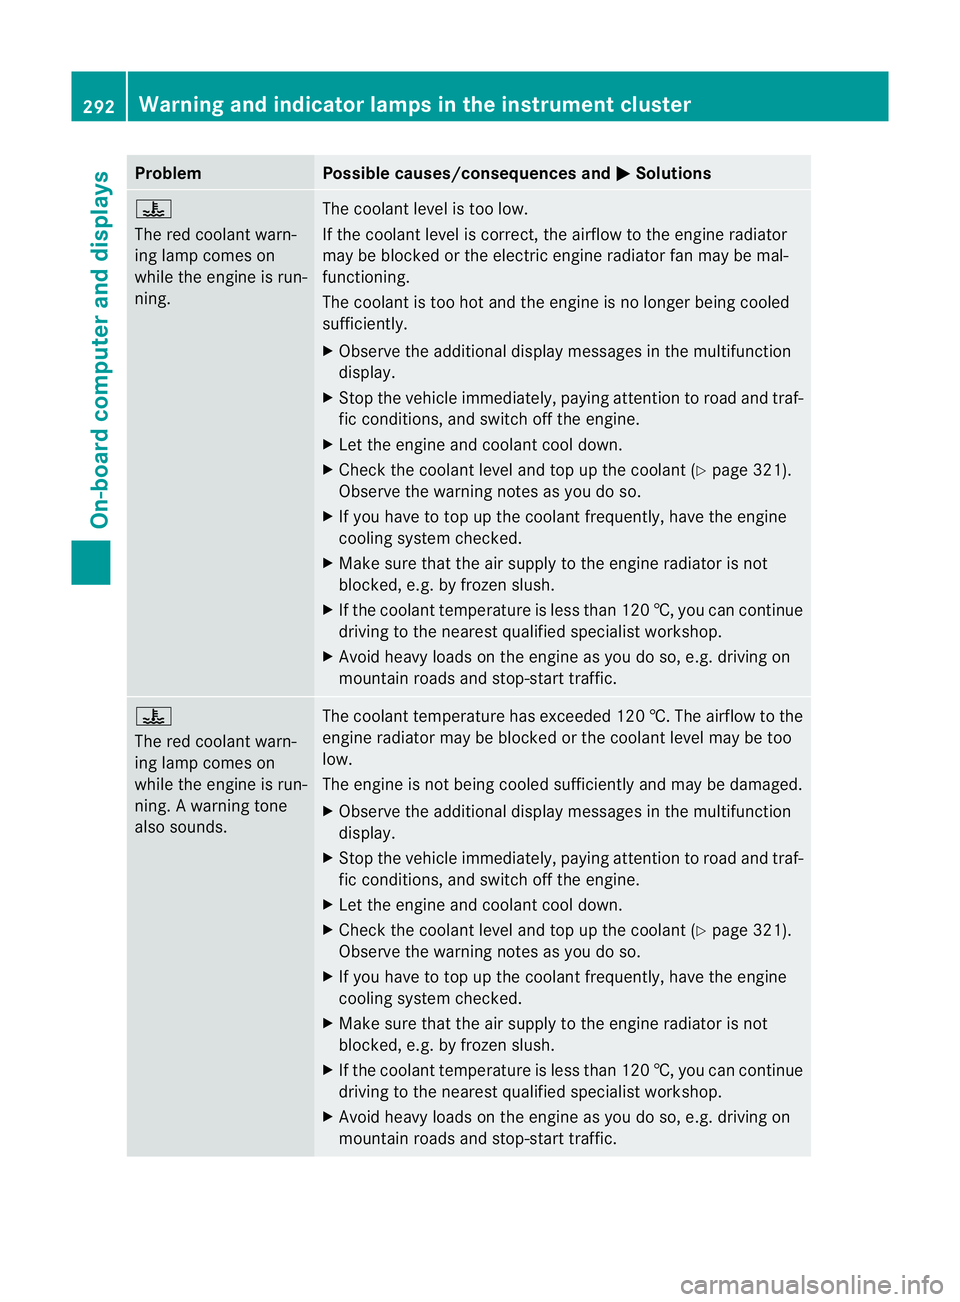
The red coolant warn-
ing lam
pcomes on
while the engin eisrun-
ning. The coolant level is too low.
If the coolant level is correct, the airflow to the engine radiator
may be blocked or the electric engine radiator fan may be mal-
functioning.
The coolant is too hot and the engine is no longer being cooled
sufficiently.
X Observe the additional display messages in the multifunction
display.
X Stop the vehicle immediately, paying attention to road and traf-
fic conditions, and switch off the engine.
X Let the engine and coolant cool down.
X Check the coolant level and top up the coolant (Y page 321).
Observe the warning notes as you do so.
X If you have to top up the coolant frequently, have the engine
cooling system checked.
X Make sure that the air suppl ytot he engin eradiator is not
blocked, e.g. by frozen slush.
X If the coolant temperature is less than 120 †, you can continue
driving to the nearest qualified specialis tworkshop.
X Avoid heav yloads on the engin easyou do so, e.g. driving on
mountain roads and stop-star ttraffic. ?
Th
er ed coolan twarn-
ing lamp comes on
while the engine is run-
ning. Awarning tone
also sounds. The coolant temperature has exceeded 120 †. The airflow to the
engine radiator may be blocked or the coolant level may be too
low.
The engine is not being cooled sufficiently and may be damaged.
X Observe the additional display message sint he multifunc tion
display.
X Stop the vehicle immediately, paying attention to roa dand traf-
fic conditions, and switch off the engine.
X Let the engine and coolant cool down.
X Check the coolant level and top up the coolant (Y page321).
Observe the warning notes as you do so.
X If you have to top up the coolan tfrequently, have th eengine
cooling system checked.
X Make sure that the air supply to the engine radiato risnot
blocked, e.g. by frozen slush.
X If the coolant temperatur eisless than 12 0†,you can con tinue
driving to the neares tqualified specialist workshop.
X Avoid heavy loads on the engine as you do so, e.g. driving on
mountain roads and stop-s tart traffic. 292
Warning and indicator lamps in the instrument clusterOn-boar
dcomputer and displays
Page 299 of 389
Usefu
linfor mati on
i This Owner's Manual describes all models
and all standard and optional equipment
available to your vehicle at the time of pub-
lication of the Owner's Manual. Country-
specific deviation sare possible .Please
not ethat your vehicle ma ynot be equipped
with all featur es described. This also
applies to safety-releva ntsystems and
functions.
i Please read the information on qualified
specialist workshops (Y page 24).Loading guidelines
G
WARNING
Secur eand position the load as described in
the loading guidelines.
Otherwise, vehicl eoccupan tscould
be injured by the loa dbeingthrown around in
th ee vent of sharp braking ,asudden change
in directio noranaccident.
You wil lfind further information in the "Secur-
ing aload" section.
Even if you follow all the loadin gguidelines,
the load will increase the risk of injury in the
event of an accident. G
WARNING
Keep the tailgate closed when the engine is
running. Otherwise, you could be poisoned by
exhaust fumes enterin gthe vehicle.
The handling characteristics of aladen vehi-
cle are dependent on the distribution of the
load within the vehicle. For this reason, you
should observe the following notes when
transporting aload:
R when transpor ting aload, never exceed the
maximum permissible gross vehicle weight or the permissible axle loads for the vehicle
(includin goccupants).
R position heavy loads as far forward saspos-
sible and as low down in the load compart-
men tasp ossible.
R the load must not protrude abov ethe upper
edge of the seat backrests.
R always plac ethe load against the rea ror
front seat backrests .Make sure that the
seat backrests are securely locked into
place.
R hook in the safety net when loading.
R always place the load behind unoccupied
seats if possible.
R secure the load with sufficiently stron gand
wear-resistant lashing material. Pad sharp
edges for protection.
i Load restraints are available at any quali-
fied specialis tworkshop, e.g. aMercedes-
Benz Servic eCentre. Stowage areas
Stowage compartments
Important safety notes G
WARNING
The stowage compartments must be closed
when item sare store dinthem. Luggage nets
ar en ot designed to secur eheavy item sof
luggage.
You or other vehicle occupant scould be
injure dbyo bjectsbeing thrown around if you:
R brak esharply
R change direction suddenly
R arei nvolved in an accident
Sharp-edge dand fragile object smust not be
placed in the luggag enet. 296
Stowage areasStowing and features
Page 300 of 389
Fron
tstowage compartments Glove compartment
i
The glove compartment can be cooled
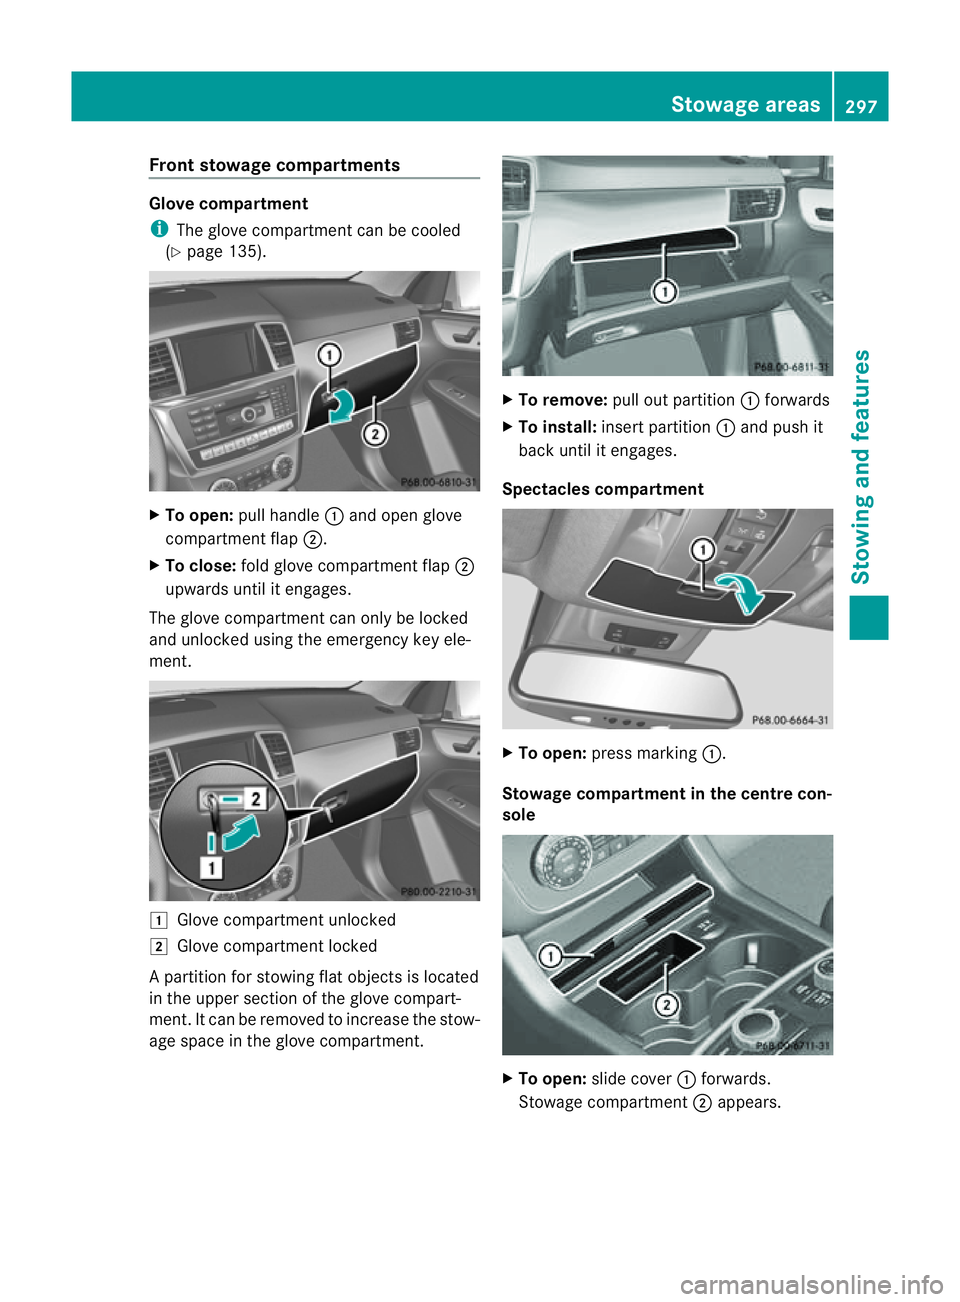
(Y page 135). X
To open: pull handle :and open glove
compartment flap ;.
X To close: fold glove compartment flap ;
upwards until it engages.
The glove compartmen tcan only be locked
and unloc kedu singthe emergenc ykey ele-
ment. 1
Glove compartmen tunlocked
2 Glove compartment locked
Ap artition for stowin gflat object sislocated
in th eupper sectio nofthe glov ecompart-
ment. It can be removed to increase the stow-
age space in the glove compartment. X
To remove: pull out partition :forwards
X To install: insert partition :and push it
back until it engages.
Spectacles compartment X
To open: press marking :.
Stowage compartment in th ecentre con-
sole X
To open: slide cover :forwards.
Stowage compartment ;appears. Stowage areas
297Stowingandfeatures Z
Page 302 of 389

X
Push cover =forwar duntil it is lying on the
rear sea tarmrest. Enlargin
gthe luggag ecompartment
Important safety notes G
WARNING
Do not carr yheavy or hard object sinsid ethe
vehicle or in the luggag ecompartmen tunless
they are secured.
Otherwise, you and othe rvehicle occupants
could be injured by object sbeing thrown
around the vehicle in the event of sharp brak-
ing, asudden change in direction or an acci-
dent.
When using the luggag ecompartment
enlargement, you should always clip in the
safet ynet,ifath and. G
WARNING
Always drive with the tailgat eclosed. Exhaust
fumes could otherwise enter the vehicle inte-
rior. G
WARNING
Do not fold the backrest ont othe folded-down
seat cushi ons.Ift he seat cushi ons arefolded
down, luggage can be thrown over the back-
rest int othe passenger compar tment,e.g.
duri ngheav ybraking ,sudden changes of
direction or in the even tofanaccident.You
coul dcause an accident or cause injury to
yourself and others. !
Fold the seat cushion upwards before
folding the rear benc hseat forward. Other-
wise, the back rests ma ybedamaged.
When the backrest is folded forwards, the
fron tseats can notb em oved to their rear-
most position .Otherwi se,the fr ontseats
and the rea rbenc hseat could be damaged.
The left -hand and right-hand rear seat backr-
ests can be folded forwards separately to
increase the luggag ecompartmen tcapacity.
Folding the rear bench seat forwards i
If the driver' sorfront-passenge rseat is
set for alarger person, it maynot be pos-
sibl etof old the rea rbench seat forwards.
In this case, mov ethe fron tseats as far
forwar daspossible.
X Move the head restraint stothe lowest
position (Y page 95).
X Fold seat cushion :upwards. X
Pull release cat ch; upwards in the direc-
tion of the arrow until the backrest is com-
pletely unlocked. Stowag
eareas
299Stowing andfeatures Z
Page 305 of 389
X
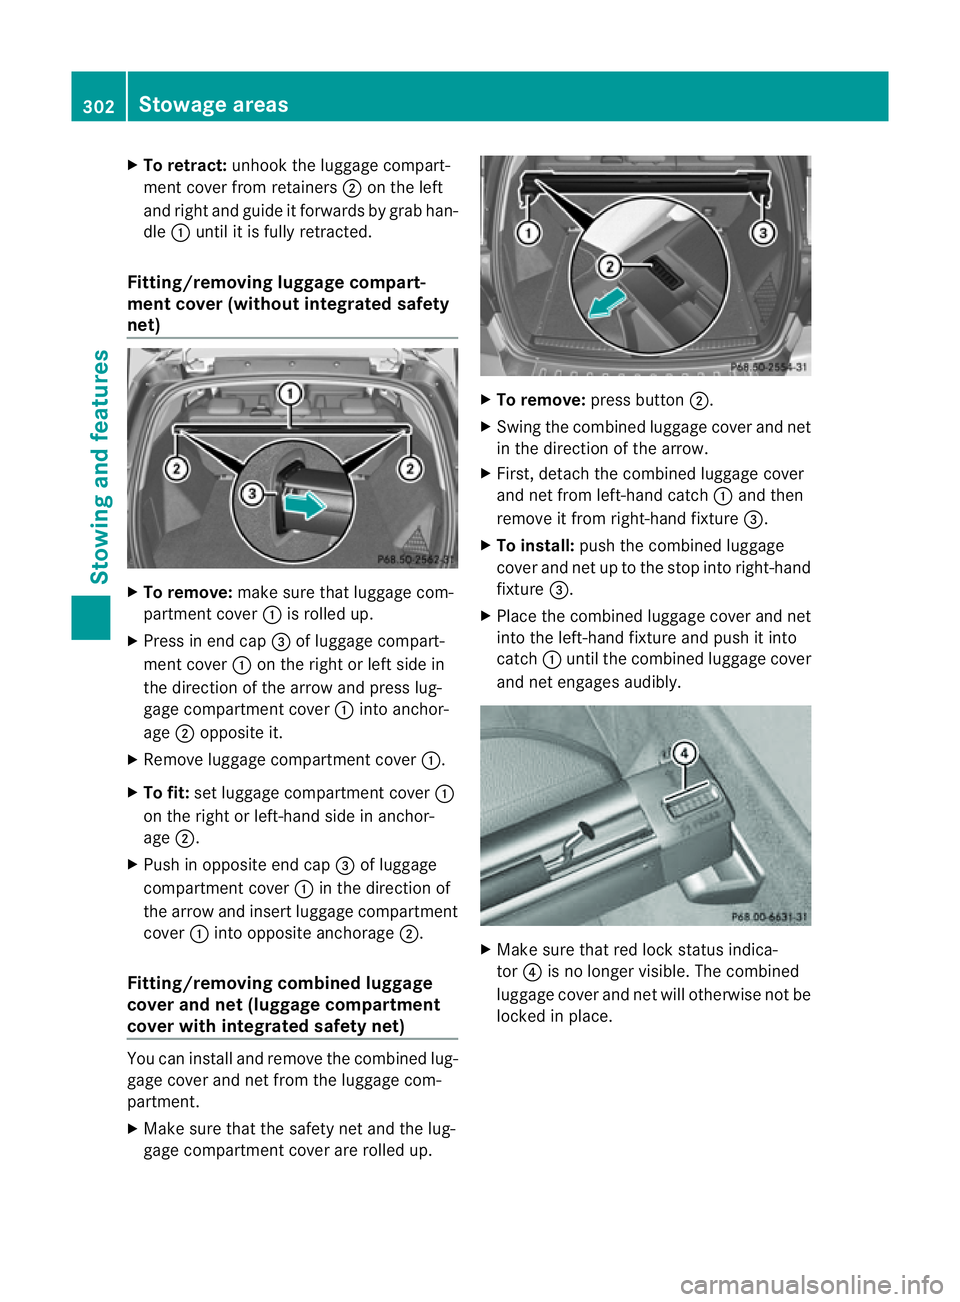
To retract: unhook the luggage compart-
ment cove rfrom retainers ;on th eleft
and right and guid eitforwards by grab han-
dle :untilit is full yretract ed.
Fitting/removing luggag ecom part-
men tcover (without integrated safety
net) X
To remov e:make sure th at luggage com-
partment cover :is rolle dup.
X Press in en dcap = of luggage compart-
men tcover :on th eright or left side in
th ed irection of th earrow and pres slug-
gage compartment cover :intoa nchor-
age ;opposit eit.
X Remov eluggage compartment cover :.
X To fit: set luggage compar tment cover:
on the right or left -hand side in anchor-
age ;.
X Push in opposite end cap =of luggage
compartment cover :in the direction of
the arrow and insert luggag ecompartment
cover :intoo pposite anchorage ;.
Fitting/removing combined luggage
cover and net (luggage compartment
cover with integra teds afety net) Yo
uc an install and remove the combined lug-
gage cover and net from the luggag ecom-
partment.
X Make sure that the safet ynet and the lug-
gage compartmen tcover ar erolled up. X
To remove: press button ;.
X Swin gthe combined luggage cover and net
in the direction of the arrow.
X First ,detac hthe combined luggage cover
and net from left-hand cat ch: and then
remove it from right-hand fixture =.
X To install: push the combined luggage
cover and net up to the stop into right-hand
fixture =.
X Place the combined luggag ecover and net
int ot he left-hand fix tureand push it into
catch :until the combined luggag ecover
and net engages audibly. X
Make sure that red lock status indica-
tor ?is no longer visible. The combined
luggage cover and net will otherwise not be
locked in place. 302
Stowage areasStowing and features
Page 307 of 389

Inserting th
ebracket sintot he loading
rail X
Insert bracket :into th ecentr eofl oading
rail ?.
X Press release button ;and push
bracket :intothe desired position in load-
ing rail ?.
X Let go of rel ease button ;.
X Press locking button =.
Bracket :is locked in loading rail ?.
X If necessary, fol dlashin geyelet A
upwards. G
WARNING
Distribute the loa donthe lashing eyelets
evenly.
Otherwise, vehicle occupants could be
injured by objects being thrown around if you:
R brake shar ply
R chang edirection suddenly
R are involved in an accident
Please observe the loading guidelines.
Luggage holder The luggage holder can be use
dtosecure
ligh tloads against the side wall of the luggage
compartment to prev entthem from moving
around.
! Only use the luggage holder to secure
loads with amaximum weight of 7kgand
with dimensions that the luggage holder
can safel yand securely contain. X
To install: insert two brackets Ainto the
left or right loading rail (Y page303).
X Press releas ebutton :of the luggage
holder and pull the strap out slightly.
X Insert luggag eholder ;intob rackets A
and ,while doing so, press release button
= and push the luggage holder downwards
until it engages.
X Press release button :of the luggage
holder and pull the strap out in the direction
of the arrow.
X Plac ethe load between the strap and the
luggage compartment side wall.
X Using one hand, press locking button :of
the luggage holder.
X With your other hand, let the strap go slowly
until the load is secured.
X Make sur ethat locking button ?on brack-
ets Ais pressed.
This keeps brackets Ain plac eonthe
loading rail.
X To remove: press release button =on
respective bracket Aand remove luggage
holder ;by pulling upwards and out.
Telescopic rod The telescopic rod can be used to secure the
load against the rea
rseats to prevent it from
moving around. 304
Stowage areasStowing and features
Page 308 of 389
X
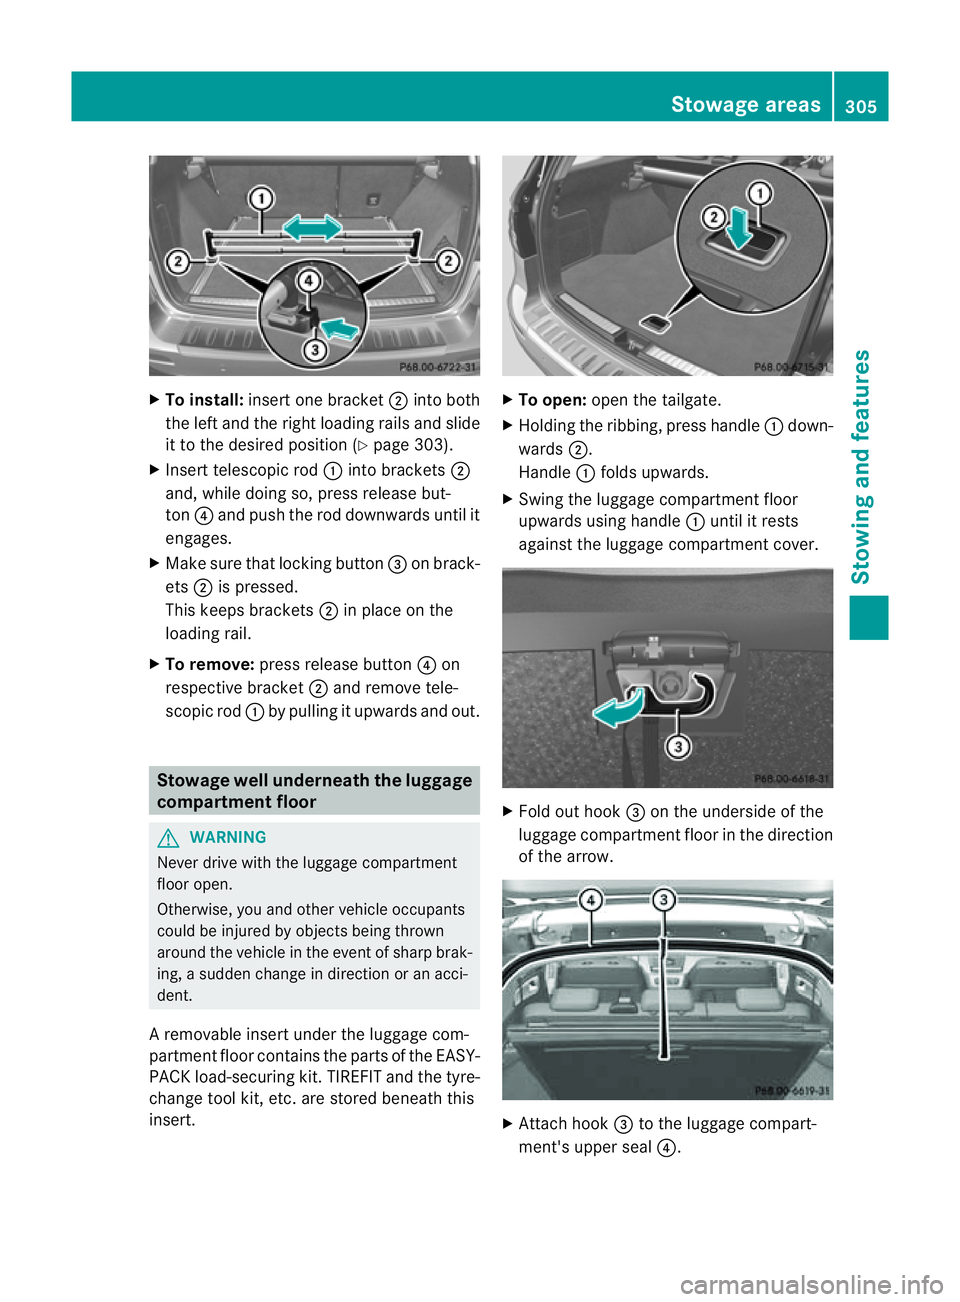
To install: insert one bracket ;into both
the left and the right loading rai lsand slide
it to the desired positio n(Ypage 30 3).
X Insert telescopic rod :into brackets ;
and ,while doing so, press release but-
ton ?and push the rod downwards until it
engages.
X Make sur ethat locking button =on brack-
ets ;is pressed.
This keeps brackets ;in plac eonthe
loading rail.
X To remove: press release button ?on
respe ctive bracket ;and remov etele-
scopic rod :by pullin gitupwards and out. Stowage well unde
rneath the luggage
compartment floor G
WARNING
Never drive with the luggage compar tment
floor open.
Otherwise, you and other vehicle occupants
could be injured by objects being thrown
around the vehicle in the event of sharp brak-
ing, asudden change in direction or an acci-
dent.
Ar emovable inser tunder the luggage com-
partmen tfloor contain sthe par tsof the EASY-
PACK load- securingkit.T IREFIT and th etyre-
change tool kit, etc. are stored beneath this
insert. X
To open: openthe tailgate.
X Holding the ribbing, press handle :down-
wards ;.
Handle :folds upwards.
X Swing the luggage compartment floor
upwards usin ghandle :until it rests
against the luggage compartment cover. X
Fold out hook =on the underside of the
luggage compartment floor in the direction
of the arrow. X
Attach hook =to the luggage compart-
ment' supper seal ?. Stowage areas
305Stowingandfeatures Z