2011 INFINITI QX56 sensor
[x] Cancel search: sensorPage 4102 of 5598
FRONT POWER WINDOW SWITCH (PASSENGER SIDE)PWC-17
< ECU DIAGNOSIS INFORMATION >
C
DE
F
G H
I
J
L
M A
B
PWC
N
O P
Fail-safeINFOID:0000000006217275
FAIL-SAFE CONTROL
Switches to fail-safe control when malfunction is detected in encoder signal that detects up/down speed and
direction of door glass. Switches to fail-safe control w hen a signal that is out of the specified value is detected
between the fully closed position and the actual position of the glass.
If fail-safe control, the system changes to a non-in itialized condition and the following function do not operate.
Auto-up operation
Anti-pinch function
Retained power function
When fail-safe control is activated, perform initialization procedure to recover. If a malfunction is detected in
power window switch or more, fail-safe control is activated again.
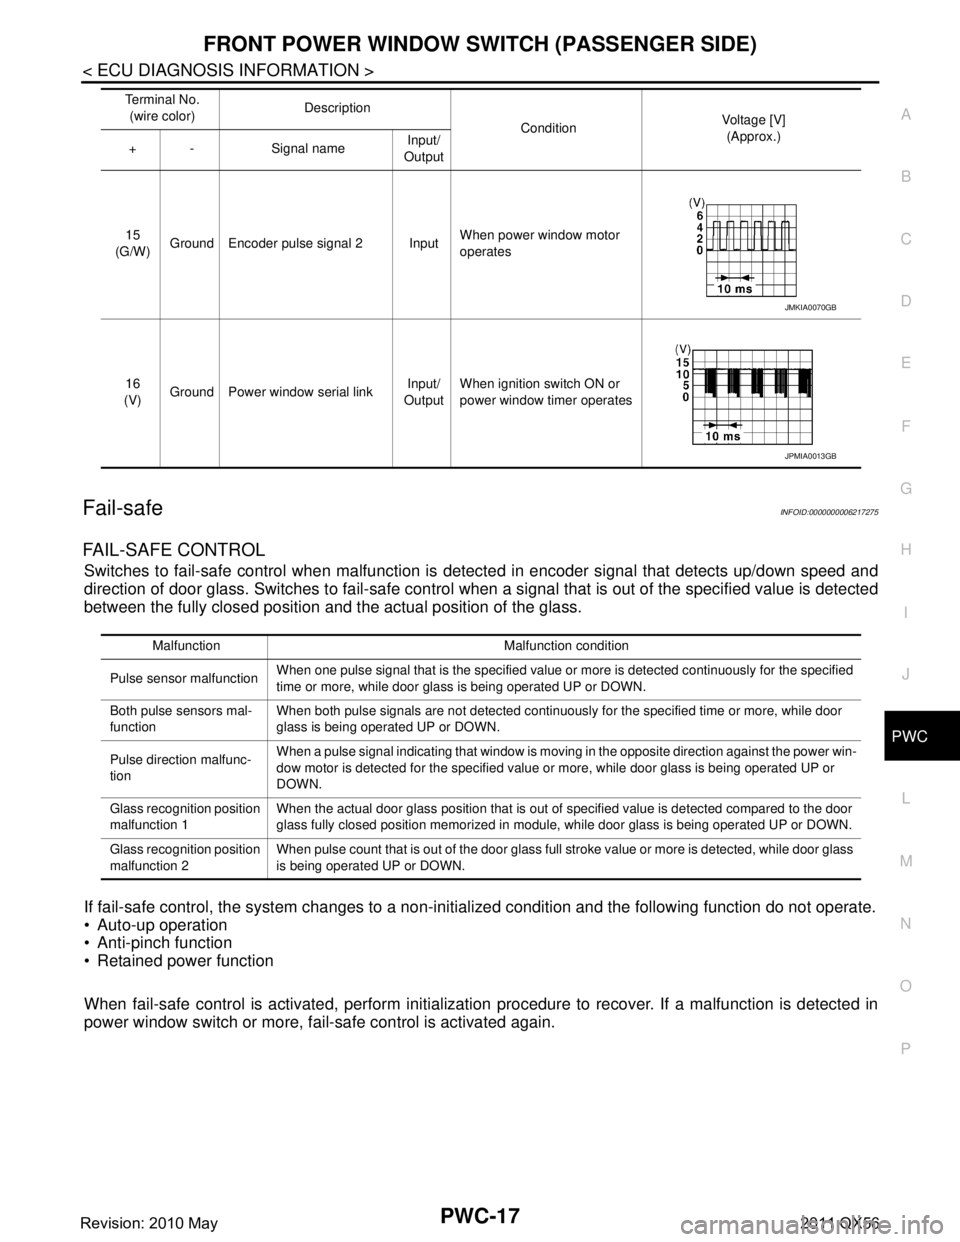
15
(G/W) Ground Encoder pulse signal 2 Input When power window motor
operates
16
(V) Ground Power window serial link Input/
Output When ignition switch ON or
power window timer operates
Te r m i n a l N o .
(wire color) Description
ConditionVoltage [V]
(Approx.)
+ - Signal name Input/
Output
JMKIA0070GB
JPMIA0013GB
Malfunction Malfunction condition
Pulse sensor malfunction When one pulse signal that is the specified value or more is detected continuously for the specified
time or more, while door glass is being operated UP or DOWN.
Both pulse sensors mal-
function When both pulse signals are not detected continuously for the specified time or more, while door
glass is being operated UP or DOWN.
Pulse direction malfunc-
tion When a pulse signal indicating that window is moving in the opposite direction against the power win-
dow motor is detected for the specified value or more, while door glass is being operated UP or
DOWN.
Glass recognition position
malfunction 1 When the actual door glass position that is out of specified value is detected compared to the door
glass fully closed position memorized in module, while door glass is being operated UP or DOWN.
Glass recognition position
malfunction 2 When pulse count that is out of the door glass full stroke value or more is detected, while door glass
is being operated UP or DOWN.
Revision: 2010 May2011 QX56
Page 4104 of 5598
REAR POWER WINDOW SWITCH LHPWC-19
< ECU DIAGNOSIS INFORMATION >
C
DE
F
G H
I
J
L
M A
B
PWC
N
O P
Fail-safeINFOID:0000000006217277
FAIL-SAFE CONTROL
Switches to fail-safe control when malfunction is detected in encoder signal that detects up/down speed and
direction of door glass. Switches to fail-safe control w hen a signal that is out of the specified value is detected
between the fully closed position and the actual position of the glass.
If fail-safe control, the system changes to a non-in itialized condition and the following function do not operate.
Auto-up operation
Anti-pinch function
Retained power function
When fail-safe control is activated, perform initialization procedure to recover. If a malfunction is detected in
power window switch or more, fail-safe control is activated again.
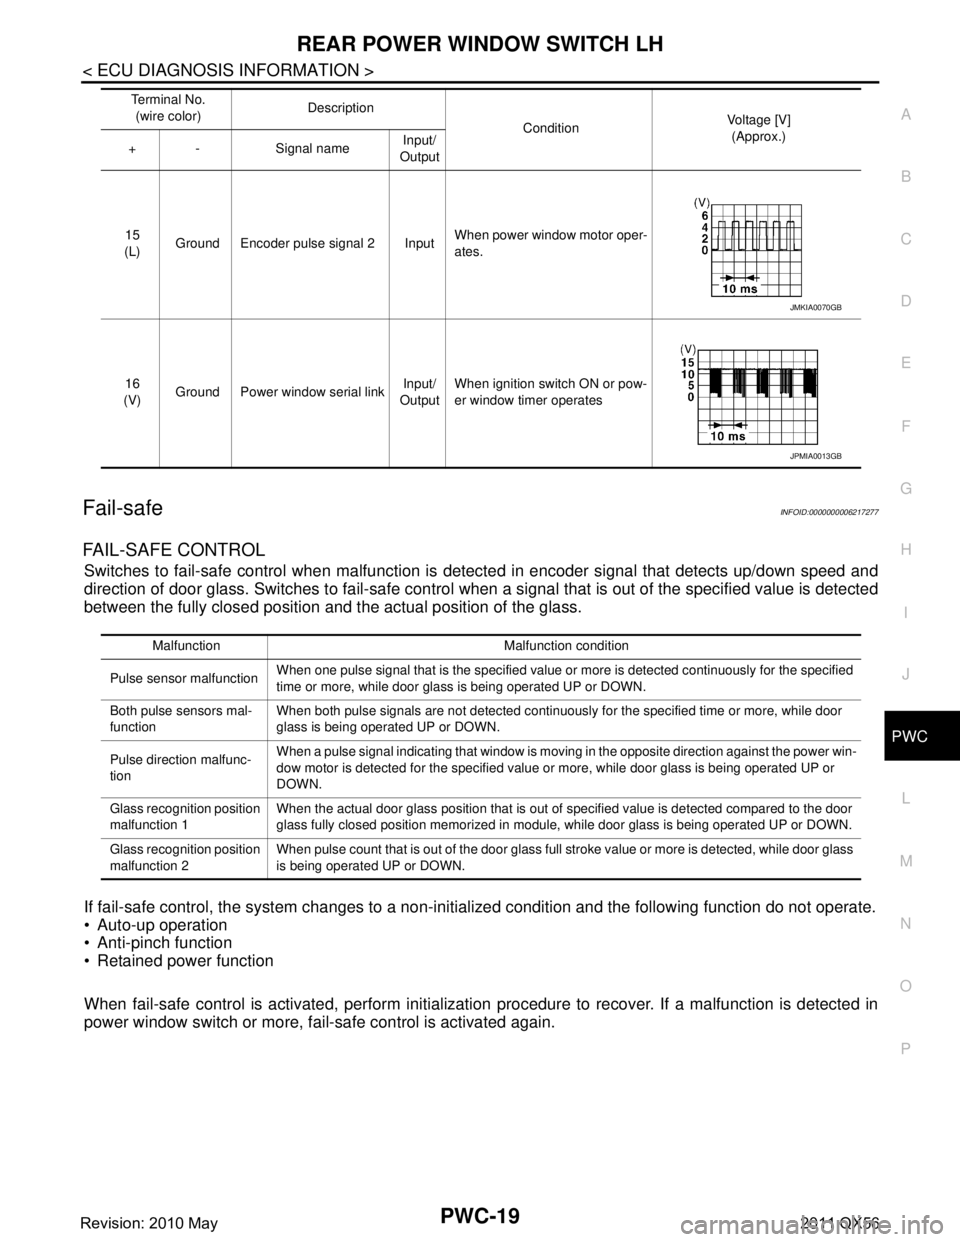
15
(L) Ground Encoder pulse signal 2 Input When power window motor oper-
ates.
16
(V) Ground Power window serial link Input/
Output When ignition switch ON or pow-
er window timer operates
Te r m i n a l N o .
(wire color) Description
ConditionVoltage [V]
(Approx.)
+ - Signal name Input/
Output
JMKIA0070GB
JPMIA0013GB
Malfunction Malfunction condition
Pulse sensor malfunction When one pulse signal that is the specified value or more is detected continuously for the specified
time or more, while door glass is being operated UP or DOWN.
Both pulse sensors mal-
function When both pulse signals are not detected continuously for the specified time or more, while door
glass is being operated UP or DOWN.
Pulse direction malfunc-
tion When a pulse signal indicating that window is moving in the opposite direction against the power win-
dow motor is detected for the specified value or more, while door glass is being operated UP or
DOWN.
Glass recognition position
malfunction 1 When the actual door glass position that is out of specified value is detected compared to the door
glass fully closed position memorized in module, while door glass is being operated UP or DOWN.
Glass recognition position
malfunction 2 When pulse count that is out of the door glass full stroke value or more is detected, while door glass
is being operated UP or DOWN.
Revision: 2010 May2011 QX56
Page 4106 of 5598
REAR POWER WINDOW SWITCH RHPWC-21
< ECU DIAGNOSIS INFORMATION >
C
DE
F
G H
I
J
L
M A
B
PWC
N
O P
Fail-safeINFOID:0000000006217279
FAIL-SAFE CONTROL
Switches to fail-safe control when malfunction is detected in encoder signal that detects up/down speed and
direction of door glass. Switches to fail-safe control w hen a signal that is out of the specified value is detected
between the fully closed position and the actual position of the glass.
If fail-safe control, the system changes to a non-in itialized condition and the following function do not operate.
Auto-up operation
Anti-pinch function
Retained power function
When fail-safe control is activated, perform initialization procedure to recover. If a malfunction is detected in
power window switch or more, fail-safe control is activated again.
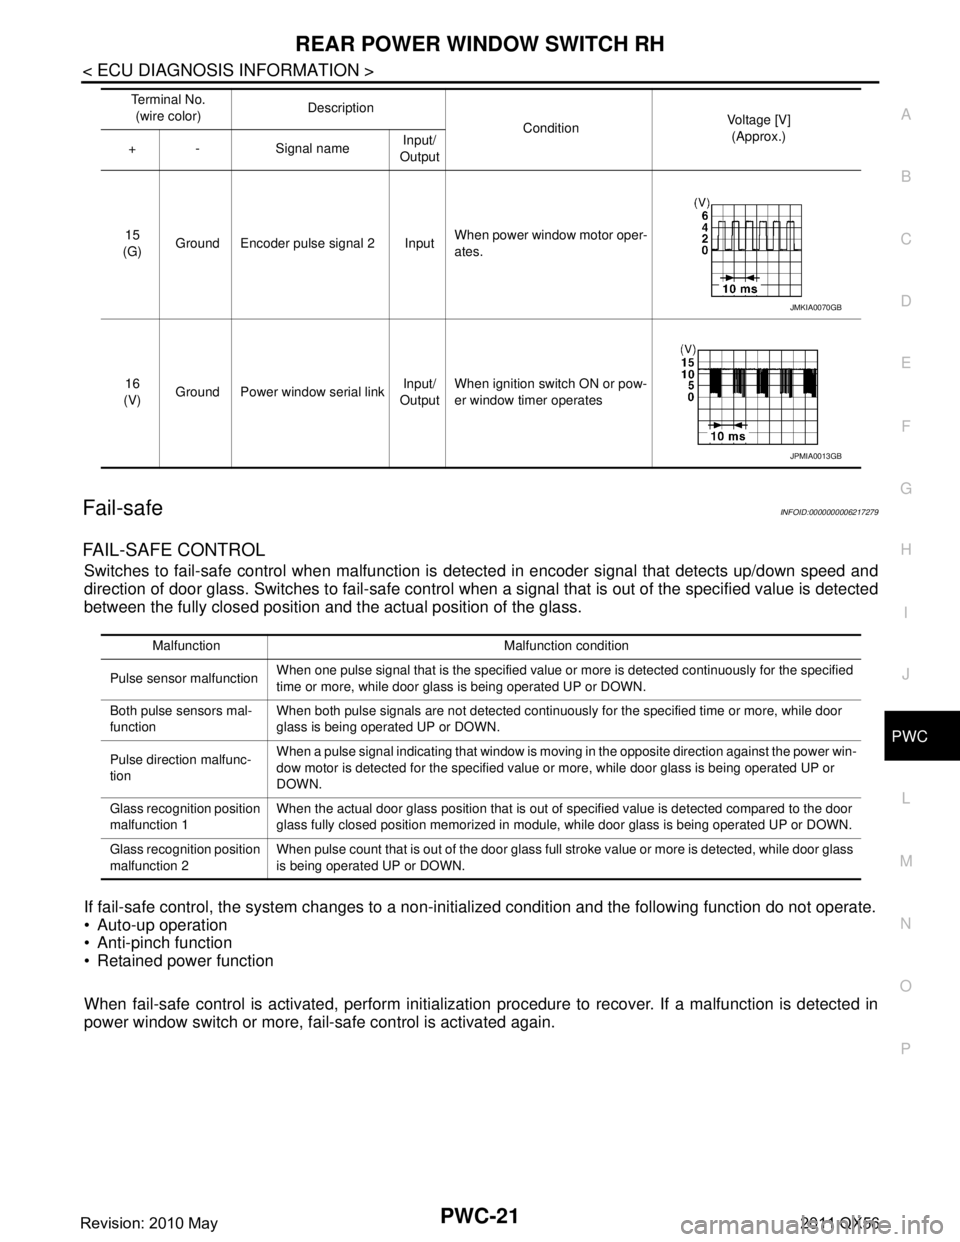
15
(G) Ground Encoder pulse signal 2 Input When power window motor oper-
ates.
16
(V) Ground Power window serial link Input/
Output When ignition switch ON or pow-
er window timer operates
Te r m i n a l N o .
(wire color) Description
ConditionVoltage [V]
(Approx.)
+ - Signal name Input/
Output
JMKIA0070GB
JPMIA0013GB
Malfunction Malfunction condition
Pulse sensor malfunction When one pulse signal that is the specified value or more is detected continuously for the specified
time or more, while door glass is being operated UP or DOWN.
Both pulse sensors mal-
function When both pulse signals are not detected continuously for the specified time or more, while door
glass is being operated UP or DOWN.
Pulse direction malfunc-
tion When a pulse signal indicating that window is moving in the opposite direction against the power win-
dow motor is detected for the specified value or more, while door glass is being operated UP or
DOWN.
Glass recognition position
malfunction 1 When the actual door glass position that is out of specified value is detected compared to the door
glass fully closed position memorized in module, while door glass is being operated UP or DOWN.
Glass recognition position
malfunction 2 When pulse count that is out of the door glass full stroke value or more is detected, while door glass
is being operated UP or DOWN.
Revision: 2010 May2011 QX56
Page 4162 of 5598
![INFINITI QX56 2011 Factory Service Manual
PWO
PRECAUTIONSPWO-3
< PRECAUTION > [POWER SOCKET]
C
D
E
F
G H
I
J
K L
B A
O P
N
PRECAUTION
PRECAUTIONS
Precaution for Supplemental
Restraint System (SRS) "AIR BAG" and "SEAT BELT
PRE-TENSIONER"
IN INFINITI QX56 2011 Factory Service Manual
PWO
PRECAUTIONSPWO-3
< PRECAUTION > [POWER SOCKET]
C
D
E
F
G H
I
J
K L
B A
O P
N
PRECAUTION
PRECAUTIONS
Precaution for Supplemental
Restraint System (SRS) "AIR BAG" and "SEAT BELT
PRE-TENSIONER"
IN](/manual-img/42/57033/w960_57033-4161.png)
PWO
PRECAUTIONSPWO-3
< PRECAUTION > [POWER SOCKET]
C
D
E
F
G H
I
J
K L
B A
O P
N
PRECAUTION
PRECAUTIONS
Precaution for Supplemental
Restraint System (SRS) "AIR BAG" and "SEAT BELT
PRE-TENSIONER"
INFOID:0000000006222454
The Supplemental Restraint System such as “A IR BAG” and “SEAT BELT PRE-TENSIONER”, used along
with a front seat belt, helps to reduce the risk or severi ty of injury to the driver and front passenger for certain
types of collision. This system includes seat belt switch inputs and dual stage front air bag modules. The SRS
system uses the seat belt switches to determine the front air bag deployment, and may only deploy one front
air bag, depending on the severity of a collision and whether the front occupants are belted or unbelted.
Information necessary to service the system safely is included in the “SRS AIR BAG” and “SEAT BELT” of this
Service Manual.
WARNING:
• To avoid rendering the SRS inoper ative, which could increase the risk of personal injury or death in
the event of a collision that would result in air ba g inflation, all maintenance must be performed by
an authorized NISSAN/INFINITI dealer.
Improper maintenance, including in correct removal and installation of the SRS, can lead to personal
injury caused by unintentional act ivation of the system. For removal of Spiral Cable and Air Bag
Module, see the “SRS AIR BAG”.
Do not use electrical test equipm ent on any circuit related to the SRS unless instructed to in this
Service Manual. SRS wiring harnesses can be identi fied by yellow and/or orange harnesses or har-
ness connectors.
PRECAUTIONS WHEN USING POWER TOOLS (AIR OR ELECTRIC) AND HAMMERS
WARNING:
When working near the Air Bag Diagnosis Sensor Unit or other Air Bag System sensors with the
ignition ON or engine running, DO NOT use air or electric power tools or strike near the sensor(s)
with a hammer. Heavy vibration could activate the sensor(s) and deploy the air bag(s), possibly
causing serious injury.
When using air or electric power tools or hammers , always switch the ignition OFF, disconnect the
battery, and wait at least 3 minutes before performing any service.
Revision: 2010 May2011 QX56
Page 4172 of 5598
![INFINITI QX56 2011 Factory Service Manual
PWO
PRECAUTIONSPWO-13
< PRECAUTION > [AC 120 V OUTLET]
C
D
E
F
G H
I
J
K L
B A
O P
N
PRECAUTION
PRECAUTIONS
Precaution for Supplemental
Restraint System (SRS) "AIR BAG" and "SEAT BELT
PRE-TENSIONER INFINITI QX56 2011 Factory Service Manual
PWO
PRECAUTIONSPWO-13
< PRECAUTION > [AC 120 V OUTLET]
C
D
E
F
G H
I
J
K L
B A
O P
N
PRECAUTION
PRECAUTIONS
Precaution for Supplemental
Restraint System (SRS) "AIR BAG" and "SEAT BELT
PRE-TENSIONER](/manual-img/42/57033/w960_57033-4171.png)
PWO
PRECAUTIONSPWO-13
< PRECAUTION > [AC 120 V OUTLET]
C
D
E
F
G H
I
J
K L
B A
O P
N
PRECAUTION
PRECAUTIONS
Precaution for Supplemental
Restraint System (SRS) "AIR BAG" and "SEAT BELT
PRE-TENSIONER"
INFOID:0000000006257062
The Supplemental Restraint System such as “A IR BAG” and “SEAT BELT PRE-TENSIONER”, used along
with a front seat belt, helps to reduce the risk or severi ty of injury to the driver and front passenger for certain
types of collision. This system includes seat belt switch inputs and dual stage front air bag modules. The SRS
system uses the seat belt switches to determine the front air bag deployment, and may only deploy one front
air bag, depending on the severity of a collision and whether the front occupants are belted or unbelted.
Information necessary to service the system safely is included in the “SRS AIR BAG” and “SEAT BELT” of this
Service Manual.
WARNING:
To avoid rendering the SRS inoper ative, which could increase the risk of personal injury or death in
the event of a collision that would result in air ba g inflation, all maintenance must be performed by
an authorized NISSAN/INFINITI dealer.
Improper maintenance, including in correct removal and installation of the SRS, can lead to personal
injury caused by unintentional act ivation of the system. For removal of Spiral Cable and Air Bag
Module, see the “SRS AIR BAG”.
Do not use electrical test equipm ent on any circuit related to the SRS unless instructed to in this
Service Manual. SRS wiring harnesses can be identi fied by yellow and/or orange harnesses or har-
ness connectors.
PRECAUTIONS WHEN USING POWER TOOLS (AIR OR ELECTRIC) AND HAMMERS
WARNING:
When working near the Air Bag Diagnosis Sensor Unit or other Air Bag System sensors with the
ignition ON or engine running, DO NOT use air or electric power tools or strike near the sensor(s)
with a hammer. Heavy vibration could activate the sensor(s) and deploy the air bag(s), possibly
causing serious injury.
When using air or electric power tools or hammers , always switch the ignition OFF, disconnect the
battery, and wait at least 3 minutes before performing any service.
Revision: 2010 May2011 QX56
Page 4204 of 5598
RAX-8
< REMOVAL AND INSTALLATION >
REAR WHEEL HUB AND HOUSING
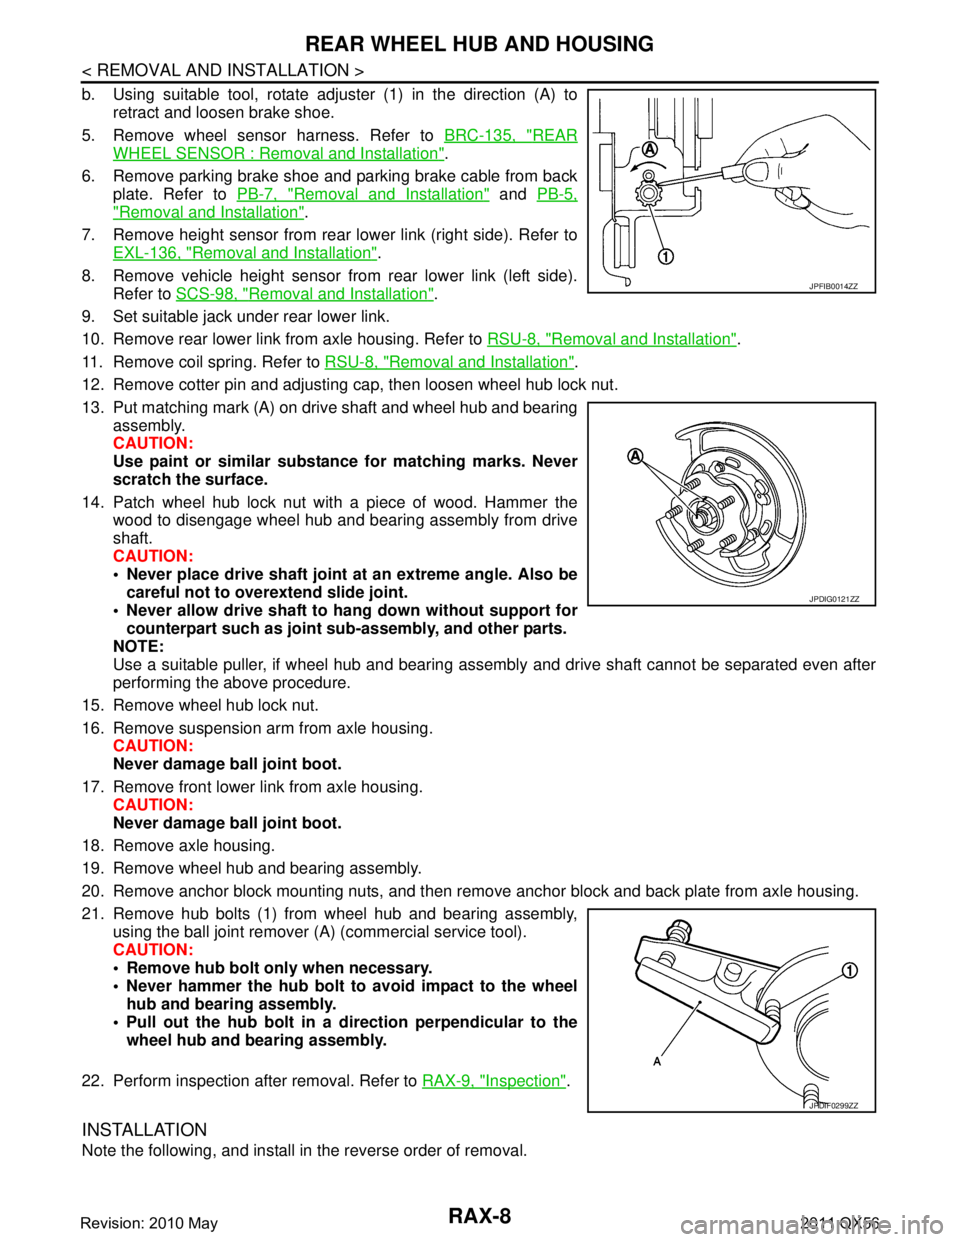
b. Using suitable tool, rotate adjuster (1) in the direction (A) toretract and loosen brake shoe.
5. Remove wheel sensor harness. Refer to BRC-135, "
REAR
WHEEL SENSOR : Removal and Installation".
6. Remove parking brake shoe and parking brake cable from back plate. Refer to PB-7, "
Removal and Installation" and PB-5,
"Removal and Installation".
7. Remove height sensor from rear lower link (right side). Refer to EXL-136, "
Removal and Installation".
8. Remove vehicle height sensor from rear lower link (left side). Refer to SCS-98, "
Removal and Installation".
9. Set suitable jack under rear lower link.
10. Remove rear lower link from axle housing. Refer to RSU-8, "
Removal and Installation".
11. Remove coil spring. Refer to RSU-8, "
Removal and Installation".
12. Remove cotter pin and adjusting cap, then loosen wheel hub lock nut.
13. Put matching mark (A) on drive shaft and wheel hub and bearing assembly.
CAUTION:
Use paint or similar substance for matching marks. Never
scratch the surface.
14. Patch wheel hub lock nut with a piece of wood. Hammer the wood to disengage wheel hub and bearing assembly from drive
shaft.
CAUTION:
Never place drive shaft joint at an extreme angle. Also be
careful not to over extend slide joint.
Never allow drive shaft to ha ng down without support for
counterpart such as joint sub-assembly, and other parts.
NOTE:
Use a suitable puller, if wheel hub and bearing assembly and drive shaft cannot be separated even after
performing the above procedure.
15. Remove wheel hub lock nut.
16. Remove suspension arm from axle housing. CAUTION:
Never damage ball joint boot.
17. Remove front lower link from axle housing. CAUTION:
Never damage ball joint boot.
18. Remove axle housing.
19. Remove wheel hub and bearing assembly.
20. Remove anchor block mounting nuts, and then remove anchor block and back plate from axle housing.
21. Remove hub bolts (1) from wheel hub and bearing assembly, using the ball joint remover (A) (commercial service tool).
CAUTION:
Remove hub bolt only when necessary.
Never hammer the hub bolt to avoid impact to the wheel
hub and bearing assembly.
Pull out the hub bolt in a direction perpendicular to the wheel hub and bearing assembly.
22. Perform inspection after removal. Refer to RAX-9, "
Inspection".
INSTALLATION
Note the following, and install in the reverse order of removal.
JPFIB0014ZZ
JPDIG0121ZZ
JPDIF0299ZZ
Revision: 2010 May2011 QX56
Page 4205 of 5598
REAR WHEEL HUB AND HOUSINGRAX-9
< REMOVAL AND INSTALLATION >
CEF
G H
I
J
K L
M A
B
RAX
N
O P
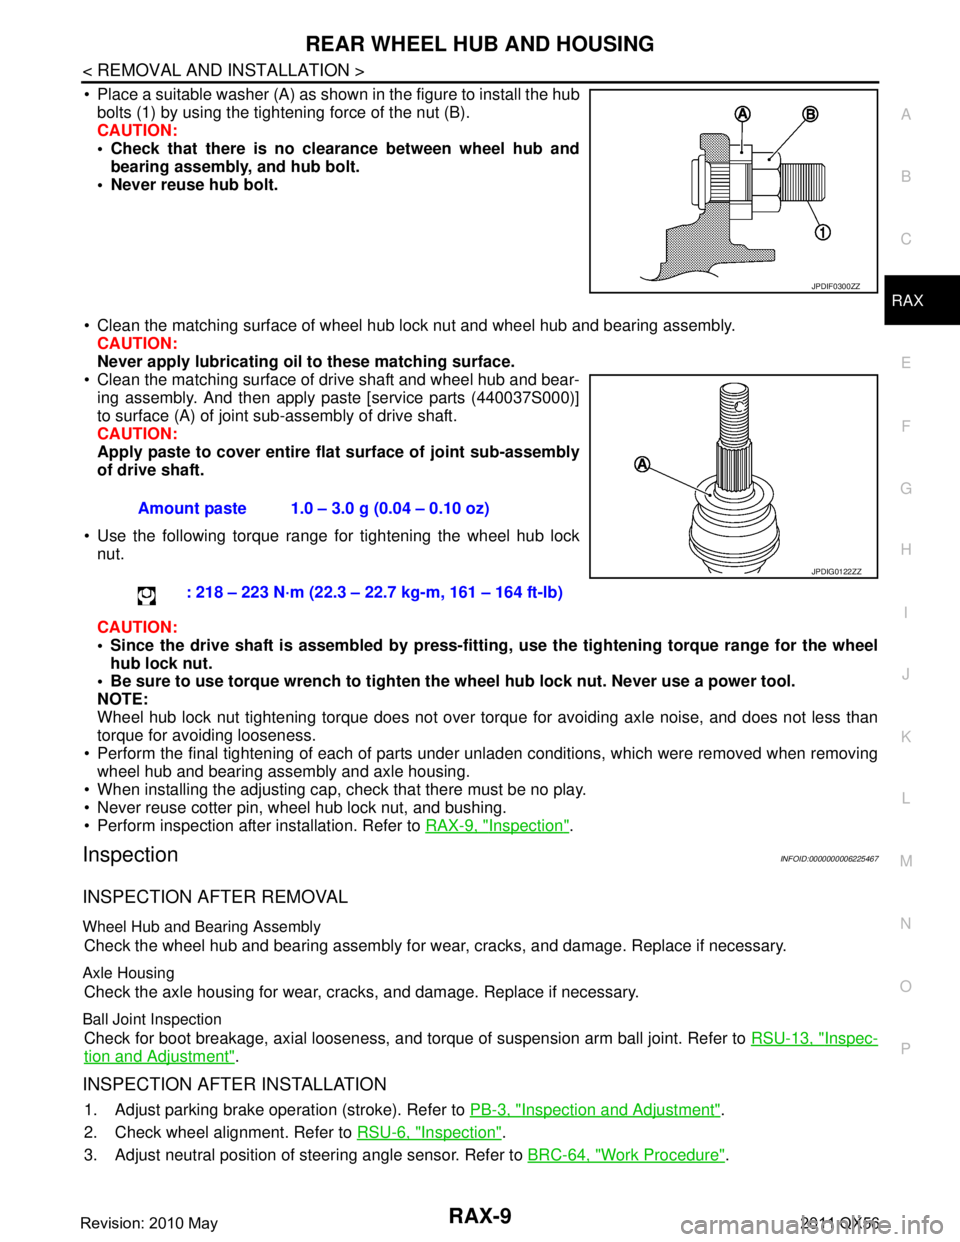
Place a suitable washer (A) as shown in the figure to install the hub bolts (1) by using the tightening force of the nut (B).
CAUTION:
Check that there is no cl earance between wheel hub and
bearing assembly, and hub bolt.
Never reuse hub bolt.
Clean the matching surface of wheel hub lock nut and wheel hub and bearing assembly. CAUTION:
Never apply lubricating oi l to these matching surface.
Clean the matching surface of drive shaft and wheel hub and bear-
ing assembly. And then apply paste [service parts (440037S000)]
to surface (A) of joint sub-assembly of drive shaft.
CAUTION:
Apply paste to cover entire fl at surface of joint sub-assembly
of drive shaft.
Use the following torque range for tightening the wheel hub lock nut.
CAUTION:
Since the drive shaft is assembled by press-fitting , use the tightening torque range for the wheel
hub lock nut.
Be sure to use torque wrench to tighten th e wheel hub lock nut. Never use a power tool.
NOTE:
Wheel hub lock nut tightening torque does not over tor que for avoiding axle noise, and does not less than
torque for avoiding looseness.
Perform the final tightening of each of parts under unladen conditions, which were removed when removing wheel hub and bearing assembly and axle housing.
When installing the adjusting cap, check that there must be no play.
Never reuse cotter pin, wheel hub lock nut, and bushing.
Perform inspection after installation. Refer to RAX-9, "
Inspection".
InspectionINFOID:0000000006225467
INSPECTION AFTER REMOVAL
Wheel Hub and Bearing Assembly
Check the wheel hub and bearing assembly for wear, cracks, and damage. Replace if necessary.
Axle Housing
Check the axle housing for wear, cracks, and damage. Replace if necessary.
Ball Joint Inspection
Check for boot breakage, axial looseness, and torque of suspension arm ball joint. Refer to RSU-13, "Inspec-
tion and Adjustment".
INSPECTION AFTER INSTALLATION
1. Adjust parking brake operation (stroke). Refer to PB-3, "Inspection and Adjustment".
2. Check wheel alignment. Refer to RSU-6, "
Inspection".
3. Adjust neutral position of steering angle sensor. Refer to BRC-64, "
Work Procedure".
JPDIF0300ZZ
Amount paste 1.0 – 3.0 g (0.04 – 0.10 oz)
: 218 – 223 N·m (22.3 – 22.7 kg-m, 161 – 164 ft-lb)
JPDIG0122ZZ
Revision: 2010 May2011 QX56
Page 4206 of 5598

RAX-10
< REMOVAL AND INSTALLATION >
REAR WHEEL HUB AND HOUSING
4. Adjust levelizer adjustment of height sensor. Refer to EXL-61, "LEVELIZER ADJUSTMENT : Special
Repair Requirement".
5. Check standard vehicle height setting of vehicle height sensor. Refer to SCS-67, "
Work Procedure".
Revision: 2010 May2011 QX56