2011 INFINITI QX56 sensor
[x] Cancel search: sensorPage 3652 of 5598
![INFINITI QX56 2011 Factory Service Manual
LAN-232
< DTC/CIRCUIT DIAGNOSIS >[CAN SYSTEM (TYPE 4)]
ITS COMMUNICATION CIRCUIT
ITS COMMUNICATION CIRCUIT
Diagnosis ProcedureINFOID:0000000006256402
1.CHECK CAN DIAGNOSIS
Check the CAN diagnosis res INFINITI QX56 2011 Factory Service Manual
LAN-232
< DTC/CIRCUIT DIAGNOSIS >[CAN SYSTEM (TYPE 4)]
ITS COMMUNICATION CIRCUIT
ITS COMMUNICATION CIRCUIT
Diagnosis ProcedureINFOID:0000000006256402
1.CHECK CAN DIAGNOSIS
Check the CAN diagnosis res](/manual-img/42/57033/w960_57033-3651.png)
LAN-232
< DTC/CIRCUIT DIAGNOSIS >[CAN SYSTEM (TYPE 4)]
ITS COMMUNICATION CIRCUIT
ITS COMMUNICATION CIRCUIT
Diagnosis ProcedureINFOID:0000000006256402
1.CHECK CAN DIAGNOSIS
Check the CAN diagnosis results from CONSULT-III to see that the CAN communication circuit 1 and CAN
communication circuit 2 have no malfunction.
NOTE:
For identification of CAN communication circuit 1, CAN communication circuit 2, and ITS communication cir-
cuit, refer to LAN-57, "
System Diagram".
Are the CAN communication 1 and CAN communication 2 circuits normal?
YES >> GO TO 2.
NO >> Check and repair CAN communication circuit 1 and/or CAN communication circuit 2.
2.CONNECTOR INSPECTION
1. Turn the ignition switch OFF.
2. Disconnect the battery cable from the negative terminal.
3. Check the following terminals and connectors fo r damage, bend and loose connection (unit side and con-
nector side).
- ADAS control unit
- Harness connector B63
- Harness connector B239
Is the inspection result normal?
YES >> GO TO 3.
NO >> Repair the terminal and connector.
3.CHECK HARNESS CONTI NUITY (OPEN CIRCUIT)
1. Disconnect the following harness connectors.
- ADAS control unit
- ICC sensor
2. Check the continuity between the ADAS control unit harness connector and the ICC sensor harness con-
nector.
Is the inspection result normal?
YES >> GO TO 4.
NO >> Repair the ADAS control unit branch line. (ITS communication circuit). Refer to LAN-57, "
System
Diagram".
4.CHECK HARNESS CONTINUITY (SHORT CIRCUIT)
1. Disconnect the following harness connectors.
- Side radar RH
- Side radar LH
- Lane camera unit
- Accelerator pedal actuator
2. Check the continuity between the ADAS control unit harness connector terminals.
Is the inspection result normal?
YES >> GO TO 5.
NO >> Check the harness and repair the root cause.
ADAS control unit harness connector ICC sensor harness connector Continuity
Connector No. Terminal No. Connector No. Terminal No.
B61 7
E65 3 Existed
86Existed
ADAS control unit harness connector Continuity
Connector No. Terminal No.
B61 7 8 Not existed
Revision: 2010 May2011 QX56
Page 3653 of 5598
![INFINITI QX56 2011 Factory Service Manual
LAN
ITS COMMUNICATION CIRCUITLAN-233
< DTC/CIRCUIT DIAGNOSIS > [CAN SYSTEM (TYPE 4)]
C
D
E
F
G H
I
J
K L
B A
O P
N
5.CHECK HARNESS CONTINUI
TY (SHORT CIRCUIT)
Check the continuity between the ADAS c INFINITI QX56 2011 Factory Service Manual
LAN
ITS COMMUNICATION CIRCUITLAN-233
< DTC/CIRCUIT DIAGNOSIS > [CAN SYSTEM (TYPE 4)]
C
D
E
F
G H
I
J
K L
B A
O P
N
5.CHECK HARNESS CONTINUI
TY (SHORT CIRCUIT)
Check the continuity between the ADAS c](/manual-img/42/57033/w960_57033-3652.png)
LAN
ITS COMMUNICATION CIRCUITLAN-233
< DTC/CIRCUIT DIAGNOSIS > [CAN SYSTEM (TYPE 4)]
C
D
E
F
G H
I
J
K L
B A
O P
N
5.CHECK HARNESS CONTINUI
TY (SHORT CIRCUIT)
Check the continuity between the ADAS control unit harness connector and the ground.
Is the inspection result normal?
YES >> GO TO 6.
NO >> Check the harness and repair the root cause.
6.CHECK TERMINATION CIRCUIT
1. Remove the ADAS control unit and the ICC sensor.
2. Check the resistance between t he ADAS control unit terminals.
3. Check the resistance between the ICC sensor terminals.
Is the inspection result normal?
YES >> GO TO 7.
NO >> Replace the ADAS control unit and/or the ICC sensor.
7.CHECK SYMPTOM
Connect all the connectors. Check if the symptoms descr ibed in the “Symptom (Results from interview with
customer)” are reproduced.
Inspection result
Reproduced>>GO TO 8.
Non-reproduced>>Start the diagnosis again. Follow the trouble diagnosis procedure when past error is
detected.
8.CHECK UNIT REPRODUCTION
Perform the reproduction test as per the following procedure for each unit.
1. Turn the ignition switch OFF.
2. Disconnect the battery cabl e from the negative terminal.
3. Disconnect one of the unit connectors of ITS communication circuit.
NOTE:
ADAS control unit and ICC sensor have a termi nation circuit. Check other units first.
4. Connect the battery cable to the negative terminal. Check if the symptoms described in the “Symptom
(Results from interview with customer)” are reproduced.
NOTE:
Although unit-related error symptoms occur, do not confuse them with other symptoms.
Inspection result
Reproduced>>Connect the connector. Check other units as per the above procedure.
Non-reproduced>>Replace the unit whose connector was disconnected.
ADAS control unit harness connector
GroundContinuity
Connector No. Terminal No.
B61 7 Not existed
8 Not existed
ADAS control unit
Resistance (Ω)
Te r m i n a l N o .
7 8 Approx. 108 – 132
ICC sensor Resistance (Ω)
Te r m i n a l N o .
3 6 Approx. 108 – 132
Revision: 2010 May2011 QX56
Page 3708 of 5598

PRECAUTIONSMIR-3
< PRECAUTION >
C
DE
F
G H
I
J
K
M A
B
MIR
N
O P
PRECAUTION
PRECAUTIONS
Precaution for Supplemental Restraint System (SRS) "AIR BAG" and "SEAT BELT
PRE-TENSIONER"
INFOID:0000000006257245
The Supplemental Restraint System such as “A IR BAG” and “SEAT BELT PRE-TENSIONER”, used along
with a front seat belt, helps to reduce the risk or severi ty of injury to the driver and front passenger for certain
types of collision. This system includes seat belt switch inputs and dual stage front air bag modules. The SRS
system uses the seat belt switches to determine the front air bag deployment, and may only deploy one front
air bag, depending on the severity of a collision and whether the front occupants are belted or unbelted.
Information necessary to service the system safely is included in the “SRS AIR BAG” and “SEAT BELT” of this
Service Manual.
WARNING:
• To avoid rendering the SRS inoper ative, which could increase the risk of personal injury or death in
the event of a collision that would result in air ba g inflation, all maintenance must be performed by
an authorized NISSAN/INFINITI dealer.
Improper maintenance, including in correct removal and installation of the SRS, can lead to personal
injury caused by unintentional act ivation of the system. For removal of Spiral Cable and Air Bag
Module, see the “SRS AIR BAG”.
Do not use electrical test equipm ent on any circuit related to the SRS unless instructed to in this
Service Manual. SRS wiring harnesses can be identi fied by yellow and/or orange harnesses or har-
ness connectors.
PRECAUTIONS WHEN USING POWER TOOLS (AIR OR ELECTRIC) AND HAMMERS
WARNING:
When working near the Air Bag Diagnosis Sensor Unit or other Air Bag System sensors with the
ignition ON or engine running, DO NOT use air or electric power tools or strike near the sensor(s)
with a hammer. Heavy vibration could activate the sensor(s) and deploy the air bag(s), possibly
causing serious injury.
When using air or electric power tools or hammers , always switch the ignition OFF, disconnect the
battery, and wait at least 3 minutes before performing any service.
Precaution Necessary for Steering Wh eel Rotation after Battery Disconnect
INFOID:0000000006257246
NOTE:
Before removing and installing any control units, first tu rn the push-button ignition switch to the LOCK posi-
tion, then disconnect both battery cables.
After finishing work, confirm that all control unit connectors are connected properly, then re-connect both
battery cables.
Always use CONSULT-III to perform self-diagnosis as a part of each function inspection after finishing work.
If a DTC is detected, perform trouble diagnos is according to self-diagnosis results.
For vehicle with steering lock unit, if the battery is disconnected or discharged, the steering wheel will lock and
cannot be turned.
If turning the steering wheel is required with the batte ry disconnected or discharged, follow the operation pro-
cedure below before starting the repair operation.
OPERATION PROCEDURE
1. Connect both battery cables. NOTE:
Supply power using jumper cables if battery is discharged.
2. Turn the push-button ignition switch to ACC position. (At this time, the steering lock will be released.)
3. Disconnect both battery cables. The steering lock wil l remain released with both battery cables discon-
nected and the steering wheel can be turned.
4. Perform the necessary repair operation.
Revision: 2010 May2011 QX56
Page 3714 of 5598

SYSTEMMIR-9
< SYSTEM DESCRIPTION >
C
DE
F
G H
I
J
K
M A
B
MIR
N
O P
Changeover switch: Select either left or right
A/T shift selector: R position
NOTE:
During the reverse interlock door mirror system, if all of the above conditions are not satisfied, mirror face
returns to original angle.
AUTO ANTI-DAZZLING INSIDE MIRROR SYSTEM
AUTO ANTI-DAZZLING INSIDE MIRRO R SYSTEM : System DescriptionINFOID:0000000006257224
The sensor built in inside mirror detects the bri ghtness of headlight of the vehicle behind and automatically
changes the light transmission to decrease the brightness.
Revision: 2010 May2011 QX56
Page 3735 of 5598

MIR-30
< REMOVAL AND INSTALLATION >
INSIDE MIRROR
REMOVAL AND INSTALLATION
INSIDE MIRROR
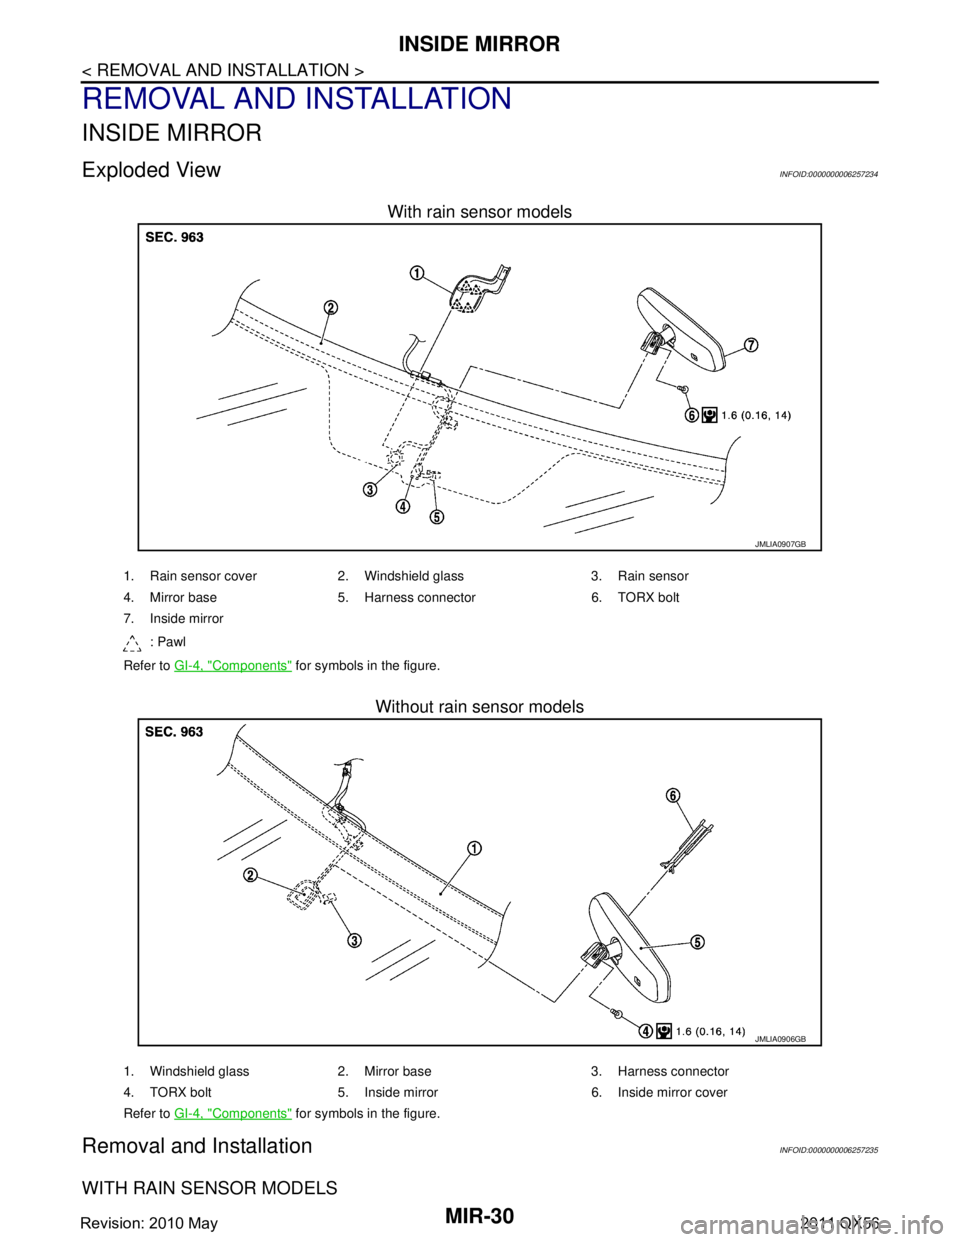
Exploded ViewINFOID:0000000006257234
With rain sensor models
Without rain sensor models
Removal and InstallationINFOID:0000000006257235
WITH RAIN SENSOR MODELS
JMLIA0907GB
1. Rain sensor cover 2. Windshield glass 3. Rain sensor
4. Mirror base 5. Harness connector 6. TORX bolt
7. Inside mirror : Pawl
Refer to GI-4, "
Components" for symbols in the figure.
JMLIA0906GB
1. Windshield glass 2. Mirror base 3. Harness connector
4. TORX bolt 5. Inside mirror 6. Inside mirror cover
Refer to GI-4, "
Components" for symbols in the figure.
Revision: 2010 May2011 QX56
Page 3736 of 5598

INSIDE MIRRORMIR-31
< REMOVAL AND INSTALLATION >
C
DE
F
G H
I
J
K
M A
B
MIR
N
O P
Removal
1. Disengage rain sensor cover fixing pawls with a remover tool to remove.
2. Disconnect harness connector from inside mirror.
3. Loosen TORX bolt and slide inside mirror upward to remove.
Installation
Install in the reverse order of removal.
WITHOUT RAIN SENSOR MODELS
Removal
1. Remove inside mirror cover.
2. Disconnect harness connector from inside mirror.
3. Loosen TORX bolt and slide inside mirror upward to remove.
Installation
Install in the reverse order of removal.
Revision: 2010 May2011 QX56
Page 3745 of 5598

MWI-2
DIAGNOSIS SYSTEM (COMBINATION
METER) ..............................................................
29
On Board Diagnosis Function .............................. ...29
CONSULT-III Function ...........................................30
ECU DIAGNOSIS INFORMATION ..............35
COMBINATION METER ................................. ...35
Reference Value .................................................. ...35
Fail-Safe .................................................................42
DTC Index ..............................................................43
IPDM E/R ...........................................................44
List of ECU Reference ......................................... ...44
WIRING DIAGRAM .....................................45
METER SYSTEM ............................................ ...45
Wiring Diagram .................................................... ...45
CLOCK ...............................................................55
Wiring Diagram .................................................... ...55
BASIC INSPECTION ...................................57
DIAGNOSIS AND REPAIR WORKFLOW
(METER SYSTEM ) .......................................... ...
57
Work flow ............................................................. ...57
DTC/CIRCUIT DIAGNOSIS ...................... ...59
U1000 CAN COMM CIRCUIT ......................... ...59
Description ........................................................... ...59
DTC Logic ...............................................................59
Diagnosis Procedure .............................................59
U1010 CONTROL UNIT (CAN) .........................60
Description ........................................................... ...60
DTC Logic ...............................................................60
Diagnosis Procedure ..............................................60
B2205 VEHICLE SPEED ...................................61
Description ........................................................... ...61
DTC Logic ...............................................................61
Diagnosis Procedure .............................................61
B2267 ENGINE SPEED .....................................62
Description ........................................................... ...62
DTC Logic ...............................................................62
Diagnosis Procedure ..............................................62
B2268 WATER TEMP ........................................63
Description ........................................................... ...63
DTC Logic ...............................................................63
Diagnosis Procedure ..............................................63
POWER SUPPLY AND GROUND CIRCUIT .....64
COMBINATION METER ........................................ ...64
COMBINATION METER : Diagnosis Procedure ....64
TRIP RESET AND ILLUMINATION CON-
TROL SWITCH SIGNAL CIRCUIT ....................
65
Diagnosis Procedure ............................................ ...65
Component Inspection ............................................66
TRIP COMPUTER SWITCH SIGNAL CIRCUIT
...
67
Diagnosis Procedure ............................................ ...67
Component Inspection ............................................68
FUEL LEVEL SENSOR SIGNAL CIRCUIT .......69
Component Function Check ................................ ...69
Diagnosis Procedure ..............................................69
Component Inspection ............................................70
OIL PRESSURE SWITCH SIGNAL CIRCUIT ...71
Component Function Check ...................................71
Diagnosis Procedure ...............................................71
Component Inspection ............................................71
WASHER LEVEL SWITCH SIGNAL CIRCUIT ...73
Diagnosis Procedure ............................................ ...73
Component Inspection ............................................73
A/C AUTO AMP. CONNECTION RECOGNI-
TION SIGNAL CIRCUIT ....................................
74
Diagnosis Procedure ........................................... ...74
SYMPTOM DIAGNOSIS ............................75
THE FUEL GAUGE INDICATOR DOES NOT
OPERATE ....................................................... ...
75
Description ........................................................... ...75
Diagnosis Procedure ...............................................75
THE TRIP RESET AND ILLUMINATION CON-
TROL SWITCH IS INOPERATIVE ....................
76
Description ........................................................... ...76
Diagnosis Procedure ...............................................76
THE TRIP COMPUTER SWITCH IS INOPER-
ATIVE .................................................................
77
Description ........................................................... ...77
Diagnosis Procedure ...............................................77
THE OIL PRESSURE WARNING LAMP
DOES NOT TURN ON .................................... ...
78
Description ........................................................... ...78
Diagnosis Procedure ...............................................78
THE OIL PRESSURE WARNING LAMP
DOES NOT TURN OFF .................................. ...
79
Description ........................................................... ...79
Diagnosis Procedure ...............................................79
THE PARKING BRAKE RELEASE WARNING
CONTINUES DISPLAYING, OR DOES NOT
DISPLAY ............................................................
80
Description ........................................................... ...80
Diagnosis Procedure ...............................................80
Revision: 2010 May2011 QX56
Page 3747 of 5598

MWI-4
< PRECAUTION >
PRECAUTIONS
PRECAUTION
PRECAUTIONS
Precaution for Supplemental Restraint System (SRS) "AIR BAG" and "SEAT BELT
PRE-TENSIONER"
INFOID:0000000006369687
The Supplemental Restraint System such as “A IR BAG” and “SEAT BELT PRE-TENSIONER”, used along
with a front seat belt, helps to reduce the risk or severi ty of injury to the driver and front passenger for certain
types of collision. This system includes seat belt switch inputs and dual stage front air bag modules. The SRS
system uses the seat belt switches to determine the front air bag deployment, and may only deploy one front
air bag, depending on the severity of a collision and w hether the front occupants are belted or unbelted.
Information necessary to service the system safely is included in the “SRS AIR BAG” and “SEAT BELT” of this
Service Manual.
WARNING:
• To avoid rendering the SRS inopera tive, which could increase the risk of personal injury or death in
the event of a collision that would result in air bag inflation, all maintenance must be performed by
an authorized NISS AN/INFINITI dealer.
Improper maintenance, including in correct removal and installation of the SRS, can lead to personal
injury caused by unintent ional activation of the system. For re moval of Spiral Cable and Air Bag
Module, see the “SRS AIR BAG”.
Do not use electrical test equipmen t on any circuit related to the SRS unless instructed to in this
Service Manual. SRS wiring harnesses can be identi fied by yellow and/or orange harnesses or har-
ness connectors.
PRECAUTIONS WHEN USING POWER TOOLS (AIR OR ELECTRIC) AND HAMMERS
WARNING:
When working near the Air Bag Diagnosis Sensor Unit or other Air Bag System sensors with the ignition ON or engine running, DO NOT use air or electric power tools or strike near the sensor(s)
with a hammer. Heavy vibration could activate the sensor(s) and deploy the air bag(s), possibly
causing serious injury.
When using air or electric power tools or hammers , always switch the ignition OFF, disconnect the
battery, and wait at least 3 minu tes before performing any service.
Revision: 2010 May2011 QX56