2011 INFINITI QX56 air filter
[x] Cancel search: air filterPage 5 of 5598

QUICK REFERENCE CHART QX56
BRAKE PEDAL
Unit : mm (in)
FRONT DISK BRAKE
Unit : mm (in)
REAR DISK BRAKE
Unit : mm (in)
REFILL CAPACITIESELS00040
Item Standard
Brake pedal height 168.5 (6.63) – 178.5 (7.03)
Depressed brake pedal height
[Depressing 490 N (50 kg, 110 lb) while turning the engine ON] 100 (3.94) or more
Item Limit
Brake pad Wear thickness 1.5 (0.059)
Disc rotor Wear thickness 28.5 (1.122)
Thickness variation (measured at 8 positions) 0.015 (0.0006)
Runout (with it attached to the vehicle) 0.053 (0.0021)
Item Limit
Brake pad Wear thickness 2.0 (0.079)
Disc rotor Wear thickness 18.0 (0.709)
Thickness variation (measured at 8 positions) 0.015 (0.0006)
Runout (with it attached to the vehicle) 0.05 (0.0020)
UNIT
Liter US measure
Fuel tank 98.4 26 gal
Engine Coolant ( With reservoir tank ) at MAX level 14.9 15-6/8 qt
Engine oil Drain and refill
With oil filter change 6.5 6-7/8 qt
Without oil filter change 6.2 6-4/8 qt
Dry engine (Overhaul) 7.6 8 qt
Transmission 10.0 10-5/8 qt
Transfer 1.5 3-1/8 pt
Final drive Front 0.75 1-5/8 pt
Rear 1.75 3-3/4 pt
Power steering system 1.0 7/8 qt
Air conditioning system Compressor oil 0.21 7.1 fl oz
Refrigerant 1.05 kg 2.32 lb
2011
Page 2289 of 5598
![INFINITI QX56 2011 Factory Service Manual
P0171, P0174 FUEL INJECTION SYSTEM FUNCTION
EC-265
< DTC/CIRCUIT DIAGNOSIS > [VK56VD]
C
D
E
F
G H
I
J
K L
M A
EC
NP
O
5. Check the continuity between
A/F sensor 1 harness connector and ground, or EC INFINITI QX56 2011 Factory Service Manual
P0171, P0174 FUEL INJECTION SYSTEM FUNCTION
EC-265
< DTC/CIRCUIT DIAGNOSIS > [VK56VD]
C
D
E
F
G H
I
J
K L
M A
EC
NP
O
5. Check the continuity between
A/F sensor 1 harness connector and ground, or EC](/manual-img/42/57033/w960_57033-2288.png)
P0171, P0174 FUEL INJECTION SYSTEM FUNCTION
EC-265
< DTC/CIRCUIT DIAGNOSIS > [VK56VD]
C
D
E
F
G H
I
J
K L
M A
EC
NP
O
5. Check the continuity between
A/F sensor 1 harness connector and ground, or ECM harness connector
and ground.
6. Also check harness for short to power.
Is the inspection result normal?
YES >> GO TO 4.
NO >> Repair open circuit, short to ground or short to power in harness or connectors.
4.CHECK FUEL PRESSURE
Check fuel pressure. Refer to EC-153, "
Work Procedure".
Is the inspection result normal?
YES >> GO TO 6.
NO >> GO TO 5.
5. DETECT MALFUNCTIONING PART
Check fuel hoses and fuel tubes for clogging.
Is the inspection result normal?
YES >> Replace “fuel filter and fuel pump assembly”. Refer to FL-5, "Removal and Installation".
NO >> Repair or replace malfunctioning part.
6.CHECK MASS AIR FLOW SENSOR
WITH CONSULT-III
1. Install all removed parts.
2. Check “MASS AIR FLOW” in “DATA MONITOR” mode with CONSULT-III.
For specification, refer to EC-538, "
Mass Air Flow Sensor".
WITH GST
1. Install all removed parts.
2. Check mass air flow sensor signal in Service $01 with GST.
For specification, refer to EC-538, "
Mass Air Flow Sensor".
Is the measurement value within the specification?
YES >> GO TO 7.
NO >> Check connectors for rusted terminals or loose c onnections in the mass air flow sensor circuit or
grounds. Refer to EC-201, "
Diagnosis Procedure".
7.CHECK FUNCTION OF FUEL INJECTOR
DTC A/F sensor 1 ECM
Continuity
Bank Connector Terminal Connector Terminal
P0171 1 F67 3
F110 88
Existed
490
694
P0174 2 F68 378
480
674
DTC A/F sensor 1 ECM
Continuity Continuity
Bank Connector Terminal Connector Terminal
P0171 1 F67 3
F110 88
Existed Not existed
490
694
P0174 2 F68 378
480
674
Revision: 2010 May2011 QX56
Page 2293 of 5598
![INFINITI QX56 2011 Factory Service Manual
P0172, P0175 FUEL INJECTION SYSTEM FUNCTION
EC-269
< DTC/CIRCUIT DIAGNOSIS > [VK56VD]
C
D
E
F
G H
I
J
K L
M A
EC
NP
O
5. Check the continuity between
A/F sensor 1 harness connector and ground, or EC INFINITI QX56 2011 Factory Service Manual
P0172, P0175 FUEL INJECTION SYSTEM FUNCTION
EC-269
< DTC/CIRCUIT DIAGNOSIS > [VK56VD]
C
D
E
F
G H
I
J
K L
M A
EC
NP
O
5. Check the continuity between
A/F sensor 1 harness connector and ground, or EC](/manual-img/42/57033/w960_57033-2292.png)
P0172, P0175 FUEL INJECTION SYSTEM FUNCTION
EC-269
< DTC/CIRCUIT DIAGNOSIS > [VK56VD]
C
D
E
F
G H
I
J
K L
M A
EC
NP
O
5. Check the continuity between
A/F sensor 1 harness connector and ground, or ECM harness connector
and ground.
6. Also check harness for short to power.
Is the inspection result normal?
YES >> GO TO 4.
NO >> Repair open circuit, short to ground or short to power in harness or connectors.
4.CHECK FUEL PRESSURE
Check fuel pressure. Refer to EC-153, "
Work Procedure".
Is the inspection result normal?
YES >> GO TO 5.
NO >> Replace fuel filter and fuel pump assembly”. Refer to FL-5, "
Removal and Installation".
5.CHECK MASS AIR FLOW SENSOR
WITH CONSULT-III
1. Install all removed parts.
2. Check “MASS AIR FLOW” in “DATA MONITOR” mode with CONSULT-III. For specification, refer to EC-538, "
Mass Air Flow Sensor".
WITH GST
1. Install all removed parts.
2. Check mass air flow sensor signal in “Service $01” with GST. For specification, refer to EC-538, "
Mass Air Flow Sensor".
Is the measurement value within the specification?
YES >> GO TO 6.
NO >> Check connectors for rusted terminals or loose c onnections in the mass air flow sensor circuit or
grounds. Refer to EC-201, "
Diagnosis Procedure".
6.CHECK FUNCTION OF FUEL INJECTOR
WITH CONSULT-III
1. Start engine.
2. Perform “POWER BALANCE” in “A CTIVE TEST” mode with CONSULT-III.
3. Check that each circuit produces a momentary engine speed drop.
WITHOUT CONSULT-III
1. Start engine and let it idle.
DTC A/F sensor 1 ECM
Continuity
Bank Connector Terminal Connector Terminal
P0171 1 F67 3
F110 88
Existed
490
694
P0174 2 F68 378
480
674
DTC A/F sensor 1 ECM
Continuity Continuity
Bank Connector Terminal Connector Terminal
P0171 1 F67 3
F110 88
Existed Not existed
490
694
P0174 2 F68 378
480
674
Revision: 2010 May2011 QX56
Page 2319 of 5598
![INFINITI QX56 2011 Factory Service Manual
P0300, P0301, P0302, P0303, P0304, P0305, P0306, P0307, P0308 MISFIRE
EC-295
< DTC/CIRCUIT DIAGNOSIS > [VK56VD]
C
D
E
F
G H
I
J
K L
M A
EC
NP
O
YES >> Replace “fuel filter and fuel pump assembly” INFINITI QX56 2011 Factory Service Manual
P0300, P0301, P0302, P0303, P0304, P0305, P0306, P0307, P0308 MISFIRE
EC-295
< DTC/CIRCUIT DIAGNOSIS > [VK56VD]
C
D
E
F
G H
I
J
K L
M A
EC
NP
O
YES >> Replace “fuel filter and fuel pump assembly”](/manual-img/42/57033/w960_57033-2318.png)
P0300, P0301, P0302, P0303, P0304, P0305, P0306, P0307, P0308 MISFIRE
EC-295
< DTC/CIRCUIT DIAGNOSIS > [VK56VD]
C
D
E
F
G H
I
J
K L
M A
EC
NP
O
YES >> Replace “fuel filter and fuel pump assembly”.
NO >> Repair or replace malfunctioning part.
12.CHECK IDLE SPEED A
ND IGNITION TIMING
Check idle speed and ignition timing.
For procedure, refer to EC-530, "
Inspection" and EC-531, "Inspection".
For specification, refer to EC-538, "
Idle Speed" and EC-538, "Ignition Timing".
Is the inspection result normal?
YES >> GO TO 13.
NO >> Follow the EC-139, "
Work Procedure".
13.CHECK AIR FUEL RATIO SENSOR 1 POWER SUPPLY CIRCUIT
1. Disconnect air fuel ratio (A /F) sensor 1 harness connector.
2. Turn ignition switch ON.
3. Check the voltage between A/F sensor 1 harness connector and ground.
Is the inspection result normal?
YES >> GO TO 14.
NO >> Repair open circuit, short to ground or short to power in harness or connectors.
14.CHECK A/F SENSOR 1 INPUT SIGNAL CIRCUIT FOR OPEN AND SHORT
1. Turn ignition switch OFF.
2. Disconnect ECM harness connector.
3. Check the continuity between A/F sensor 1 harness connector and ECM harness connector.
4. Check the continuity between A/F sensor 1 harness connector and ground, or ECM harness connector
and ground.
5. Also check harness for short to power.
Is the inspection result normal?
YES >> GO TO 15.
NO >> Repair open circuit, short to ground or short to power in harness or connectors.
15.CHECK A/F SENSOR 1 GROUND CIRCUIT FOR OPEN AND SHORT
1. Turn ignition switch OFF.
2. Disconnect ECM harness connector.
3. Check the continuity between A/F sensor 1 harness connector and ECM harness connector.
DTCA/F sensor 1
Ground Voltage
Bank Connector Terminal
P0130 1 F67 4 Ground 3.0 V
P0150 2 F68 4
DTC A/F sensor 1 ECM
Continuity
Bank Connector Terminal Connector Terminal
P0130 1 F67 3 F11088
Existed
P0150 2 F68 3 78
DTC A/F sensor 1 ECM
Ground Continuity
Bank Connector Terminal Connector Terminal
P0130 1 F67 3 F11088
Ground Not existed
P0150 2 F68 3 78
Revision: 2010 May2011 QX56
Page 2563 of 5598

EM-1
ENGINE
C
DE
F
G H
I
J
K L
M
SECTION EM
A
EM
N
O P
CONTENTS
ENGINE MECHANICAL
PRECAUTION ................ ...............................3
PRECAUTIONS .............................................. .....3
Precaution for Procedure without Cowl Top Cover ......3
Precaution for Supplemental Restraint System
(SRS) "AIR BAG" and "SEAT BELT PRE-TEN-
SIONER" ...................................................................
3
Precaution Necessary for Steering Wheel Rota-
tion after Battery Disconnect .....................................
3
Precaution for Drain Engine Coolant and Engine
Oil ..............................................................................
4
Precaution for Disconnecting Fuel Piping .................4
Precaution for Handling High Pressure Fuel Sys-
tem ............................................................................
4
Precaution for Removal and Disassembly ................4
Precaution for Inspection, Repair and Replace-
ment ..........................................................................
4
Precaution for Assembly and Installation ..................4
Parts Requiring Angle Tightening .............................5
Precaution for Liquid Gasket .....................................5
Definitions of Bank Names ........................................6
PREPARATION ............................................7
PREPARATION .............................................. .....7
Special Service Tool ........................................... ......7
Commercial Service Tool ..........................................9
BASIC INSPECTION ...................................12
CAMSHAFT VALVE CLEARANCE ............... ....12
Inspection ............................................................ ....12
COMPRESSION PRESSURE ............................16
Inspection ............................................................ ....16
SYMPTOM DIAGNOSIS ..............................18
NOISE, VIBRATION AND HARSHNESS
(NVH) TROUBLESHOOTING ........................ ....
18
NVH Troubleshooting - Engine Noise .............. ....18
Use the Chart Below to Help You Find the C
ause of the Symptom ........................................ ....
19
PERIODIC MAINTENANCE ........................20
DRIVE BELTS ...................................................20
Exploded View ..................................................... ....20
Checking ..................................................................20
Tension Adjustment ................................................20
Removal and Installation .........................................20
Inspection ................................................................21
AIR CLEANER FILTER .....................................22
Exploded View .........................................................22
Removal and Installation .........................................22
SPARK PLUG ...................................................23
Exploded View .........................................................23
Removal and Installation .........................................23
Inspection ................................................................24
REMOVAL AND INSTALLATION ...............25
ENGINE COVER ...............................................25
Exploded View ..................................................... ....25
Removal and Installation .........................................25
DRIVE BELT AUTO TENSIONER AND IDLER
PULLEY .............................................................
26
Exploded View .........................................................26
Removal and Installation .........................................26
AIR CLEANER AND AIR DUCT .......................27
Exploded View .........................................................27
Removal and Installation .........................................27
Inspection ................................................................28
IGNITION COIL .................................................29
Exploded View .........................................................29
Removal and Installation .........................................29
INTAKE MANIFOLD .........................................30
Exploded View .........................................................30
Revision: 2010 May2011 QX56
Page 2584 of 5598

EM-22
< PERIODIC MAINTENANCE >
AIR CLEANER FILTER
AIR CLEANER FILTER
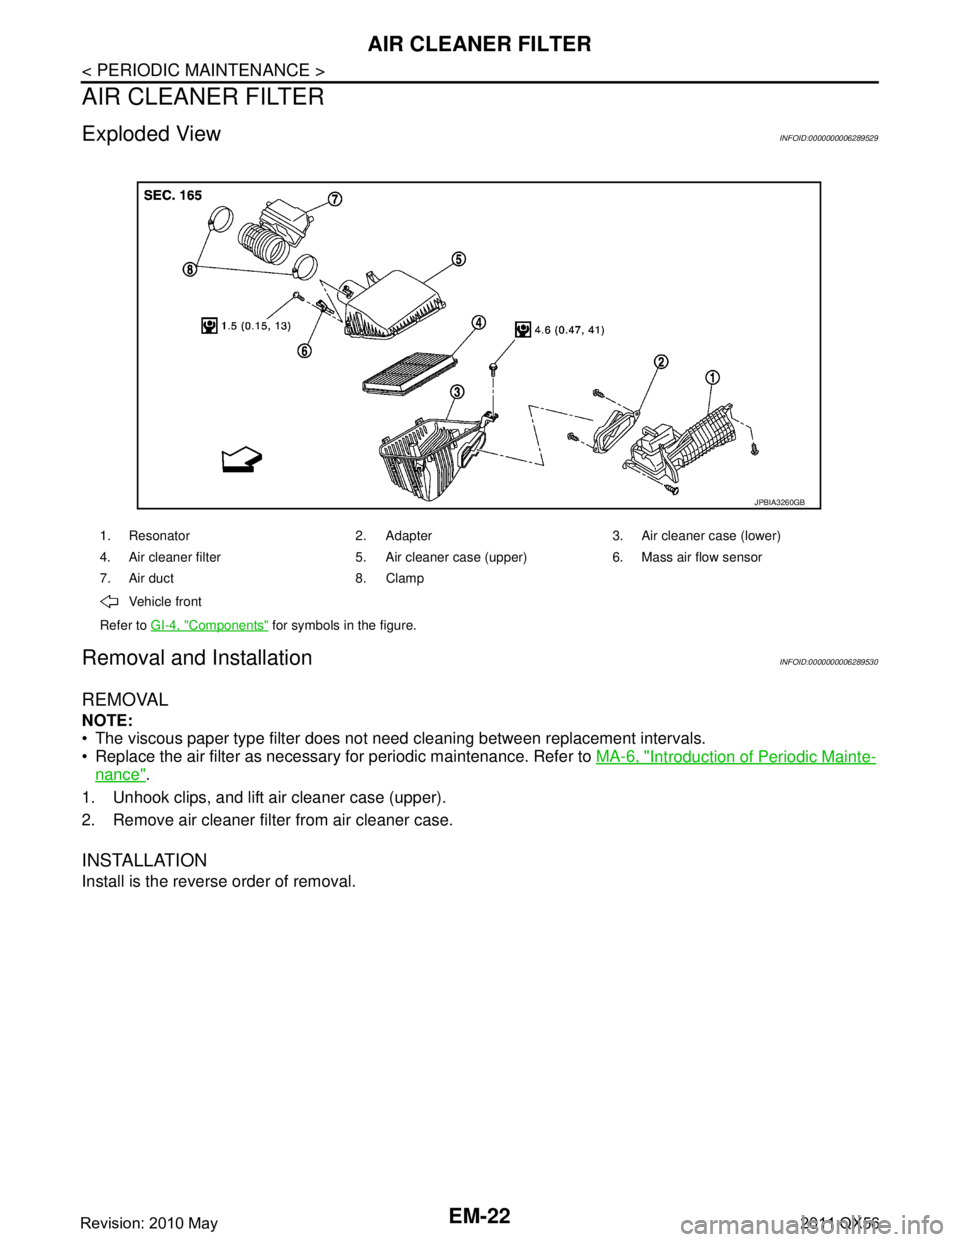
Exploded ViewINFOID:0000000006289529
Removal and InstallationINFOID:0000000006289530
REMOVAL
NOTE:
The viscous paper type filter does not need cleaning between replacement intervals.
Replace the air filter as necessary for periodic maintenance. Refer to MA-6, "
Introduction of Periodic Mainte-
nance".
1. Unhook clips, and lift air cleaner case (upper).
2. Remove air cleaner filter from air cleaner case.
INSTALLATION
Install is the reverse order of removal.
1. Resonator 2. Adapter 3. Air cleaner case (lower)
4. Air cleaner filter 5. Air cleaner case (upper) 6. Mass air flow sensor
7. Air duct 8. Clamp
Vehicle front
Refer to GI-4, "
Components" for symbols in the figure.
JPBIA3260GB
Revision: 2010 May2011 QX56
Page 2589 of 5598

AIR CLEANER AND AIR DUCTEM-27
< REMOVAL AND INSTALLATION >
C
DE
F
G H
I
J
K L
M A
EM
NP
O
AIR CLEANER AND AIR DUCT
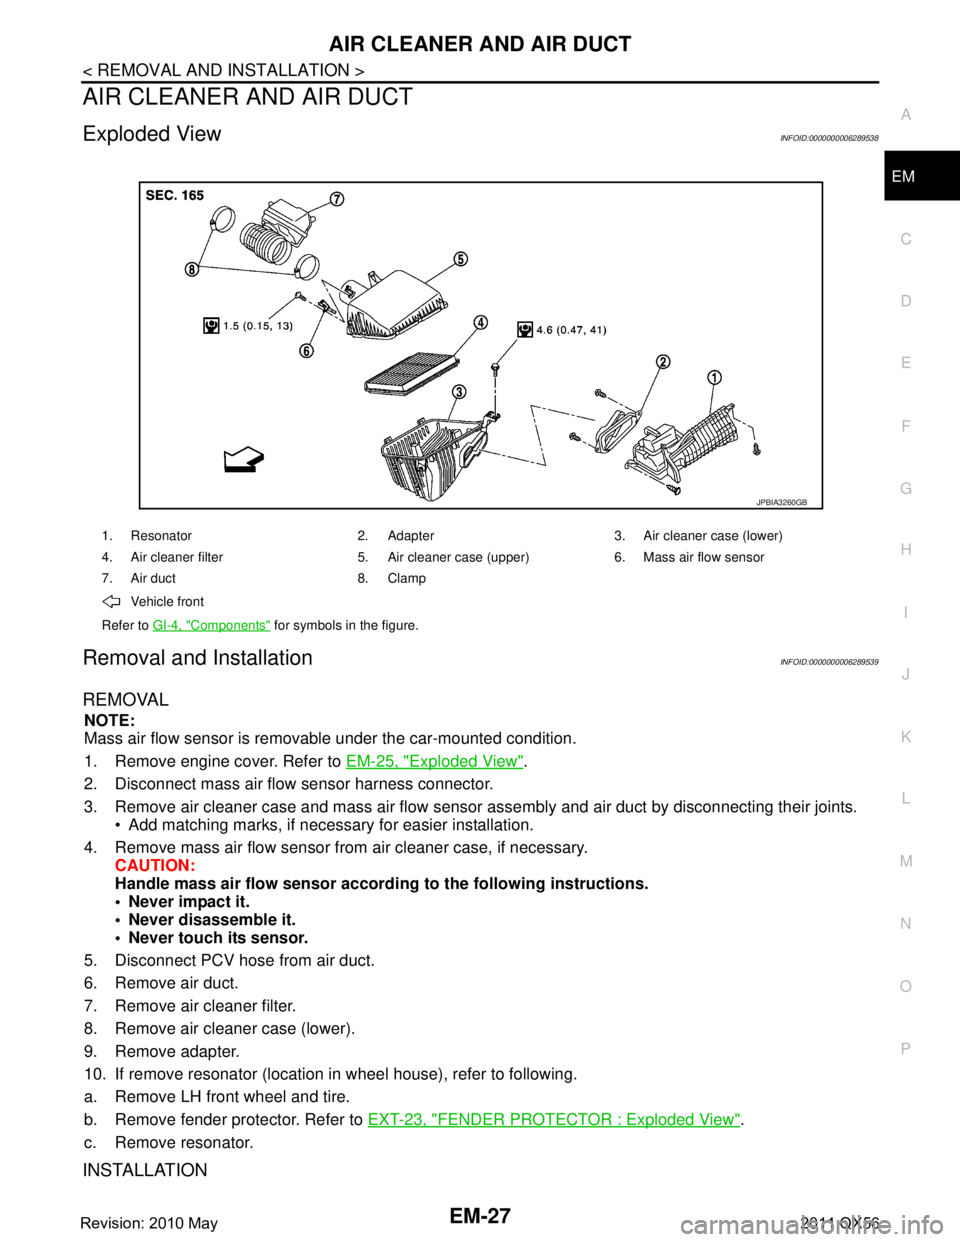
Exploded ViewINFOID:0000000006289538
Removal and InstallationINFOID:0000000006289539
REMOVAL
NOTE:
Mass air flow sensor is removable under the car-mounted condition.
1. Remove engine cover. Refer to
EM-25, "
Exploded View".
2. Disconnect mass air flow sensor harness connector.
3. Remove air cleaner case and mass air flow sensor assembly and air duct by disconnecting their joints.
Add matching marks, if necessary for easier installation.
4. Remove mass air flow sensor from air cleaner case, if necessary. CAUTION:
Handle mass air flow sensor accordi ng to the following instructions.
Never impact it.
Never disassemble it.
Never touch its sensor.
5. Disconnect PCV hose from air duct.
6. Remove air duct.
7. Remove air cleaner filter.
8. Remove air cleaner case (lower).
9. Remove adapter.
10. If remove resonator (location in wheel house), refer to following.
a. Remove LH front wheel and tire.
b. Remove fender protector. Refer to EXT-23, "
FENDER PROTECTOR : Exploded View".
c. Remove resonator.
INSTALLATION
1. Resonator 2. Adapter 3. Air cleaner case (lower)
4. Air cleaner filter 5. Air cleaner case (upper) 6. Mass air flow sensor
7. Air duct 8. Clamp
Vehicle front
Refer to GI-4, "
Components" for symbols in the figure.
JPBIA3260GB
Revision: 2010 May2011 QX56
Page 2647 of 5598

CAMSHAFTEM-85
< REMOVAL AND INSTALLATION >
C
DE
F
G H
I
J
K L
M A
EM
NP
O
5. Perform the following inspection if engine oil does not
come out from valve timing control solenoid valve
oil hole of the valve timing control cover.
Remove oil filter, and then clean it. Refer to EM-61, "
Exploded View".
Clean oil groove between oil strainer and valve timing control solenoid valve. Refer to LU-5, "
Engine
Lubrication System" and LU-6, "Engine Lubrication System Schematic".
6. Remove components between valve timing control solenoid valve and camshaft sprocket, and then check each oil groove for clogging.
Clean oil groove if necessary. Refer to LU-5, "
Engine Lubrication System" and LU-6, "Engine Lubrica-
tion System Schematic".
7. After inspection, install removed parts in the reverse order.
Inspection for Leakage
The following are procedures for chec king fluid leakage, lubricant leakage.
Before starting engine, check oil/fluid levels including engine coolant and engine oil. If any are less than the
required quantity, fill them to the specified level. Refer to MA-10, "
Fluids and Lubricants".
Follow the procedure below to check for fuel leakage.
- Turn ignition switch to the “ON” position (with engi ne stopped). With fuel pressure applied to fuel piping,
check for fuel leakage at connection points.
- Start engine. With engine speed increased, check again for fuel leakage at connection points.
Run engine to check for unusual noise and vibration. NOTE:
If hydraulic pressure inside chain tensioner drops after removal/installation, slack in guide may generate a
pounding noise during and just after the engine start. However, this does not indicate a malfunction. The
noise will stop after hydraulic pressure rises.
Warm up engine thoroughly to check that there is no leak age of fuel, or any oil/fluids including engine oil and
engine coolant.
Bleed air from lines and hoses of applicable lines, such as in cooling system.
After cooling down engine, again check oil/fluid levels including engine oil and engine coolant. Refill them to
the specified level, if necessary.
Summary of the inspection items:
* Power steering fluid, brake fluid, etc. Items Before starting engine Engine running After engine stopped
Engine coolant Level Leakage Level
Engine oil Level Leakage Level
Transmission /
transaxle fluid AT & CVT Models Leakage Level / Leakage Leakage
MT Models Level / Leakage Leakage Level / Leakage
Other oils and fluids* Level Leakage Level
Fuel Leakage Leakage Leakage
Revision: 2010 May2011 QX56